This project was one of the requirements for completing the Deep Reinforcement Learning Nanodegree (DRLND) course at Udacity.com. The preceding lessons focused on deep Q networks.
A learning agent is trained to navigate and collect bananas in a finite square world shown in the clip below. Collecting a yellow banana results in a reward of +1 while collecting a blue banana results in a negative reward of -1. The environment was pre-built for the project using the Unity ML-agents toolkit.

(From the Udacity course project introduction)
The state space has 37 dimensions. Parameters characterize the agent's velocity, along with ray-based perception of objects around the agent's forward direction. Given this information, the agent ideally learns how to select actions that increase the score
There are 4 possible actions for the agent to choose from:
- 0 - move forward.
- 1 - move backward.
- 2 - turn left.
- 3 - turn right.
The environment is episodic. The stated goal of the project is to have the learning agent achieve a score of at least +13 averaged over 100 consecutive episodes.
The installation of the software is accomplished with the package manager, conda. Installing Anaconda (https://www.anaconda.com/) will include conda as well as facilitate the installation of other data science software packages. The Jupyter Notebook App is also required for running this project and is installed automatically with Anaconda.
The dependencies for this project can be installed by following the instructions at https://github.com/udacity/deep-reinforcement-learning#dependencies. Required components include but are are not limited to Python 3.6 (I specifically used 3.6.6), and PyTorch v0.4, and a version of the Unity ML-Agents toolkit. Note that ML-Agents are only supported on Microsoft Windows 10. I only used Windows 10, so cannot vouch for the accuracy of the instructions for other operating systems.
-
Linux or Mac:
In a terminal window, perform the following commands:
conda create --name drlnd python=3.6
source activate drlnd
-
Windows:
Make sure you are using the anaconda command line rather than the usual windows cmd.exe.
conda create --name drlnd python=3.6
activate drlnd
The instructions at https://github.com/udacity/deep-reinforcement-learning indicate that you should enter the following on the command line to clone the the repository and install the dependencies:
git clone https://github.com/udacity/deep-reinforcement-learning.git
cd deep-reinforcement-learning/python
pip install .
However, for Windows 10, this did not work for me. The pip command fails when it tries to install torch 0.4.0. This version may no longer be available. I edited the dependencies shown in the requirements.txt file in the directory and changed the line for torch from
torch==0.4.0 to torch==0.4.1.
The pip command worked after the change. Otherwise you can install the required packages in the requirements folder manually. Sometimes these software packages change and you may need to refer to the specific instructions for an individual package. For example, https://pytorch.org/get-started/locally/ may be helpful for installing PyTorch.
If you clone the DRLND repository, the original files from the project can be found in the folder deep-reinforcement-learning\p1_navigation
The folder is named p1_navigation_SNH.
Use one of the following links:
- Linux: click here
- Mac OSX: click here
- Windows (32-bit): click here
- Windows (64-bit): click here
Place the file in the DRLND GitHub repository, in the p1_navigation_SNH/ folder, and unzip (or decompress) the file. Copy the file into the folder p1_navigation_SNH
Create an IPython kernel for the drlnd environment:
python -m ipykernel install --user --name drlnd --display-name "drlnd"
These steps only need to be performed once.
- In a terminal window, specifically an Anaconda terminal window for Microsoft Windows, activate the conda environment if not already done:
- Linux or Mac:
source activate drlnd
-
Windows:
Make sure you are using the anaconda command line rather than the usual windows cmd.exe.
activate drlnd
- Change directory to the
p1_navigate_SNHfolder. Run Jupyter Notebook:
jupyter notebook
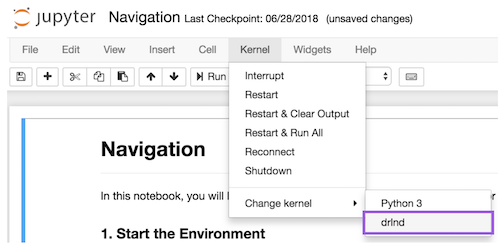
- Open the notebook
Navigation_SNH.ipynb. Before running code in a notebook, change the kernel to match thedrlndenvironment by using the drop-downKernelmenu:
- To train the the deep Q network with the provided parameters, just "run all" under the Cell drop down menu of the jupyter notebook.
The parameters of the learning agent can be changed in Section 4 of the notebook. The parameters for running the simulation and training the agent can be modified in Section 5. The notebook can then be run again. The parameters are described below. During training, a checkpoint named checkpoint13.pth is saved after it achieves a score of greater than 13 averaged over 100 episodes. After all the training is completed (currently set at 5000 episodes), a checkpoint named checkpoint_final.pth is saved.
Run the notebook named Navigation_run_saved.ipynb to read in the save checkpoint for the trained agent to watch it play the game without further learning. The name of the notebook can be changed in section 3 of the notebook. It is currently set up to run the agent through 100 episodes end provide scores and the final average score. The final parameter is the number of episodes to run and can also be changed:
load_and_run_agent(agent, env, 'checkpoint_5000_not_prioritized.pth', 100)
Navigation_SNH.ipynb: Jupyter notebook to train the agent and to save the trained agent as a checkpoint.
Navigation_run_saved.ipynb: Notebook to read in a saved checkpoint and run the agent without additional learning.
model.py: The neural networks
agent.py: The deep Q learning agent (python class Agent)
These parameters and the implementation are discussed more in the file Report.md.
    state_size (int): Number of parameters in the environment state
    action_size (int): Number of different actions
    seed (int): random seed
    learning_rate (float): initial learning rate
    batch_normalize (boolean): Flag for using batch normalization in the neural network
    error_clipping (boolean): Flag for limiting the TD error to between -1 and 1
    reward_clipping (boolean): Flag for limiting the reward to between -1 and 1
    gradient_clipping (boolean): Flag for clipping the norm of the gradient to 1
    target_update_interval (int): Set negative to use soft updating. The number of
    	learning steps between updating the neural network for fixed Q targets.
    double_dqn (boolean): Flag for using double Q learning
    dueling_dqn (boolean): Flag for using dueling Q networks
    prioritized_replay (boolean): Flag for using prioritized replay memory sampling
    n_episodes (int): Maximum number of training episodes
    max_t (int): Maximum number of timesteps per episode
    epsilon_initial (float): Initial value of epsilon for epsilon-greedy selection of
    	an action
    epsilon_final (float): Final value of epsilon
    epsilon_rate (float): A rate (0.0 to 1.0) for decreasing epsilon for each episode.
    	Higher is faster decay.
    gamma_initial (float): Initial gamma discount factor (0 to 1). Higher values favor
    	long term over current rewards.
    gamma_final (float): Final gamma discount factor (0 to 1).
    gammma_rate (float): A rate (0 to 1) for increasing gamma.
    beta_initial (float): For prioritized replay. Corrects bias induced by weighted
    	sampling of stored experiences. The beta parameters have no effect if the agent
    	unless  prioritized experience replay is used.
    beta_rate (float): Rate (0 to 1) for increasing beta to 1 as per Schauel et al. 		https://arxiv.org/abs/1511.05952
    tau_initial (float): Initial value for tau, the weighting factor for soft updating
    	the neural network. The tau parameters have no effect if the agent uses fixed Q
    	targets instead of soft updating.
    tau_final (float): Final value of tau.
    tau_rate (float): Rate (0 to 1) for increasing tau each episode.