A little utility for making manual UI testing as quick and painless as possible.
Automated testing and unit testing are obvs essential, but so is having an actual human actually interacting with an actual interface (aka manual testing). Yet manual testing often falls by the wayside. Why?
It's time consuming, it's labor intensive, and it often doesn't catch the things it should because it presents a very real conflict of interest for anyone whose job it is to make the product. Since every bug they find is just makng more work for themselves, they have an incentive to tread lightly on the UI and to minimize whatever bugs they do find.
Of course, if your project has the resources to do so, you should hire a dedicated QA Engineer! Their job is to find bugs, which should eliminate the pesky conflict of interest. But what do you do if you have a small team without the resources to hire someone to do QA? Well, you try to make manual testing as quick, painless, and documentable as possible.
I created Flogger for TallyLab when our team was tiny (as of this writing, it still is!), in an attempt to hold my own feet to the fire.
Flogger has no dependencies. It's written in plain old JavaScript, with a coat of CSS to make it stand out from your UI (more on that in the FAQs below).
If you want the keyboard shortcuts to work, you'll need to include Mousetrap.
Just include flogger.js, flogger.css, Moustrap if you want keyboard shortcuts, and whatever tests you've written (see Usage below). You can do that in the head of your HTML, like so:
<link rel="stylesheet" type="text/css" href="../flogger.css">
<script type="text/javascript" src="../libs/mousetrap.js"></script>
<script type="text/javascript" src="../flogger.js"></script>
<script type="text/javascript" src="tests.js"></script>
When testing TallyLab, we load Flogger only when needed by adding a param to the URL that says which test to run. We're using jQuery, so it looks like this:
var flogParam = window.location.href.match(/(flog=)(\w*)/);
var flog = flogParam ? flogParam[2] : localStorage.getItem('flog');
if ( flog ){
  $.getScript("/app/test/flogs.js")
    .done(function(script, textStatus){ runFlog(flog,'load'); })
    .fail(function(jqxhr, settings, exception){
      console.log(exception);
    });
}
Tests should be organized in a single JS object called flogs. This is our very simplistic way of namespacing the tests.
var flogs = { }
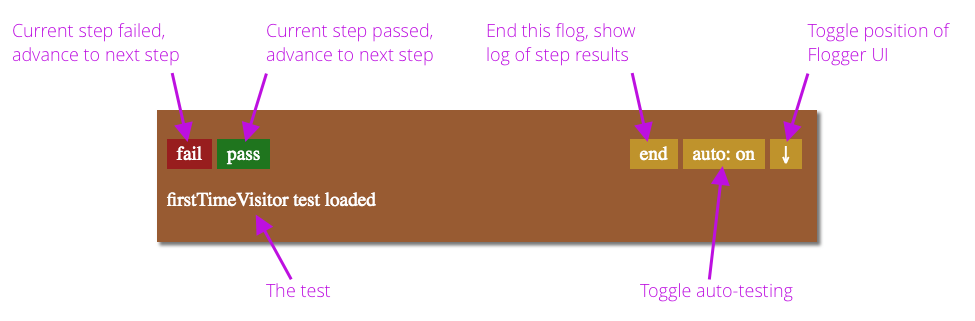
Within that high-level object, each series of tests (a "flog", so to speak) is its own array. Our best practice is to always make the first step of each flog "the test itself loaded", just to verify things are working correctly and that you loaded the test you meant to load.
firstTimeVisitor: [
  {
    stepDesc: "firstTimeVisitor test loaded"
  },
  {
    stepDesc: "Clicking link opens Wikipedia in a new tab"
  }
]
The only required property for each step of a flog is stepDesc, which ideally describes what the tester should do for that step. Sometimes it's just to verify something is present in the UI, other times the tester must actually interact with the UI in some way in order to verify.
Either way, the tester advances to the next step by indicating whether the current step passed or failed. This can be done by pressing the "pass" or "fail" buttons on Flogger's UI, or by using the f and j keys if Mousetrap is present.
It's important to note here that Flogger can only advance through the steps of your test(s), it cannot go back. Think of each flog as a UI workflow.
If you are only planning to step through a flog manually, the basic case above is all you need. Flogger does, however, have an auto mode that can be turned on by pressing the "auto" button on the UI or by usin the a key if Moustrap is present.
Automatic mode on a manual testing utility?! You read right. Toggling auto to "on" and adding a stepExec property to each step in your flog is what really unlocks Flogger's power!
Whenever a stepExec function is present, it will be run automatically as part of the step. All you'll need to do to walk through an entire flog is to indicate "pass" or "fail" for each step. It's like watching a movie of someone using your UI!
firstTimeVisitor: [
  {
    stepDesc: "firstTimeVisitor test loaded"
  },
  {
    stepDesc: "Clicking link opened Wikipedia in a new tab",
    stepExec: function(){
      var clickEvent = new MouseEvent("click", {
          "view": window,
          "bubbles": true,
          "cancelable": false
      });

      document.getElementById('theLink').dispatchEvent(clickEvent);
    }
  }
]
So, the full flogs object with multiple suites of tests would look something like this:
var flogs = {
  firstTimeVisitor: [
    {
      stepDesc: "firstTimeVisitor test loaded"
    },
    {
      stepDesc: "Clicking link opened Wikipedia in a new tab",
      stepExec: function(){
        var clickEvent = new MouseEvent("click", {
            "view": window,
            "bubbles": true,
            "cancelable": false
        });

        document.getElementById('theLink').dispatchEvent(clickEvent);
      }
    }
  ],
  crazySelecter: [
    {
      stepDesc: "crazySelecter test loaded"
    },
    {
      stepDesc: "Selecting text launches alert",
      stepExec: function(){
        var selectEvent = new MouseEvent("select", {
            "view": window,
            "bubbles": true,
            "cancelable": false
        });

        document.getElementById('theParagraph').dispatchEvent(selectEvent);
      }
    }
  ]
}; // flogs
While testing, you'll see the semi-transparent Flogger widget floating above your UI. Here's what each button does:
So that it's more likely to stand out from the beautiful UI you're testing! (Apologies if your UI is styled with a garish combination of brown, red, and green...)
Include whatever logic you want in the test, including sniffing the url before and after a page load. E.g.
if ( window.location.indexOf("foo") === -1 ){
  window.location = "/foo";
} else {
  console.log('hi');
}
An underlying assumption here is that the tests you're running will change the underlying state of the app. Depending on what you're trying to test, that could mean a previous step no longer applies or makes sense.
Futhermore, in order to advance to the current step, you had to weigh in on whether the prior step passed or failed. Subsequent changes in the state of the app could change that outcome in weird ways.
Use the arrows in the upper right corner to toggle Flogger between the top and bottom of your screen.
You have to hit "end" on the previous test in order to clear it out of the localStorage.
Feel free to ask questions in Issues. PRs are welcome!
MIT © 2019 Jordyn Bonds