Event-on-air is a social media wall that is primarily meant to encourage/show social media engagement during events, especially used to hype the crowd when waiting for events/talks to start. Although there are providers who already does this, they usually costly and you cannot control the update frequency if you're on the free plan.
A demo is available here
This repository is the backend of the app that runs on Firebase Cloud Functions and some Cloud Scheduler stuff, and entirely serverless! (yay)
- Since the app pulls data from Twitter, you must apply for a twitter developer account here it will take a few days to approve
- Since the app pulls data from Instagram, you must have a Instagram Business Account and a Facebook Page
- Blaze plan for Firebase is required, since we wil be using Cloud Functions to communitate with external APIs.
- Firebase account. (duh)
- Clone the repository
- Set up Node.js and the Firebase CLI
- For installing Node.js and npm, Node Version Manager is recommended. Once you have Node.js and npm installed, install the Firebase CLI via npm:
npm install -g firebase-tools
- Navigate to the repository and login to your firebase project via command line
firebase login
- Change the Firebase project with your newly created firebase project
firebase use project-id
- Go to your Firebase project in the console. In the Database section, click the Get Started button for Cloud Firestore. Select Test mode for your Cloud Firestore Security Rules.
- Go to
functions/setup.tsand change the firebase configuration:
const app = firebase.initializeApp({
    apiKey: "apiKey",
    authDomain: "authDomain",
    databaseURL: "databaseURL",
    projectId: "projectId",
    storageBucket: "storageBucket",
    messagingSenderId: "messagingSenderId"
});
- Deploy the functions and security rules to Firebase.
firebase deploy
- Migrate data to firestore. Navigate to
\functionsfolder then run
npm run setup
- Check Firestore on the Firebase console to ensure that there are collections in the Firestore as well as Firestore rules.
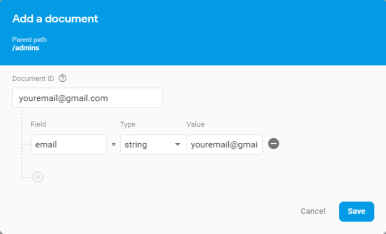
- In Firestore, you should see a
adminscollection. Add a new admin with your Google account with your email as the document key.
- Go to the Firebase console and enable Google authentication in Firebase Authentication.
- Apply for a Twitter developer account. Be sure to explain clearly what you are using it for. It will take a few days to approve.
- Go to
config.tsto change the twitter api keys. - Deploy functions
firebase deploy --only functions
You must complete the initial setup before continuing.
- Create an business account on Instagram and link it to your Facebook Page.
- Create a Facebook App. Get the App Id and App Secret. Remember this information.
- Add Facebook Login product to your app.
- Go to API Explorer and select your newly created app.
- Add permissions to the api explorer:
instagram_basicmanage_pages. Click get access token. Ignore the warning. - Change the url in the API Explorer to
me/accountsthen click submit. Search for the pages that you have linked to Instagram. Remember the Page Id. - Using the Page Id, Change the url in the API Explore to
/{page-id}?fields=instagram_business_account, then click submit. Remember the Instagram Business Account Id - You should be able to get the following information. Keep this information, you will need it in step 4.
- Facebook App Id
- Facebook App Secret
- Facebook Page Id
- Instagram Business Account Id
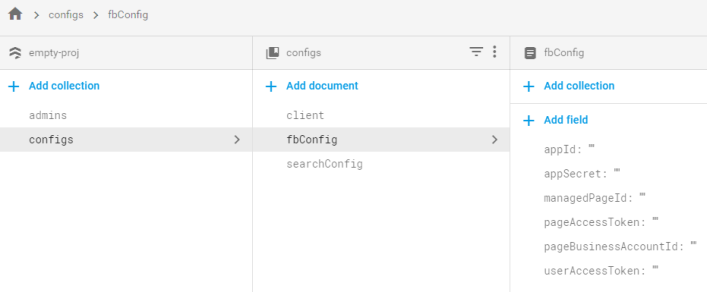
- Go to Firestore, and update the values in
configs/fbConfig. Update these fields:
- appId (Facebook App Id)
- appSecret (Facebook App Secret)
- managedPageId (Facebook Page Id)
- pageBusinessAccountId (Instagram Business Account Id)
- Go to Firestore on Firebase console, in the
configscollection you need to configure the following:
This configures the appearance in the client side app.
| Field | Description | Example |
|---|---|---|
| backgroundColor | background color of the app | "#039be5" |
| backgroundImageUrl | the image you want to display as app banner background | "https://cdn.something.com/image.jpg" |
| displayInterval | how long to wait in seconds before a post is shown | 30 |
| displayIntervalSize | how many posts to accumulate before displaying them | 1 |
| lanes | how many lanes to show on the screen. Use higher value for longer screens | 5 |
| subtitle | what text to show in the banner's subtitle | "event is starting soon" |
| title | the title to show in the banner | "#cat" |
This configures what is searched on Twitter/Instagram
| Field | Description | Example |
|---|---|---|
| autoApprove | if set to true, will automatically show posts on screen. If false you will need to manually approve posts in the moderate page | true |
| hashtags | hashtags to search | ["#cat"] |
You have completed the setup for the serverless part of the app. Now you must configure the client here