Copyright (c) 2018, Ryo Currency Project
Copyright (c) 2014-2017, The Monero Project
Copyright (c) 2012-2013, The Cryptonote developers
Copyright (c) 2017, Sumokoin.org
- Web: ryo-currency.com
- Mail: contact@ryo-currency.com
Please note that code is developed on the dev branch, if you want to check out the latest updates, before they are merged on main branch, please refer there. Master branch will always point to a version that we consider stable, so you can download the code by simply typing git clone https://github.com/ryo-currency/ryo-currency.git
Ryo (両 in Japanese: one syllable) is the most secure, private and untraceable cryptocurrency out there. Ryo originated from the Tael, an ancient Far East unit of weight standard used for exchanging gold and silver. Based on the foundations of Monero, Ryo emerged and is poised to dominate the privacy conscious crypto scene. Backed by a full featured and balanced development team headed by the legendary fireice_uk and psychocrypt.
Our blockchain ensures the highest level of privacy out there by from the get-go having(1) Ring Confidential Transactions (RingCT) (2) and hardcoding minimum transaction mixin to 12. These settings significantly reduce the chance of being identified, traced or attacked by blockchain statistical analysis.
Ryo has a very high privacy setting that is suitable for all high confidential transactions as well as for storage of value without being traced, monitored or identified. We call this true fungibility. This means that each coin is equal and interchangable; it is highly unlikely that any coin can ever by blacklisted due to previous transactions. Over the course of many years these characteristics will pay off as crypto attacks become more sophisticated with much greater computation power in the future.
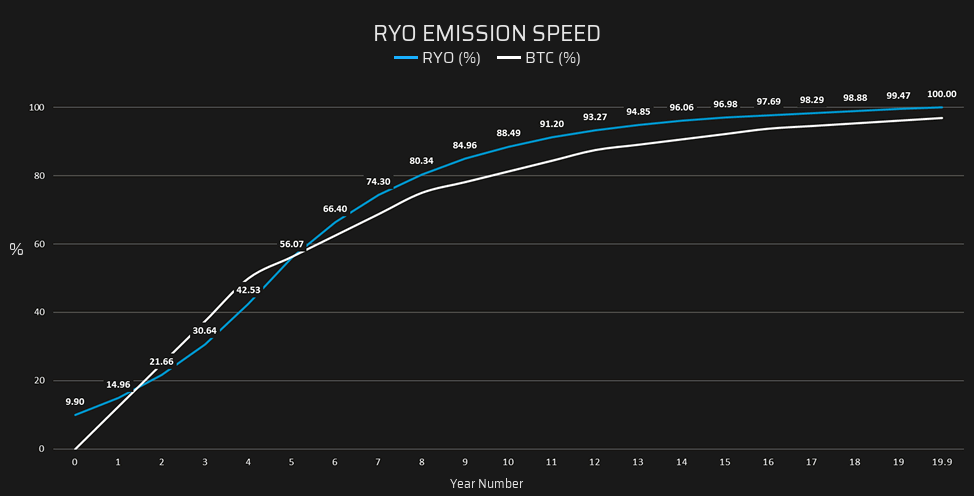
- Total supply: 80,188,888 coins in 20 years, then 263,000 coins will be emitted yearly to account for inflation.
- More than 80 million coins are available for community mining.
- 8,790,000 Ryo coins were burned to get rid of the original Sumokoin premine. Additionally, 100,000 coins were premined and instantly unlocked to Sumokoin devs in 2017.
The pre-mined coins have been frozen/burned in commit c3a3cb6/ blockchain_db/blockchain_db.cpp#L250-L258 as announced on reddit.
- Coin symbol: RYO
- Coin Units:
- 1 nanoRyo = 0.000000001 RYO (10-9-the smallest coin unit)
- 1 microRyo = 0.000001 RYO (10-6)
- 1 milliRyo = 0.001 RYO (10-3)
- Hash algorithm: CryptoNight Heavy (Proof-Of-Work)
- Emission scheme: Ryo's block reward changes every 6-months according to the following "Camel" distribution*. Our emission scheme is inspired by real-world mining production comparable to crude oil, coal and gas which is often slow at first, accelerated in the next few years before declining and becoming depleted. However, the emission path of Ryo is generally not that far apart from Bitcoin.


* The emulated algorithm of Ryo block-reward emission can be found in Python and C++ scripts at scripts directory.
- You can claim your Ryo, if you had Sumokoin before they forked at block #137500. Ryo Currency as a chain fork kept all the transactions -and thus coins you had in your wallet- up and until Sumokoin forked at block #137500. To further secure your Ryo, we're going to tie the coins to a block after the fork.
- First, install the latest Ryo wallet. Run it and generate a new wallet. Write down the seeds. Copy the MAIN ADDRESS under the RECEIVE tab. Then from the Ryo gui, click SETTINGS » NEW WALLET and restore your Ryo from the same seeds used for your old Sumokoin wallet in the Ryo GUI.
- Send all your coins to the new Ryo MAIN ADDRESS you copied before. After this, you can safely transact Sumokoin, it's important to first move your Ryo, before you move your Sumokoin.
- If you are comfortable using the CLI, you can just SWEEP ALL Ryo to yourself instead of all the above.
This is the core implementation of Ryo. It is open source and completely free to use without restrictions, except for those specified in the license agreement below. There are no restrictions on anyone creating an alternative implementation of Ryo that uses the protocol and network in a compatible manner.
Along with each release you can find our precompiled binaries. To verify that the downloaded binaries are created by one of our developer please verify the checksums. The authenticity of the checksums can by verified with the PGP-key's.
The following table summarizes the tools and libraries required to build. A
few of the libraries are also included in this repository (marked as
"Vendored"). By default, the build uses the library installed on the system,
and ignores the vendored sources. However, if no library is found installed on
the system, then the vendored source will be built and used. The vendored
sources are also used for statically-linked builds because distribution
packages often include only shared library binaries (.so) but not static
library archives (.a).
| Dep | Min. version | Vendored | Debian/Ubuntu pkg | Arch pkg | Fedora | Optional | Purpose |
|---|---|---|---|---|---|---|---|
| GCC | 4.7.3 | NO | build-essential |
base-devel |
gcc |
NO | |
| CMake | 3.0.0 | NO | cmake |
cmake |
cmake |
NO | |
| pkg-config | any | NO | pkg-config |
base-devel |
pkgconf |
NO | |
| Boost | 1.58 | NO | libboost-all-dev |
boost |
boost-devel |
NO | C++ libraries |
| OpenSSL | basically any | NO | libssl-dev |
openssl |
openssl-devel |
NO | sha256 sum |
| libzmq | 3.0.0 | NO | libzmq3-dev |
zeromq |
cppzmq-devel |
NO | ZeroMQ library |
| libunbound | 1.4.16 | YES | libunbound-dev |
unbound |
unbound-devel |
NO | DNS resolver |
| libsodium | ? | NO | libsodium-dev |
? | libsodium-devel |
NO | libsodium |
| libminiupnpc | 2.0 | YES | libminiupnpc-dev |
miniupnpc |
miniupnpc-devel |
YES | NAT punching |
| libunwind | any | NO | libunwind8-dev |
libunwind |
libunwind-devel |
YES | Stack traces |
| liblzma | any | NO | liblzma-dev |
xz |
xz-devel |
YES | For libunwind |
| libreadline | 6.3.0 | NO | libreadline6-dev |
readline |
readline-devel |
YES | Input editing |
| ldns | 1.6.17 | NO | libldns-dev |
ldns |
ldns-devel |
YES | SSL toolkit |
| expat | 1.1 | NO | libexpat1-dev |
expat |
expat-devel |
YES | XML parsing |
| GTest | 1.5 | YES | libgtest-dev^ |
gtest |
gtest-devel |
YES | Test suite |
| Doxygen | any | NO | doxygen |
doxygen |
doxygen |
YES | Documentation |
| Graphviz | any | NO | graphviz |
graphviz |
graphviz |
YES | Documentation |
[^] On Debian/Ubuntu libgtest-dev only includes sources and headers. You must
build the library binary manually. This can be done with the following command sudo apt-get install libgtest-dev && cd /usr/src/gtest && sudo cmake . && sudo make && sudo mv libg* /usr/lib/
Clone recursively to pull-in needed submodule(s):
$ git clone https://github.com/ryo-currency/ryo-currency.git
If you already have a repo cloned, initialize and update:
$ cd ryo-currency
Ryo uses the CMake build system and a top-level Makefile that invokes cmake commands as needed.
-
Install the dependencies
-
Change to the root of the source code directory, change to the most recent release branch, and build:
cd ryo-currency git checkout tags/0.2.0 makeOptional: If your machine has several cores and enough memory, enable parallel build by running
make -j<number of threads>instead ofmake. For this to be worthwhile, the machine should have one core and about 2GB of RAM available per thread.Note: If cmake can not find zmq.hpp file on OS X, installing
zmq.hppfrom https://github.com/zeromq/cppzmq to/usr/local/includeshould fix that error.Note: The instructions above will compile the most stable release of the Ryo software. If you would like to use and test the most recent software, use
git checkout master. The master branch may contain updates that are both unstable and incompatible with release software, though testing is always encouraged. -
The resulting executables can be found in
build/release/bin -
Add
PATH="$PATH:$HOME/ryo/build/release/bin"to.profile -
Run Ryo with
ryod --detach -
Optional: build and run the test suite to verify the binaries:
make release-testNOTE:
core_teststest may take a few hours to complete. -
Optional: to build binaries suitable for debugging:
make debug -
Optional: to build statically-linked binaries:
make release-static
Dependencies need to be built with -fPIC. Static libraries usually aren't, so you may have to build them yourself with -fPIC. Refer to their documentation for how to build them.
-
Optional: build documentation in
doc/html(omitHAVE_DOT=YESifgraphvizis not installed):HAVE_DOT=YES doxygen Doxyfile
Tested on a Raspberry Pi Zero with a clean install of minimal Raspbian Stretch (2017-09-07 or later) from https://www.raspberrypi.org/downloads/raspbian/. If you are using Raspian Jessie, please see note in the following section.
-
apt-get update && apt-get upgradeto install all of the latest software -
Install the dependencies for Ryo from the 'Debian' column in the table above.
-
Enable zram:
	sudo zramctl --find --size=1024M # Note the device name
	sudo mkswap <device name>
	sudo swapon <device name>
- Clone ryo and checkout most recent release version:
        git clone https://github.com/ryo-currency/ryo-currency.git
	cd ryo-currency
	git checkout tags/0.2.0
- Build:
make release
-
Wait 4-6 hours
-
The resulting executables can be found in
build/release/bin -
Add
PATH="$PATH:$HOME/ryo/build/release/bin"to.profile -
Run Ryo with
ryod --detach -
You may wish to reduce the size of the swap file after the build has finished, and delete the boost directory from your home directory
If you are using the older Raspbian Jessie image, compiling Ryo is a bit more complicated. The version of Boost available in the Debian Jessie repositories is too old to use with Ryo, and thus you must compile a newer version yourself. The following explains the extra steps, and has been tested on a Raspberry Pi 2 with a clean install of minimal Raspbian Jessie.
- As before,
apt-get update && apt-get upgradeto install all of the latest software, and enable zram
	sudo zramctl --find --size=1024M # Note the device name
	sudo mkswap <device name>
	sudo swapon <device name>
-
Then, install the dependencies for Ryo except
libunwindandlibboost-all-dev -
Install the latest version of boost (this may first require invoking
apt-get remove --purge libboost*to remove a previous version if you're not using a clean install):
	cd
	wget https://sourceforge.net/projects/boost/files/boost/1.64.0/boost_1_64_0.tar.bz2
	tar xvfo boost_1_64_0.tar.bz2
	cd boost_1_64_0
	./bootstrap.sh
	sudo ./b2
- Wait ~8 hours
sudo ./bjam install
-
Wait ~4 hours
-
From here, follow the general Raspberry Pi instructions from the "Clone ryo and checkout most recent release version" step.
Binaries for Windows are built on Windows using the MinGW toolchain within MSYS2 environment. The MSYS2 environment emulates a POSIX system. The toolchain runs within the environment and cross-compiles binaries that can run outside of the environment as a regular Windows application.
Preparing the Build Environment
-
Download and install the MSYS2 installer, either the 64-bit or the 32-bit package, depending on your system.
-
Open the MSYS shell via the
MSYS2 Shellshortcut -
Update packages using pacman:
pacman -Syuu -
Exit the MSYS shell using Alt+F4
-
Edit the properties for the
MSYS2 Shellshortcut changing "msys2_shell.bat" to "msys2_shell.cmd -mingw64" for 64-bit builds or "msys2_shell.cmd -mingw32" for 32-bit builds -
Restart MSYS shell via modified shortcut and update packages again using pacman:
pacman -Syuu -
Install dependencies:
To build for 64-bit Windows:
pacman -S mingw-w64-x86_64-toolchain make mingw-w64-x86_64-cmake mingw-w64-x86_64-boost mingw-w64-x86_64-openssl mingw-w64-x86_64-zeromq mingw-w64-x86_64-libsodiumTo build for 32-bit Windows:
pacman -S mingw-w64-i686-toolchain make mingw-w64-i686-cmake mingw-w64-i686-boost mingw-w64-i686-openssl mingw-w64-i686-zeromq mingw-w64-i686-libsodium -
Open the MingW shell via
MinGW-w64-Win64 Shellshortcut on 64-bit Windows orMinGW-w64-Win64 Shellshortcut on 32-bit Windows. Note that if you are running 64-bit Windows, you will have both 64-bit and 32-bit MinGW shells.
Cloning
-
To git clone, run:
git clone https://github.com/ryo-currency/ryo-currency.git
Building
-
Change to the cloned directory, run:
cd ryo-currency -
If you would like a specific version/tag, do a git checkout for that version. eg. '0.2.0'. If you dont care about the version and just want binaries from master, skip this step:
git checkout 0.2.0 -
If you are on a 64-bit system, run:
make release-static-win64 -
If you are on a 32-bit system, run:
make release-static-win32 -
The resulting executables can be found in
build/release/bin -
Optional: to build Windows binaries suitable for debugging on a 64-bit system, run:
make debug-static-win64 -
Optional: to build Windows binaries suitable for debugging on a 32-bit system, run:
make debug-static-win32 -
The resulting executables can be found in
build/debug/bin
The project can be built from scratch by following instructions for Linux above. If you are running ryo in a jail you need to add the flag: allow.sysvipc=1 to your jail configuration, otherwise lmdb will throw the error message: Failed to open lmdb environment: Function not implemented.
We expect to add Ryo into the ports tree in the near future, which will aid in managing installations using ports or packages.
This has been tested on OpenBSD 5.8.
You will need to add a few packages to your system. pkg_add db cmake gcc gcc-libs g++ miniupnpc gtest.
The doxygen and graphviz packages are optional and require the xbase set.
The Boost package has a bug that will prevent librpc.a from building correctly. In order to fix this, you will have to Build boost yourself from scratch. Follow the directions here (under "Building Boost"): https://github.com/bitcoin/bitcoin/blob/master/doc/build-openbsd.md
You will have to add the serialization, date_time, and regex modules to Boost when building as they are needed by Ryo.
To build: env CC=egcc CXX=eg++ CPP=ecpp DEVELOPER_LOCAL_TOOLS=1 BOOST_ROOT=/path/to/the/boost/you/built make release-static-64
You will need to add a few packages to your system. pkg_add cmake miniupnpc zeromq libiconv.
The doxygen and graphviz packages are optional and require the xbase set.
Build the Boost library using clang. This guide is derived from: https://github.com/bitcoin/bitcoin/blob/master/doc/build-openbsd.md
We assume you are compiling with a non-root user and you have doas enabled.
Note: do not use the boost package provided by OpenBSD, as we are installing boost to /usr/local.
# Create boost building directory
mkdir ~/boost
cd ~/boost

# Fetch boost source
ftp -o boost_1_64_0.tar.bz2 https://netcologne.dl.sourceforge.net/project/boost/boost/1.64.0/boost_1_64_0.tar.bz2

# MUST output: (SHA256) boost_1_64_0.tar.bz2: OK
echo "7bcc5caace97baa948931d712ea5f37038dbb1c5d89b43ad4def4ed7cb683332 boost_1_64_0.tar.bz2" | sha256 -c
tar xfj boost_1_64_0.tar.bz2

# Fetch and apply boost patches, required for OpenBSD
ftp -o boost_test_impl_execution_monitor_ipp.patch https://raw.githubusercontent.com/openbsd/ports/bee9e6df517077a7269ff0dfd57995f5c6a10379/devel/boost/patches/patch-boost_test_impl_execution_monitor_ipp
ftp -o boost_config_platform_bsd_hpp.patch https://raw.githubusercontent.com/openbsd/ports/90658284fb786f5a60dd9d6e8d14500c167bdaa0/devel/boost/patches/patch-boost_config_platform_bsd_hpp

# MUST output: (SHA256) boost_config_platform_bsd_hpp.patch: OK
echo "1f5e59d1154f16ee1e0cc169395f30d5e7d22a5bd9f86358f738b0ccaea5e51d boost_config_platform_bsd_hpp.patch" | sha256 -c
# MUST output: (SHA256) boost_test_impl_execution_monitor_ipp.patch: OK
echo "30cec182a1437d40c3e0bd9a866ab5ddc1400a56185b7e671bb3782634ed0206 boost_test_impl_execution_monitor_ipp.patch" | sha256 -c

cd boost_1_64_0
patch -p0 < ../boost_test_impl_execution_monitor_ipp.patch
patch -p0 < ../boost_config_platform_bsd_hpp.patch

# Start building boost
echo 'using clang : : c++ : <cxxflags>"-fvisibility=hidden -fPIC" <linkflags>"" <archiver>"ar" <striper>"strip"  <ranlib>"ranlib" <rc>"" : ;' > user-config.jam
./bootstrap.sh --without-icu --with-libraries=chrono,filesystem,program_options,system,thread,test,date_time,regex,serialization,locale --with-toolset=clang
./b2 toolset=clang cxxflags="-stdlib=libc++" linkflags="-stdlib=libc++" -sICONV_PATH=/usr/local
doas ./b2 -d0 runtime-link=shared threadapi=pthread threading=multi link=static variant=release --layout=tagged --build-type=complete --user-config=user-config.jam -sNO_BZIP2=1 -sICONV_PATH=/usr/local --prefix=/usr/local install
Build cppzmq
Build the cppzmq bindings.
We assume you are compiling with a non-root user and you have doas enabled.
# Create cppzmq building directory
mkdir ~/cppzmq
cd ~/cppzmq

# Fetch cppzmq source
ftp -o cppzmq-4.2.3.tar.gz https://github.com/zeromq/cppzmq/archive/v4.2.3.tar.gz

# MUST output: (SHA256) cppzmq-4.2.3.tar.gz: OK
echo "3e6b57bf49115f4ae893b1ff7848ead7267013087dc7be1ab27636a97144d373 cppzmq-4.2.3.tar.gz" | sha256 -c
tar xfz cppzmq-4.2.3.tar.gz

# Start building cppzmq
cd cppzmq-4.2.3
mkdir build
cd build
cmake ..
doas make install
Build Ryo: env DEVELOPER_LOCAL_TOOLS=1 BOOST_ROOT=/usr/local make release-static
The default Solaris linker can't be used, you have to install GNU ld, then run cmake manually with the path to your copy of GNU ld:
    mkdir -p build/release
    cd build/release
    cmake -DCMAKE_LINKER=/path/to/ld -D CMAKE_BUILD_TYPE=Release ../..
    cd ../..
Then you can run make as usual.
    # Build image (select android64.Dockerfile for aarch64)
    cd utils/build_scripts/ && docker build -f android32.Dockerfile -t ryo-android .
    # Create container
    docker create -it --name ryo-android ryo-android bash
    # Get binaries
    docker cp ryo-android:/opt/android/ryo/build/release/bin .
By default, in either dynamically or statically linked builds, binaries target the specific host processor on which the build happens and are not portable to other processors. Portable binaries can be built using the following targets:
make release-static-linux-x86_64builds binaries on Linux on x86_64 portable across POSIX systems on x86_64 processorsmake release-static-linux-i686builds binaries on Linux on x86_64 or i686 portable across POSIX systems on i686 processorsmake release-static-linux-armv8builds binaries on Linux portable across POSIX systems on armv8 processorsmake release-static-linux-armv7builds binaries on Linux portable across POSIX systems on armv7 processorsmake release-static-linux-armv6builds binaries on Linux portable across POSIX systems on armv6 processorsmake release-static-win64builds binaries on 64-bit Windows portable across 64-bit Windows systemsmake release-static-win32builds binaries on 64-bit or 32-bit Windows portable across 32-bit Windows systems
DISCLAIMER: These packages are not part of this repository or maintained by this project's contributors, and as such, do not go through the same review process to ensure their trustworthiness and security.
Packages are available for
-
Docker
  # Build using all available cores
  `docker build -t ryo .`

  # or build using a specific number of cores (reduce RAM requirement)
  `docker build --build-arg NPROC=1 -t ryo .`

  # either run in foreground
  `docker run -it -v /ryo/chain:/root/.ryo -v /ryo/wallet:/wallet -p 18080:18080 ryo`

  # or in background
  `docker run -it -d -v /ryo/chain:/root/.ryo -v /ryo/wallet:/wallet -p 18080:18080 ryo`
Packaging for your favorite distribution would be a welcome contribution!
The build places the binary in bin/ sub-directory within the build directory
from which cmake was invoked (repository root by default). To run in
foreground:
./bin/ryod
To list all available options, run ./bin/ryod --help. Options can be
specified either on the command line or in a configuration file passed by the
--config-file argument. To specify an option in the configuration file, add
a line with the syntax argumentname=value, where argumentname is the name
of the argument without the leading dashes, for example log-level=1.
To run in background:
./bin/ryod --log-file ryod.log --detach
To run as a systemd service, copy
ryod.service to /etc/systemd/system/ and
ryod.conf to /etc/. The example
service assumes that the user ryo exists
and its home is the data directory specified in the example
config.
If you're on Mac, you may need to add the --max-concurrency 1 option to
ryo-wallet-cli, and possibly ryod, if you get crashes refreshing.
While Ryo isn't made to integrate with Tor, it can be used wrapped with torsocks, by setting the following configuration parameters and environment variables:
--p2p-bind-ip 127.0.0.1on the command line orp2p-bind-ip=127.0.0.1in ryod.conf to disable listening for connections on external interfaces.--no-igdon the command line orno-igd=1in ryod.conf to disable IGD (UPnP port forwarding negotiation), which is pointless with Tor.DNS_PUBLIC=tcporDNS_PUBLIC=tcp://x.x.x.xwhere x.x.x.x is the IP of the desired DNS server, for DNS requests to go over TCP, so that they are routed through Tor. When IP is not specified, ryod uses the default list of servers defined in src/common/dns_utils.cpp.TORSOCKS_ALLOW_INBOUND=1to tell torsocks to allow ryod to bind to interfaces to accept connections from the wallet. On some Linux systems, torsocks allows binding to localhost by default, so setting this variable is only necessary to allow binding to local LAN/VPN interfaces to allow wallets to connect from remote hosts. On other systems, it may be needed for local wallets as well.- Do NOT pass
--detachwhen running through torsocks with systemd, (see utils/systemd/ryod.service for details). - If you use the wallet with a Tor daemon via the loopback IP (eg, 127.0.0.1:9050),
then use
--untrusted-daemonunless it is your own hidden service.
Example command line to start ryod through Tor:
DNS_PUBLIC=tcp torsocks ryod --p2p-bind-ip 127.0.0.1 --no-igd
TAILS ships with a very restrictive set of firewall rules. Therefore, you need to add a rule to allow this connection too, in addition to telling torsocks to allow inbound connections. Full example:
sudo iptables -I OUTPUT 2 -p tcp -d 127.0.0.1 -m tcp --dport 18081 -j ACCEPT
DNS_PUBLIC=tcp torsocks ./ryod --p2p-bind-ip 127.0.0.1 --no-igd --rpc-bind-ip 127.0.0.1 \
    --data-dir /home/amnesia/Persistent/your/directory/to/the/blockchain
While ryod and ryo-wallet-cli do not use readline directly, most of the functionality can be obtained by running them via rlwrap. This allows command recall, edit capabilities, etc. It does not give autocompletion without an extra completion file, however. To use rlwrap, simply prepend rlwrap to the command line, eg:
rlwrap bin/ryo-wallet-cli --wallet-file /path/to/wallet
Note: rlwrap will save things like your seed and private keys, if you supply them on prompt. You may want to not use rlwrap when you use simplewallet to restore from seed, etc.
This section contains general instructions for debugging failed installs or problems encountered with Ryo. First ensure you are running the latest version built from the github repo.
We generally use the tool gdb (GNU debugger) to provide stack trace functionality, and ulimit to provide core dumps in builds which crash or segfault.
- To use gdb in order to obtain a stack trace for a build that has stalled:
Run the build.
Once it stalls, enter the following command:
gdb /path/to/ryod `pidof ryod`
Type thread apply all bt within gdb in order to obtain the stack trace
- If however the core dumps or segfaults:
Enter ulimit -c unlimited on the command line to enable unlimited filesizes for core dumps
Enter echo core | sudo tee /proc/sys/kernel/core_pattern to stop cores from being hijacked by other tools
Run the build.
When it terminates with an output along the lines of "Segmentation fault (core dumped)", there should be a core dump file in the same directory as ryod. It may be named just core, or core.xxxx with numbers appended.
You can now analyse this core dump with gdb as follows:
gdb /path/to/ryod /path/to/dumpfile
Print the stack trace with bt
- To run ryo within gdb:
Type gdb /path/to/ryod
Pass command-line options with --args followed by the relevant arguments
Type run to run ryod
We use the tool valgrind for this.
Run with valgrind /path/to/ryod. It will be slow.
There is an mdb_stat command in the LMDB source that can print statistics about the database but it's not routinely built. This can be built with the following command:
cd ~/ryo/external/db_drivers/liblmdb && make
The output of mdb_stat -ea <path to blockchain dir> will indicate inconsistencies in the blocks, block_heights and block_info table.
The output of mdb_dump -s blocks <path to blockchain dir> and mdb_dump -s block_info <path to blockchain dir> is useful for indicating whether blocks and block_info contain the same keys.
These records are dumped as hex data, where the first line is the key and the second line is the data.