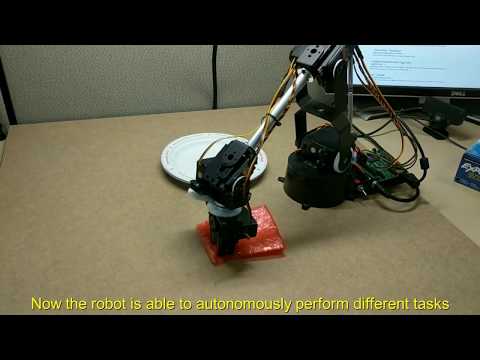
This framework is designed to demonstrate arbitrary object manipulation tasks to a robot and train a deep neural network to autonomously mimic that behavior by processing sequence of images from the environment.
- Rouhollah Rahmatizadeh, Pooya Abolghasemi, Ladislau Bölöni, Sergey Levine. Vision-Based Multi-Task Manipulation for Inexpensive Robots Using End-To-End Learning from Demonstration. arXiv
Dependencies:
- Chainer
- Blocks (cutting-edge development version)
- Pandas (
pip install pandas) - OpenCV
- Pillow
- Robot Operating System (We tested on ROS Indigo and Ubuntu 14.04)
Optional:
- [PlayStation Move API] (https://github.com/thp/psmoveapi)
- [LeapMotion] (https://www.leapmotion.com/setup/desktop/linux)
First you need a robot (If you do not have a robot, you can try the simulator in this repository: roboinstruct-1). The system should work for different robots. However, the code in this repository is only able to control a Lynxmotin AL5D robot arm. Connect this robot to your computer. Connect a camera and set its corresponding image topic in record_demonstration.py and config.py. Place the camera in a position so that it can see the robot arm and the relevant objects in the environment. Install either PlayStation Move API or LeapMotion driver and connect the device to your computer. Copy demonstrate_ros_package folder to your ROS workspace and build the ros package (catkin_make etc.). For PS Move, change the path to the PS Move API in publish_move_pose.py file. Run these commands:
rosrun demonstrate_leap leap_al5d -l 1 (1 for LeapMotion, 0 for PS Move)
rosrun demonstrate_leap publish_move_pose.py (Only for PS Move)
rosrun demonstrate_leap record_demonstration.py
If everything goes well, the recorded demonstration will be saved in your home directory. Copy them into a new folder in roboinstruct root folder and call it trajectories. Create another folder in roboinstruct root folder and call it models.
make_dataset.py reads the data from trajectories folder and converts it into appropriate formats for Chainer or Blocks code to train the neural network. Open config.py file, change make_dataset_mode to prepare_data_for_chainer, and run make_dataset.py. Go to autoencoder/chainer_vaegan/src and run train.py. When the vision part is trained well after a few epochs, copy the saved models from autoencoder/chainer_vaegan/model to autoencoder/chainer_vaegan/model-saved folder. Now in config.py file, change make_dataset_mode to prepare_data_for_blocks, and run make_dataset.py. run train.py to train the LSTM model given visual features. This saves the final model into the models folder.
Most of the parameters can be set in config.py.
There are some ideas implemented that are not included in the paper such as multi-timescale learning, auxiliary predictions, etc. You can take a look at the config.py to see a short description of these ideas. If you feel confident, you can change these parameters.
For testing the trained model on the robot, first run rosrun demonstrate_leap leap_al5d so that you can send commands to the robot. Setup the camera and run it to publish the images on its corresponding ROS topic. Set the ID of the task that you want to robot to perform in task_to_perform variable in config.py. Run sample.py to load the saved model and generates the trajectory and send commands to the robot.
The codes in the char-rnn, chainer-vae-gan, and leap-hand repositories helped a lot in this project.