This small Windows form program is created to analyze the PC screen and calculate an average color. This calculated color can be sent as a webhook or in an MQTT message. The output color data can be an RGB color code (128,234,55) or a HEX code (#D36AF4)
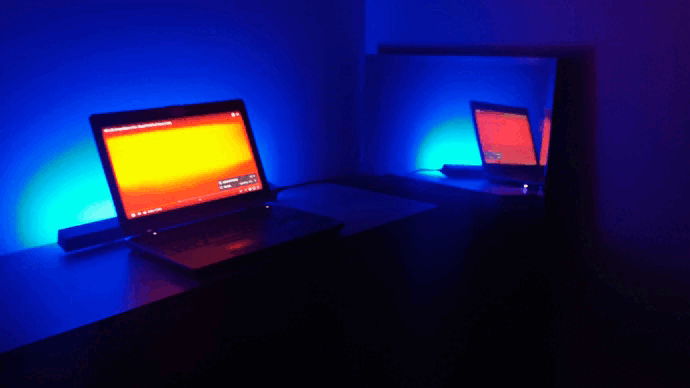
This tool can be used to create an ambient light behind your PC monitor. Any remote-controlled light can be used as a light source. For example, you can use a microcontroller and LED strip with https://github.com/Aircoookie/WLED installed on it.
Demo:
- calculate the average color of the screen
- shows the calculated screen on the UI
- calculate the color manually
- minimize to tray option
- send the color data over MQTT
- send the color data by calling a webhook
- set send frequency between 200ms and 15s
- skip the dark pixels (if R and G and B components are under 100) and the dark/light pixel ratio is over 1:2
- save config to a file (C:\Users\ [username] \AppData\Roaming\AmbientLight\config.json)
- IMPORTANT: if the background calculates the same color after another then MQTT and webhook operation will be not called. It reduces unnecessary calls, saves network traffic
- currently, it analyzes primary screen only
- it has no output (debug, error log)
TODO: divide the screen to segments and send more colors for LED strip. On WLED it is possible to have segments too.ready
Download the release version from here: https://github.com/redakker/ambientlight/releases/tag/release
- run in your Windows system
- set the MQTT credentials or the Webhook
- set the desired checkboxes
- change the send frequency if needed
- press apply settings
If the "Running" checkbox is set then the calculated RGB or HEX code is sent periodically with a set frequency.
- Minimize to tray: allow the program to run in the background
- Skip dark pixels: background calculation will skip the dark pixels. Dark pixels R < 100 and G < 100 and B < 100
- Divide screen: UI will divide the screen into smaller areas and will analyze the color of the small segments. Wildcards of the segment colors are shown on the bottom-right side of the window
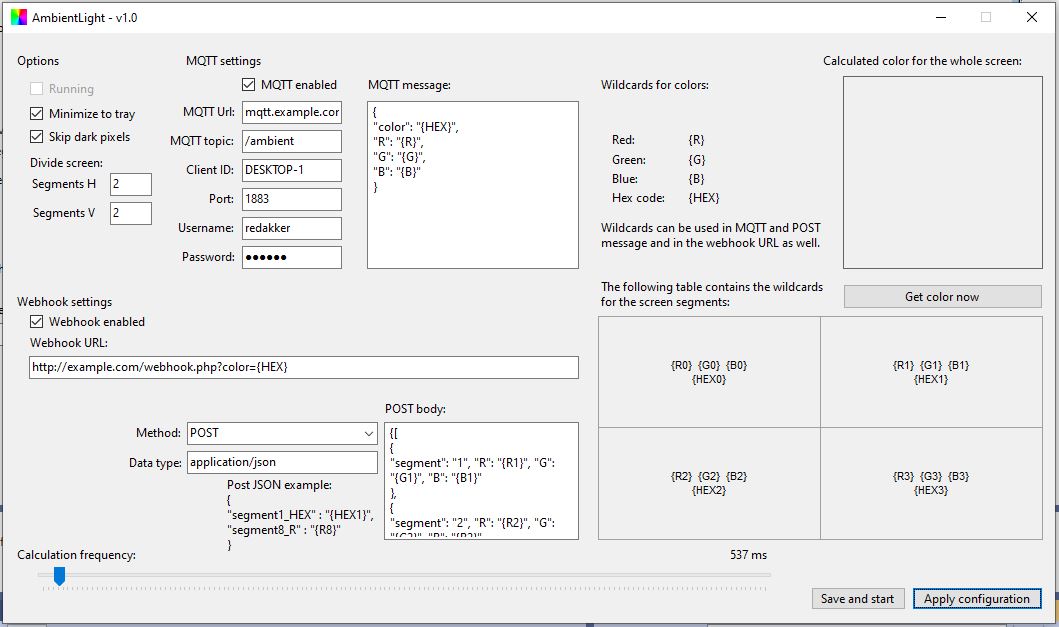
- MQTT settings: set your MQTT credentials here. Wildcards for colors can be used in the message area (see the main picture)
- Right side square: after a background color generation this area shows the average color of the whole screen
- Get color now button: push for one-time calculation. Configuration can be tried/tested in this way
- Webhook settings: Webhook data can be set here. Wildcards can be used in the URL and the POST body fields as well.
- Bottom-right panel: it shows how the screen is divided. Each segment shows the color wildcard for that area
- Calculation frequency: set this value to get slower and faster calculation and sending
- Apply configuration: save settings to the config file
- Save and start: save settings to the config file and start the background process. If the background process is running this button stops the calculation.
Configure webhook which calls the WLED microcontroller's API. GET request, single color The webhook is similar to this
http:// [WLED_IP_ADDRESS] /win&T=1&FX=0&SX=0&R={R}&G={G}&B={B}
Configure webhook which calls the WLED JSON API. POST request, screen divided to 4 segments
- set the divide screen option to 2x2
- enable the webhook checkbox
- set the request URL: http:// [WLED_IP_ADDRESS] /json/state
- paste the code below the POST body input field
- modify the JSON data start/stop properties for your LED installation (start, stop means the LED number where the segment starts/ends)
{
    "transition": 5,
    "seg": [
        {
            "id": 0,
            "start": 0,
            "stop": 30,
            "grp": 1,
            "spc": 0,
            "of": 0,
            "on": true,
            "frz": false,
            "bri": 255,
            "cct": 127,
            "col": [
                [
                    {R0},
                    {G0},
                    {B0}
                ],
                [
                    0,
                    0,
                    0
                ],
                [
                    0,
                    0,
                    0
                ]
            ],
            "fx": 0,
            "sx": 0,
            "ix": 27,
            "pal": 0,
            "sel": true,
            "rev": false,
            "mi": false
        },
        {
            "id": 1,
            "start": 30,
            "stop": 80,
            "grp": 1,
            "spc": 0,
            "of": 0,
            "on": true,
            "frz": false,
            "bri": 255,
            "cct": 127,
            "col": [
                [
                    {R1},
                    {G1},
                    {B1}
                ],
                [
                    0,
                    0,
                    0
                ],
                [
                    0,
                    0,
                    0
                ]
            ],
            "fx": 0,
            "sx": 0,
            "ix": 27,
            "pal": 0,
            "sel": true,
            "rev": false,
            "mi": false
        },
        {
            "id": 2,
            "start": 80,
            "stop": 110,
            "grp": 1,
            "spc": 0,
            "of": 0,
            "on": true,
            "frz": false,
            "bri": 255,
            "cct": 127,
            "col": [
                [
                    {R2},
                    {G2},
                    {B2}
                ],
                [
                    0,
                    0,
                    0
                ],
                [
                    0,
                    0,
                    0
                ]
            ],
            "fx": 0,
            "sx": 0,
            "ix": 27,
            "pal": 0,
            "sel": true,
            "rev": false,
            "mi": false
        },
        {
            "id": 4,
            "start": 110,
            "stop": 160,
            "grp": 1,
            "spc": 0,
            "of": 0,
            "on": true,
            "frz": false,
            "bri": 255,
            "cct": 127,
            "col": [
                [
                    {R3},
                    {G3},
                    {B3}
                ],
                [
                    0,
                    0,
                    0
                ],
                [
                    0,
                    0,
                    0
                ]
            ],
            "fx": 0,
            "sx": 0,
            "ix": 27,
            "pal": 0,
            "sel": true,
            "rev": false,
            "mi": false
        }


    ]
}
Configure an automation which listents on an MQTT topic. Example:
- topic: /ambient/color
- message: {R},{G},{B}
Configure an action for this automation which applies the RGB color for the chosen lights
This software is developed in Visual Studio 2022. After downloading the repository, open the solution file and it will be ready to run.
Environment: .NET 6
This is my first .NET project so please be nice to me if you find some mistake. :)
Buy me a coffee: https://www.buymeacoffee.com/redakker