This is super flexible Custom tab bar controller implementation. You have the complete opportunity to customise according to your necessity.
Experience a live demonstration
You can design whatever tabbar controller comes in your mind. Following is some simple demonstration. Many more are yet to come. If you have any unique idea, you would like to implement it for you feel free to contact Sharker.ratul.08@gmail.com

###Step1: Copy the RSCustomTabbarController in your project.
###Step2:
Create a new class extending from the base class RSCustomTabbarController. Let the new class name is Demo1TabbarController.
Demo1TabbarController.h looks like following.
#import <UIKit/UIKit.h>
#import "RSCustomTabbarController.h"

@interface Demo1TabbarController : RSCustomTabbarController

@end
Now implement the RSCustomTabbarImplementationDelegate by adding following properties & methods in Demo1TabbarController
@property UIView *viewControllerContainer;

@property NSArray<NSLayoutConstraint*> *tabbarContainerHeight;
@property NSArray<NSLayoutConstraint*> *tabbarWidgetHolderTop;

-(CGFloat)heightForTabbarController:(RSCustomTabbarController*)tabbarController;
-(void)newSelectedTabbarIndex:(NSUInteger)newSelectedIndex whereOldIndexWas:(NSUInteger)oldSelectedIndex;
Before getting into nitty gitty details, first grab some key concept about this protocol. This RSCustomTabbarImplentationDelegate will
ask for these 3 properties & 2 method. You are about to apply your own graphical design, but how should RSCustomTabbarController would
know about which is your view controller container and what will act as an tabbar container. Thats why this protocol is designed to communicate between your provided presentation and internal tabbar like maintanance.
now the Demo1TabbarController.h is looks like
#import <UIKit/UIKit.h>
#import "RSCustomTabbarController.h"

@interface Demo1TabbarController : RSCustomTabbarController <RSCustomTabbarImplementationDelegate>

#pragma mark implementation properties
@property IBOutlet UIView *viewControllerContainer;
@property IBOutletCollection (NSLayoutConstraint) NSArray *tabbarContainerHeight;
@property IBOutletCollection (NSLayoutConstraint) NSArray *tabbarWidgetHolderTop;

@end
and the Demo1TabbarController.m will look like
#import "Demo1TabbarController.h"

@interface Demo1TabbarController ()

@end

@implementation Demo1TabbarController

#pragma mark life cycle
-(void)viewDidLoad
{
    [super viewDidLoad];
}

#pragma mark CustomTabbarImplementationDelegate
-(CGFloat)heightForTabbarController:(RSCustomTabbarController*)tabbarController
{
    //todo -- implementation
}
-(void)newSelectedTabbarIndex:(NSUInteger)newSelectedIndex whereOldIndexWas:(NSUInteger)oldSelectedIndex
{
    //todo -- implementation
}
@end
For now we are done with class. Now we need to add a inteface builder file (storyboard/nib) file for designing the tabbar controller.
Following is the hierarchy we will be following to create the Demo1TabbarContorller
      UIVIewController
      |
      |--> self.view
          |
          |--> viewController container
          |--> tabbar container
              |
              |--> bar button container
                  |
                  |--> buttons
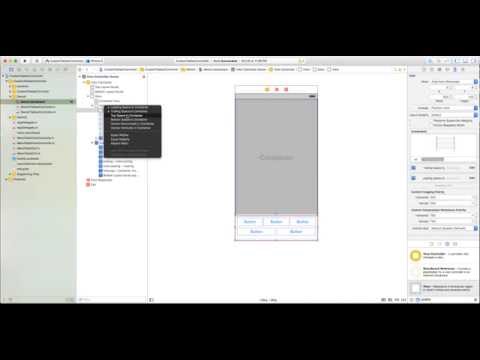
Storyboard designing can be done as followos
After done with your designing, now add some IBOutlets, IBactions and variables in the Demo1TabbarController.m. It should look like following
#import "Demo1TabbarController.h"

@interface Demo1TabbarController ()
{
    NSArray<UIButton*> *buttonArr;
}
@property (strong, nonatomic) IBOutlet UIButton *mViewBtn0;
@property (strong, nonatomic) IBOutlet UIButton *mViewBtn1;
@property (strong, nonatomic) IBOutlet UIButton *mViewBtn2;
@property (strong, nonatomic) IBOutlet UIButton *mViewBtn3;
@property (strong, nonatomic) IBOutlet UIButton *mViewBtn4;

@end

@implementation Demo1TabbarController

#pragma mark life cycle
-(void)viewDidLoad
{
    _mViewBtn0.tag = 0;
    _mViewBtn1.tag = 1;
    _mViewBtn2.tag = 2;
    _mViewBtn3.tag = 3;
    _mViewBtn4.tag = 4;


    buttonArr = @[_mViewBtn0, _mViewBtn1, _mViewBtn2, _mViewBtn3, _mViewBtn4];

    [super viewDidLoad];
}


#pragma mark CustomTabbarImplementationDelegate
-(CGFloat)heightForTabbarController:(RSCustomTabbarController*)tabbarController
{
    return 95;
}
-(void)newSelectedTabbarIndex:(NSUInteger)newSelectedIndex whereOldIndexWas:(NSUInteger)oldSelectedIndex
{
    buttonArr[oldSelectedIndex].selected = NO;
    buttonArr[newSelectedIndex].selected = YES;
}

#pragma mark IBActions
-(IBAction)tabbarButtonPressed:(UIButton*)sender
{
    NSLog(@"tabbar button pressed");
    [super setSelectedViewCotnrollerAtIndex:sender.tag];
}

@end
Now time to connect the IBAction and IBOutlet of the implementation so that the storyboard widgets can map into it. These are shown in the next video.
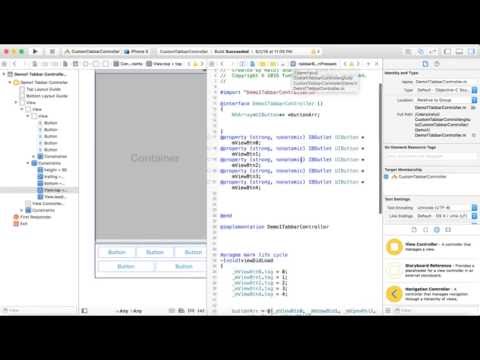
Our custom tabbar is ready to rock and roll. Instantiate it from Storyboard and use it just like regular UITabbarController.