Windows Laptop setup for Developer with Docker Desktop & Applications. The primary purpose is to have a standard way of configuring a development environment that is simple, fast and completely automated.
Following Applications & Tools are setup/teardown from the automation script
Containerization - [Docker Desktop]
Containerization - Docker Desktop
- Check Windows Version for Compatibility
- Check HyperV is Enabled
- Enable Virtualization in BIOS - If Required
- Enable WSL2 & Update Kernel
Applications and Tools
-
Package Manager -scoop
- Git Bash
- GitHub CLI
- Code Editor (IDE) - Visual Studio Code
- concfg
- PowerSession
-
Visual Studio Code Extensions
-
References:
- Docker Desktop for Windows Troubleshooting Guide
Automation script does following Prerequisites Checks, Setup and Tests. Open Powershell as current user.
TIP: Search for
Powershellin Windows Start Menu and open it.
1. Windows Version
Check Windows 10 and Above
Get-ComputerInfo | select WindowsProductName, WindowsVersionThe output should contain one of the following
- Windoes 10 Pro
- Windows 10 Enterprise and Education Edition
- Windows 11
HyperV is supported only in above versions of Windows by default. HyperV allows running Virtual Machine on Windows.
2. HyperV is Enabled
- In Powershell Windows
systeminfo /fo csv | ConvertFrom-Csv | select OS*, System*, Hotfix*,Hyper-V* | Format-List- Check the output
-
If it says
A hypervisor has been detected. Features required for Hyper-V will not be displayed.This means Hyper-V is already enabled -
Otherwise, check for
Virtualization Enabled in Firmware:.- If its
No, click here.
- If its
1. Workspace & Applications
1.1 Workspace
In Powershell window Run following commands for workspace setup
Set-ExecutionPolicy -ExecutionPolicy RemoteSigned -Scope currentuser
iwr -useb https://raw.githubusercontent.com/rajasoun/win10x-onboard/main/e2e.ps1 | iex
cd ~\workspace
git clone https://github.com/rajasoun/win10x-onboard
cd win10x-onboard
Invoke-Pester src\lib\Workspace.Tests.ps1 -Output Detailed
1.2 Applications Setup
In Powershell window Run following commands for Prerequisite Checks
.\e2e.ps1 apps1.3 Check Applications Setup
In Powershell window Run following commands for Automated Checks.\e2e.ps1 apps-setup-test2. HyperV
- In Powershell window Run following commands following commands to setup HyperV.
Switch to Elevated Previlage
.\e2e.ps1 elevateIn the New Elevated Powershell as Administrator
.\e2e.ps1 hypervFYI: System will restart.
-
After Restarting Windows, search for
Turn Windows features on or offin the Start Menu search bar and open it.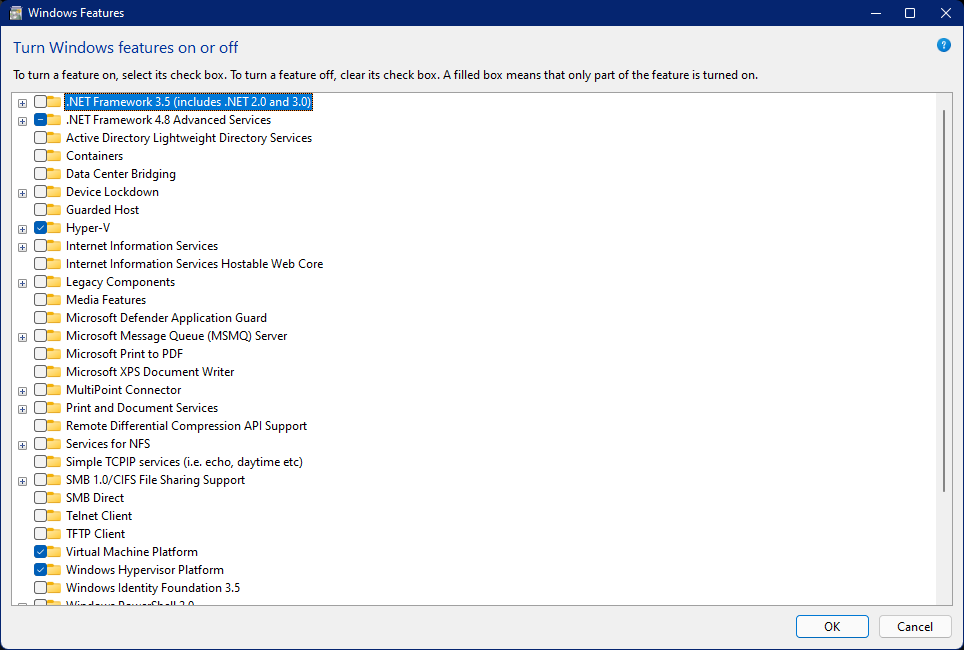
-
In the Window, lookout for
Hyper-V,Virtual Machine PlatformandWindows Hypervisor Platform. Then check the check boxes before them and clickOK. This will also take some time and then a Restart is necessary.
3. WSL2 & Kernel Update
In Powershell window Run following commands following commands to setup WSL, WSL2 Kernel Update
Switch to Elevated Previlage
.\e2e.ps1 elevateIn the New Elevated Powershell as Administrator
.\e2e.ps1 wslFYI: System will restart.
4. Docker Desktop
Install Docker Desktop For Windows
5. Test Docker Setup
- Switch to bash shell
.\e2e.ps1 bash-it
nix/assist.sh bash-setup- Docker Test: Open Git Bash command prompt and output should contain
Hello from Docker
docker run --rm hello-world- Check the Speed of the Internet using docker
MSYS_NO_PATHCONV=1 docker run --rm rajasoun/speedtest:0.1.0 "/go/bin/speedtest-go"- Switch to Powershell
exitIn Powershell Window
1. TDD Scripts
.\e2e.ps1 apps-setup-testSwitch to Elevated Previlage
.\e2e.ps1 elevateIn the New Elevated Powershell as Administrator
.\e2e.ps1 system-setup-test2. ATDD Scripts
Invoke-Pester e2e.Tests.ps1 -Tag "prerequisite"  -Output Detailed
Invoke-Pester e2e.Tests.ps1 -Tag "apps"   -Output Detailed
TDD - Test Driven Development
ATDD - Acceptance Test Driven Development
4.1 Teardown Applications
To uninstall scoop and all applications installed via scoop
.\e2e.ps1 teardown4.2 Disable HyperV & WSL
To Disable HyperV & WSL. Restart at End
.\e2e.ps1 elevate
Disable-WindowsOptionalFeature -Online -FeatureName Microsoft-Hyper-V-All
Disable-WindowsOptionalFeature -Online -FeatureName Microsoft-Windows-Subsystem-Linux
4.3 Uninstall Docker Desktop
- From the Windows Start menu, select Settings > Apps > Apps & features.
- Select Docker Desktop from the Apps & features list and then select Uninstall.
- Click Uninstall to confirm your selection.
Manual Steps
The process of enabling virtualization can vary a lot depending on the motherboard manufacturer, but it can be summarized in a few steps:-
Completely Shutdown you Computer and turn it on again.
-
Keep pressing the key to open the BIOS (usually it is
Del,F1,F2,F4,F11, orF12). This key depends on the Motherboard manufacturer. You can easily google it out. -
Once you get into the BIOS, it may look very scary or intimidating, but don't worry, you will get it right. Mouse may not work in BIOS so you might have to use the Directional or Arrow keys and the Enter key of the Keyboard to navigate.
- Search for the CPU configuration section, it can be called
CPU configuration,processor,NorthbridgeorChipsetand may be under anadvancedoradvanced modetab or menu. - Now you need to look for the virtualization option and enable it, it can have different names such as
Hyper-V,Vanderpool,SVM,AMD-V,Intel Virtualization TechnologyorVT-X. - Once its enabled, save and reboot your pc.
If this part did not help you, you can specifically go the Website of the Mother Board Manufacturer of you Computer and ask for help.
Last Updated by Rohini Gorige