
Welcome to the University Projects Repository for Introduction to VHDL and Digital Logic, focusing on the Basys 3 board and Vivado! 🚀
This repository provides resources to comprehend VHDL, a hardware description language crucial for designing and simulating digital circuits. These projects were created as part of university courses and are tailored to work specifically with the Basys 3 development board and Vivado design suite.
Here you will find:
-
Basic Concepts: Description of VHDL and its significance in digital circuit design.
-
Digital Logic Fundamentals: Basic principles of digital electronics and their application in circuit design.
-
Concurrent and Sequential Statements: Organizing VHDL statements to create efficient circuits.
-
Structural Design: Composing complex circuits using simpler components with VHDL.
-
Selected and Conditional Signals: Implementing conditional logic in VHDL designs.
-
Components and Generation: Creating reusable components and generating efficient design structures.
-
State Diagrams: Designing and representing digital system behaviors using state diagrams.
-
Simulation and Verification: Using software tools to simulate and verify VHDL designs, especially in the context of the Basys 3 board and Vivado.
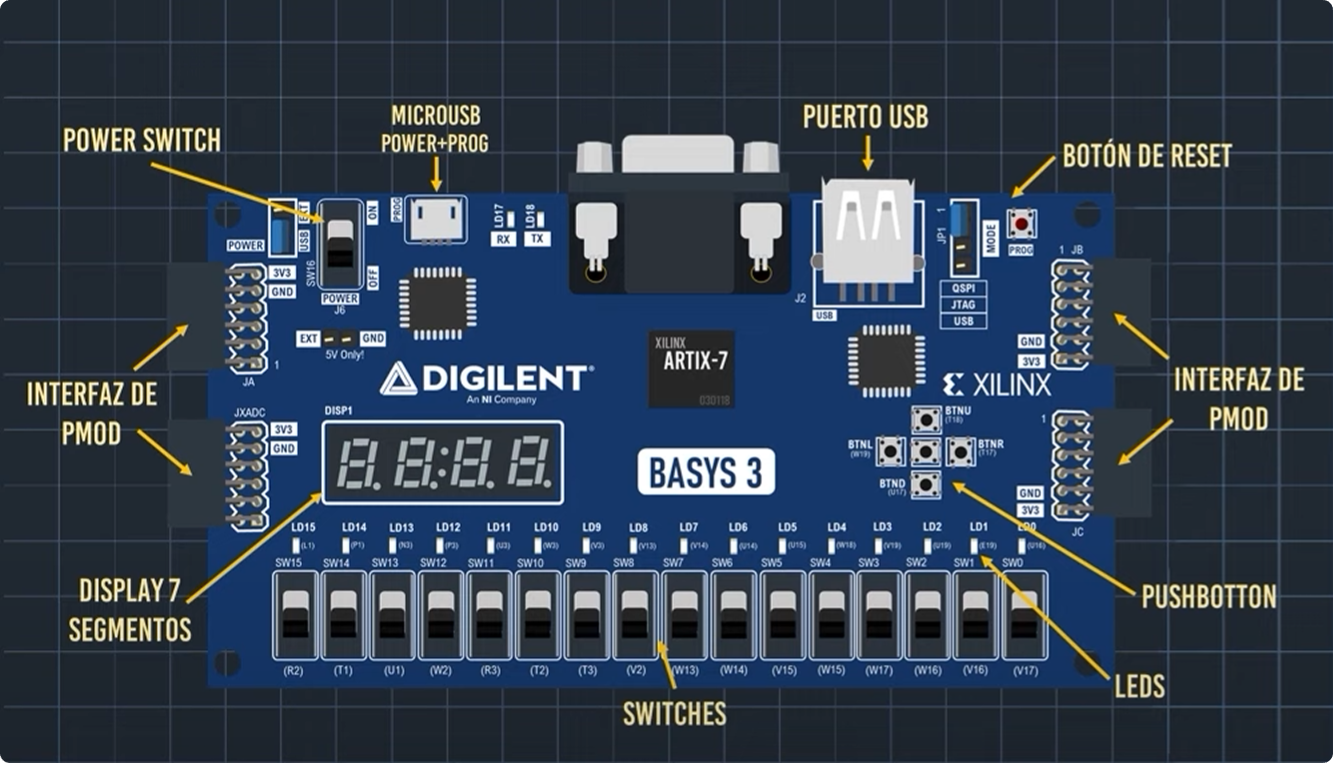
The Basys 3 development board offers a wide range of components and features for digital design and experimentation:
-
Clock: An internal clock that Verilog projects can utilize, featuring an additional line for configuration.
-
Switches: 16 switches located along the bottom edge of the board.
-
LEDs: 16 small LEDs positioned above the switches along the bottom of the board.
-
7-Segment Display: A 4-digit 7-segment display.
-
Pushbuttons/Buttons: Five accessible buttons in the middle of the board. These buttons are designed to prevent bouncing.
-
PMOD Headers: These are 4-pin and 12-pin connectors located on the sides of the board, allowing communication with external devices.
-
VGA Connector: VGA port for graphical display capabilities.
-
USB Connections: Interfaces for communication through USB.
-
Quad SPI Flash: Flash memory for storage.
- Vivado is a powerful tool for FPGA (Field-Programmable Gate Array) development provided by Xilinx. It offers a comprehensive suite of tools to design, synthesize, implement, and program FPGAs. Here's a quick overview of its usage:
Generate .Bin File 📔
Click generate bitstream (can be carried out step by step, Run Synthesis - Run Implementation - Generate bitstream) and generate bit files and bin files.
-
Synthesis: Run synthesis to convert your high-level design into a gate-level netlist. This step optimizes the design for performance, area, and power, generating a representation that can be implemented on the FPGA.
-
Implementation: In this step, the synthesis results are used to place and route the design onto the target FPGA device. This process involves mapping the logic elements of your design to the physical resources on the FPGA.
-
Generate Bitstream: The final implementation generates a bitstream file that contains configuration data for the FPGA. This bitstream is what you'll load onto the FPGA to program its behavior.
-
Programming: Connect your FPGA board to the development environment, and use Vivado to program the bitstream onto the FPGA. This configures the FPGA to function according to your design specifications.
-
Debugging and Verification: Vivado provides debugging tools to help you troubleshoot your design. You can simulate your design, use logic analyzers, and interact with the FPGA to ensure proper functionality.
-
Hardware Debugging: If needed, you can use hardware debugging tools to probe and analyze signals within the FPGA during runtime. This is especially useful for identifying issues that may arise due to physical connections.

- Vivado's intuitive graphical interface and powerful command-line tools make it a comprehensive environment for FPGA development. It's commonly used for a wide range of applications, including digital signal processing, embedded systems, high-performance computing, and more.
Program Basys3 ⚙️
-
Step 1: Open the Vivado project and open the target by clicking on "Open Target" in "Open Hardware Manager" in the "Program and Debug" section of the Flow Navigator window. Select "Auto Connect".

-
Step 2: If the device is detected successfully, then select "Program Device" by right-clicking on the target device.

-
Step 3: In the dialog window which opens up, Vivado automatically chooses the correct bitstream file if the design was synthesized, implemented, and bitstream generated successfully. If needed, browse to the bitstream which needs to be programmed to FPGA. Finally, click "Program".

-
Basys3MusicNotes: Implementation of a musical system on a Basys 3 board.
-
BlinkyLed: Basic example of a blinking LED on an FPGA.
-
Constraints Template: Template for FPGA project constraints.
-
Dec3_8: Design of a 3-to-8 decoder in VHDL.
-
Digital-Chronometer: Digital chronometer implemented on an FPGA.
-
Modules Template: Template for reusable VHDL modules.
-
Random-Generator: Random number generator using digital logic.
-
Schematic Diagrams: Basys 3 Schematic (PDF)
-
Basys3 Manual: Basys 3 Reference Manual
-
Constraints: Basys 3 Constraints (XDC)
-
Basys3 Introduction Video: FPGA INTRODUCTION (BASYS 3)
-
Vivado / VHDL Video Collection: DIGITAL PROGRAMMABLE ELECTRONICS
-
Vivado Download: (AMD XILINX) In my case I am using the version 2023.1
-
Vivado Download Tutorial: AMD XILINX
-
Vivado Documentation: AMD XILINX Documentation Portal