![]()
![]()
![]()
![]()
Qulacs is a Python/C++ library for fast simulation of large, noisy, or parametric quantum circuits. Qulacs is developed at QunaSys, Osaka University, NTT, and Fujitsu.
Qulacs is licensed under the MIT license.
pip install qulacs
If your CPU is older than Intel Haswell architecture, the binary installed with the above command does not work. In this case, please install Qulacs with the following command. Even if your CPU is newer than Haswell, Qulacs installed with the below command shows better performance but takes a longer time. See "Install Python library from source" section for detail.
pip install git+https://github.com/qulacs/qulacs.git
If you have NVIDIA GPU and CUDA is installed, GPU-version can be installed with the following command:
pip install qulacs-gpu
Note Qulacs-Osaka/qulacs-osaka was integrated into the qulacs/qulacs. For more details, please refer to Information section.
- Fast quantum circuit simulation with parallelized C/C++ backend
- Noisy quantum gate for simulation of NISQ devices
- Parametric quantum gates for variational methods
- Circuit compression for fast simulation
- GPU support for fast simulation
- Many utility functions for research
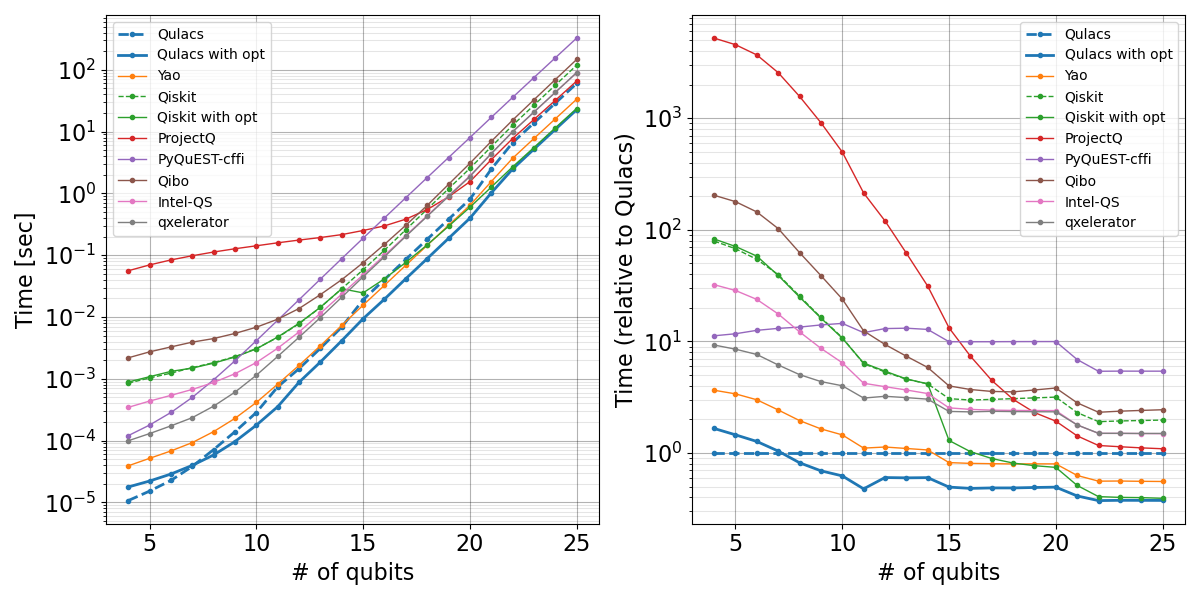
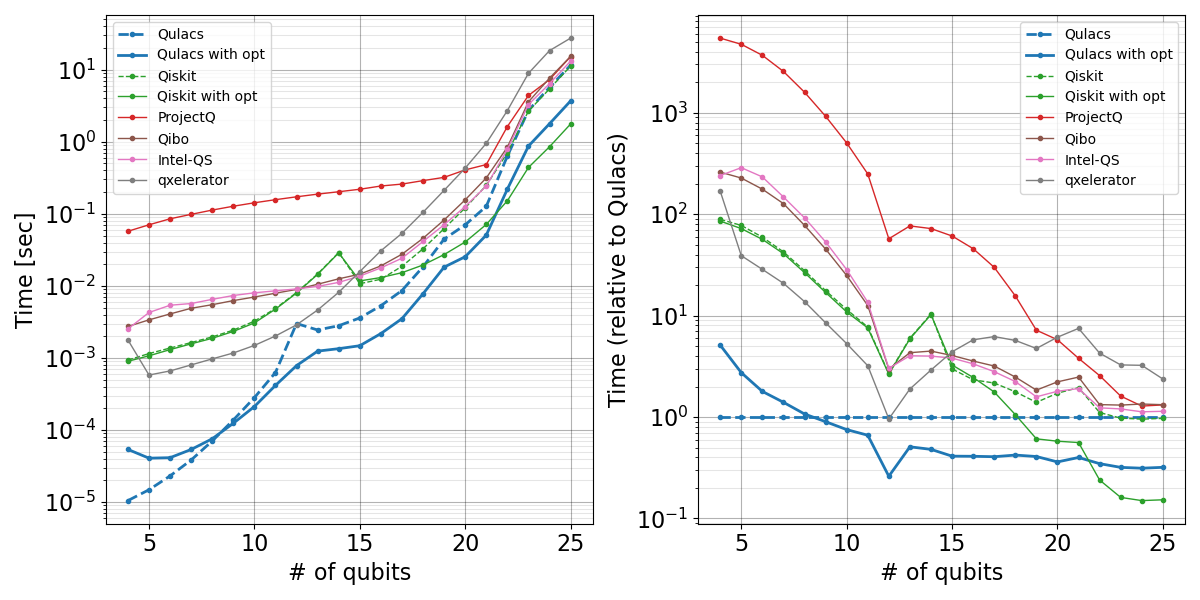
The time for simulating random quantum circuits is compared with several quantum circuit simulators in November 2020.
See the benchmark repository and Section VI and VII of our paper for the detail of this benchmark.
Note that the plots with names ending with "opt" and "heavy opt" perform circuit optimization for fast simulation, where the time for optimization is included in the execution time.

To install Qulacs optimized for your system, we recommend the following install procedure for faster simulation of quantum circuits, while this requires a compiler and takes time for installation. In addition, you can enable or disable optimization features such as SIMD optimization, OpenMP parallelization, and GPU support.
A binary that is installed via pip command is optimized for Haswell architecture. Thus, Qulacs installed via pip command does not work with a CPU older than Haswell. If your CPU is newer than Haswell, Qualcs built from source shows the better performance.
- C++ compiler (gcc or VisualStudio)
- gcc/g++ >= 7.0.0 (checked in Linux, MacOS, cygwin, MinGW, and WSL)
- Microsoft VisualStudio C++ 2015 or later
- Boost >= 1.71.0 (Minimum version tested in CI)
- Python >= 3.7
- CMake >= 3.0
- git
- (option) CUDA >= 8.0
- (option) AVX2 support
If your system supports AVX2 instructions, SIMD optimization is automatically enabled.
If you want to enable GPU simulator, install qulacs through qulacs-gpu package or build from source.
Note that qulacs-gpu includes CPU simulator. You don't need to install both.
Qulacs is tested on the following systems.
- Ubuntu 20.04
- macOS Big Sur 11
- Windows Server 2019
If you encounter some troubles, see troubleshooting.
Install with default options (Multi-thread without GPU):
pip install .
If AVX2 instructions are not supported, SIMD optimization is automatically disabled.
Install with GPU support (CUDA is required):
USE_GPU=Yes pip install .
Install single-thread Qulacs:
USE_OMP=No pip install .
If you install qulacs manually, it does not have type stubs.
To include type stubs into the package, you have to run script/generate_stubs.sh after the first install and reinstall.
pip install .
script/update_stubs.sh
pip install .
The number of threads used in Qulacs installed with default options can be controlled via the environment variable OMP_NUM_THREADS or QULACS_NUM_THREADS.
While OMP_NUM_THREADS affects the parallelization of other libraries, QULACS_NUM_THREADS controls only the parallelization of QULACS.
Or, if you want to force only Qulacs to use a single thread, You can install single-thread Qulacs with the above command.
For development purpose, optional dependencies can be installed as follows.
# Install development tools
pip install .[dev]
# Install dependencies for document generation
pip install .[doc]
Uninstall Qulacs:
pip uninstall qulacs
Static libraries of Qulacs can be built with the following commands:
git clone https://github.com/qulacs/qulacs.git
cd qulacs
./script/build_gcc.sh
To build shared libraries, execute make shared at ./qulacs/build folder.
When you want to build with GPU, use build_gcc_with_gpu.sh instead of build_gcc.sh.
Then, you can build your codes with the following gcc command:
g++ -O2 -I ./<qulacs_path>/include -L ./<qulacs_path>/lib <your_code>.cpp -lvqcsim_static -lcppsim_static -lcsim_static -fopenmpIf you want to run your codes with GPU, include cppsim/state_gpu.hpp and use QuantumStateGpu instead of QuantumState and build with the following command:
nvcc -O2 -I ./<qulacs_path>/include -L ./<qulacs_path>/lib <your_code>.cu -lvqcsim_static -lcppsim_static -lcsim_static -lgpusim_static -D _USE_GPU -lcublas -Xcompiler -fopenmp
Static libraries of Qulacs can be built with the following command:
git clone https://github.com/qulacs/qulacs.git
cd qulacs
script/build_msvc_2017.bat
When you want to build with GPU, use build_msvc_2017_with_gpu.bat.
If you use MSVC with other versions, use build_msvc_2015.bat or edit the generator name in build_msvc_2017.bat.
Your C++ codes can be built with Qulacs with the following process:
- Create an empty project.
- Select "x64" as an active solution platform.
- Right Click your project name in Solution Explorer, and select "Properties".
- At "VC++ Directories" section, add the full path to
./qulacs/includeto "Include Directories" - At "VC++ Directories" section, add the full path to
./qulacs/libto "Library Directories" - At "C/C++ -> Code Generation" section, change "Runtime library" to "Multi-threaded (/MT)".
- At "Linker -> Input" section, add
vqcsim_static.lib;cppsim_static.lib;csim_static.lib;to "Additional Dependencies".
See the following documents for tutorials.
from qulacs import Observable, QuantumCircuit, QuantumState
from qulacs.gate import Y,CNOT,merge

state = QuantumState(3)
state.set_Haar_random_state()

circuit = QuantumCircuit(3)
circuit.add_X_gate(0)
merged_gate = merge(CNOT(0,1),Y(1))
circuit.add_gate(merged_gate)
circuit.add_RX_gate(1,0.5)
circuit.update_quantum_state(state)

observable = Observable(3)
observable.add_operator(2.0, "X 2 Y 1 Z 0")
observable.add_operator(-3.0, "Z 2")
value = observable.get_expectation_value(state)
print(value)
If you want to run it on GPU, install GPU-enabled qulacs and replace QuantumState in the above codes with QuantumStateGpu.
#include <iostream>
#include <cppsim/state.hpp>
#include <cppsim/circuit.hpp>
#include <cppsim/observable.hpp>
#include <cppsim/gate_factory.hpp>
#include <cppsim/gate_merge.hpp>

int main(){
    QuantumState state(3);
    state.set_Haar_random_state();

    QuantumCircuit circuit(3);
    circuit.add_X_gate(0);
    auto merged_gate = gate::merge(gate::CNOT(0,1),gate::Y(1));
    circuit.add_gate(merged_gate);
    circuit.add_RX_gate(1,0.5);
    circuit.update_quantum_state(&state);

    Observable observable(3);
    observable.add_operator(2.0, "X 2 Y 1 Z 0");
    observable.add_operator(-3.0, "Z 2");
    auto value = observable.get_expectation_value(&state);
    std::cout << value << std::endl;
    return 0;
}
If you place the above codes in the root directory of this repository(e.g., qulacs/main.cpp), you can build your codes with the following command:
g++ -O2 -I ./include -L ./lib main.cpp -fopenmp -lcppsim_static -lcsim_static
If you want to run it on GPU, include cppsim/state_gpu.hpp and replace QuantumState with QuantumStateGpu.
Please cite this arXiv paper: Qulacs: a fast and versatile quantum circuit simulator for research purpose
Experimental new features of Qulacs that have been developed in the Osaka University repository Qulacs-Osaka/qulacs-osaka will be integrated into the original Qulacs. The following new features will be added!!!
Scheduled around August 2022.
The main new features are as follows
- Providing type hint files for Python
- Configure tools such as mypy to take full advantage of type hint information.
- mypy can detect the use of incorrect argument types in the qulacs API.
- Sending exceptions with detailed information
- Makes it easier to understand the cause of the error.
- (For Jupyter Notebook users) kernel is less likely to crash if incorrect input is given.
- Added backprop (gradient calculation by error back propagation method) to ParametricQuantumCircuit
- It is faster than calculating gradients one by one.
- Gradient Calculator
The existing functionality has not been changed, so the existing code using Qulacs will continue to work as is. However, since the implementation language of csim has been changed from C to C++, changes may be necessary if you have been using direct calls to csim.
Due to the C++ change, all complex numbers are now handled by std::complex.
This integration adds boost as a dependency library. There will be some changes in the installation procedure.