The Infragram project brings together a range of different efforts to make Do-It-Yourself plant health comparisons possible with infrared photography.
This project is a minimal core of the Infragram project in JavaScript and was made possible with support from Google and the AREN Project at NASA.
Check it here: https://publiclab.github.io/infragram/

This is ported out of the Node server application at https://github.com/p-v-o-s/infragram-js
Read more at https://publiclab.org/infragram

- Quick Installation
- Purpose
- Usage
- Architecture
- Inputs
- Converting
- Processors
- Presets
- Colorizing
- Outputs
- Interface
- Legacy Code
- Pi and VR versions
- Contributing
- Developers
- First Time?
- Fork our repo.
- In the console, download a copy of your forked repo with
git clone https://github.com/your_username/infragramwhereyour_usernameis your GitHub username. - Enter the new infagram directory with
cd infragram. npm install- this will install all the node packages into your local machine.npm install http-server -g && http-server(this installs http-server globally and then runs it, next time you just need to dohttp-serverto run it locally)
The purpose of this software is to convert a photo taken from an "Infragram" multispectral camera using NDVI or another technique, then colorize that image. It can then be downloaded or forwarded to another web app.

See this tutorial for how to use Infragram.org, step by step:
This edition of Infragram is slimmed down and simplified vs. previous versions. The whole project runs using just JavaScript (and WebGL) from a single index.html file, in the browser.
The basic flow is as shown here:
Input => Convert => Colorize => Output
- Input: an image or video stream is chosen.
- Convert: The image gets modified/transformed using a given algorithm, like NDVI or another simple mathematic expression. This is handled by the processor (see below)
- Colorize: It gets colorized (optionally), which is also handled by the processor (see below).
- Output: the image can be downloaded or sent to another website.
Images can come from two sources: files or webcam video.
Handling for "uploaded" files (note that we don't send files anywhere, they're just used in the browser) is handled in /src/ui/interface.js.
Depending on which processor is selected (see below), the image is read, then sent to the updateImage() function of either the webgl (default) or javascript processor for conversion.
If the user presses the Webcam button, we use the WebRTC webcam API to stream video from the selected webcam, and we perform conversion and colorizing on each frame in real-time. This works faster with webgl mode. In upcoming versions we would like to try accepting uploaded videos, which would be dragged in just like images, but would play on loop just like webcam video streams.

Conversion is the step of changing the value of each pixel of the input image using a given mathematical expression. The default is NDVI or Normalized Difference Vegetation Index. The above diagram shows how one channel of the input image is used for infrared light, instead of its original color. NDVI represents the (normalized) difference between infrared and visible (red, green, or blue) light.
Learn more about NDVI and the broader project and techniques at:
- https://publiclab.org/infragram
- https://publiclab.org/multispectral-imaging
- https://publiclab.org/wiki/ndvi
This step is labeled "2. Analysis" in the UI (although we could change that to Convert).

The mathematical expression which is run on each pixel follows a syntax we've called "infragrammar" (corny pun, sorry!). Basically, for each pixel of the input image, you get values of R, G, and B for the three color channels red, green, and blue. The expression (using any basic JavaScript math operations) uses these to calculate an "output" value for the pixel. The output in "Grey" or monochrome mode is just one value. That means the output of this step would be a monochrome image:

If you change to HSV mode, you can set a different expression for Hue, Saturation, and Value of the resulting pixel, and get a color image, but it's usually easier to just do that in the Colorize step (see below). Finally, in RGB mode, you can set a different expression for each channel of the resulting pixel, R, G, or B. This is useful for swapping channels, like displaying R as B.
Read more about Infragrammar and modes here:
- https://publiclab.org/infragrammar
- https://publiclab.org/notes/warren/08-24-2013/infragrammar-with-hsv-color-model
Conversion with Infragrammar is handled by the Processor, described below.
Two separate systems are available for converting and colorizing: javascript and webgl, both using the HTML Canvas API. The javascript processor is simpler to read, write, and debug but is slower. The webgl processor is MUCH faster but very hard to code/modify/change.
The selected processor handles the Conversion and Colorizing steps.
There are two types of input images, because there are two types of multispectral cameras people are making: red filtered (more common now) and blue filtered (older) cameras. You can read about the difference here:
https://publiclab.org/wiki/infragram#Conversion+types
As a result, we have a pop-up modal that guides users through the 2 most common workflows:
- NDVI conversion for red filters + colorizing
- NDVI conversion for blue filters + colorizing
Once these are selected, the pop-up disappears and the image is shown with these settings. The presets will change step 2 (Conversion/Analysis) and step 3 (Colorize) accordingly, although this might not be very obvious to new users.
The processors also handle colorizing, which is also confusing because the webgl colorizer has to work very differently than the javascript version.
Colorizing is just converting a black and white (monochrome) image to a color one, where a given spectrum or "color map" is used to convert each pixel's brightness value to a color. The most familiar would be where "hot" colors like red represent higher values, and "cold" colors like blue represent lower values. The range of colors is shown in a key at the bottom of the image.

The way NDVI works also means that it's useful to visually see what pixels are greater or less than 0, so some color maps are not smooth - they have a sharp color transition at 0, so you can visually see parts of the photo that are >0.
Colorizing code for both processors can be found at https://github.com/publiclab/infragram/tree/main/src/color. While javascript code for colormaps has been cleaned and consolidated there, webgl code is contained in the fragment shader file at https://github.com/publiclab/infragram/blob/f15add6ae6057bd99b4b1b930449f75ca974270e/dist/shader.frag and has not been reconciled with the long list of colormaps available in JavaScript.
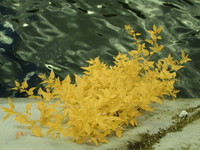
The output of the above is dependent on the quality of the input. When using an "Infragram" multispectral camera, careful white balancing is essential for good NDVI images. The following are two examples of well-white-balanced images.
 |
 |
|---|---|
| A red-filtered image by @mathew - try processing this image on Infragram. | A blue-filtered image by @warren - try processing this image on Infragram. |
Read more about white-balancing at https://publiclab.org/wiki/infrablue-white-balance.
Once the image is converted and (optionally) colorized, it can be downloaded. But there are two other options:
The image is encoded as a data-url and a new tab is opened with the Public Lab Editor at https://publiclab.org/post, with the image "sent" to become the main image. This is convoluted but easier than sending the image separately; see the code for this here. Images then appear with the tag infragram-upload on this page: https://publiclab.org/tag/infragram-upload
Similarly, we can "send" the image to https://sequencer.publiclab.org, as a data-url although it may fail for very large images since we must send it in a GET request. It is then run through a similar (but not identical, unfortunately) set of steps of conversion and colorizing, in the step-by-step interface of Image Sequencer, for fine-tuning. Learn more about this technique here: https://publiclab.org/notes/warren/08-02-2018/use-image-sequencer-for-ndvi-plant-analysis-with-a-modified-mini-sport-camera
The interface (UI design) for Infragram is built using Bootstrap 3 and makes use of jQuery event handling. Most of the code can be found in https://github.com/publiclab/infragram/tree/main/src/ui although some listeners are still mixed into the rest of the code (we hope to improve this)
Previous versions of Infragram had different workflows, technologies, and architectures. Some code remains which is no longer used.
See the deprecation label for more on this code:
deprecation
Two extra folders /pi/ and /vr/ are for different variants of the project, designed to be run on a Raspberry Pi-based camera (live-streaming video through the converter from the Pi camera) and for use with a VR headset with a Pi camera attached to the front. These are experimental but if major breaking changes are implemented in the main index.html file, we would like them to be ported over to these files as well, especially the /pi/ version, so the interfaces look and work the same.
We welcome contributions and are especially interested in welcoming first-time contributors. Read more about how to contribute below! We especially welcome contributions from people belonging to groups under-represented in free and open-source software!
Please read and abide by our Code of Conduct; our community aspires to be a respectful place both during online and in-personinteractions.
Help improve Public Lab software!
- Join the chatroom at https://publiclab.org/chat
- Look for open issues at https://github.com/publiclab/infragram/labels/help-wanted
- We're specifically asking for help with issues labeled with the help wanted tag
- Find lots of info on contributing at http://publiclab.org/developers
- Review specific contributor guidelines at http://publiclab.org/contributing-to-public-lab-software
- Find the steps on how to make a Pull Request at #300
New to open source/free software? Here is a selection of issues we've made especially for first-timers. We're here to help, so just ask if one looks interesting : https://code.publiclab.org
Here is a link to our Git workflow.
Let the code be with you, happy open-sourcing 😄