![]()
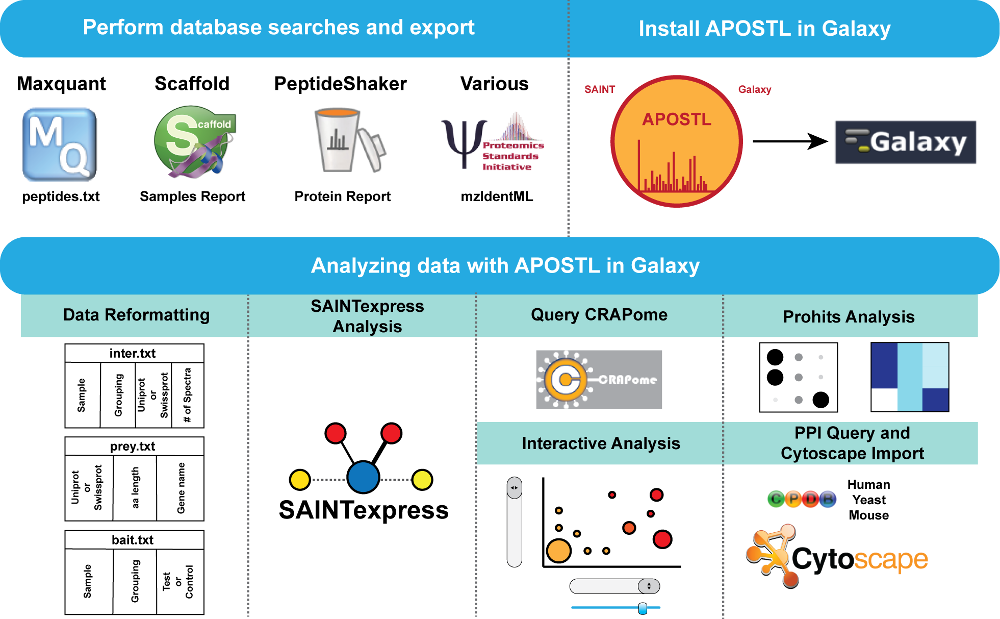
APOSTL is a Galaxy-based analysis pipeline for reproducible analysis of affinity proteomics (AP) data. APOSTL utilizes Significance Analysis of INTeractome (SAINT), a popular command-line software for analyzing AP data. APOSTL can process AP results from MaxQuant, Scaffold, PeptideShaker, or any software that can export mzIdentML. APOSTL can create a number of publication-quality visualizations including interactive bubble plots, protein-protein interaction networks through Cytoscape.js integration, and pathway enrichment/gene ontology plots. All visualizations are accomplished through Shiny, an interactive and open-source visualization package for the R programming language. APOSTL is open-source software released under GPLv3, and it is freely available through the Galaxy ToolShed, GitHub, and Docker.
APOSTL has been published! The paper is available via this link to the Journal of Proteome Research. Please cite our paper if you have found APOSTL helpful in your work.
We published a book chapter on APOSTL! This tutorial chapter utilizes a combined workflow from the GalaxyP and APOSTL Galaxy servers. The chapter can be found via this link.
Please contact the authors (see below) if you would like to request a PDF copy of the APOSTL paper or chapter.
The easiest way to install APOSTL is through the Galaxy ToolShed. Instructions for this process can be found at https://wiki.galaxyproject.org/Admin/Tools/AddToolFromToolShedTutorial, and the latest tools can be found at https://toolshed.g2.bx.psu.edu/view/bornea/apostl_tools/8df5e7e70999.
APOSTL requires an installed R environment to run properly. APOSTL scripts will attempt to install required R packages when they are first run. APOSTL also requires Bioconductor packages to be installed, and these packages may require additional Linux libraries for installation. For example, in CentOS 7 needs openssl, libcurl and xml2lib (devel versions) to be installed before bioconductor packages can be installed. Make sure that the terminal command Rscript for running R scripts from the command line is in your $PATH variable.
Please refer to documentation for how to install the Shiny R package and Shiny Server on different distributions of Linux. Additional packages libcurl-devel, libxml2-devel, openssl-devel, gsl-devel.x86_64 and libpng-devel may need to be installed (on CentOS, these packages can be installed via the yum package manager).
Once installed, please change the permissions of the /srv/shiny-server directory. Copy the contents of the shiny_bubble folder from the APOSTL GitHub repository into /srv/shiny-server:
chmod -R 777 /srv/shiny-server
cp -r ~/APOSTL/shiny_bubble /srv/shiny-server
APOSTL uses a Python wrapper to run the Shiny analysis. The Python wrapper APOSTL_Interactive_Analysis.py and tool definition XML APOSTL_Interactive_Analysis.xml need to be moved into Galaxy tools directory. An entry needs to made in the galaxy/config/tool_conf.xml file so that Galaxy is aware of the tool. It may also be necessary to change the run_as variable in the /etc/shiny-server/shiny-server.conf file to the user account that runs Galaxy.
Note: For help with adding Galaxy tools, see the Galaxy Add Tool Tutorial.
The Shiny Server will listen on port 3838 by default. Please navigate to the bottom of APOSTL_Interactive_Analysis.py and make sure the line beginning with x.write contains an http:// address that reflects your network configuration. This provides an HTML link within Galaxy for a user to click on which then brings them to the Shiny interface with their analysis imported from Galaxy.
The APOSTL Docker Image is a running version of Galaxy, Shiny, and all of the APOSTL tools built within CentOS 7. The docker image can be downloaded from https://hub.docker.com/r/bornea/apostl_shiny/.
Within Docker, get the image started using:
docker run -p 8080:8080 -p 3838:3838 -ti bornea/apostl_shiny /bin/bashThe image will be running in interactive mode. This will allow you to change information in /galaxy-apostl-docker/config/galaxy.ini.sample to reflect
your server's network configuration. Start the Galaxy server while in the interactive mode and verify that everything runs properly:
cd /galaxy-apostl-docker
sh run.sh
Once the startup has successfully completed and Galaxy reports that it is listening for incoming HTTP connections, stop Galaxy with a keyboard interrupt (Ctrl+C). Start Galaxy in daemon (background) mode and start the Shiny server as well:
sh run.sh --daemon
sh ./shiny_galaxy_run.sh
APOSTL should now be accessible from a web browser at http://127.0.0.1:8080. If using a non-linux OS then the IP is determined by your Docker configuration.
This walkthrough will guide you through using APOSTL with sample data and pre-made workflows available in a Galaxy test instance accessible at http://apostl.moffitt.org.
Creating a user account allows you to access all the tools and features of APOSTL. User accounts are free, are generated immediately, and can be used immediately. Please select the Register button under the User tab on the menu.

Fill out the form with your e-mail, a strong password, and a diplay name (mainly for sharing data/workflows with other users; data is not shared automatically).
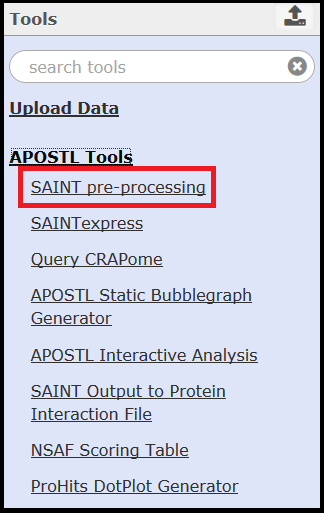
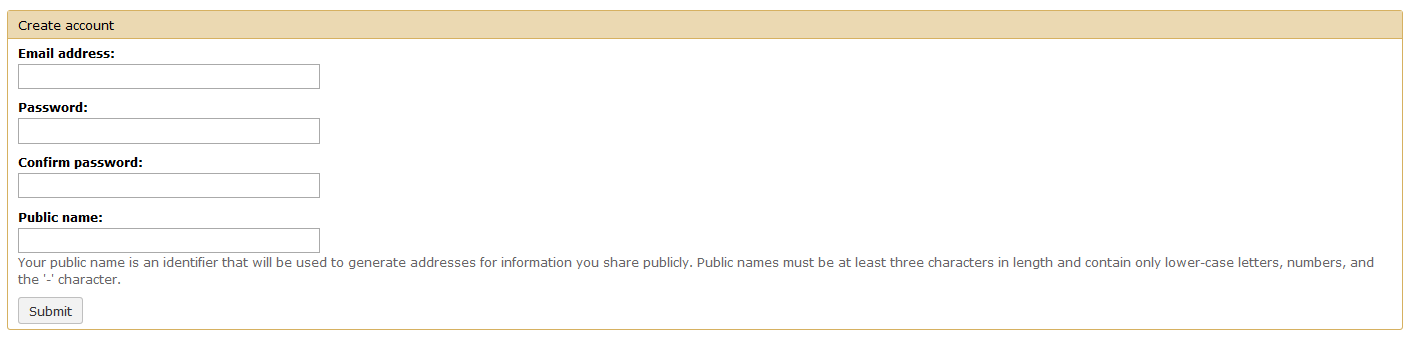 Once you click Submit you will be redirected to the Home page. Although this walkthrough focuses on using pre-defined workflows, all of the tools that make up APOSTL can be accessed on the left hand side of the screen under the APOSTL Tools menu.

Instructions for some of the tools are provided on their respective tool pages within Galaxy. For help with tools maintained by other groups, please see the SAINT user manual, the ProHits user manual, and the CRAPome guide.
APOSTL is able to recognize the Scaffold Samples Report export file, the peptides.txt file in the Maxquant /txt output folder, the PeptideShaker Protein Report export file, or the output from other tools in mzIdentML format. Scaffold, MaxQuant, and PeptideShaker output files must be saved as tab delimited text, and no other modifications should be made to these files.
Note: See the SAINT user manual for more information about file formatting requirements.
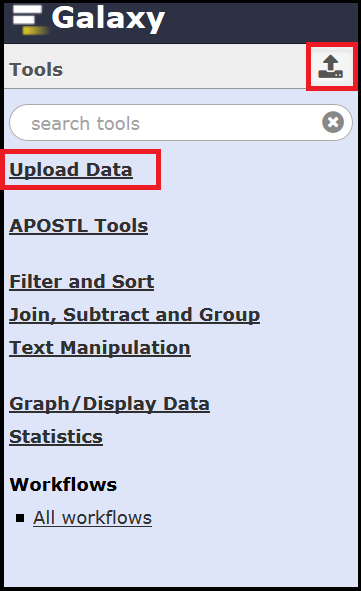
Both options will bring up the upload interface where you can drag and drop a file or select Choose a local file. When uploading it is best to leave the Type as auto-detect and the Genome as unspecified.
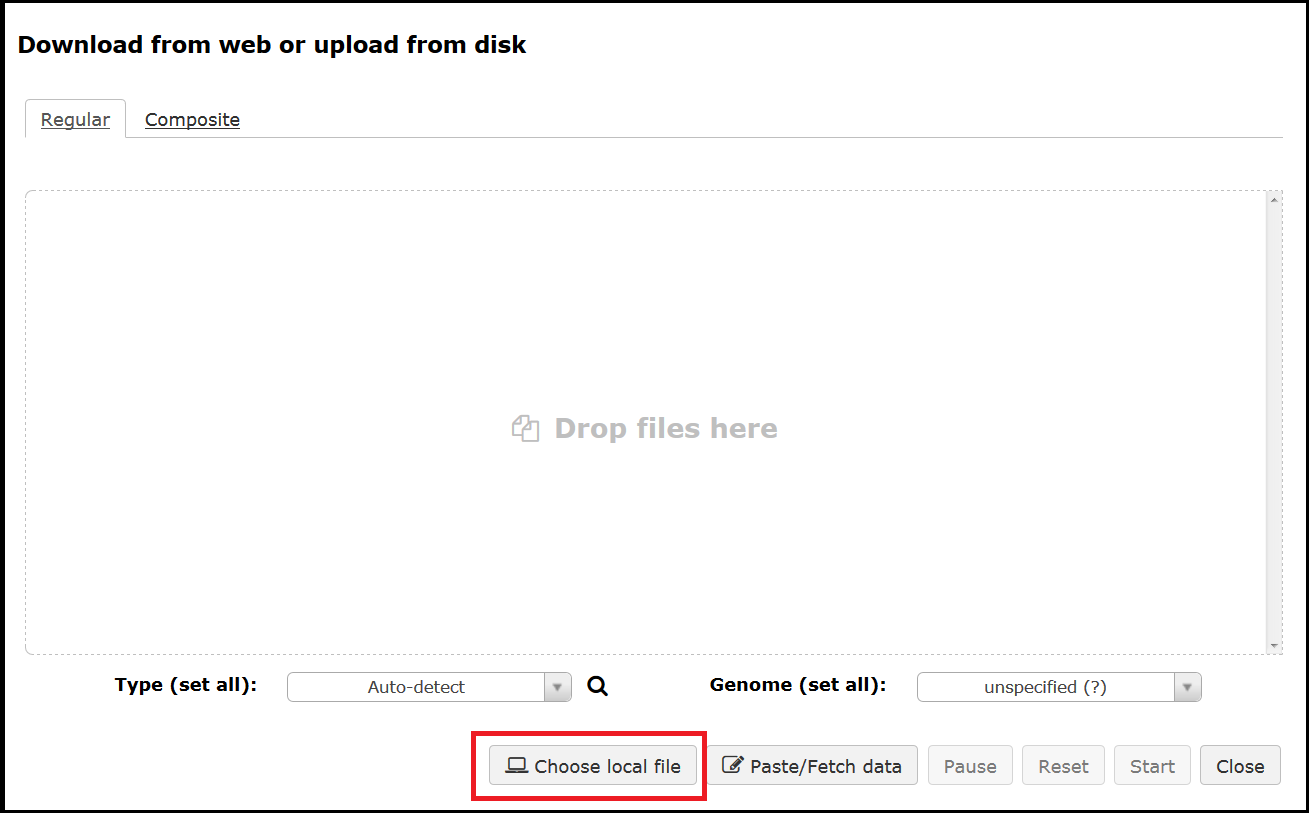 Once your files have been selected use the Start button to initiate the upload.
A bait file can be uploaded by the user. Proper formatting of this file is essential (see SAINT user manual for more information). If a bait file is not provided, then it can be created with the SAINT pre-processing tool's Bait Create function.
To access the Bait Create function, simply select No for Are You Providing Your Own bait file. Select Insert Bait Create to add additional baits:
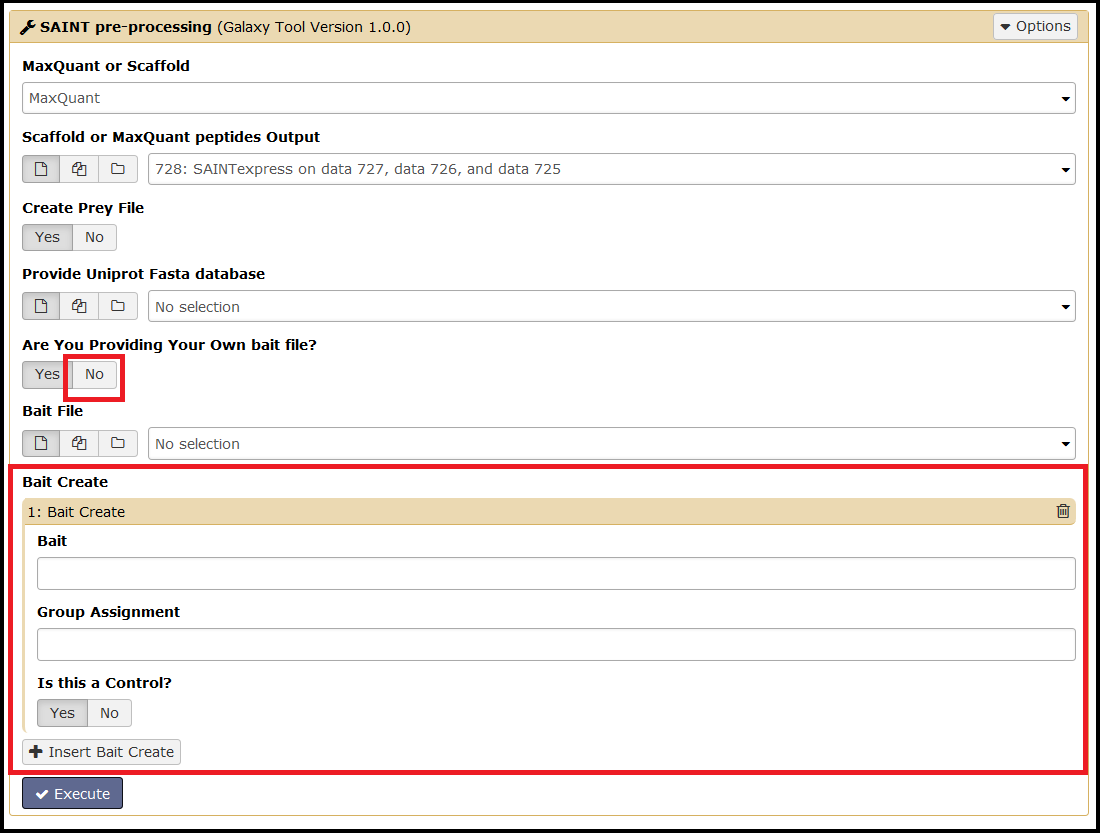
This tool will check your bait(s) against your input file prior to executing SAINT and ensures proper formatting of the bait file.
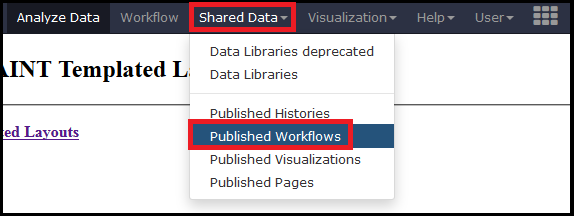
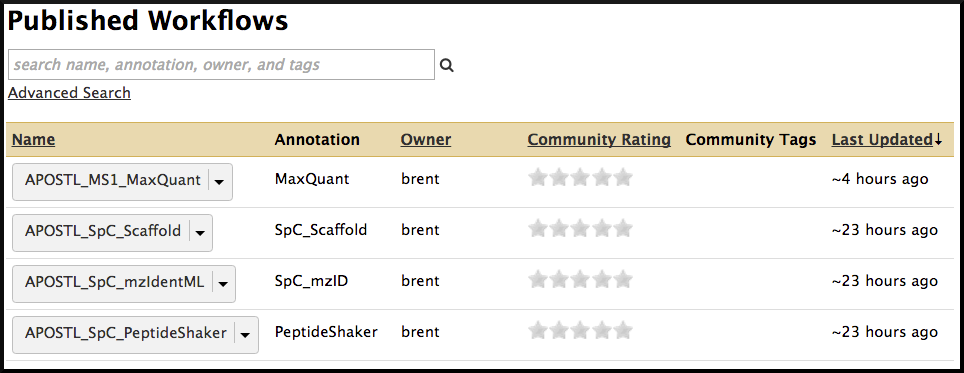
The Galaxy portion of APOSTL is a number of individual tools strung together using workflows. We provide several pre-made workflows so users can quickly process their own data. These workflows can be accessed from the http://apostl.moffitt.org Galaxy instance by selecting the Shared Data dropdown menu at the top of the screen followed by Published Workflows:
Next, select a pre-made workflow based on the type of data you are using (MaxQuant , Scaffold, mzIdentML, or PeptideShaker):
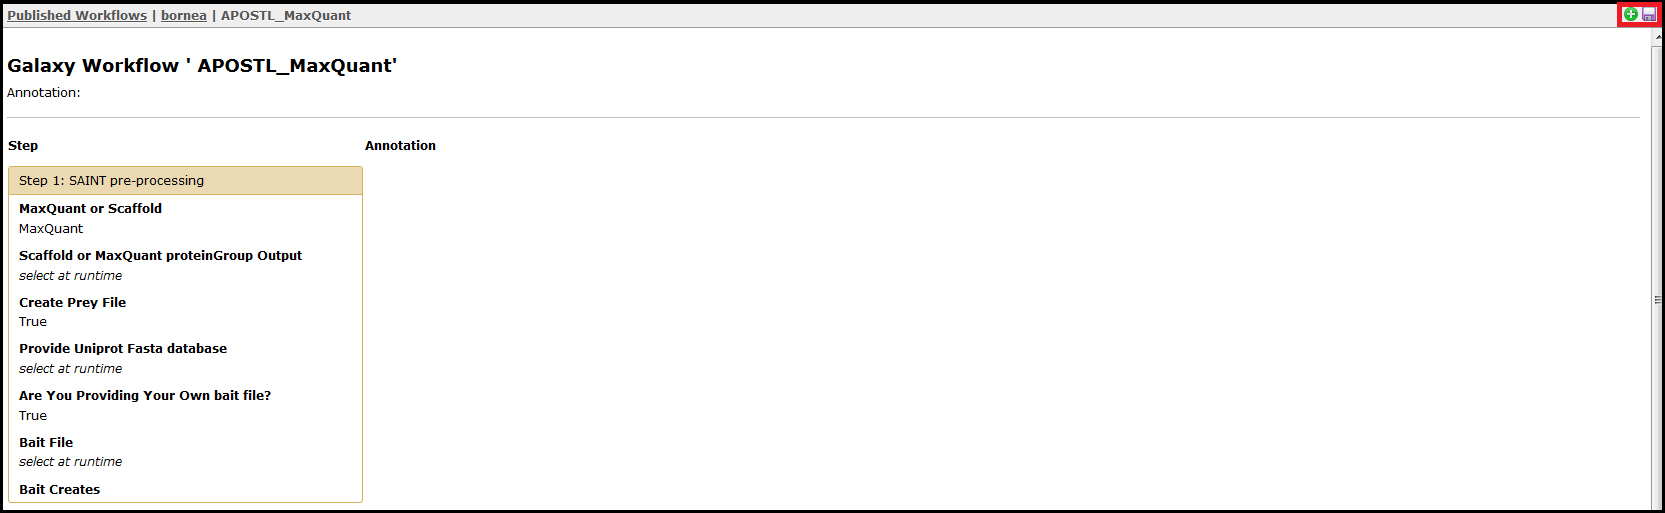
Alternatively, you can click on the workflow name directly to view each step and the presets involved. From this page, the workflow can be imported using the + icon or downloaded using the floppy disk icon found in the top right corner of the screen.
If the user is not using http://apostl.moffitt.org or the APOSTL Docker image, then the workflows will first need to be imported into the Galaxy instance. The workflows can be downloaded from the APOSTL GitHub repository under Workflows. Once dowloaded, these workflows can be imported into any Galaxy instance that has APOSTL installed, and this can be accomplished by selecting Workflow and Upload or import workflow.

Once imported, the workflows can be accessed from the Workflow menu tab at the top of the screen.

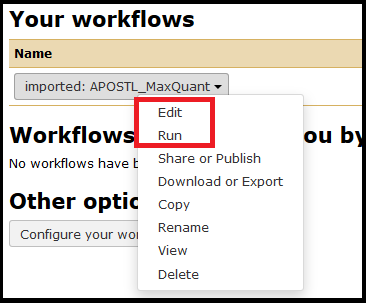
The workflow can be edited first or run as-is. Select the workflow you just imported and click Run.
Select your previously uploaded data (see 2) Upload Data) using the dropdown menus. You will also need to provide a bait file unless you just generated one (see 2) Upload Data). Other options can be chosen at this time but are not required (e.g., a custom FASTA database for identification of proteins). Unless otherwise specified, APOSTL will use a reference Uniprot database downloaded on 08/2014.
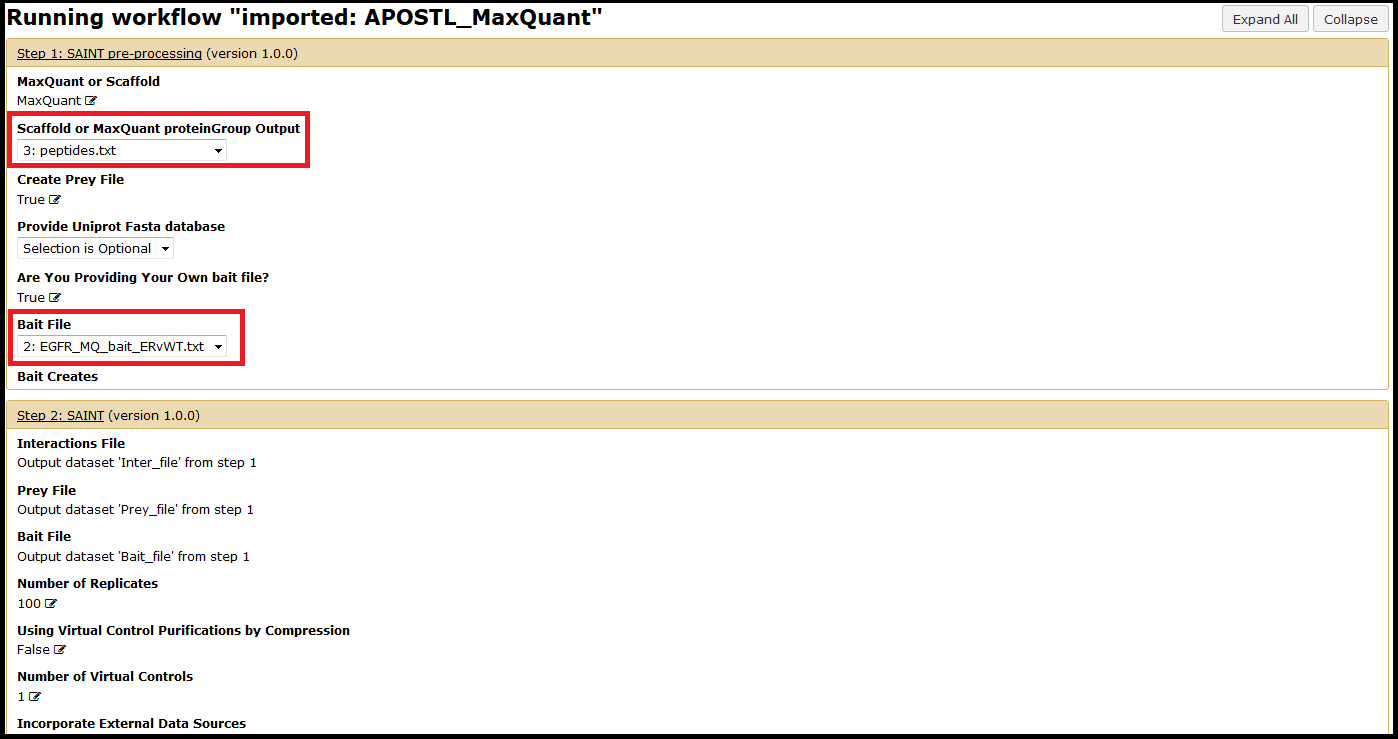
Once you have selected the necessary files and options, click the Run Workflow button at the bottom of the page:

The jobs will begin running and show up in your History on the right side of the screen. Jobs that successfully complete will be colored in green. Jobs that do not successfully complete will be colored red and the execution of the workflow will be halted. If everything completes successfully, select the APOSTL Interactive Analysis from your History, click the eye (View Data) icon, and click the link to be taken to the Shiny portion of APOSTL:

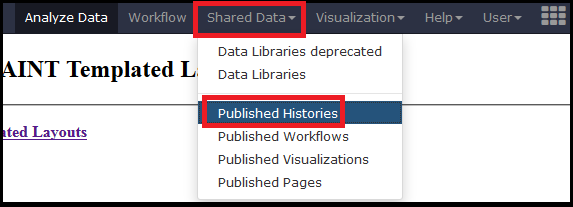
We provide several processed datasets on http://apostl.moffitt/org to highlight the capabilities and outputs of APOSTL without requiring users to become familiar with the tools. To access the shared histories, select Shared Histories under the Shared Data tab on the top menu.
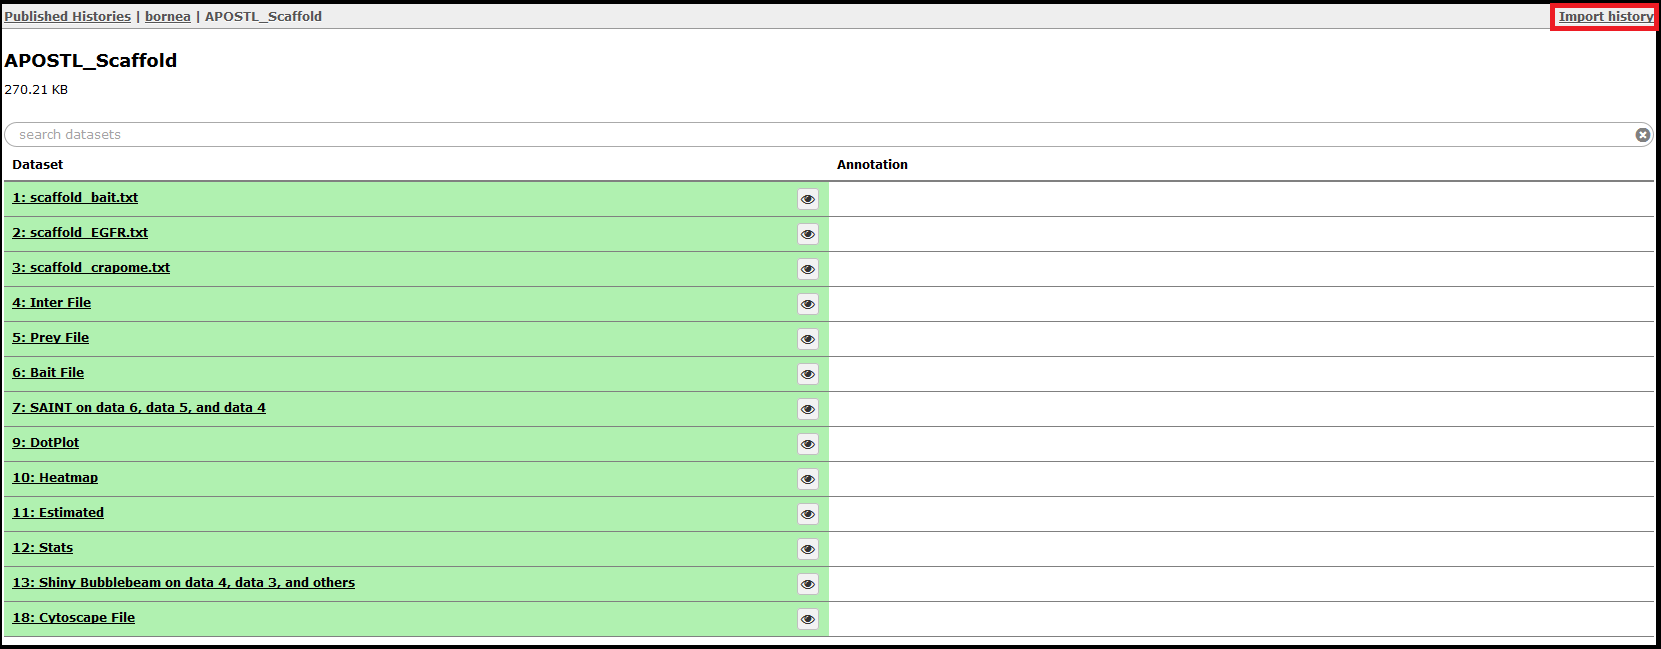
Select a History by clicking on it. The shared History will show you all the steps completed, and the History can be imported with the Import History in the top right corner.
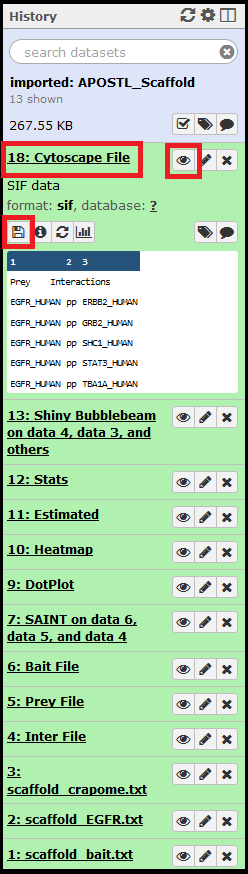
Once imported, the History will be shown in the History right side column. When clicked on, the job details will expand. The eye (View Data) icon will open the dataset for viewing in the web browser, and the floppy disk icon can be used to download the dataset.
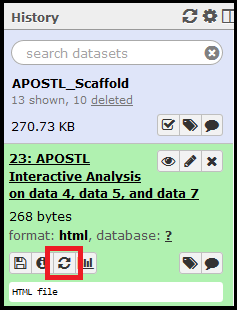
Shiny tools can be accessed by clicking/expanding the output from the completed APOSTL Interactive Analysis job, clicking the eye (View Data) icon, and clicking on the APOSTL Interactive Analysis link in the main window.
Any job can be re-run with the same settings using the circular arrows button.
APOSTL has been tested on a number of datasets and species. The most common errors in Galaxy typically stem from bad input files (e.g., spaces instead of tabs in a file that should be tab delimited). For troubleshooting a workflow with your own data, follow the jobs in sequential order and look at the first job that gives an error message. There is often output or error messages that can be helpful for deducing what went wrong.
If you are an Galaxy administrator having problems with R (e.g., messages such as Error in library(...) : there is no package called '...'), then packages are likely not being automatically installed as intended. One solution is to manually install the required R packages. Open an R session (make sure it's the same R used by Galaxy), and use the following commands to install the required packages:
install.packages(c("dplyr", "tidyr", "httr", "jsonlite", "colorRamps", "gplots", "ggrepel", "ggplot2", "data.table", "stringr", "VennDiagram", "devtools", "visNetwork", "shiny", "shinyjs"), repos = "http://cran.us.r-project.org")
library("devtools")
devtools::install_github("cytoscape/r-cytoscape.js")
source("https://bioconductor.org/biocLite.R")
biocLite(c("mygene", "affy", "clusterProfiler", "org.Hs.eg.db", "mzID"))
APOSTL has been tested with MaxQuant version 1.2.2.5 as well as Scaffold version 4.3.4. Our test server runs APOSTL using CentOS 7, R 3.2.3, and Python 2.7.5. If you are using properly formatted input files from a software known to work with APOSTL, then please create an issue in Github. Alternatively, we are happy to hear from you directly if you are experiencing difficulties with running or configuring APOSTL. Please send questions or other correspondence to the authors Brent Kuenzi, Adam Borne, or Paul Stewart.
-
Teo G, Liu G, Zhang J, Nesvizhskii AI, Gingras A-C, Choi H. SAINTexpress: improvements and additional features in Significance Analysis of INTeractome software. J Proteomics. 2014 Apr 4
-
Zybailov B, Mosley AL, Sardiu ME, Coleman MK, Florens L, Washburn MP. Statistical Analysis of Membrane Proteome Expression Changes in Saccharomyces cerevisiae. J Proteome Res. 2006 Apr 10
-
Knight JD, Liu G, Zhang JP, Pasculescu A, Choi H, Gingras AC. A web-tool for visualizing quantitative protein-protein interaction data. Proteomics. 2015 Jan 19
-
Vaudel M, Burkhart JM, Zahedi RP, Oveland E, Berven FS,Sickmann A, Martens L, Barsnes H. PeptideShaker enables reanalysis of MS-derived proteomics data sets. Nature Biotechnology. 2015
- Kuenzi, B.M., Borne, A.L., Li, J., Haura, E.B., Eschrich, S.A., Koomen, J.M., Rix, U., and Stewart, P.A. APOSTL: An Interactive Galaxy Pipeline for Reproducible Analysis of Affinity Proteomics Data. J. Proteome Res., 2016, 15 (12), pp 4747–4754 DOI:https://doi.org/10.1021/acs.jproteome.6b00660