Troubleshooting issues with samples
If you run into issues using a sample, you should know that every sample is tested and reviewed before it is approved; while it may not work in your environment, or due to changes in some of the sample's dependencies, the sample worked when it was posted.
This article should help you resolve the majority of issues, starting with the most likely cause to the most obscure.
Once you have performed the steps in this article, you can proceed with creating an issue -- but make sure to read how to create good issues first, because the people who support these samples are all volunteers, and we certainly want to be respectful of their time, don't we?
Items marked with a 🔗 can be found on this page.

Please note that warnings will rarely prevent the solution from working; We only worry about errors.
Items marked with a 🔗 can be found on this page.

Make sure that you are running npm install in the root folder where the web part code is located. There should be an existing package.json file. Do not create a package.json, because the solution must already have one -- otherwise it would not have been accepted as a sample.
If you're already currently in the root of the sample solution, take a look to see if the sample contains sub-components; are there any folders named webparts (or something similar)? If so, try looking for the README.md for instructions on how to build the sample.
Every version of SPFx can be compatible with a different version of Node.js. If you run into an issue with npm install, gulp serve, gulp build, or any other gulp commands, it is most likely because the environment you are using to run the sample is not compatible with the sample itself.
You can see a full list of SPFx versions and the supported environment in the SPFx Compatibility Matrix.
Every sample's README.md file contains a Compatibility section, indicating the version of SPFx and the Node.js version compatibility for that sample.
Look for visual tags such as these:
The SPFx version indicates which version of the SPFx Yeoman generator was used to build the sample. It does not need to match the version of the generator currently installed on your workstation -- unless you are trying to add new SPFx components to the sample (something that you should only consider after you get the solution to build successfully).
The Node.js version shows the possible major versions that are expected to be compatible with the version of SPFx used. Your current version of Node.js must match one of the versions listed in the README.md's compatibility section.
You can determine the version of Node.js on your workstation by running the following command from your workstation's command prompt, Node.js command prompt, or PowerShell:
node -v
The version returned should match the following pattern:
v##.##.##
Where the first 2 digits (immediately after the v) should match one of the versions listed in the README.md's compatibility section.
Note: if running
node -vcauses an error, your workstation is most likely not configured as an SPFx development workstation. Please refer to the workstation configuration steps before continuing any further.
The easiest way to make sure that your workstation is correctly configured to use the sample is to use the CLI for Microsoft 365 spfx doctor from within the sample solution's root folder.
Tip: To easily run the commands in the root folder of the sample solution, try opening the folder with Visual Studio Code, and hit CTRL+` (or CTRL+Shift+` to open a brand new terminal)
To do so, follow these steps:
-
If you do not have the CLI for Microsoft 365 installed, install it now; it is a command-line utility that is not required to build SPFx solutions, but is extremely useful. Using your command prompt, enter the following command:
npm i -g @pnp/cli-microsoft365
If you already have the CLI for Microsoft 365 installed, make sure that you have the latest version installed by running the following command using your command prompt:
m365 version
If you need to update, you should see a message providing you the instructions to do so:
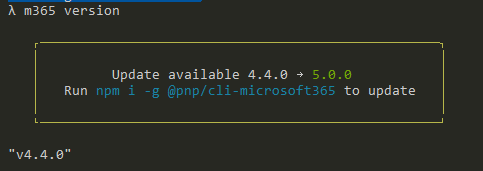
The steps to upgrade the CLI are the same as the steps to install:
npm i -g @pnp/cli-microsoft365
-
With the CLI installed, change your command prompt's current directory to the root of the sample's solution. Although it is often the same folder containing the
README.md, some more complex samples may have multiple solutions in multiple sub-folders. The root will contain apackage.json.You can confirm that you are within the solution's root folder by using your command prompt to enter the following command:
ls package.json
If it returns a single
package.json, you are in the right folder. If you getls: cannot access 'package.json': No such file or directory, make sure to change the current folder (usingcd, followed by the full path of where your sample is stored). -
Using your command prompt, enter the following command:
m365 spfx doctor -o text
The command will analyze your environment against the solution. You should see results that begin with the following text:
CLI for Microsoft 365 SharePoint Framework doctor Verifying configuration of your system for working with the SharePoint Framework -
If your environment is configured correctly, you will get a series of checkmarks (
√), for example:√ SharePoint Framework v1.13.1 √ Node v12.20.2 √ yo v4.3.0 √ gulp v4.0.2However, if there are any issues with environment compatibility, you will get one or more
×, for example:× react v10.8.5 found, v16.9.51 required -
If you received one or more checkmarks, follow the Recommended fixes: generated by
spfx doctor. For example:Recommended fixes: - npm i react@16.9.51 -
Follow each recommended fixes and repeat the
spfx doctorcommand until you can confirm that your environment is compatible with the sample. -
If you still cannot resolve the issue, run
spfx doctorto generate ajsonoutput, and submit a new issue, making sure to copy the output of to the SPFx doctor section. You can do so by using the command prompt to enter the following command:m365 spfx doctor -o json
Copy the output and open a new bug report
If you are unable to update your environment to run the solution, consider the following alternatives:
- Upgrade the sample: You may be tempted to upgrade the sample to the latest version of SPFx, but doing so may take some time and you may find out that the sample no longer works, or does not meet your needs. Furthermore, you may introduce new bugs that were previously not found in the original version. You should only invest the time to upgrade a sample if you can confirm that the sample works in within a compatible environment, and if you need to add new capabilities that are not supported in previous versions of SPFx, or to fix a vulnerability which can only be fixed with newer versions of SPFx, Node.js, or solution dependencies.
To be added later
To be added later