
Version 0.3.1 (History)
- Supported boards
- DIGI ConnectCore 8X Development Kit
- Supported cameras
- VC MIPI IMX327 / VC MIPI IMX327C
- Linux kernel
- Version 5.4.84
- Features
- Image Streaming in Y10 and SRGGB10 format (4 bit left shifted).
- Exposure and Gain can be set via V4L2 library.
- vcmipidemo supports software implementation to correct the 4 bit left shift.
- Bugfixes
- VCImgNetClient: Images saved to file without color modification.
- Known Issues
- Handling for arbitrary image width and height not ready.
- A headless (no display connected) hardware setup is assumed.
- You need a Windows 10 PC to run the vcmipidemo frontend.
- Recommended OS is Ubuntu 18.04 LTS or Ubuntu 20.04 LTS.
- You need git to clone this repository.
- All other packages are installed by the scripts contained in this repository.
When we use the $ sign it is meant that the command is executed on the host PC. A # sign indicates that you have to execute the command on the target machine.
-
Follow the instruction from DIGI to setup your board. (DIGI original doc: Step 2 - Set up the hardware)
-
Create a directory and clone the repository
$ cd <working_dir> $ git clone -b master https://github.com/pmliquify/vc_mipi_digi -
Setup the toolchain and the kernel sources.
$ cd vc_mipi_digi/bin $ ./setup.sh host -
Build the kernel image, kernel modules and device tree files.
$ ./build.sh -
Install a fresh BSP Image to the target
- Connect a USB type-C cable between target and host.
- Reboot device in U-Boot console and selecting the USB interface you want it to listen to by entering
=> fastboot 1 - We provide a script to easily flash an image. It will download the tools from DIGI and start the recovery process.
$ ./recover.sh
(DIGI original doc: Recover your device - Update bootloader from USB using Fastboot)
-
After boot up install the VC MIPI driver with the kernel image, modules and dtb files we have build in step 4.
$ ./flash.sh all
The system should start properly. (There are some error messages that can be ignored for this pre version)
-
Install the vcmipidemo frontend on Windows 10.
- Copy all files from <working_dir>/src/vcmipidemo/win to a usb stick.
- Install python-2.7.11.msi
- Install pygtk-all-in-one-2.24.2.win32-py2.7.msi
- Do not start the python script yet!
-
Build and install the vcmipidemo backend on the target.
$ ./build.sh test $ ./setup.sh test -
Login to the target and check if the driver was loaded properly. You should see something similar to the output in the second box.
  $ ssh root@ccimx8x-sbc-pro
  # dmesg | grep '16-00'
[ 3.455851] i2c 16-0010: VC MIPI Module - Hardware Descriptor [ 3.461631] i2c 16-0010: [ MAGIC ] [ mipi-module ] [ 3.466540] i2c 16-0010: [ MANUF. ] [ Vision Components ] [ MID=0x0427 ] [ 3.473265] i2c 16-0010: [ SENSOR ] [ SONY IMX327C ] [ 3.478253] i2c 16-0010: [ MODULE ] [ ID=0x0327 ] [ REV=0x0002 ] [ 3.484282] i2c 16-0010: [ MODES ] [ NR=0x0002 ] [ BPM=0x0010 ] [ 3.490309] i2c 16-0010: VC MIPI Sensor succesfully initialized. [ 3.862068] mx8-img-md: Registered sensor subdevice: vc-mipi-cam 16-001a (1) [ 3.903763] mx8-img-md: created link [vc-mipi-cam 16-001a] => [mxc-mipi-csi2.0] -
Start the vcmipidemo to stream the image to the frontend.
Please do all in the described order!-
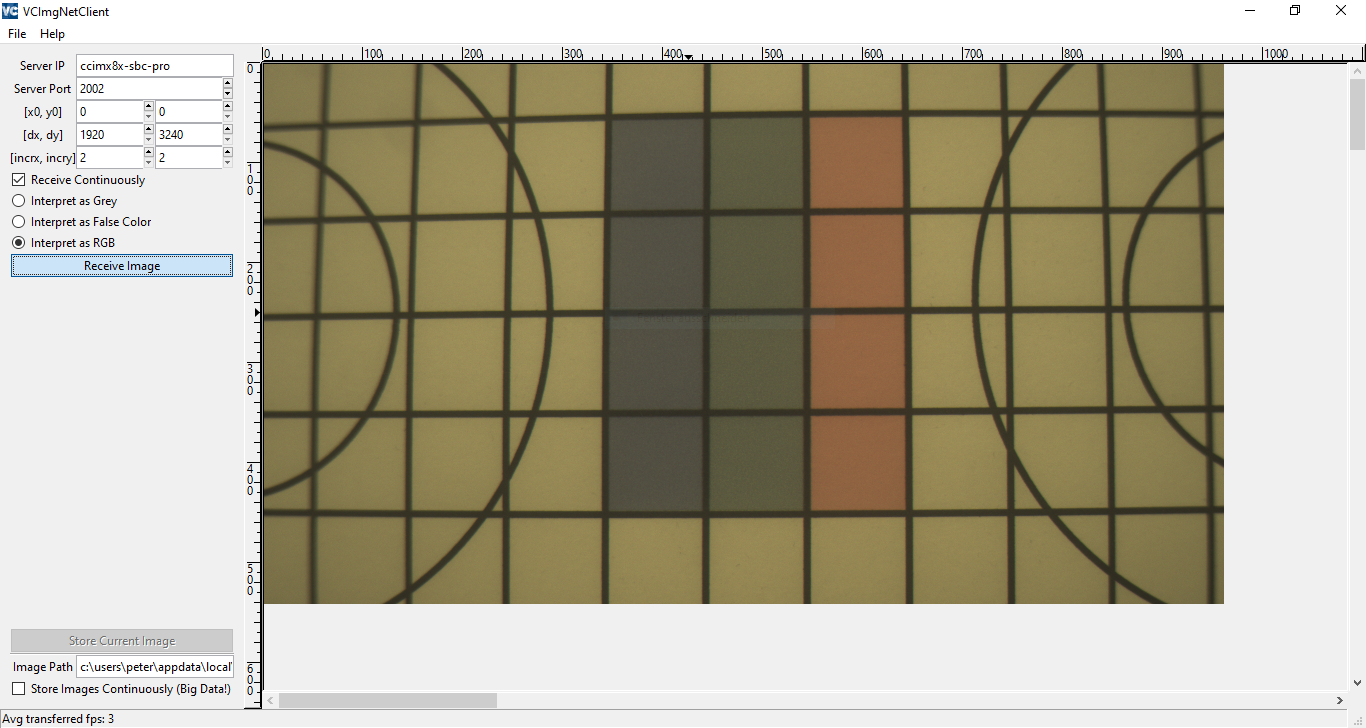
Open a new terminal, login and start the vcimgnetsrv. The server starts to listen for the connection from the VCImgNetClient.
$ ssh root@ccimx8x-sbc-pro # ./test/vcimgnetsrv Start VC Image Net Server ... Listen on port 2002 -
Execute the python script vcimgnetclient.py.
- The window from the VCImgNetClient should show up.
- Choose option Interpete as RGB
- Click the Receive Image Button.
- In the first terminal you should see that the client had connected to the server.
# ./test/vcimgnetsrv Start VC Image Net Server ... Listen on port 2002 Client connected! - The plain gray mainframe in the VCImgNetClient window should change to a diagonal hatched pattern. A moving bar shows that the app is waiting to receive image data.
-
Open a second terminal, login and start the vcmipidemo to start the image stream. The application starts streaming and should show some image information and the first few bytes from the image. Please note the option -ax4 to suppress ASCII output and the option to output image informations and apply the 4 bit shift correction
  $ ssh root@ccimx8x-sbc-pro

  # ./test/vcmipidemo -ax -s 10000 -g 10                  v    v    v    v    v    v    v    v    v    v
  img.org (fmt: RG10, dx: 1920, dy: 1080, pitch: 3840) - 9024 5022 f025 0022 7024 a022 0025 4022 2025 b022
  img.org (fmt: RG10, dx: 1920, dy: 1080, pitch: 3840) - 4025 7021 b024 7022 1025 1022 9025 8022 2025 7022
  img.org (fmt: RG10, dx: 1920, dy: 1080, pitch: 3840) - 0025 f021 8024 d022 2025 5022 e024 7022 6025 1022
  img.org (fmt: RG10, dx: 1920, dy: 1080, pitch: 3840) - e024 7022 6025 4022 4024 4022 f024 c022 d024 e021
  ...
                                                         (shifted 4 bits right)
  # ./test/vcmipidemo -ax4 -s 10000 -g 10                  v    v    v    v    v    v    v    v    v    v
  img.org (fmt: RG10, dx: 1920, dy: 1080, pitch: 3840) - 4f02 1502 4902 2502 4302 1002 4802 1902 5002 2302
  img.org (fmt: RG10, dx: 1920, dy: 1080, pitch: 3840) - 4f02 1a02 4602 2302 4502 2402 4202 1f02 4502 2402
  img.org (fmt: RG10, dx: 1920, dy: 1080, pitch: 3840) - 4f02 1e02 4402 1502 4902 1a02 4102 1b02 5702 1c02
  img.org (fmt: RG10, dx: 1920, dy: 1080, pitch: 3840) - 4f02 1b02 4102 2302 4a02 1202 4202 1e02 4b02 2302
  ...
On Windows you should see the live image stream.
-