Welcome to the PiE Runtime repo! This README will only cover how to install, build, and run Runtime. If you want to learn more info about how Runtime works, or are a new member, please check out our wiki https://github.com/pioneers/runtime/wiki.
This is a diagram of the entirety of Runtime. To download and view in detail, see runtime-docs/Runtime-Diagram.png:
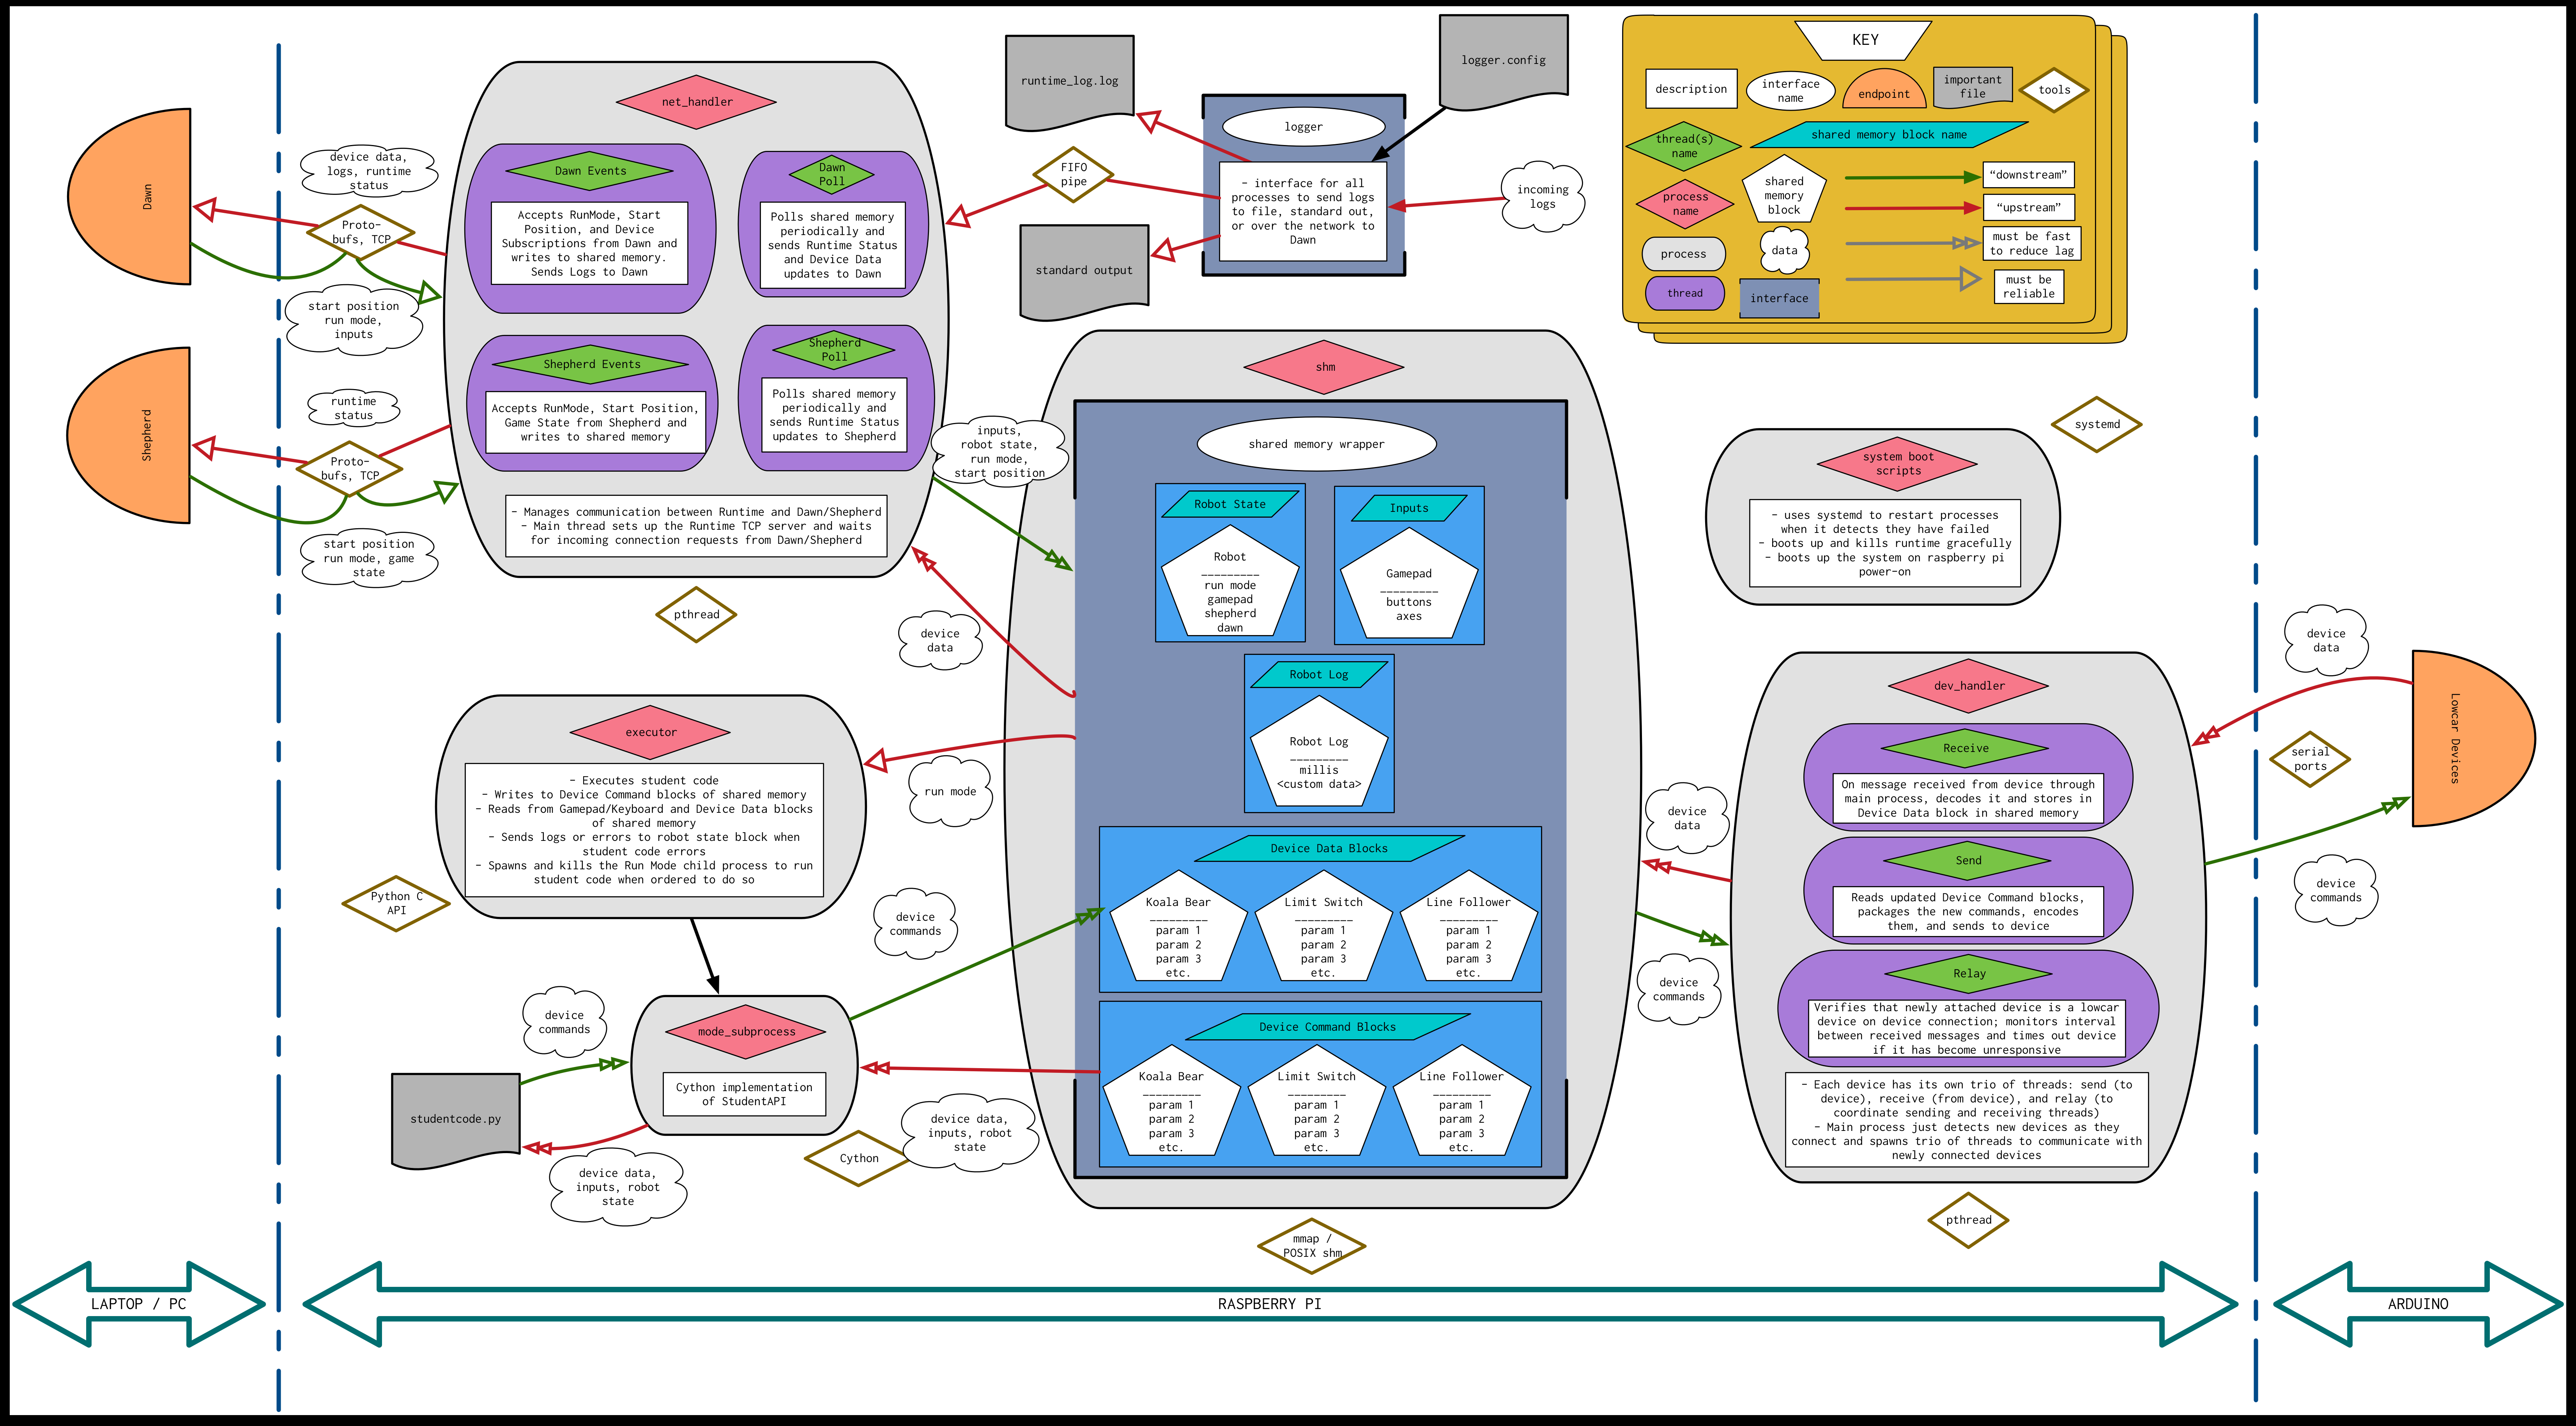
Runtime can be divided into a few neatly containerized parts:
- The Network Handler: abbreviated
net_handler, this is a process in Runtime, and is responsible for all communication between the Raspberry Pi and Dawn, and between the Raspberry Pi and Shepherd. - The Device Handler: abbreviated
dev_handler, this is a process in Runtime, and is responsible for all communication between the Raspberry Pi and all the devices that are attached to the robot at any given time. - The Executor: this is a process in Runtime, and is responsible for running the student code that is uploaded to the robot from Dawn.
- The Shared Memory Wrappers: abbreviated
shm_wrapper, this is the tool that facilitates the efficient communication between the above three processes. Think of this wrapper as the "glue" that holds the three processes together, and lets them talk to each other. - The Logger: this is the tool that Runtime uses to gather all the logs generated at various places in the code (including by student code) and outputs them to a terminal window, to a file, to Dawn over the network, or to some combination of the three.
- The Device Code: codenamed "
lowcar" 1 this is the set of all the code on the Arduinos that directly control an individual device that is connected to the robot. All of this code is collectively called the "lowcar library". - The Systemd Services: this is a collection of system services that allow Runtime to start automatically when the Raspberry Pi is turned on, recover when Runtime crashes, and automatically get and install new Runtime updates from this Github.
- The Runtime Utility: this is a collection of helper functions and defined constants that are used throughout Runtime. Most of them have to do with certain Runtime configuration values, maximum sizes for certain messages, or retrieving information about the different types of
lowcardevices. - The Scripts: this is a collection of shell scripts that do general things to all of Runtime, such as build it, run it, and test it. There is also a tool to flash
lowcardevices. All of them are called by theruntimescript in the root directory. - The Test Framework: this is a collection of clients, command-line-interfaces, tools, visual aids, scripts, and test programs that we use to diagnose problems with Runtime as well as run automated tests of the entire system, without the need to use a real robot, or have a working version of Dawn or Shepherd.
In addition to these parts, there are a number of configuration files for Runtime to manage the various tools that we use. They are listed here, with a brief explanation about what they do:
.gitignore: this file lists out all of the directories and files that we don't want in our Git repository. This includes things like executables, build files, and.DS_Store..gitattributes: this file is purely for aesthetic purposes. It tells Github which files to exclude when calculating the repository language makeup you see in the repo (below the "Contributors" section in the sidebar on the web page that you're probably looking at right now)..github/workflows/pull_request_ci.yml: this file outlines the steps taken by the Github Action that we use to test our code before we release Runtime. See our most recent CI builds here!runtime: this file is a convenience shell script that makes it easy to call the various other shell scripts in our directory, which you will read more about later.
This README will not go into each of these parts into exhaustive detail; explanations for each part can be found in the corresponding folder's README in the repo as well as our wiki.
Runtime is designed to be used on the Raspberry Pi, and with a distribution of Linux called Raspbian, a slight variant of the extremely popular Debian. We tested Runtime to work well on Linux systems. Only some parts of Runtime work on macOS and may require different commands to compile; no parts of Runtime can operate on Windows. Please use a Linux machine or (preferably) a Raspberry Pi to run Runtime!
As a baseline, Runtime uses the following commonly used tools that should already be installed on your machine (if you don't have these, ask the Runtime Project Manager to help you install them):
- Python 3.7 or later: While Python 3.6 will work, we recommend using Python 3.7 as that's what the Raspberry Pis are using.
gcc: short for "GNU C Compiler", we use this compiler to generate executables from C source code.
Runtime has the following third-party library dependencies:
Cython: this library is used byexecutorto implement the Student API in a way that is both callable from Runtime (which is written in C) and from student code (which is written in Python)- Read more here
- Google
protobufandprotobuf-c: Googleprotobufis the library that we use to serialize our messages between Runtime and Shepherd, and Runtime and Dawn.- Read more here
sudo apt-get -y install python3-dev(get<Python.h>,libpython3.7m.so)sudo apt-get -y install python3-pip(getpip)python3 -m pip install Cython(getCythonusingpip)
-
From
https://github.com/protobuf-c/protobuf-c/releasesdownload version 1.4.1, i.e.protobuf-c-1.4.1.tar.gzand extract it (for help, click here) -
You may need to install some tools (
libtool,pkg-config,g++). To install a tool you don't have, runsudo apt-get -y install <tool-name>, replace<tool-name>with what you want to install. -
To install Google Protobuf, run:
sudo apt-get -y install protobuf-compilersudo apt-get -y install libprotoc-dev
-
To install
protobuf-c, firstcdinto the folder forprotobuf-c-<release>.tar.gzand run:./configuremakesudo make installsudo ldconfig
-
(optional) To view
protobuf-cdocumentation:- Install
doxygen:sudo apt-get -y install doxygen - Repeat steps 5.i and 5.ii from above in the
protobuf-cdirectory, then domake html - Then navigate to that directory in Explorer/Finder and open the
html/index.htmlfile by double clicking on it
- Install
First, download the tar archive into your current working directory with
wget https://github.com/protocolbuffers/protobuf/releases/download/<release>.tar.gz
Then, extract the files with
tar -xzf protobuf-cpp-<release>.tar.gz
You might need to install wget and tar with sudo apt-get -y install wget tar.
The Shared Memory UI allows the user to have a real-time view of data flowing in and out of shared memory. This is analogous to the "shm_cli" among dev_handler_cli, executor_cli, and net_handler_cli. Note that the UI is used in development only as a debugging tool and should not be used in production. The command below will install ncurses on Linux machines:
sudo apt-get -y install libncurses5-dev libncursesw5-dev
Clang Format is used to format code to comply with our code style. Code that is not formatted with Clang cannot be merged into master. After installing, use the runtime script to format code. (See runtime format)
sudo apt-get -y install clang-format
We use the bash script runtime in this root directory as the entrypoint to our code. You can call it with ./runtime <args> in this folder. However, you can also have it be callable from any directory by adding it to your PATH variable. This can be done automatically adding the following line to your ~/.bashrc file:
export PATH="$PATH:<path to runtime folder>"
Then either close and reopen the terminal, or do source ~/.bashrc.
If you now type runtime it will list all the possible subcommands you can run. We currently have
build: will build the code baserun: will run Runtime like how it will on the Raspberry Pi robotstest: will run our test suiteformat: will format your code to match our styleflash: will flash an Arduino as a Lowcar deviceclean: will remove all artifacts generated when building or running Runtimeupdate: waits for newruntime.zipto appear in/tmpand then will unzip it and reboot the robotstatus: will display the currently running processes under theubuntuuser (to list active Runtime processes)
The first version of runtime in C was written in the summer of 2020 (when we all had lots of time.... fuck covid and trump) nearly entirely by:
- Ben Liao
- Ashwin Vangipuram
- Vincent Le
- Daniel Molina
- James Shi
Some inspiration and design was drawn from previous iterations of Runtime and Lowcar, written mostly by:
- Doug Hutchings
- Yizhe Liu
- Jonathan Lee
- Brose Johnstone
- Sam Zhou
- Brandon Lee
1: This name has an interesting origin. The code for the devices used to be in a completely separate PiE project called "Hibike" (pronounced HEE-bee-kay). Some members of Hibike who wrote much of the original Arduino code were avid fans of anime. So, they named the project Hibike after the anime "Hibike! Yufoniamu" (Sound! Euphonium). Later, some members who were not such avid fans of anime decided to pronounce "Hibike" as "HAI-bike", which sounds like the two English words "High Bike". Later still, when members decided to refactor the code to be more object-oriented, it was decided that a new name was needed for the project. Ben Liao coined the name "Low Car" as wordplay on "High Bike", and the name stuck. ↩