
- Physics Code is an educational website aimed at bringing free Physics based content to students and teachers worldwide in a simple and aesthetically pleasing manner. The site will be set up to appear more like a textbook, with simple to read pages, large fonts and easy to identify cards. Each card will be presented with labels and images to help direct the student to making the correct input for their desired result.
-
The website is informative allowing users to present information as an educator or as a student, to help prepare for internal assessments, essays, mathematical modelling, exams, and other educational needs. Users can:
- understand the inputs required for a particular calculation
- develop their own understanding at their pace of the concepts presented
- test themselves on the concept being presented in randomised variable challenges
- adapt the information into their own context by using the onboard calculators
-
The website is accessible to anyone regardless of their level in Physics and with some easy navigation can learn and scaffold with the concepts being presented. Users can:
- scaffold their own knowledge by using the navigation plane
- apply their curiosity to any of the input fields without the fear of being judged for trying something new or unexpected
- use any HTML5 enabled browser with JavaScript. There is no special downloads or applications required
- use unspecialised equipment and will only need a device that can access the internet and display HTML5 based webpages with JavaScript embedded
-
The website promotes curiosity at a scientific level and allows students to experiment with the calculations to see the outcomes. Users:
- are guided to input correct data but can choose to go to extremes to "see what happens"
- will have a help guide to understand what variables they are inputting
-
The website provides the world's first online dilemma zone calculator. Users will be able to:
- input velocity, yellow light phase, interphase, reaction time, the coefficient of friction, intersection size, and car length
- investigate the individual variables and how they are calculated
- apply their knowledge to real life situations with detailed context
- easily get detailed help on each of the variables through various methods including a help page and various "tooltips" embedded in question mark icons beside the variables on the calculator
-
The website allows the student to investigate all of the variables in a dilemma zone calculation for straight line and constant velocity or under extreme braking conditions. Users can:
- investigate their own intersections based on the information given
- test themselves with randomised and realistic scenarios that allow for extremes on the test yourself
- explore one of five maps from around the world with a real life intersection and realistic scenarios that allow for extremes
- refresh scenarios to have nearly unlimited types of randomised variables that can be calculated using the seven variables in the calculator
- attempt to calculate outcomes themselves without the use of the calculator by following the help page page.
-
The website provides an interactive game that helps the user become aware of their reaction time to help calculate a dilemma zone. Users:
- can estimate their reaction time at the game page
- will not need special equipment or any downloads other than a web browser that is capable of reading HTML5 and JavaScript
- can test their reaction time repeatedly and share their high scores on their Facebook timeline
-
The website allows the user to have some input for future development.
- Users of the website are able to contact the author to request new features which can be built into up and coming versions of Physics Code.
-
The website sources map data from Google Maps making use of Google's Application Programming Interface (API) to provide users with highly detailed and specific maps to investigate dilemma zones at real-world intersections.
-
The website uses MathJax an open-source JavaScript display engine for LaTeX, MathML, and AsciiMath notation that works in all modern browsers, with built-in support for assistive technology like screen readers.
-
The website uses Bootstrap libraries to provide a responsive website that adapts to the user's devices.
- allows users to be on mobile, tablet or desktop devices in an array of size dimensions without impacting the user's visual experience
-
The website uses EmailJS to remove the need for backend form filling and allow users to seamlessly send messages to the author.
-
As the website develops it is anticipated that:
- more calculators and help pages will come online
- more tests for users will become available based on the new calculators
- additions to current the dilemma zone calculator to include an optional dilemma zone for perpendicular roads and for non-constant acceleration
- additional APIs based on the context of the new calculators and could include other reality based principles including climate-change
-
-
The first time visitor will want to:
- Easily understand the purpose of the site;

- Be able to navigate easily and seamlessly throughout the whole site with the same navbar and text at the head of the page;

- View the access cards to all the various pages and applications that the user can click on to navigate to with ease;

- View information on the author to see relevant qualifications;

- Scroll down to see an uncluttered and relaxed page with an identical footer on each page giving access to social media links, sharing, terms and conditions, and privacy policies of the page;

- Access the world's first online dilemma zone calculator to input variables with large cards and icon hints for each variable set out in textbook fashion;

- Input the seven variables and scroll down to calculate the outcome;

- View the help page with a single click which navigates to a new browser tab leaving the user's current calculation untouched;

- Access short hints about the variable being input;

- See the calculated outcome of the input variables;

- Find errors in the input due to accidental keypresses or numbers that exceed realistic values;

- Reset the variables to their default values with a single click;

- View the help page with ease and see more detailed information on the dilemma zone and the calculator variables with matching cards and symbols with description about the calculation

- Access data about individual variables by clicking the help question mark;

- See beautifully presented equations using LaTeX based formulas;

- Access an interactive game measuring reaction time, one of the variables for the dilemma zone calculator;

- Will get to try to hit a brake button as quick as they can after pushing a start button and waiting a random amount of time before the brake button appears;

- Will be able to try to hit a brake button as quick as they can but will be surprised to see the button appearing in a random location within the card;

- Watch a short 7 second animation of the reaction time game being played;
- Users will be able to save their high scores within the cache of their browser and can reset the game to begin again. Score saving is automatic;

- Users will be able to share their best scores to their Facebook timeline if they are logged in to Facebook;

- Try to test their knowledge by accessing highly detailed Google Maps of real world intersections with full instructions for desktop or mobile phone (Android or Apple);

- Try out unique and random scenarios based on real world data for each of the five intersections with seven variables to use in their calculation;

- Discover a new way to measure small distacnes on Google Maps, this short seveon second animation shows how quickly this can be done;

- Will not get surprises with incorrect or blank inputs for their answers and are guided to input the correct outcome for their calculation;

- Can compare their data to the expected data based on the scenario;

- Can accidentally move the map off of centre and the map will automatically return to the intersection so users can not get lost;
- Can explore the map from a driver's point of view by using Google's Street View;

- Can contact the site's author to request new calculators or simply message the author with questions or gratitude;

- Share the site directly to their Facebook timeline by using the Facebook Share button in the footer of each page;

- If users get lost, they can easily find their way back to the homepage or get links to any of the other pages on the site with a 404 error page;


-
The returning visitor will want to:
-
Easily see new content with the help of easy to navigate cards on the home page with uncluttered content;

-
Return to pages that they have previously encountered to try new scenarios or games via the easy to use navigation on all pages
-
Try to beat their high score in the reaction time game or new games as they come online
-
Contact the author with new ideas for calculators, help and games
-
Add new data to the calculators to check other intersections for dilemma zones
-
Check their work from a modelled situation that was being used for an assignment, assessment or essay
-
Navigate easily back to the home page
-
Share the page on their Facebook timeline
-
Share their results from the reaction time game
-
- The frequent visitor will want to:
- Easily see new content and access previous content as a teacher or student;
- Set goals for a class, lesson or themselves to complete equations and calculations pertaining to the dilemma zone
- Find their own data from Google Maps and base their model on the site's ready-to-use calculator
- Keep in touch with he page author
- Share the page to Facebook or add it into their Google Classroom or similar educational niché platform
- Challenge other uses in the reaction time game or at solving dilemma zone equations
-
Users who have access to the site via their mobile will be able to navigate to the same pages and have the same overall experience as a user on a tablet or desktop. However, Google Maps measurements are best achieved on desktop and tablets, there is excellent instructions for those using mobile devices to make sure they are not disadvantaged in calculating the dilemma zone on their device.
-
Mobile navigation is made easy with a hamburger drop down menu which pushes content down to display the navigation panel and text;


-
The site's navigation is familiar and all pages are accessible. Some display changes can be noticed on a mobile phone or smaller device width. The MathJax equations on the Help page are wrapped to allow users on smaller devices to see the full equation without left or right scrolling;

-
The site uses light colours to aid those with colour vision deficiency which make up about 5% of the world's population (1 in 12 males and 1 in 200 females)
-
The site's colour scheme avoids the use of black or dark text on red backgrounds or strong red over a dark colour
-
The author has mild colour blindness and uses this to make the site accessible for anyone, furthermore, checks are made with testers who have normal colour vision to make sure there is efficient use of colours and appropriate gradients and contrast
-
The navigation bar uses #d7e9f5 as a background colour - a light blue colour that compliments the dark text and highlights the bright red Physics Code icon
-
The heading boxes of each page are nested in a darker blue compliment to the navigation bar - #54a5d5
-
The background of each heading and subheading box is based on the near white colour #f8f8ff with some opacity to allow for a bold heading or writing to stand out
-
The actionable content and cards are located on a lighter blue background that compliments both the navigation and the headings of the page.
-
The user has a clear understanding that each section is separated from the other. The colour of #b6d5eb is used in all content divs
-
A rule of thirds is instigated on every page, with a container filling up 67% of the screen width on large screens leaving some white space on either side (approximately 16.2% on each side)
-
Each content container does not take up more than a third of the page before being broken by a heading div on a darker blue background (#54a5d5)
-
The colour scheme remains consistent on smaller devices, but due to limitation of space and for ease of viewing, the white space on each side of the content is much reduced in size and does not obstruct user view
-
The page flows onto the footer with the same colour as the header's navigation bar of #d7e9f5
-
All graphics are small sized png files or jpg with the exception of the icons which are sourced from Fontawesome and the favicon which is an ico file type
-
Silhouette images are used on all cards and are primarily single tone black on a white background.
-
Two traffic light pictures on the home page which have a red light filled in on one of the images and a yellow light on the other - this does not affect user experience as the cards are specifically labelled
-
Other card images are sourced from Fontawesome and are coloured black to appear as a silhouette
-
The author's caricatures were created in Bitmoji and saved as a png file
-
Card images were sourced from Flaticon, pngfuel, kindpng, webstock review, freepik and pngguru
-
Edits to the pictures were made in GIMP which included colouring the traffic lights and flipping images or shading as required
-
Images are clean, non-confrontational, contextual, add to the user's visual recognition of particular variables and helps provide hints to requirements of the input values
-
Familiar icons are used within buttons and include checkmarks for submit, crosses for close, paper planes for send etc
-
Question mark icons are used to provide clickable tooltips or links to other pages such as the info button leading to the help page
-
All headings use the font family Rubik with a fall back of San Serif if Rubik fails to load. Rubik was first discovered at Google Fonts
-
Headings are all coloured in a dark crimson #85144b and is set as a colour opposite of the darker blue background
-
All paragraph text uses the font family Ubuntu also falling back to Sans Serif should Ubuntu fail to load. The font was first discovered at Google Fonts
-
Fonts were chosen for their clarity and ease to read even though the font styling was subtly unique but retained boldness and perspicuousness
-
Navbar text uses Raleway and also falls back to Sans Serif should Raleway fail to load. The font was also discovered at Google Fonts
-
The site uses the Bootstrap grid system to effectively separate each heading division and subsequent subdivision
-
The heading box is lowered slightly from the navigation bar allowing a gap for users to see the structure. Inside each heading box is a rounded off white background containing the heading texts
-
The containers are separated by title boxes and are always followed by content boxes. All content is readable by being placed on the same off white background
-
Box structure is used to separate content, highlight interactive locations and guide the user through easy to follow instructions on site usage
-
Maps on the test yourself page are large sized and easy to manipulate, movable as well as being clickable to see in a full screen on a new browser tab
-
The game box takes up considerably more space than the average card to allow for more random patterns for where the brake button will show
-
The contact-us page uses a large sized form that occupies two thirds of the screen with easy to follow directions
-
Mobile users still enjoy a rule-of-thirds, however, less white space is apparent
-
Overflow is removed from the content so users on any devices, especially mobile, do not need to scroll left or right for the same visual experience regardless of screen size
-
All forms on the page (contact us in particular) use Bootstrap's form control
-
Inputs on the calculator and test yourself pages are validated via CSS and turn a pinky red (#c66464) when an invalid input is received
-
Inputs turn a pale white for contrast with valid inputs (#fbfaf5)
-
Inputs on the calculator page are highlighted and a tooltip presented if an invalid response is given
-
Inputs on the calculator page with invalid responses are scrolled to automatically on submit
-
All form fields on the contact us page needs to be completed before submission can occur. Inline text help is given when an incorrect input is completed by a user in one of the fields
-
When users have calculated a scenario on the test yourself page they are prompted to add a value to the input box but are not able to submit this until a number is presented
-
Users are prompted when an invalid input is received and the input box turns pinky red (#c66464) with invalid responses such as non-number input
-
All forms are validated in HTML using browser validation and complimented with JavaScript validation written by the author
The overall strategy goals of the website design is to produce an easy flowing, uncluttered site but without being too minimal. Removing distractions from the student is advantageous for the context of their work while at the same time, large easy to navigate cards allow user input and interaction. This further drives the curiosity of the student who can associate images with hints towards the variables required in the calculator or the type of button that they're about to press. This helps scaffold the site and differentiate for all users. A beginner in Physics will see the car emblem for instance and recognize this as a kinetic object and is prompted by the word velocity. A more seasoned user will instantly see the scientific notation for metres per second and associate the site with SI Units even though they will be able to add imperial units in at least two of the calculator inputs. And professional educators will be able to use the site as a demonstration or homework assignment for their students or students will be able to model their own data from Google Maps or similar after completing their own calculations on the random scenarios. Each page is designed with the same format and layout as the previous page leaving no surprises or the feeling that the user is on the wrong page. Any external links are opened in a new browser tab and if the user is on the Calculator page they can access the help page without losing their data.
The textbook feel of the site provides a sense of professionalism and trust for the student but without being overwhelming. A seemingly difficult task, such as calculation of the dilemma zone is made easy by splitting each variable in a logical order for input. The beginner will only require primary data which can be obtained easily on the site with default values already input into the calculator. A more seasoned Physics student will want to gather their own data and might further investigate reaction times, intersection sizes, phase times for traffic lights and so on, and can then calculate for secondary data. Those who are looking to manipulate the data further can adjust scenarios easily and the model allows for a simple single variable change over a large range to allow secondary and tertiary data to be obtained.
Physics Code is primarily for students around the world. It is anticipated that a large variance in internet speeds will be encountered and as such, images have been made as small in size as possible using TinyPNG as well as making pages less data intrusive. The site was tested using Pingdom and was found to be responsive at a "B" level. Certain known issues such as Expires Headers have been considered. But for this particular project, will not be included.
Users close to Stockholm (closest server appears to be Frankfurt) have a very fast response time to enter the site at just 376 ms.

Those who access the site from further away, in Washington still recieve excellent load times at 475 ms.

People accessing the site from Sydney can also rely on fast loading times at 1.82 s.

The original site design had not included a landing page, this was later added. The first version of the site included only a calculator page. The game and test yourself pages were added at the completion of the basic calculation. Site design was regarded as secondary to the functionality to begin with and a simple wireframe model was constructed to reflect this. As the JavaScript was completed it was apparent that a more detailed design wireframe was required although the original wireframe allowed for a simple design template for each page. New wireframes were made for the game, test yourself and contact pages. The final wireframe to be added was for the landing page which was subsequently the last page to be designed and added to the site index. Page design remained consistent and modelled on the wireframes with very little change made to the original design. The game page required a considerably larger game pad area to allow for more randomness and excitement in users getting a good representation of reaction time. Equations were originally going to be screenshots from an equation editor. However, that never occurred and the MathJax libraries were added for the help page increasing professionalism and clarity of the display.
The main sources for additional content such as API and external libraries were considered in the building of the wireframe.
The only APIs to be visible on the page were from Google Maps and Facebook. However, emailJS is added as a background functionality.
Visible libraries such as Bootstrap and MathJax were built into the wireframe design.
However, it is not clear that MathJax is visible on the help page wireframe and appears as substitute text only.
The coefficient of friction data table was added later and had not been initially considered for the project. An external source was first used, but an alpha-tester complained that the data for friction was not readily available to produce accurate calculations.
This was remedied with the current table on the Help and Test Yourself pages.
The data also better reflected the updated and refactored JavaScript randomised friction generators based on tire quality and weather.
-
API sources that were considered in the wireframes:
-
Google Maps used on the Test Yourself page;
-
Five intersections were considered and included for this project
-
Russia - Leningradsky Ave over Tverskaya Zastava Square in Moscow
-
Australia - Sunnyholt Road at the M7 intersection in Sydney
-
United States of America - Lexington Drive over the Harry Byrd Highway in Ashburn, Virginia
-
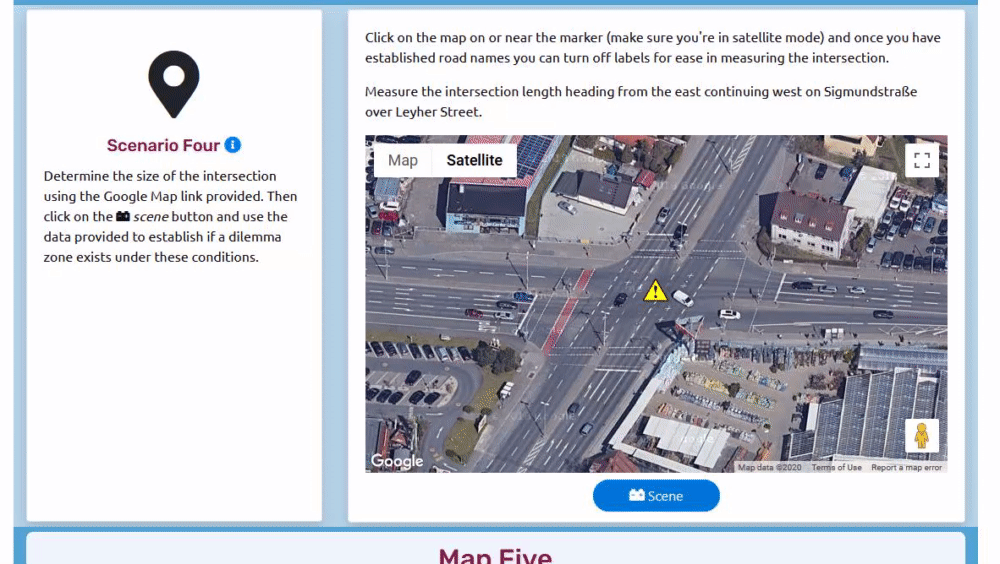
Germany - Sigmundstraße and Leyher Street in Nürnberg
-
Ireland - Constitution Hill at the intersection on Western Way Dublin
-
All maps were considered based on media reports, local knowledge and searching Google Maps for appropriately sized intersections. Intersections were only added if certain criteria was met. The intersection needed to be greater than 40 metres in length, have no corners or turns, allowed for unique weather conditions (eg ice, snow, heavy rain etc), and were controlled by traffic light signals. Maps also needed to be accessible with satellite view and were clear enough at mobile phone size to see the intersection for measurement.
-
Social media share functionality;
-
Facebook for developers used on each page and in particular the Game page;
-
Each page was to have a share button to Facebook in the footer regardless of the content the page was presenting
-
The share button would default to the landing page as a link on the user's timeline
-
An extra share function was built into the Game to allow sharing of scores directly to Facebook
-
Other social media share functionality was also considered, however, Facebook was the only one added in the wireframes and first released version of the site.
Twitter is likely to be added at a later stage before other social media share buttons.
-
Graphical representation of equations:
-
MathJax LaTeX mathematical equation builder used on the [Help](https://pauld0051.github.io/physics-code/help.html;
-
Equation display is critical in helping the user understand complex equations
-
Screenshot images of equations were considered as they can be made fluid, however, the overall presentation using MathJax was considerably more valuable and useful for site presentation
-
-
Contact-Us ability without backend or server requirements:
-
Responsive display:
-
Bootstrap libraries were used to set up a grid, box and container system
-
Bootstrap functionality and design is shown in all wireframes
-
The initial wireframe designs were chosen due to their low amount of clutter, ease of reading, adaptability and consistency among each page.
The colour schemes were picked to enhance the design and keep the site closer to neutral without overwhelming colours or intrusive design.
Various icons were replaced as more appropriate icons were discovered and each button had an icon added to it that represented the button's process.
For example, a paper plane was added to the submit button on the contact page.
The design had also been intended to include a calculator on the "calculate" button however, due to the nature of the "input", a value for an HTML entity code (allowing the use of icons in the value attribute) calculator detracted from the final anticipated design.
Therefore a check mark (tick) was used as a clear indicator that button was for "checking" work.
A terms and conditions as well as a privacy page with links in the footer were added at a later stage after discovering their requirement for Facebook to allow an app number for the ability to share the page and scores on the game page. These links are embedded in each footer on each page and the text and HTML was generated by a wizard found at Privacy Policy Generator and Terms and Conditions Generator. No additional styling was required other than paragraph spacing and the use of the site's default fonts.
The equations used on the Help page were all generated using MathJax libraries, however, the code is not actively responsive and large equations did not wrap on mobile devices. This was unforeseen at the initial production phase and was only discovered when viewing on a mobile telephone outside of Chrome's "inspection". Initial consultation suggested that the equation should be removed and replaced with a fluid image that would be more responsive. However, this detracted from the site's purpose to appear more like a textbook as well as a website. Instead of adding images,
Bootstrap Display Properties were added to the code at the card level. A user on a large screen is able to view the equation on three lines, where a mobile user will see the equation appear on five lines at appropriate break points. MathJax equations can not have a d-none attribute and this would fail to hide the equation. It was discovered the entire card that contained the equation needed to be hidden for the anticipated outcome to occur.
The author picture (displayed on the home page wireframe) was not the final chosen picture. Instead, on a large screen, a full body picture with the caricature holding books is displayed. On a smaller screen, a close up of the caricature's head is displayed. Both allow a hover enhancement which enlarges the picture by 10%. Hover enlargement is also found on the index page as users mouse-over the display cards. It was anticipated this would be included for all cards throughout the site, but the enlarging cards detracted from the purpose and was not included in the final version. Originally, cards didn't enlarge, but shrunk. This also detracted from their purpose.
Although Hover.css: had been considered for the site, in the end a previously used hover code was included in CSS without the use of any external libraries.
The site had undergone several colour changes. Initially, to help in design, distinct colours were used for each division and section to aid in the creation. However, these were not considered final colours and were removed as the project became closer to completion. Colours were added by using colour palettes ideas from Color Hex. However, the final production did not use a palette from the site, but author generated colours were used instead and consultation with normal colour vision parties was made.
An additional 404 page was added for users who accidentally key in the wrong address in the address bar of their browser.
The vast majority of the site is represented in the wireframes, right down to the chosen maps on the test yourself page. Minor changes were made based on user comments during alpha testing and where the site did not display as anticipated on a particular sized screen.
-
Physics Code is primarily designed for use on mobile devices or smaller screen devices.
-
Alpha testing was conducted on a Samsung Galaxy S7, Huawei P20 pro and Apple iPhone 8+.
-
Bootstrap Grid Systems were extensively used throughout the site. On smaller devices, cards appear on one line, one on top of the other making content easily scrollable.
-
The Landing Page provides easy access to each of the navigation cards and a close-up Bitmoji character of the author is displayed.
-
The menu system uses the Bootstrap Navbar functionality for small screens using the toggle capability for the drop down menu list from a hamburger icon which pushes content neatly down. The content below the menu drop down is always visible to some degree.
-
Headers were not made sticky as they interfered with the site's content and detracted from required entry of input. It also was not considered necessary for the site to have sticky navbars remaining in the top field as the site's scrollable content was not extensive and the Footer has a link back to the home page from any of the site's pages.
-
All images that need to resize are done so by using Bootstrap's Responsive Images and the img-fluid class.
-
All maps on the site resize with their container width and height to remain in focus at all times. Maps are clickable and interactive.
-
White space is minimised on mobile displays, however, a rule of thirds still remains so the screen is not overwhelming.
-
Alpha testing was conducted on 32in (71 cm width), 55in (121.7 cm) and more common 15in to 24in (38 cm to 61 cm) displays.
-
Headers and footers are not fixed in place and scroll with the content.
-
The navigation menu remains open and does not toggle into the hamburger menu style unless screen width is below 1100 px. This differs from Bootstrap breakpoints due to the extra wording on the right hand side of the navigation pane. As screen size becomes smaller, the tendency for links to wrap detracted from the aesthetically pleasing navbar element. To prevent that the new breakpoint was added in CSS3.
-
Images remain fluid on all pages and are generally at their maximum size on large screens but are still limited to the container that holds them.
The site was tested on numerous devices, and while all care is taken to make sure the site displays accurately, it is possible that some browsers or devices may cause slight variations in display. During testing, Am-I-Responsive was used to display the site on various sized displays:

Users are encouraged to interact on most pages by clicking for tooltips, inputting data, submitting data, sending messages to the author, using maps, calculating dilemma zones etc. The main feature of the site is the Dilemma Zone Calculator, the first of its kind on the internet. The calculator allows users to input seven variables to calculate the existence of dilemma zones based on their known primary data. The second key element to interactivity is the Reaction Time Game providing the user with a reasonable estimate for their reaction time (one of the seven variables for the calculator). The next key interactive element is the random scenario generator from one of five possible intersections around the world. Not only does this encourage the user to calculate the outcome of the dilemma or option zone, but their working out is checked by JavaScript.
Furthermore, there is nearly an endless supply of random outcomes based on initial velocity, traffic light phases, reaction times, tire conditions, weather conditions, and car lengths. The intersections are pre-measured before adding to the website, but users are to make their own measurements on Google Maps.
Finally, users can interact with the site's author by sending a message through EmailJS on the site's Contact page. It is noted that currently only a free subscription to EmailJS exists which limits emails to only 200 submissions per month. During the testing phase, 21 emails were sent and received successfully.
-
Users can input seven variables, default values are in place as a guideline only and can easily be erased with new variable values added
-
The calculator has tooltips on each variable to give more advice on the input values
-
There are links to the Help page which opens in a new browser tab
-
Calculations will not submit if data is non-numerical in any of the seven inputs
-
Input fields change colour based on valid and invalid data
-
Tooltips flash up on the input field if an invalid value is being submitted
-
The input field is scrolled to if an invalid value is being submitted
-
-
Calculations are completed and all values are displayed in a pop-up modal, users will be able to see;
-
distance the vehicle travels throughout the yellow and interphase duration
-
distance the vehicle travels throughout the duration of the reaction time
-
total distance from the stop-line required for the vehicle coming to a complete halt
-
maximum Distance the vehicle is from stop-line
-
non-absolute value (either negative or positive) for the type of zone discovered
-
absolute value of the zone and type of zone
-
velocity in metres per second (especially if converted from one of the other two units, kilometres per hour or miles per hour)
-
intersection size in metres (especially if converted from the alternative unit of yards)
-
type of zone in the header of the modal
-
-
Users can then reset all data to the default values and re-input a new calculation
-
The game helps determine one of the seven variables of the calculator, reaction time
-
Users are greeted with a start button and a red-light (a lamp icon)
-
Once the start button is pushed, the light turns green and the user is anticipating an upcoming stop on a red light
-
The light remains green for a random amount of time (set to a maximum of 8 seconds and minimum of 3)
-
The user will then attempt to push the brakes button as soon as it appears and the light has turned red
-
The brake button appears at one of a nearly unlimited amount of positions within the display frame
-
Users can then see their best score in a pop-up and their current score
-
A reset button sets the game up to start again
-
A share button allows users to share their best score on their Facebook timeline
In upcoming editions of new games, the Reaction Time game will be slightly modified to remove the hidden "brakes" button and replace this with an empty div. The button will be added to the DOM via JavaScript rather than the current method of adding and removing CSS classes. For this particular project, the adding and removing of classes seemed the most logical method to achieve the desired goal. However, it is possibly better in the long run not to have hidden buttons, but rather no button at all until called upon.
-
Users can view one of five real world intersections on the website
-
Maps are familiar to the user as Google Maps and allow similar interactivity on the site
-
Users can click on the maps anywhere to open them in a new, full sized tab for ease of calculation of intersection distance
-
Maps are able to be navigated as normal within the test-yourself page, users can access street view included
-
It is possible to move the maps around, but to avoid being "lost" maps re-centre on the intersection after 3 seconds
-
Users are supplied with seven variables to help determine the risk of a dilemma zone;
-
initial velocity
-
yellow light phase
-
interphase
-
driver's reaction time
-
vehicle's tire conditions
-
weather conditions
-
vehicle length
-
-
intersection size is measured using Google Maps with instructions provided by Google in the main heading of the page
-
Users can then either use their own method of calculation, the Help page or the Calculator page to determine if a dilemma zone exists in the given scenario
-
Once users have calculated their type of zone, a radio button choice is made, users can choose either;
-
Dilemma Zone
-
Option Zone
-
-
Users input their value and submit this for calculation and self assessment based on a supplied answer
-
Invalid inputs are treated similarly to the Calculator](https://pauld0051.github.io/physics-code/calculator.html) page except the submit button is disabled until a valid input is received
-
Users will be prompted by inline text underneath the input to make sure they're aware of a the required valid response
-
It is possible to reset the input field (causing the submit button to disable until a valid input is received)
-
Users can choose to get a new scenario from any of the five available maps
-
Answers are displayed as;
-
type of zone picked by the user followed by a check mark (tick) for correct choice or "X" for an incorrect answer
-
the user's input value and then is described as too low, too high or within an acceptable range regardless of zone type chosen
-
users can achieve a perfect response
-
-
finally, the calculations as derived by the JavaScript based on intersection size and variables mentioned is given for the user to evaluate their score
-
users will get be within acceptable range when they are +/- 20% of the expected value (this allows for differences in intersection measurement and coefficient of friction)
-
Users can attempt each map and random scenario an unlimited amount of times
-
Users who have an email address will be able to contact the page's author without the need to access their own personal email
-
Respondents will be asked to supply a name, email and a message to the author
-
A submit button indicates "sending..." when pushed and an alert is given for a successfully sent email
-
Users will be prompted to add valid inputs into each field with similar inline prompts at each invalid response
-
Failed messages will also be prompted - however, till date this has not been confirmed
All efforts are being made to future proof Physics Code and the contents. A whole host of new features will be able to go live over time as the site gains traction among students and teachers alike. New calculators, games and tests can be added with ease as well as new help pages and features. It is anticipated that Physics Code will be able to increase usability with membership and monthly newsletters. It is already possible for users to contact the author with suggestions for new site features.
The original site investigation lead to the idea of providing a projectile motion calculator, however, code was already written and available online for projectile motion as well as many interactive sites promoting their projectile calculator. In order to be unique, and ahead of the game, the more complex Dilemma Zone Calculator was designed and was based on an original assignment given to Queensland students in Australia as part of their Year 11 assessments. At the time the site was produced, no other site has offered a dilemma zone calculator, Physics Code is the first and unique in this sense. However, not all calculators need to be unique as they are added to the site. Calculators should be useful, intuitive, easy to access, will not require special technology or devices and will have a large interactive component attached. A number of calculators are being considered for coding:
- Projectile Motion Calculator
This will involve inputting a number of variables;
-
angle of launch
-
either initial velocity (overall) or;
-
horizontal or vertical velocity
-
gravity
-
starting height (if required)
-
ending height (if required)
The calculator will not require all inputs so long either angle and one of the velocities are supplied or; two velocities (initial, horizontal or vertical) - providing any two of those are known, a triangle can be formed and from that all the other variables can be determined.
The calculator, although not unique, will be provided in similar fashion to the Dilemma Zone calculator with large cards, input variable fields and images to hint for the type of input required. Along with this, tooltips will be provided in much the same fashion.
-
Dilemma Zone Calculation with Perpendicular Roads Due to the high complexity of angled velocity in motor vehicles, including road angle, vehicle mass, turning arc etc, the idea of introducing this as a starting calculator was deterred. This feature will be added in with an "Advanced Options" feature at a later stage. The calculator will then include:
-
vehicle mass
-
angle of turn
-
constant velocity (using circumference of a circle and arc-length)
Users will then be expected to supply their own data for this calculation. Although Google Maps could find the distance in an angled turn, the accuracy of such needs to be considered.
- Uncertainty Calculator The third calculator is something all first year Physics students struggle with, the concept of uncertainty. The calculator will add a range of possibilities for the user to input variables, units, addition, subtraction, multiplication, division, exponents, square roots, averages etc. The calculator will build their equation using MathJax and display their answer, with absolute uncertainty. Displayed answers will also include percentage uncertainties where required.
-
Other calculators up for consideration but are not limited to;
-
Pendulum calculator
-
Spring calculator
-
Inductance calculator (including transformers)
-
Relativity calculators
-
Kinetic energy conversions (including Newton's Gravitation)
-
Thermal conductivity and thermal transfer calculators including specific heat and power calculations
-
Diffraction and interference calculators
-
Standing wave calculators
-
Electrical circuit calculators, including a Kirchoff's Law calculator
-
Magnetic effects calculations (on charged particles, on current carrying wires etc)
-
Doppler effect calculator
-
Half life and nuclear decay calculator
-
All calculators will be based on a minimum requirement for the International Baccalaureate DP1 and DP2 High Level Program.
All calculators will be coupled with a help page set up using MathJax for equation display. Other LaTeX libraries may be considered depending on availability. Help pages, like their counterpart calculators, can be reached through dropdown navigation on the navbar (not currently active due to only one calculator, help page etc being available on first release) using Bootstrap's drop down ability for all navbar links. Access to help files will also be available on each calculator through the infolink ("i" in a blue circle).
In similar fashion to the current reaction time game, games linked to a variable or variables in each calculator will be offered. Some examples are give here:
-
Projectile Motion Game
-
Hit a target with the projectile motion calculator after being given a random distance, initial and final height of the target
-
Target will be displayed in 2d and a parabola drawn tracing the motion of the projectile
-
Users will determine angle and initial velocity to hit the target and will be scored on accuracy
-
Users will need to race the clock to get the highest scores - the faster the user determines the initial velocity and angle, and the closer to the target the user gets, the more points will be associated
-
Users will be able to share their scores in similar methods as currently available on the reaction time game
-
-
Bungee Jumping Game (associated with the spring calculator)
-
Users will need to pick the correct bungee length and spring constant for a given human's height, mass and height of jump
-
Scores will be determined on the "fun" that the human jumper had - for example if they want to get wet (ie the bungee length allows the human to be dunked in the water below), the human was slow enough as they entered the water to eliminate risk of being hurt, the human was slowed down at a reasonable rate and was able to "bounce" back etc
-
Scores will also be determined on time it took to work out the calculation for spring constant and bungee length given the random variables
-
-
Age, Length, Momentum and Energy Game (based on the relativity calculator)
-
Users will be given random velocities (up until the speed of light) of a given object carrying a human
-
From the data supplied users will determine how old the occupant will be when they return to Earth, how "long" their spacecraft was to an observer at maximum velocity, their momentum and energy at various points of the journey
-
Participants will need to be quick and accurate in order to answer questions and score points
-
As with help pages, all calculators will have variable associated games. As a calculator comes online, so will its associated help page and game page.
There is a near unlimited amount of potential for other calculators, help pages and games and the site will continually expand and be accessible for all.
Physics Code uses three main languages as a basis for the code on all the pages, these include;
-
HTML5 (75.7%)
-
CSS3 (4.2%)
-
JavaScript (18.6%)
The coding for the website included libraries and frameworks that make use of the languages involved, these include (in alphabetical order);
jQuery is used extensively in Bootstrap and was also in replacement of some JavaScript functions
All of the code for the website was produced and enhanced by using the following software applications (in alphabetical order);
Allows editors to see how the site is displayed on various sized screens.
Atom is an integrated development environment (IDE) used to store Physics Code's HTML, CSS and JavaScript files as well as to beautify the script using Atom Beautify.
The site's wireframes were created using Balsamiq software.
The author's cartoon pictures were created in Bitmoji on an Android device.
The favicon that appears in the browser tab was converted from png to ico using convertico. The site was also used to convert jpg to png.
Tutorial on building custom alert boxes with code ready for styling.
Is a replacement for the need to add a backend or server for contacting the page author. Emails are sent from the site via the author's Gmail account. Up to 200 emails can be sent per month for free.
All Unicode characters were taken from FileFormat.
GIMP (GNU Image Manipulation Program) was used for shading, adjusting, colouring and saving all images on the website
Github acted as a repository for all versions of the website and as a host for the website's pages.
Gitpod is an IDE that was used extensively to code and test all versions of the website as well as to push the code through to the repository at Github.
Gyazo was used to capture animated images for this README.md file as well as a visual display to focus on errors with the site's display and to share animated files within the network to troubleshoot the issue.
The site's spelling was checked using this service
Used to test small snippets of code that in an external environment.
A handy, online JavaScript validator.
The README.md spelling was checked through this open office software. However, this is not a recommended process as format issues occurred directly after pasting the spell checked text back into Gitpod's editor.
Mozilla's developer network documentation is an extensive resource for code and usage.
For testing the site's speed and response.
The site's privacy policy content was created using this generator.
Snip & Sketch is a Windows utility used to capture screenshots and was primarily used to produce the images for the README.md file presented here.
Re-formating of the README.md file after formating was lost from reinserting text from Libre Office. This will now be the preferred editor for other markdown pages in the future.
The wealth of knowledge of the many is the most valuable resource for anyone starting out and learning new code. Stackoverflow was a heavily used network or resources, both for asking questions, confirming code and searching code.
The site's terms and condition content was created with this generator.
All images on the site were first sent to TinyPNG before being uploaded to Gitpod and sent to the Github repository. The aim is to make the page load faster but also to keep the same image quality that users would expect.
Helped with checking CSS file validation
Enabled checking the site's HTML coding with ease.
Primarily Physics Code relies on Google Maps API for access to map data for display as part of the user's ability to test themselves as a random calculation for a given real-world intersection. All API calls are located at the bottom of the HTML page so as to increase the speed users can access the page and thus loading of JavaScript happens secondary. This is backed up with the evidence of an "A" in Pingdom's test which responded with the following:

All maps were provided by Google by accessing the Google Developers Console and applying for an Maps API key. This key is used only for this site and has restrictions for all other URLs other than Physics Code. The key is called on in the maps.js file via these two scripts located at the bottom of the test_yourself page:
[script src="https://unpkg.com/@google/markerclustererplus@5.1.0/dist/markerclustererplus.min.js"](<script src="https://unpkg.com/@google/markerclustererplus@5.1.0/dist/markerclustererplus.min.js">)</script>
[script src="https://maps.googleapis.com/maps/api/js?key=AIzaSyBWKHz27Q-E_mW5wHULLj6Wgap3VOjrCbs&callback=initMap"](<script src="https://maps.googleapis.com/maps/api/js?key=AIzaSyBWKHz27Q-E_mW5wHULLj6Wgap3VOjrCbs&callback=initMap">)</script>
Each map is called by its location (coordinates latitude and longitude) which are picked up from the map itself. For example, intersection one is called by:
let intersection_one = {
lat: 55.777034,
lng: 37.583926
};
Each intersection is labelled intersection_[map number] to a total of five maps. The maps are then set to display as a satellite picture with a pre-set zoom:
let map2 = new google.maps.Map(
document.getElementById('map_two'), {
zoom: 19,
center: intersection_two,
mapTypeId: 'satellite',
zoomControl: false,
rotateControl: false
});
Zoom controls were removed from the maps to allow a crisper view of the entire intersection and rotational control was removed as this could confuse the user as to the direction required for calculation of the intersection.
The unique map icon located at the center of each intersection was positioned by this code:
let marker = new google.maps.Marker({
position: intersection_one,
map: map,
icon: image
});
A previously labelled variable (intersection_[map number]) was used to locate the position of the marker and the image was derived from:
let image = 'assets/images/map_icon_marker.ico';
Users are able to scroll around in the maps and use them as though they are on Google's own site. However, in doing so, a user may become disoriented and may then become frustrated when trying to find the intersection again. This could be seen as a poor user experience. To compensate for this, the map returns to its centred position after 3000 ms (3 seconds) by using the following code:
let marker2 = new google.maps.Marker({
position: intersection_two,
map: map2,
icon: image
});
map2.addListener("center_changed", () => {
window.setTimeout(() => {
map2.panTo(marker2.getPosition());
}, 3000);
});
Finally, users are able to click on the map at any point (on the marker or anywhere on the map) to access the map in a full screen on a new browser tab. The code allowing for this is:
google.maps.event.addListener(map2, "click", function() {
window.open("<https://www.google.com/maps/@-33.7385745,150.9177533,120m/data=!3m1!1e3">);
});
All code pertaining to the Maps JavaScript API are located in a single file maps.js.
To insert maps into your own projects you will need to first acquire an API from Google. Full documentation on this can be found at Google's Get an API Key help files. The following is a brief description of how to get your own API and secure it to prevent others using the API key maliciously.
Firstly, access the Get an API Key to begin the process. You will be greeted with some options, if this is your first project, go directly to the button marked "Go to the project selector page"

When at the "project selector page" select "Create new project" on the top right.

When you select a new project you can name it and organise it as needed.

When you have named you project and saved, you will then be taken to this screen which shows the details of your new project.

You will need to now select APIs and Services and click "Credentials":

This takes you to your dashboard to create new API keys.

In the top panel select "Create Credentials":

Followed by API Key:

The API key is then created (in this case, the one pictured here is blanked out to avoid malicious use, keep your API keys safe, even if you have them restricted).

You should then restrict the API to your website only by selecting: HTTP referrers followed by your website address in the Web Restrictions "New item" box.

And then your API key is created, safe, restricted and ready for you to use.

Documentation and description of the codes is found by exploring the vast documentation at the Google Map JavaScript API Guide.
To allow users to share the site on their Facebook timelines a Facebook share button was added to each of the pages in the footer. For further sharing ability, game share of scores was also enabled using similar code. To access the Facebook SDK a Facebook account is needed.
At the bottom of each page a on Physics Code a share functionality was embedded inside of script tags. An app number is applied for and granted when a page can prove it has both a terms and conditions and privacy policy for public view. The app number is granted and can be used for various application processes. Again, this is restricted to only the application being used, in this case, solely for Physics Code. In order for share functionality, developers are recommended to include og tags for meta data at the top of each page that is being shared. Although this was optional, all pages received the same meta data.
The scripts at the bottom of each page set the share functionality and the share button is embedded into the HTML at the location where the developer wishes this to appear.
The HTML is as follows (located in the footer of each page):
<div class="container text-center">
<div class="fb-share-button" data-href="https://pauld0051.github.io/physics-code/index.html" data-layout="button" data-size="large">
<a target="_blank" href="https://www.facebook.com/sharer/sharer.php?u=https%3A%2F%2Fpauld0051.github.io%2Fphysics-code%2Findex.html&src=sdkpreparse"
class="fb-xfbml-parse-ignore">Share</a></div>
</div>
This is followed by the script being loaded at the bottom of the page:
<div  id="fb-root"></div>
<script  src="https://connect.facebook.net/en_GB/sdk.js#xfbml=1&version=v8.0&appId=335490644461179&autoLogAppEvents=1"  nonce="jH6xsmAN"></script>
The metatags at the header of each page are as follows:
<meta property="og:url" content="https://pauld0051.github.io/physics-code/index.html" />
<meta property="og:type" content="website" />
<meta property="og:title" content="Physics Code" />
<meta property="og:description" content="A free web resource for Physics students." />
<meta property="og:image" content="https://pauld0051.github.io/physics-code/assets/images/logo-main.png" >
This also helps with search engines to find the site and provides Facebook share services with the information required to display the logo as well as a small tag line about the site. The information and code development for a share button can be found at Facebook Share Button documentation.
To share results from the reaction time game, the app with the app number (previously discussed) is used with the following code:
document.getElementById("share_button").addEventListener("click", share_result);
function share_result() {
FB.ui({
app_id: [APP NUMBER HERE],
method: 'feed',
link: '<https://pauld0051.github.io/physics-code/'>,
quote: "I got a high score of " + localStorage.getItem('score') + "s in the Reaction Time game at Physics Code."
}, function(response) {
if (response && !response.error_message) {
Alert.render("Thank you for sharing. Think of all the people you just helped!");
} else {
Alert.render("Oopsy daisy. Your score was not posted, did you close before sharing?");
}
});
}
This code also includes custom alerts if a user closes the share function before actually sharing to their profile and timeline. Information for this code is found at the Facebook Share Dialogue documentation.
To add a share button to your site you can follow the code instructions at the Share Button Documentation page at Facebook. For the following you will require a Facebook account.

Copy and paste the code into the location you want the button to appear.

Although the SDK recommends the Facebook script be loaded at the top of the page, this was the last script to be loaded and is at the bottom of the page.
To make an app that can be shared to Facebook can visit Facebook for Developers to create a new app.

Choose the type of application you're going to want an app number for, in this case, because the game was being made on a website (able to be played on mobile too) the app was created for off Facebook selecting the "Integrate Third-Party Gaming App".

Create the app by making a name, using your email address that is associated with your Facebook account and add your Business Manager account if applicable.

From this point you will be able to access your dashboard and will have an app number which acts as an API key for your application(s).

On your dashboard you will need to be able to supply a privacy policy as well as a terms and conditions page for your application or website. These were generated for Physics Code at Privacy Policy Generator and Terms and Conditions Generator respectively.
Enter these into your applications "Basic" settings on the dashboard:

Currently individual verification has been paused due to the outbreak of COVID-19, however, this has not impacted on Physics Code users and is unlikely to cause any issues in the future.

Scroll further down on your Basic settings dashboard and fill in your address details as well as the application site details. Although this is not confirmed, it is believed this allows Facebook timeline sharing to produce a clickable link to your page.

When you have completed this data, it may take some time before this feature is fully active and functional. For Physics Code, this took approximately two weeks.
An account and email address is required to access the EmailJS services. From there, an email template can be created with necessary requirements filled out.
When an account has been created and an email added it is possible then to add templates via the EmailJS Template Editor.
For Physics Code the template was set up to include an email "to", an email "from", the user's name and a message (with prompt).

The final part of the message {{from_name}} can be contacted at {{from_email}} shows the user's email address for easy reply.
With the template set up, the script required to call the emailJS functionality is initiated in the HTML at the bottom of the page along with the other scripts:
<script type="text/javascript">
(function() {
emailjs.init("user_4M0aY6Qk6YuN226ZoNGhW");
})();
</script>
The full JavaScript is then run from the sendemail.js file:
let myform = $("form#user_request");
myform.submit(function(event) {
event.preventDefault();
let service_id = "default_service";
let template_id = "physics_code_message";
myform.find("button").html('<i class="fas fa-paper-plane"></i> Sending...');
emailjs.sendForm(service_id, template_id, myform[0]).then(function() {
Alert.render("Sent! Thank you, we look forward to your message.");
myform.find("button").html('<i class="fas fa-paper-plane"></i> Submit');
}, function(err) {
Alert.render("Failed to get through!\r\n Response:\n " + JSON.stringify(err));
myform.find("button").html('<i class="fas fa-paper-plane"></i> Submit');
});
return false;
});
To add EmailJS functionality to a site you will require an EmailJS account, use the "Sign Up for Free" option on the top right.

Continue to the dashboard in your new account and add a new service.

There are currently 17 services available. Choose the one where you have access to that service. For Physics Code, gmail was used.

Once you have chosen the service, fill in the details of your mail and "connect account" then "Create Service":

From there you can make your template for this service as suggested above or with individualised responses.
Due to the extensive nature of the site, scripts had the tendency to be large files that could evidentially slow the site down and produce difficult to manipulate code.
In particular the test_yourself.js code file was over 800 lines long in the earlier stages of development. Although this was somewhat intentional to begin with, it wasclear that the entire content had numerous areas for improvement and readability.
To begin with there are five maps, each with a specific [mapNumber] variable (eg "One", "Two", "Three" etc). This allowed maps to be separated in the scripts whole at the same time allowing unique situations to be called on and parsed into the scenario data. Each map is called as soon as the user selects the Scene button at the bottom of each map. The [mapNumber] then becomes a global variable and is used to calculate the scene.
An example of refactoring is shown here:
document.getElementById("One").addEventListener("click", mapVariables);
document.getElementById("Two").addEventListener("click", mapVariables);
document.getElementById("Three").addEventListener("click", mapVariables);
document.getElementById("Four").addEventListener("click", mapVariables);
document.getElementById("Five").addEventListener("click", mapVariables);
Although only taking up five lines of code, this was refactored to:
document.querySelectorAll(".mapVariables").forEach(item => {
item.addEventListener('click', mapVariables)
})
Essentially just two lines of code.
In the first editions of the test_yourself page each map was separated to have unique variables. In the refactored version, each map still had unique variables but was called on from one set of data instead of five individual sets. Each map gets the variables from this code:
document.getElementById(mapNumber + "InitialVelocity").innerHTML = velocity.toFixed(2) + " kmh<sup>-1</sup>";
document.getElementById(mapNumber + "Phase").innerHTML = yellowPhase.toFixed(1) + " s";
document.getElementById(mapNumber + "RlPhase").innerHTML = interPhase.toFixed(1) + " s";
document.getElementById(mapNumber + "RtRandom").innerHTML = reactionTime.toFixed(3) + " s";
document.getElementById(mapNumber + "TireCondition").innerHTML = tires[tireCondition];
document.getElementById(mapNumber + "WeatherCondition").innerHTML = climate[climateCondition];
document.getElementById(mapNumber + "CarLength").innerHTML = carLength.toFixed(1);
The data for each can then be taken from also one location rather than five individual locations such as the data for climate which needs to be individualised for each map:
let climate;
if (mapNumber === "mapOne" || mapNumber === "mapThree") {
climate = ["dry", "dry", "dry", "dry", "light rain", "medium rain", "heavy rain", "light snow", "medium snow", "heavy snow", "light ice", "very icy", "severe ice"];
climateCondition = Math.floor(Math.random() _ climate.length);
keyClim = climate[climateCondition];
} else if (mapNumber === "mapTwo") {
climate = ["dry", "dry", "dry", "light rain", "medium rain", "heavy rain"];
climateCondition = Math.floor(Math.random() _ climate.length);
keyClim = climate[climateCondition];
} else if (mapNumber === "mapFour") {
climate = ["dry", "light rain", "medium rain", "heavy rain", "light snow", "light ice"];
climateCondition = Math.floor(Math.random() _ climate.length);
keyClim = climate[climateCondition];
} else if (mapNumber === "mapFive") {
climate = ["dry", "light rain", "medium rain", "heavy rain"];
climateCondition = Math.floor(Math.random() _ climate.length);
keyClim = climate[climateCondition];
} else climate = false;
Now new maps can be added with ease or use existing data. Note that some of the random conditions contain the same variable, such as map two with "dry" appearing three times. This prevents the randomisation selecting a variable with an even distribution. As the location of map two is Sydney, the area is more likely to be dry than to have rain. Although rain is still a possibility, it is not an even distribution. There are subsequent methods that can be employed to lower the risk of producing an even distribution for the chance of an event occurring, however, for practicality, it was more valid to add the variable in more times as required. Now "dry" is able to be picked three times out of six, or approximately 50% of the time. Furthermore, it is never likely to snow in Sydney (though it has happened, but extremely rarely) and therefore it would be a poor user experience to include an unrealistic scenario for the city. Therefore map one and three where snow is likely and can be heavy and map four, where light snow and ice is possible allows for a more realistic setting for each intersection.
The entire code was reduced by about 70% from near 800 lines to around 240 lines.
Input validation was considerably more time consuming than many of the other sections of code. The main reason for adding external validation checks for input was due to browser differences between two of the most popular browsers in use. On Chrome, the input type="number" prevents the input of letters, except "e" (for exponentials) and on mobile phone opens up the numeric keypad instantly when the input is selected. However, on Firefox, input type="number" neither prevents input of letters and fails to effectively validate for such. Despite these two major differences, HTML validation is certainly not entirely reliable and should not be considered the only source of validation. Secondly, Firefox validation does provide a default user hint in a bubble/tooltip that is seemingly anchored to the input where an invalid response has been received.
Unfortunately if the user scrolls, the tooltip is no longer anchored and floats up the screen as the user scrolls. Not only is this unsightly, but defeats the purpose of the tooltip showing the user where their invalid input has been located. Because of this scenario, default tooltips on all browsers was turned off using the following code:
document.querySelector("form").addEventListener("invalid", function(event) {
event.preventDefault();
}, true );
Secondly, code was added to CSS to change the colour of inputs if they are valid or invalid by using this code: (Pablo Darde, 2020)
input[type="number"] + div {
display: none;
}
input[type="number"]:valid {
background-color: #fbfaf5;
}
input[type="number"]:invalid {
background-color: #eac6c6;
}
input[type="number"]:invalid + div {
display: block;
color: #c66464;
}
Spinners on number inputs were also removed using code first found at W3Schools:
input::-webkit-outer-spin-button,
input::-webkit-inner-spin-button {
-webkit-appearance: none;
margin: 0;
}
input[type=number] {
-moz-appearance: textfield;
}
Finally, JavaScript was used to determine if a number had been inputted and contained only 2 or 3 decimal places and no exponents.
For two decimal places the variable was set from the following:
const isOpen = (val) => {
const num = parseFloat(val);
if (isNaN(num)) {
return true;
} else {
const decimals = num.toString().split('.')[1] || '';
if (decimals.length > 2) {
return true;
} else {
return false;
}
}
};
Discussion with others at StackOverflow had suggested to replace this code with a regex code instead. Although plenty of regex code was available, this code had already been written and was suitable to complete the job. For future use, a regex code will be used, especially for email.
The constants are then parsed into the validation filter to trigger a tooltip and a scroll "up" to the invalid input if required:
$(document).ready(function() {
$("#submitCalculation").click(function() {
$(".checkVelocity").each(function() {
const val = $(this).val();
if (isOpen(val) || val > 300) {
$(this).popover({
placement: "top",
content: `'<textarea class="popover-textarea"></textarea>',`
template: `'<div class="popover"><div class="arrow"></div>'` +
`'<div class="row"><div class="col-3 my-auto"><i class="fas fa-exclamation-triangle" id="invalid-input3">'` +
`'</i></div><div class="popover-content col-9">Enter the velocity of the car between 10 and 300 ms<sup>-1</sup>, kmh<sup>-1</sup> or mph.'` +
`'</div></div>'`
});
$(this).popover("show");
$(this).click(function() {
$(this).popover("hide");
});
$('html, body').scrollTop($(".cardBodyVelocity").offset().top);
}
})
})
})
This code is on the form_validation.js file and checks the validation of the velocity input on the calculator page.
The code allowed tooltips (pop-overs) to occur at the invalid input (code partly from [Bootstrap Tooltips (https://getbootstrap.com/docs/4.0/components/tooltips/)) as well as the scroll function to the first invalid response. If multiple invalid responses occur, each time the user attempts to submit the function will scroll to the next invalid input. The original code and idea was first found here: http://jsfiddle.net/bqo5mdcz/3/ through a Google search, however, it was not clear who the original author was.
Although email and name validation is also run by similar code, instead of having a non-numerical value ping "false", a numerical only value in the name or email field would.
Names and emails, although can have numbers, can not be numbers. Again, a suitable regex could be used for this purpose.
Although vast numbers of libraries exist that help control for input, the learning experience was more valuable to include a unique validation system. Further projects may include libraries or parts of code from libraries to cut down on the extensive amount of time spent on coding for validation of inputs.
The site release and current version has slightly varying methods of preventing user invalid input on the test_yourself page.
Because there is no backend or serve side requirements, all validation can be completed with HTML, CSS and JavaScript. Because there is only one user input field, there is no requirement to scroll to the input box. However, if the user was able to input an invalid number, because of the global requirement of the mapNumber variable, a user would be able to submit and a calculation would still be performed even without a number.
Many methods to prevent code from continuing had been tested, including event.preventDefault and event.stopPropagation but to no avail. Finally, it was decided that the default "enabled" submit button would need the disabled attribute until such a time a valid input was included.
This also meant the reset button would clear the input and would also set the submit button to disabled. The main issue was getting the "submit" button to listen for invalid inputs after the default disabled was removed (for example, an invalid input was backspaced to a point where a valid input was ready to be accepted but the user continued to re-input an invalid response). To further make this task difficult, the response to disable the submit button needed to be instantaneous. Because the CSS had been controlling for the colour of the input field, it was believed a code could read the colour of the input and adjust the submission button status through this method.
The original code was authored and edited testing at JSBin however, the final code was consulted with sale108 from StackOverflow with subtle changes allowing for the code to read the input values instantly (keyup listener).
The final code to listen for the colour of the input field is as follows:
const elem = document.getElementById(mapNumber + "UserInput");
elem.addEventListener("keyup", () => {
let theStyle = window.getComputedStyle(elem, "").getPropertyValue("background-color");
let submitBtn = document.getElementById(mapNumber + "Submit");
if (theStyle === "rgb(234, 198, 198)") {
submitBtn.disabled = true;
document.getElementById(mapNumber + "InvalidResponse").innerHTML = "Add a value for your calculation then click on the <em>submit</em> button below to check your answers."
} else if (theStyle === "rgb(251, 250, 245)") {
submitBtn.disabled = false;
}
});
const reset = document.getElementById(mapNumber + "Reset")
reset.addEventListener("click", disableSubmit);
function disableSubmit() {
document.getElementById(mapNumber + "Submit").disabled = true;
};
To cut down on code, the RGB value was used and not converted to hex (16).
For the vast majority of the calculations it is easier for students to see individual variables broken down and where multiple variables are required, they are separated in chunks and slowly scaffolded. Giving an entire equation ignores students who may have more difficulties with the mathematical side of physics. For this student the site allows individual variables to be entered and the calculation works in the background. For students who have a more advanced mathematical ability will still be able to add variables in the same manner, and will not see this any less than primary data addition. Providing benefits for lower end students provides benefits for all.
Therefore the equations in JavaScript pertaining to the dilemma zone are also broken down to provide the eight outcomes for the dilemma zone.
Firstly the car's velocity is calculated if required (ie, units other than metres per second were used). Because default values have already been included, students could use this calculator to convert from kilometres per hour or miles per hour into metres per second without adding any further variables.
The car's velocity is then used to determine how far it can travel within the time before traffic lights on perpendicular roads turn green allowing traffic from other roads to progress. The time is an addition of yellow and interphase times in seconds.
velocity = distance(travelled) / time
From this the calculator can determine exactly how far back from the intersection a vehicle can be to exit the intersection safely within this time. Therefore the vehicle's length and intersection distance are used and then subtracted from the total distance the vehicle can travel in the yellow and interphase time. This now provides the furthest point from the intersection a vehicle can be as soon as a traffic light turns yellow.
total distance from intersection = distance(travelled) - (intersection length + car length)
This ends the first section of the equation, the second section works out stopping distance. This requires the vehicle's initial velocity, the driver's reaction time, and the coefficient of friction.
stopping distance = (reaction time * velocity) + (velocity squared / 2 * coefficient of friction * gravity (9.81))
Finally, the dilemma zone is when the stopping distance is smaller than the distance the vehicle can travel through the intersection. Depending on the treatment of the two equations a negative number will determine a dilemma zone (ie, stopping distance > distance able to be travelled). If stopping distance is less than the distance able to be travelled, then an option zone will exist (ie, a vehicle's driver has a choice to either continue going or brake to stop).
All numbers are set to a maximum of two decimal places in the final answer (reaction time and coefficient of friction allows for three decimal place inputs). This avoids extreme numbers with insignificant data.
Custom alert boxes were first introduced as a last minute alternative to the default JavaScript alert boxes. The default boxes, although effective, did not appear visually to represent the site nor fit in with any particular theme. Although a few options were tested, only one particular style was considered. The custom dialog (sic) box tutorials at Develop.com were decided on due to the ease of integration and simplicity of styling. However, the code itself is not without problems, especially as it is not written for mobile first. On a small display the alert box does not render correctly, is not fluid and the "close" button can not be seen. It is also noted that the overlay does not extend all the way down to the footer and some vertical scrolling, although extremely limited, is still possible.
The original script allowed for a 550px sized box which would render correctly on large screen directly in the centre of the screen with the following code:
function CustomAlert(){
this.render = function(dialog){
~~let winW = window.innerWidth;~~ // Removed
let winH = window.innerHeight;
let dialogoverlay = document.getElementById('dialogoverlay');
let dialogbox = document.getElementById('dialogbox');
dialogoverlay.style.display = "block";
dialogoverlay.style.height = winH+"px";
~~dialogbox.style.left = (winW/2) - (550 * .5)+"px";~~ // Removed
dialogbox.style.top = "100px";
dialogbox.style.display = "block";
document.getElementById('dialogboxhead').innerHTML = '<strong>Share your score to Facebook</strong>';
document.getElementById('dialogboxbody').innerHTML = dialog;
document.getElementById('dialogboxfoot').innerHTML = '<button  class="btn btn-danger"  onclick="Alert.ok()"><i  class="far fa-times-circle"></i> Close</button>';
}
this.ok = function(){
document.getElementById('dialogbox').style.display = "none";
document.getElementById('dialogoverlay').style.display = "none";
}
}
let Alert = new CustomAlert();
However, because of the fixed sizing the two lines (as indicated) were removed to make the code mobile-first responsive.
The CSS delivers the style to the boxes and now provides the location as well.
#dialogbox {
display: none;
position: fixed;
margin-top: 17.5%;
top: 50%;
left: 50%;
transform: translate(-50%, -50%);
background: #0b6623;
border-radius: 7px;
width: 67.7%;
max-width: 550px;
z-index: 2001;
}
The margin-top, top, left, transform: translate, colour, width and max-width were all modified to allow for mobile first display rendering.
All the other code remains identical to the tutorial code in the link above (with the exception of the JavaScript "var" being replaced with "let").
Some minor issues still remain, the code doesn't allow for a natural centre for the dialog box and due to the length of the messages in the dialog box body, the alert box now wraps (appropriately) on smaller displays.
Also noteworthy is the z-index value for both the overlay and dialogbox. The standard Bootstrap modal has a z-index of 1050, so a z-index greater than 1050 is required to appear over the top of the modal. The overlay equally needs to prevent the modal from being operated while an error warning is present. So the overlay has an z-index of 2000 and the dialogbox a z-index of 2001.
Currently, there are few known bugs in the code and the code operates as anticipated. However, there are multiple limitations to the code and equations used. Firstly, the equation can only determine if a dilemma zone exists (or option zone) if a vehicle has either a constant velocity or constant de-acceleration (braking). This means that only straight line dilemma zones can be determined. Vehicles that are using perpendicular roads to travel to or from are excluded from this equation. Secondly, users are limited to realistic values to avoid extreme numbers that display incorrectly in Bootstrap modals. Thirdly, the equations for dilemma and option zones assume flat roads with no hills or turns.
After a user has completed a game and shared the results on their Facebook timeline, a link to the Reaction Timer - Physics Code is displayed in the top of the person's post:

This takes the user directly to the Physic's Code page, originally the link returned an error on Facebook and suggested the application had not been approved. It has since been approved and users should not be troubled by this error.
However, advert blocking applications such as uBlock Origin may prevent the Facebook share button from accessing various components on the user's browser. However, this does not affect the user's ability to input valid responses and share the site on their Facebook timeline. The only time this may be noticed is if the user with an advert blocking application accesses the "inspect" function of the browser:

Although instances of the Facebook share button disappearing have been noted during testing phase, it has not been shown to be caused by advert blocking applications. Instead it was most likely due to updating the code which may have impacted on the Facebook sharing code. At present, the share button appears on several tested devices with and without advert blocking applications. Because Facebook sharing is a third party add-on to Physics Code, this can be monitored over time. However, it is hoped that Facebook will notify developers of changes that occur to the code which may prevent share facilities from displaying accurately.
A second, but minor issue occurs when users are using a Chromium based browser and share their best time to Facebook. On Firefox browsers, all browser default pop-ups have been removed. However, on Chrmoium based browsers, the Facebook share page which opens in a new pop-up tab is separate from the Physics Code bage. If a user chooses to send their score to the timeline or close the page before sending their score to their timline a browser default pop-up is displayed. All efforts to remove this pop-up were explored and no fix has currentöy been found. This means on Chromium based browsers the user will experience the default pop-up warning first and if the user continues with their action, will then receive the Physics Code default alert. It is most likely due to the fact the Facebook pop-up occurs on a different site and is not directly controlled by Physics Code.
The site relies heavily on icon hints in various cards and buttons. However, due to the nature of <input> verses <button> meant that input tags require a "value" attribute however, button tags can have text input including Fontawesome icons. Although Fontawesome does display the Unicode equivalent of their icons, the Unicode supplied did not provide the icon when used in an <input> tag. This meant alternatives were sought or fixes. In this case, alternative Unicode icons were sought. All Unicode HTML characters were taken from FileFormat. Although not every devices has been checked, it is apparent these Unicode characters are more likely to be displayed than icons.
Previously mentioned invalid input default validators will ignore various letter inputs producing a non-number equation. This was prevented by adding a second layer of validation via JavaScript; see Input Validation.
Spinners from all inputs were removed to prevent negative numbers from being presented. Although this is stopped in JavaScript, this is a secondary method to prevent invalid inputs.
A "current" scenario button had been included in earlier versions of the test_yourself page, but due to input validation, it was impossible to re-open a modal without a) refreshing the content inside or; b) ignoring the current map number preventing input from the user. Although many possible considerations were made to include the button, it was not an overall requirement. It was then decided to prevent the user from accidentally closing the modal with a key push or clicking outside of the modal. Instead, a user must now use one of the two active "close" buttons. This was included in HTML attributes:
data-backdrop="static"
data-keyboard="false"
This prevented accidental closing of modals when a calculation was being performed.
In early versions of the Physics Code calculator, users could accidental "scroll" when the mouse was over an input and change their value for the variables. This was prevented by adding this code:
$('form').on('focus', 'input[type=number]', function(e) {
$(this).on('wheel.disableScroll', function(e) {
e.preventDefault();
});
});
$('form').on('blur', 'input[type=number]', function(e) {
$(this).off('wheel.disableScroll');
})
(source: https://stackoverflow.com/questions/9712295/disable-scrolling-on-input-type-number)
Negative numbers in the dilemma zone calculation need to be given as "absolute" so the Math.abs(total) code was used.
The reaction time game prototype showed that the counter was able to stop and work out the number of seconds the user took to press the "brakes" button. However, the brakes button remained active and was able to be pushed again. An initial attempt to remove the ID that allows the "click" event to be listened to failed to work. Finally, a jQuery button disabled function was able to complete the job.
$("#brake_button").attr("disabled", true);
Screen size negatively affected the display of MathJax equations, especially the final equation on the help page which subsequently is also the largest equation. The only available fix for this that worked was to give the entire card where the equation was displayed a "no-display" class for small screens but instead display the equation presented with more line breaks added. This was all done using Bootstrap display functions.
It should also be noted that some of the MathML lengths are to be deprecated, however, this is part of the MathJax library and not directly affecting Physics Code displays. The warning in the console is as follows:
- " “veryverythinmathspace”, “verythinmathspace”, “thinmathspace”, “mediummathspace”, “thickmathspace”, “verythickmathspace” and “veryverythickmathspace” are deprecated values for MathML lengths and will be removed at a future date."
Occasionally maps may not display all sectors. It is not yet understood what causes some sectors in maps not displaying, however, the rarity of the situation is not causing concern. The most likely explanation is to do with browser loading capabilities.
All pages were run through appropriate validation services. Any adjustments that were required were made immediately. Testing was done throughout development as individual pages were nearing completion or if a particular code failed to produce the desired outcome.
JS Hint was used to validate all JavaScript pages. Although some minor warnings were shown, these were checked and no errors were caused as a result of these warnings. In some circumstances JS Hint is suggesting that variables are undefined. Again, these were checked and had either been defined or required user input.
The JS Hint output for calculator.js:

The JS Hint output for dependencies.js:

The JS Hint output for form_validation.js:

The JS Hint output for game.js:

The JS Hint output for maps.js:

The JS Hint output for sendmail.js:

The JS Hint output for test_yourself.js:

HTML validation was all checked using the W3C Markup Validation Service and if adjusments were required, these were done accordingly. There is one known error on the calculator page displayed below.
The W3C validation report for the 404.html page:

The W3C validation report for the calculator.html page. A known warning is displayed due to the zone_header being input via JavaScript dependent on calculated results. Therefore, this leaves the header in the modal empty. There is no impact to the code, usability or outcome due to this error.

The W3C validation report for the contact.html page:

The W3C validation report for the game.html page:

The W3C validation report for the help.html page:

The W3C validation report for the index.html page:

The W3C validation report for the privacy.html page:

The W3C validation report for the terms.html page:

The W3C validation report for the test_yourself.html page:

CSS was validated using the W3C CSS Validator. No errors were found in this process.

The initial site will be deployed using Github Pages, however, it is possible further editions of the site will be released on public domains with an appropriate URL.
The initial project was written entirely using Gitpod and Atom as IDEs and then pushed to Github making Github Pages the first choice for initial deployment.
Github Pages deployment is conducted from the settings page and uses the following information:

A copy of the GitHub Repository can be made by forking the GitHub account preferably, with permission of the author.
This copy can be viewed and changes can be made to the copy without affecting the original repository. In order to create a fork follow these steps:
-
Log in to GitHub and locate the Physics Code GitHub Repository;
-
On the top right locate the "Fork" Button;

- Clicking on this will create a fork in your directory where you can add data without affecting the original master copy.
It is plausible that a clone of this repository will be made so that more calculators and games can be added along with help files. Cloning is conducted at the GitHub Repository by clicking on the code button and downloading the repository. This can then be uploaded in a new repository or worked on locally using an IDE such as Atom.
-
Firstly access the repository to clone: https://github.com/pauld0051/physics-code
-
Click on "Code" on the right hand side:

- Select "Download Zip" to download the file and add to a directory on your local computer.

- From there you can access the files and use local based software to adjust the code accordingly. You will need to access your own APIs for Google Maps, Facebook and an account with EmailJS if you plan on using this code on a new website.

Although the current versions of Physics Code were never branched, there is plenty of merit for future versions to have branches associated. While the project was small, branches didn't appear essential. But as the project grows and new calculators, games and help files are added, branching will be required so that live versions are not altered and new versions can be added at the completion of a branch after subsequent testing.
Ideally, a new branch will be made from the master and the branch to be worked on will be created from this branch.
- Firtly create a branch either in Github or on Gitpod (either way produces the same outcome);
Select "master" from your Github repository and create a new branch by typing in a name. In this case I created a first branch and a second branch to come from that branch.

- Alternatively you can do this in Gitpod on the bottom left of your Gitpod dashboard you'll see the "master" button with a refresh. If you decided to make a new branch in Github, you can click refresh to change to that branch or click "master" to create a new branch which you can then switch to.

- Finally, switch the branch or carry on making a new branch for your repository. All changes you make can be merged later after exhaustive testing.

All code was written by Paul Davis in consultation with the following:
There are a number of people and organisations that helped make Physics Code possible.
Above all, Felipe Alarcon and his commitment along with encouragement as well as imparting countless bits of knowledge and providing expertise on all areas of coding. Felipe was available at short notice and was continually active on Slack to provide his field of expertise.
The community at StackOverflow where countless questions have been asked and answered. Usually within minutes of being posted. I am looking to pay this community back 10 fold as my experience grows.
The Code Institute tutoring team, especially Kevin and Cormac who provided advice for many challenging situations for where an answer was not readily available on searches or was too large to ask at the Slack community.
The Code Institute lessons, especially on Google Maps, EmailJS and various JavaScript tips and tricks.
My wife Inga Veličko, daughter Paige Davis and friend Adela Tavačová for providing expertise on colours to be used for the site and for continually testing the site throughout the development stages.
Rudolf Grigeľ for providing a one-on-one consultation to finalise input validation.
Continuous support from peers at the Code Institute Slack channel.
Code has been credited internally by use of inline comments or throughout this Readme file. These include codes that were originally found at:
-
User code at Codepen
All images were first downloaded and used from one of the following locations:
All images are subject to international copyright laws.
Throughout the development phase, regular commits were made and pushed to the Github repository. Early version commits were not made in the imperative as feedback had not yet been received from the MS1. This was adjusted as soon as the feedback was received. The following is the list of commits over the entire project.
The full list of commits are available in pdf format: