![]()
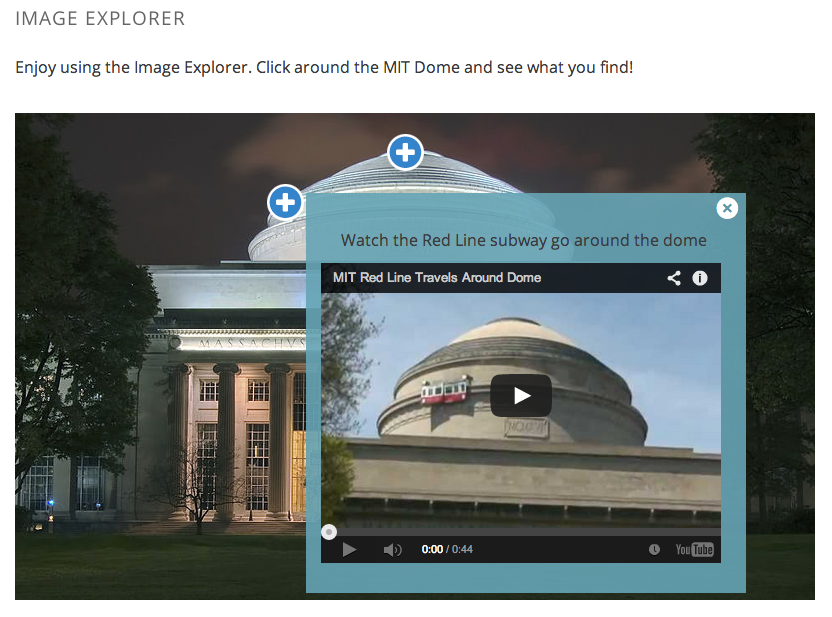
This package provides the Image Explorer XBlock that allows you to use an image with hotspots in a course. When the student clicks a hotspot icon, tooltip containing custom content is displayed.
Screenshot below shows the Image Explorer XBlock rendered inside the edX LMS with an activated tooltip containing and embedded YouTube video.
Install the requirements into the python virtual environment of your
edx-platform installation.
$ pip install -r requirements.txtYou can enable the Image Explorer XBlock in studio through the advanced settings.
- From the main page of a specific course, navigate to
Settings -> Advanced Settingsfrom the top menu. - Check for the
advanced_modulespolicy key, and add"image-explorer"to the policy value list. - Click the "Save changes" button.
Make sure you have firefox and geckodriver installed and added to your PATH,
then, follow these instructions:
-
Create a virtualenv and enable it.
-
Install tox with
pip install tox -
Run
toxto run all tests.
You can also run separate test environments like this:
tox -e unit  # Run only unit tests
tox -e integration  # Integration tests
tox -e quality  # pylint
When you add the Image Explorer component to a course in the studio,
the block is field with default content, shown in the screenshot below.
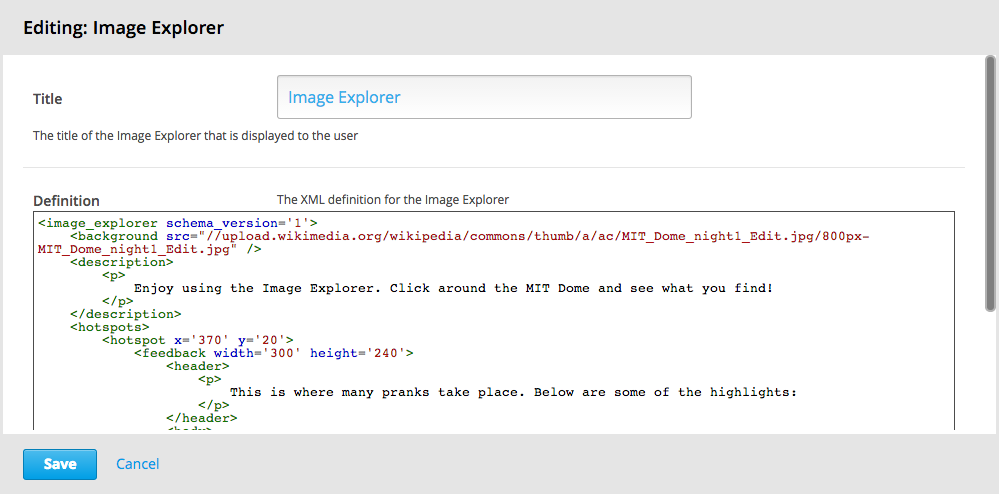
The basic structure of the image_explorer XBlock looks like this:
<image_explorer schema_version="1">
  <background src="http://link/to/image.jpg" />
  <description>...custom HTML content...</description>
  <hotspots>
    <hotspot x="370" y="20">
      <feedback width="300" height="300">
        <header>...custom HTML content...</header>
        <body>...custom HTML content...</body>
        <youtube video_id="dmoZXcuozFQ" width="400" height="300" />
      </feedback>
    </hotspot>
    <hotspot>...</hotspot>
    ...
    <hotspot>...</hotspot>
  </hotspots>
</image_explorer>
The schema_version attribute of the <image_explorer> wrapper
element should be set to 1. It currently isn't used but will provide
help for easier schema migrations if the XML schema changes in future
versions.
The <image_explorer> element should contain the following child
elements:
<background>(required)<description>(optional)<hotspots>(required)
The src attribute of the <background> element defines the image
over which the hotspots are placed.
The optional <description> element can contain arbitrary HTML
content that is rendered above the image.
The <hotspots> element wraps an arbitrary number of child
<hotspot> elements. These define the position of the hotspots on the
background image and the content of the tooltips.
The supported attributes of <hotspot> elements are x and y (both
required) that specify the position of the hotspot on the background
image, item-id which can be set to a unique string used to
identify the hotspot in the emitted events and optional side attribute
that allows to override hotspot's popup position. If side attribute is
missing or set to anything except left and right automatic positioning
is used.
Each <hotspot> element must contain the <feedback> child
element. The <feedback> element supports width, height and max-height
attributes (all optional) that specify the dimensions of the tooltip
element. The default width is 300px and if no height is specified, the
max-height is set to 500px. So the content will be sized dynamically with a
vertical scrollbar for the overflow.
The <feedback> element can contain the following child elements:
<header><body><youtube>
If present, the <header> specifies the tooltip header. It may
contain arbitrary HTML content.
The <body> element can contain arbitrary HTML content that is
rendered in the tooltip.
The <youtube> element offers a convenient way of placing an embedded
YouTube video into a tooltip. The required attributes are video_id,
width, and height.
The <ooyala> element offers a convenient way of placing an embedded
Ooyala video into a tooltip. The required attributes are video_id,
width, and height.
The <brightcove> element offers a convenient way of placing an embedded
Brightcove video into a tooltip. The required attributes are video_id,
account_id, width, and height.
e.g;
<brightcove video_id="6110618169001" account_id="6057949416001" width="320px" height="180px" />
Retrieve fixed data for all Image Explorer XBlocks in a course:
GET https://<lms_server_url>/api/courses/v1/blocks/?course_id=<course_id>&username=<username>&depth=all&requested_fields=student_view_data
Example image explorer return value:
"student_view_data": {
    "hotspots": [
        {
            "item_id": "hotspotA",
            "x": "370",
            "feedback": {
                "body": "<ul><li>Once there was a police car up here</li><li>Also there was a Fire Truck put up there</li></ul>",
                "width": "300",
                "youtube": null,
                "max_height": null,
                "height": "240",
                "header": "<p>This is where many pranks take place. Below are some of the highlights:</p>",
                "type": "text",
                "side": "auto"
            },
            "y": "20"
        },
        {
            "item_id": "hotspotB",
            "x": "250",
            "feedback": {
                "body": null,
                "width": "440",
                "youtube": {
                    "width": "400",
                    "video_id": "dmoZXcuozFQ",
                    "id": "youtube-f6c7d27d30834097bb1b17af1074e98c",
                    "height": "300"
                },
                "max_height": null,
                "height": "400",
                "header": "<p>Watch the Red Line subway go around the dome</p>",
                "type": "youtube",
                "side": "auto"
            },
            "y": "70"
        }
    ],
    "description": "<p>Enjoy using the Image Explorer. Click around the MIT Dome and see what you find!</p>",
    "background": {
        "src": "//upload.wikimedia.org/wikipedia/commons/thumb/a/ac/MIT_Dome_night1_Edit.jpg/800px-MIT_Dome_night1_Edit.jpg",
        "height": null,
        "width": null
    }
},
The Image Explorer XBlock is available under the GNU Affero General Public License (AGPLv3).