![]()
OpenPiton is the world's first open source, general purpose, multithreaded manycore processor. It is a tiled manycore framework scalable from one to 1/2 billion cores. It is a 64-bit architecture using SPARC v9 ISA with a distributed directory-based cache coherence protocol across on-chip networks. It is highly configurable in both core and uncore components. OpenPiton has been verified in both ASIC and multiple Xilinx FPGA prototypes running full-stack Debian linux. We have released both the Verilog RTL code as well as synthesis and back-end flow. We believe OpenPiton is a great framework for researchers in computer architecture, OS, compilers, EDA, security and more.
OpenPiton has been published in ASPLOS 2016: Jonathan Balkind, Michael McKeown, Yaosheng Fu, Tri Nguyen, Yanqi Zhou, Alexey Lavrov, Mohammad Shahrad, Adi Fuchs, Samuel Payne, Xiaohua Liang, Matthew Matl, and David Wentzlaff. "OpenPiton: An Open Source Manycore Research Framework." In Proceedings of the 21st International Conference on Architectural Support for Programming Languages and Operating Systems (ASPLOS '16), April 2016.
- More information about OpenPiton is available at www.openpiton.org
- Follow us on Twitter!
- Get help from others by joining our Google Group
- Keep up-to-date with the latest releases at the OpenPiton Blog
If you use OpenPiton in your research please reference our ASPLOS 2016 paper mentioned above and send us a citation of your work.
There are several detailed pieces of documentation about OpenPiton in the docs folder listed below:
- OpenPiton Simulation Manual
- OpenPiton Microarchitecture Specification
- OpenPiton FPGA Prototype Manual
- OpenPiton Synthesis and Back-end Manual
We also host GitHub repositories for other parts of the project, including:
-
The
PITON_ROOTenvironment variable should point to the root of the OpenPiton repository -
The Synopsys environment for simulation should be setup separately by the user. Besides adding correct paths to your
PATHandLD_LIBRARY_PATH(usually accomplished by a script provided by Synopsys), the OpenPiton tools specifically reference theVCS_HOMEenvironment variable which should point to the root of the Synopsys VCS installation. -
Run
source $PITON_ROOT/piton/piton_settings.bashto setup the environment- A CShell version of this script is provided, but OpenPiton has not been tested for and currently does not support CShell
-
Top level directory structure:
- piton/
- All OpenPiton design and verification files
- docs/
- OpenPiton documentation
- build/
- Working directory for simulation and simulation models
- piton/
-
Depending on your system setup, Synopsys tools may require the
-full64flag. This can easily be accomplished by adding a bash function as shown in the following example for VCS (also required for URG):function vcs() { command vcs -full64 "$@"; }; export -f vcs
-
On many systems, an error with
goldfinger, or other errors not described below, may indicate that you should run themktoolscommand once to rebuild a number of the tools before continuing. If you see issues later with building or running simulations, try runningmktoolsif you have not already. -
In some cases, you may need to recompile the PLI libraries we provide. This is done using
mkplilibwith the argument for the simulator you want to rebuild for. You may need to runmkplilib cleanfirst, then depending on which simulator, you can build with:mkplilib vcs,mkplilib ncverilog,mkplilib icarus, ormkplilib modelsim. -
If you see an error with
bw_cppthen you may need to install gcc/g++ (to getcpp), orcsh(cshon ubuntu,tcshon centos) -
If you see an error with
goldfingerorg_asthen you may need to install 32-bit glibc (libc6-i386on ubuntu,glibc.i686on centos) -
If you see an error with
goldfingerorm4then you may need to install libelf (libelf-devon ubuntu,elfutils-libelf-develon centos) -
You also need the Perl Bit::Vector package installed on your machine (
libbit-vector-perlon ubuntu,perl-Bit-Vector.x86_64on centos, also installable via CPAN)
==========================
cd $PITON_ROOT/buildsims -sys=manycore -x_tiles=1 -y_tiles=1 -vcs_buildbuilds a single tile OpenPiton simulation model.- A directory for the simulation model will be created in
$PITON_ROOT/buildand the simulation model can now be used to run tests. For more details on building simulation models, please refer to the OpenPiton documentation.
Note: if you would like to decrease the testbench monitor output to a minimum, append
-config_rtl=MINIMAL_MONITORINGto your build command in step 2. above.
==========================
cd $PITON_ROOT/buildsims -sys=manycore -x_tiles=1 -y_tiles=1 -vcs_run princeton-test-test.sruns a simple array summation test given the simulation model is already built.- The simulation will run and generate many log files and simulation output to stdout. For more details on running a simulation, provided tests/simulations in the test suite, and understanding the simulation log files and output, please refer to the OpenPiton documentation.
==========================
A regression is a set of simulations/tests which run on the same simulation model.
cd $PITON_ROOT/buildsims -sim_type=vcs -group=tile1_miniruns the simulations in the tile1_mini regression group.- The simuation model will be built and all simulations will be run sequentially. In addition to the simulation model directory, a directory will be created in the form
<date>_<id>which contains the simulation results. cd <date>_<id>regreport $PWD > report.logwill process the results from each of the regressions and place the aggregated results in the filereport.log. For more details on running a regression, the available regression groups, understanding the regression output, and specifying a new regression group, please refer to the OpenPiton documentation.
==========================
Continuous integration bundles are sets of simulations, regression groups, and/or unit tests. The simulations within a bundle are not required to have the same simulation model. The continuous integration tool requires a job queue manager (e.g. SLURM, PBS, etc.) to be present on the system in order parallelize simulations.
cd $PITON_ROOT/buildcontint --bundle=git_pushruns the git_push continuous integration bundle which we ran on every commit when developing Piton. It contains a regression group, some assembly tests, and some unit tests.- The simulation models will be built and all simulation jobs will be submitted
- After all simulation jobs complete, the results will be aggregated and printed to the screen. The individual simulation results will be saved in a new directory in the form
contint_<bundle name>_<date>_<id>and can be reprocessed later to view the aggregated results again. - The exit code of the command in Step 2 indicates whether all tests passed (zero exit code) or at least one failed (non-zero exit code).
- For more details on running continuous integration bundles, the available bundles, understanding the output, reprocessing completed bundles, and creating new bundles, please refer to the OpenPiton documentation.
==========================
![]()
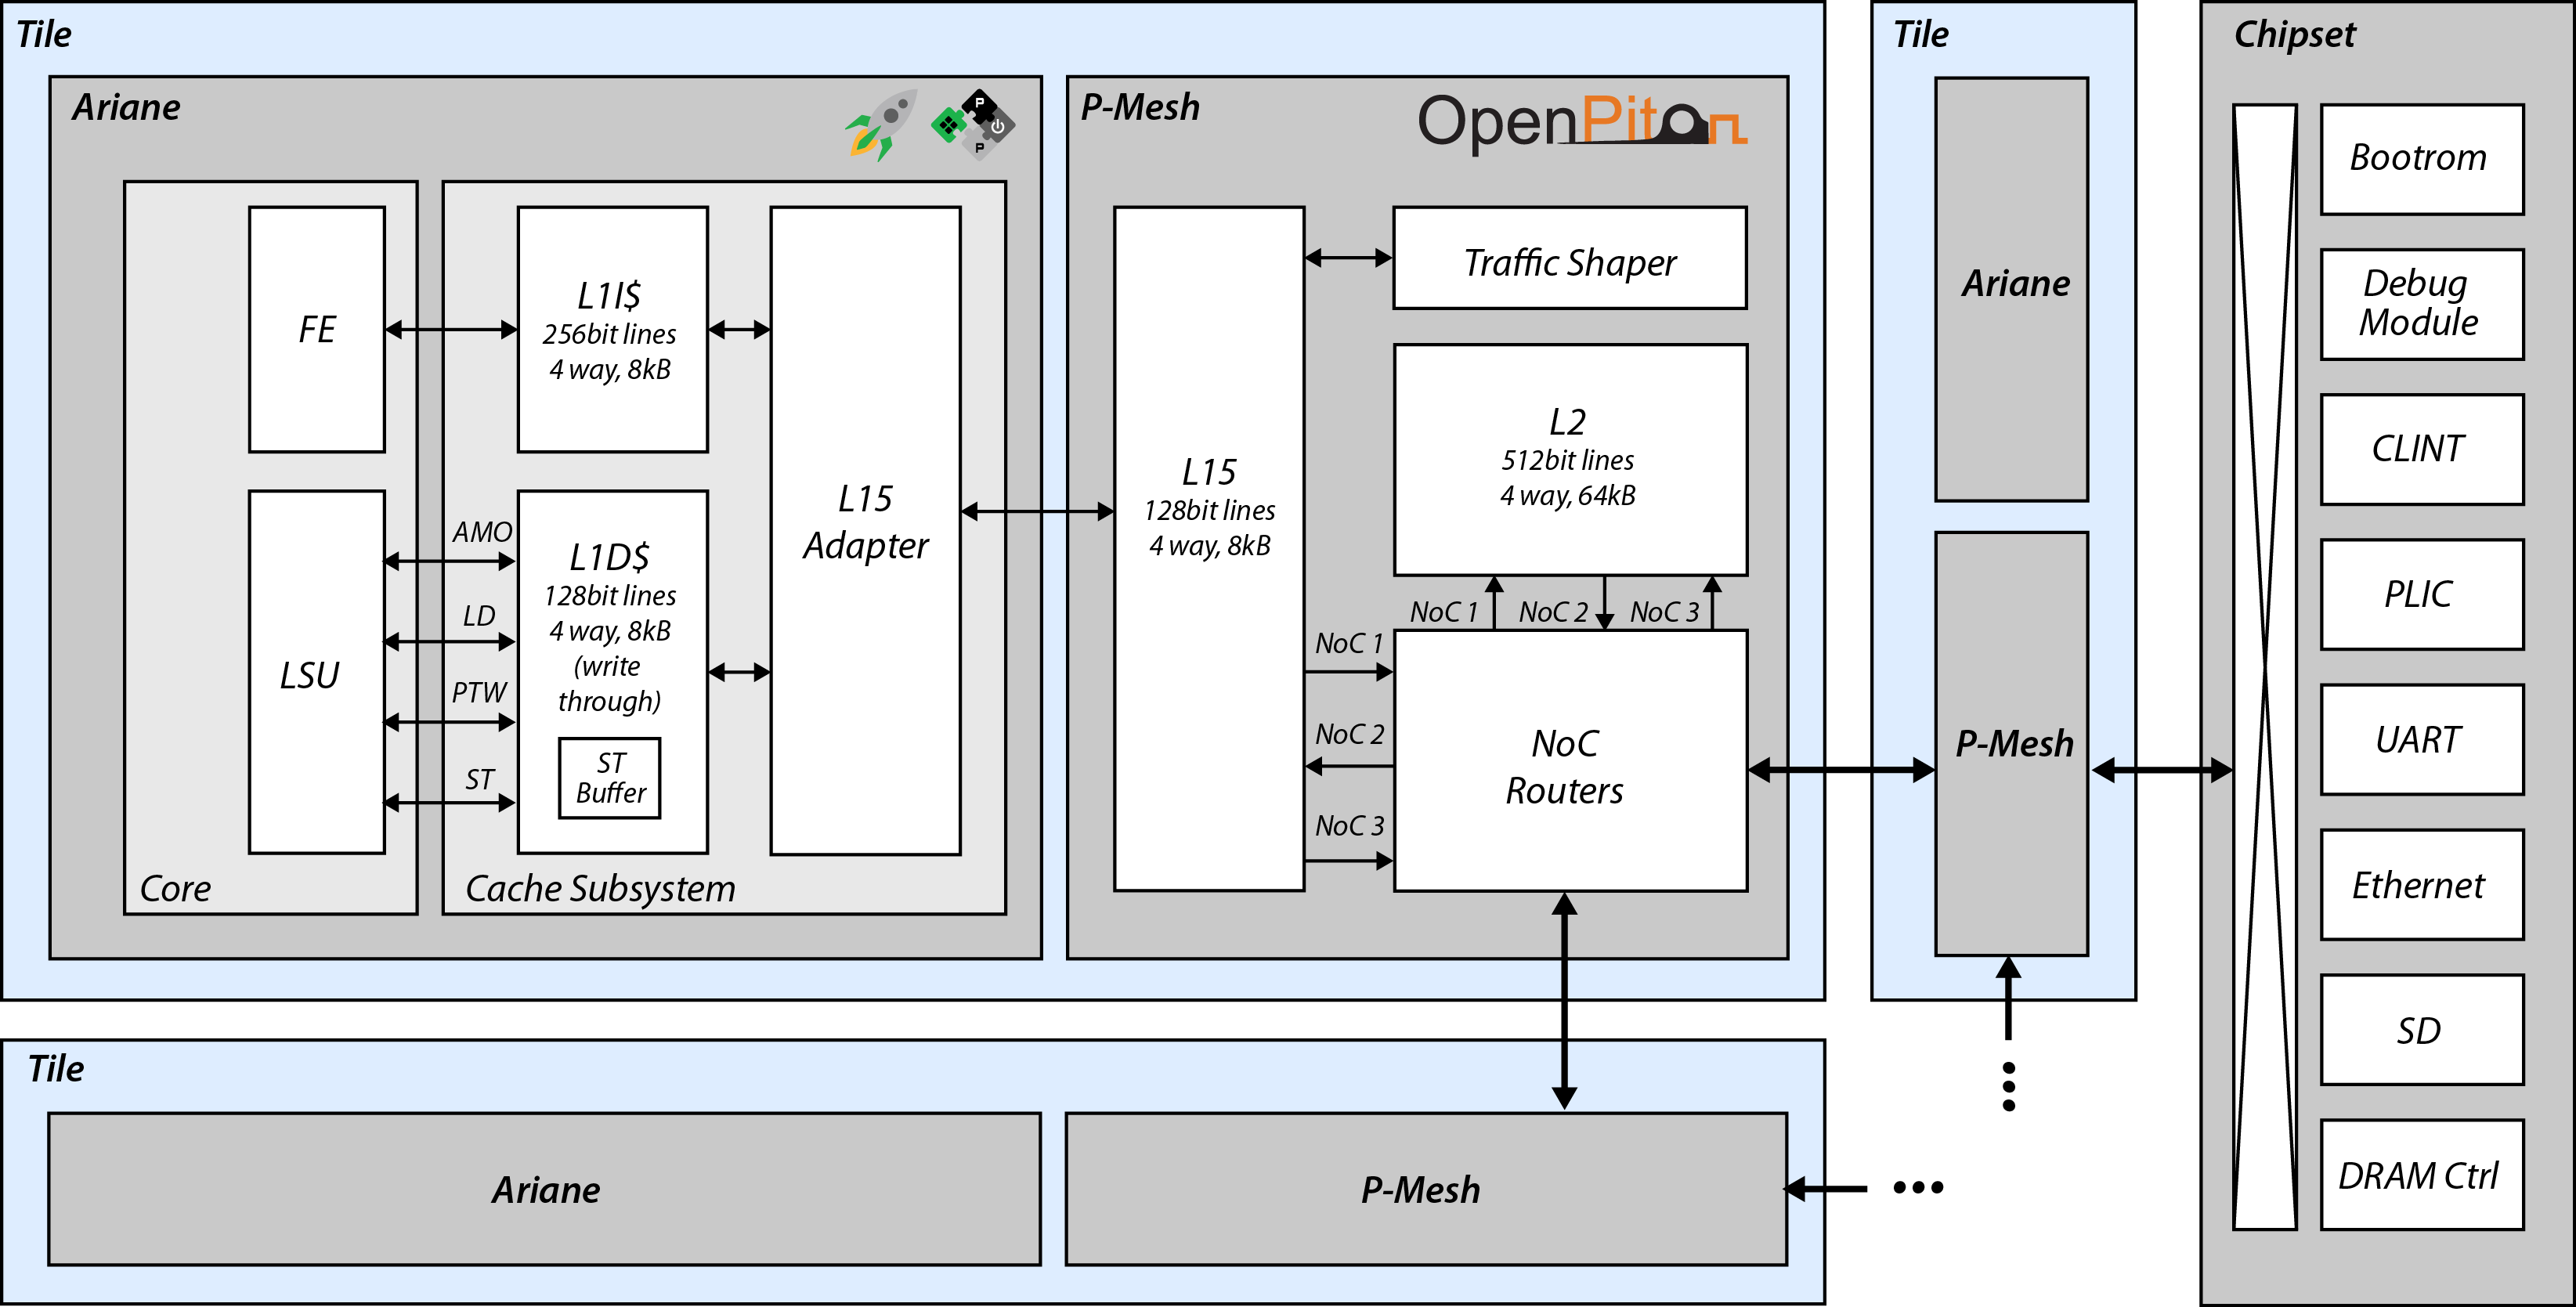
This version of OpenPiton has preliminary support for the 64bit Ariane RISC-V processor from ETH Zurich. To this end, Ariane has been equipped with a different L1 cache subsystem that follows a write-through protocol and that has support for cache invalidations and atomics. This L1 cache system is designed to connect directly to the L1.5 cache provided by OpenPiton's P-Mesh.
Check out the sections below to see how to run the RISC-V tests or simple bare-metal C programs in simulation.
For simulation, Questasim 10.6b, VCS 2017.03 or Verilator 4.014 is needed (older versions might work, but have not been tested).
You will need Vivado 2017.3 or newer to build an FPGA bitstream with Ariane.
In addition to the OpenPiton setup described above, you have to adapt the paths in the ariane_setup.sh script to match with your installation (we support Questasim, VCS and Verilator at the moment). Source this script from the OpenPiton root folder and build the RISC-V tools with ariane_build_tools.sh if you are running this for the first time:
cd $PITON_ROOT/source piton/ariane_setup.shpiton/ariane_build_tools.sh
Step 3. will then download and compile the RISC-V toolchain, the assembly tests and Verilator.
Note that the address map is different from the standard OpenPiton configuration. DRAM is mapped to
0x8000_0000, hence the assembly tests and C programs are linked with this offset. Have a look atpiton/design/xilinx/genesys2/devices_ariane.xmlfor a complete address mapping overview.
Also note that we use a slightly adapted version of
syscalls.c. Instead of using the RISC-V FESVR, we use the OpenPiton testbench monitors to observe whether a test has passed or not. Hence we added the corresponding pass/fail traps to the exit function insyscalls.c.
The RISC-V benchmarks are precompiled in the tool setup step mentioned above. You can run individual benchmarks by first building the simulation model with
cd $PITON_ROOT/buildsims -sys=manycore -x_tiles=1 -y_tiles=1 -msm_build -ariane
Then, invoke a specific riscv test with the -precompiled switch as follows
sims -sys=manycore -msm_run -x_tiles=1 -y_tiles=1 rv64ui-p-addi.S -ariane -precompiled
This will look for the precompiled ISA test binary named rv64ui-p-addi in the RISC-V tests folder $ARIANE_ROOT/tmp/riscv-tests/build/isa and run it.
In order to run a RISC-V benchmark, do
sims -sys=manycore -msm_run -x_tiles=1 -y_tiles=1 dhrystone.riscv -ariane -precompiled
The printf output will be directed to fake_uart.log in this case (in the build folder).
Note: if you see the
Warning: [l15_adapter] return type 004 is not (yet) supported by l15 adapter.warning in the simulation output, do not worry. This is only generated since Ariane does currently not support OpenPiton's packet-based interrupt packets arriving over the memory interface.
You can also run test programs written in C. The following example program just prints 32 times "hello_world" to the fake UART (see fake_uart.log file).
cd $PITON_ROOT/buildsims -sys=manycore -x_tiles=1 -y_tiles=1 -msm_build -arianesims -sys=manycore -msm_run -x_tiles=1 -y_tiles=1 hello_world.c -ariane -rtl_timeout 10000000
And a simple hello world program running on multiple tiles can run as follows:
cd $PITON_ROOT/buildsims -sys=manycore -x_tiles=4 -y_tiles=4 -msm_build -arianesims -sys=manycore -msm_run -x_tiles=4 -y_tiles=4 hello_world_many.c -ariane -finish_mask 0x1111111111111111 -rtl_timeout 1000000
In the example above, we have a 4x4 Ariane tile configuration, where each core just prints its own hart ID (hardware thread ID) to the fake UART. Synchronization among the harts is achieved using an atomic ADD operation.
Note that we have to adjust the finish mask in this case, since we expect all 16 cores to hit the pass/fail trap.
The RISC-V ISA tests, benchmarks and some additonal simple example programs have been added to the regression suite of OpenPiton, and can be invoked as described below.
- RISC-V ISA tests are grouped into the following four batches, where the last two are the regressions for atomic memory operations (AMOs):
sims -group=ariane_tile1_asm_tests_p -sim_type=msm
sims -group=ariane_tile1_asm_tests_v -sim_type=msm
sims -group=ariane_tile1_amo_tests_p -sim_type=msm
sims -group=ariane_tile1_amo_tests_v -sim_type=msm
- RISC-V benchmarks can be run with:
sims -group=ariane_tile1_benchmarks -sim_type=msm
- Simple hello world programs and AMO tests for 1 tile can be invoked with
sims -group=ariane_tile1_simple -sim_type=msm
- And a multicore "hello world" example running on 16 tiles can be run with
sims -group=ariane_tile16_simple -sim_type=msm
If you would like to get an overview of the exit status of a regression batch, step into the regression subfolder and call regreport . -summary.
The bitfile for a 1x1 tile Ariane configuration for the Genesys2 board can be built using the follong command:
protosyn -b genesys2 -d system --core=ariane --uart-dmw ddr
It is recommended to use Vivado 2018.2 or later since earlier versions might not produce a working bitstream.
Once you have loaded the bitstream onto the FPGA using the Vivado Hardware Manager or a USB drive plugged into the Genesys2, you first need to connect the UART/USB port of the Genesys2 board to your computer and flip switch 7 on the board as described in the OpenPiton FPGA Prototype Manual. Then you can use pitonstream to run a list of tests on the FPGA:
pitonstream -b genesys2 -d system -f ./tests.txt --core=ariane
The tests that you would like to run need to be specified in the test.txt file, one test per line (e.g. hello_world.c).
You can also run the precompiled RISCV benchmarks by using the following command
pitonstream -b genesys2 -d system -f ./piton/design/chip/tile/ariane/ci/riscv-benchmarks.list --core=ariane --precompiled
Note the
-precompiledswitch here, which has the same effect as when used with thesimscommand.
OpenPiton+Ariane supports the RISC-V External Debug Draft Spec and hence you can debug (and program) the FPGA using OpenOCD. We provide two example scripts for OpenOCD below.
To get started, connect the micro USB port that is labeled with JTAG to your machine. This port is attached to the FTDI 2232 USB-to-serial chip on the Genesys 2 board, and is usually used to access the native JTAG interface of the Kintex-7 FPGA (e.g. to program the device using Vivado). However, the FTDI chip also exposes a second serial link that is routed to GPIO pins on the FPGA, and we leverage this to wire up the JTAG from the RISC-V debug module.
If you are on an Ubuntu based system you need to add the following udev rule to
/etc/udev/rules.d/99-ftdi.rulesSUBSYSTEM=="usb", ACTION=="add", ATTRS{idProduct}=="6010", ATTRS{idVendor}=="0403", MODE="664", GROUP="plugdev"
Once attached to your system, the FTDI chip should be listed when you type lsusb
Bus 005 Device 019: ID 0403:6010 Future Technology Devices International, Ltd FT2232C/D/H Dual UART/FIFO IC
If this is the case, you can go on and start openocd with the fpga/ariane.cfg configuration file below.
$ openocd -f fpga/ariane.cfg
Open On-Chip Debugger 0.10.0+dev-00195-g933cb87 (2018-09-14-19:32)
Licensed under GNU GPL v2
For bug reports, read
    http://openocd.org/doc/doxygen/bugs.html
adapter speed: 1000 kHz
Info : auto-selecting first available session transport "jtag". To override use 'transport select <transport>'.
Info : clock speed 1000 kHz
Info : TAP riscv.cpu does not have IDCODE
Info : datacount=2 progbufsize=8
Info : Examined RISC-V core; found 1 harts
Info :  hart 0: XLEN=64, misa=0x8000000000141105
Info : Listening on port 3333 for gdb connections
Ready for Remote Connections
Info : Listening on port 6666 for tcl connections
Info : Listening on port 4444 for telnet connections
Info : accepting 'gdb' connection on tcp/3333
Note that this simple OpenOCD script currently only supports one hart to be debugged at a time. Select the hart to debug by changing the core id (look for the -coreid switch in the ariane.cfg file). If you would like to debug multiple harts at once, you can use ariane-multi-hart.cfg.
Then you will be able to either connect through telnet or with gdb:
$ riscv64-unknown-elf-gdb /path/to/elf
(gdb) target remote localhost:3333
(gdb) load
Loading section .text, size 0x6508 lma 0x80000000
Loading section .rodata, size 0x900 lma 0x80006508
(gdb) b putchar
(gdb) c
Continuing.

Program received signal SIGTRAP, Trace/breakpoint trap.
0x0000000080009126 in putchar (s=72) at lib/qprintf.c:69
69    uart_sendchar(s);
(gdb) si
0x000000008000912a  69    uart_sendchar(s);
(gdb) p/x $mepc
$1 = 0xfffffffffffdb5ee
You can read or write device memory by using:
(gdb) x/i 0x1000
    0x1000: lui t0,0x4
(gdb) set {int} 0x1000 = 22
(gdb) set $pc = 0x1000
In order to compile programs that you can load with GDB, use the following command:
sims -sys=manycore -novcs_build -midas_only hello_world.c -ariane -x_tiles=1 -y_tiles=1 -gcc_args="-g"
Note that the tile configuration needs to correspond to your actual platform configuration if your program is a multi-hart program. Otherwise you can omit these switches (the additional cores will not execute the program in that case).
We currently support single core and SMP Linux on the Genesys2, VC707 and Nexys Video FPGA development boards.
In order to build an FPGA image for these boards, use either of the following commands:
protosyn -b genesys2 -d system --core=ariane --uart-dmw ddr
protosyn -b vc707 -d system --core=ariane --uart-dmw ddr
protosyn -b nexysVideo -d system --core=ariane --uart-dmw ddr
The default configuration is 1 core for all boards, but you can override this with command line arguments. The commands below represent the maximum configurations that can be mapped onto the corresponding board:
protosyn -b genesys2 -d system --core=ariane --uart-dmw ddr --x_tiles=2
protosyn -b vc707 -d system --core=ariane --uart-dmw ddr --x_tiles=2 --y_tiles=2
Once you generated the FPGA bitfile, go and grab the ariane-sdk and follow the steps in that readme to build the Linux image and prepare the SD card. If you do not want to go through the hassle of building your own image, you can download a pre-built linux image from here.
Note that the board specific settings are encoded in the device tree that is automatically generated and compiled into the FPGA bitfile, so no specific configuration of the Linux kernel is needed.
Insert the SD card into the corresponding slot of the FPGA board, connect a terminal to the UART using e.g. screen /dev/ttyUSB0 115200, and program the FPGA. Once the device comes out of reset, the zero-stage bootloader copies the Linux image (including the first stage bootloader) into DRAM, and executes it. Be patient, copying from SD takes a couple of seconds.
There is also preliminary support for the VCU118, but not all features work yet on that board. For the VCU118 board you need the PMOD SD adapter from Digilent to be able to use an SD card (the slot on the VCU118 board is not directly connected to the FPGA). As the PMOD0 port has open-drain level-shifters, you also have to replace the R1-R4 and R7-8 resistors with 470 Ohm 0201 SMD resistors on the Digilent PMOD SD adapter to make sure that signal rise times are short enough.
The following items are currently under development and will be released soon.
-
Thorough validation of cache coherence.
-
RISC-V FESVR support in simulation.
-
Synthesis flow for large FPGAs.
-
Performance enhancements (cache re-parameterization, write-buffer throughput).
Stay tuned!