Bare Metal Hello World Operating System for Raspberry Pi 4/4b.
Boots and prints Hello World via TTL.
Compiling the kernel required the ARM 64 GNU C Cross Compiler. On Arch / Arch based distros it can be installed by running :
sudo pacman -S aarch64-linux-gnu-gcc
GNU Make is used to handle the kernel compilation. It is normally present on major distributions but can be easily installed by referring to the distribution specific install instructions. On Arch / Arch based distros it can be installed individually by running :
sudo pacman -S make
or with the base-devel group by running :
sudo pacman -S base-devel
Clone this repository by running :
git clone https://github.com/oddlyspaced/rpi4-hello-world.git
The Makefile contains 2 targets.
A standard all target which compiles the kernel image.
A clean target which cleans the build directory and any present images.
In order to compile the kernel image just cd to the source folder (rpi4-hello-world if you executed the above git command) and execute :
make
This should generate an img file called kernel8.img . This is our compiled kernel image.
The custom kernel image can be tested by following two different methods.
- Flash the latest Raspberry Pi OS Image on your SD Card
[Lite variant is recommended since our kernel is super bare bones and is not going to do much apart from just printing Hello World]'
-
Mount the boot partition
a. Find out the device and partition name by running
sudo fdisk -lIn my case the following was the output for the SD Card.
 Disk /dev/sda: 29.72 GiB, 31914983424 bytes, 62333952 sectors
 Disk model: SD/MMC/MS PRO
 Units: sectors of 1 * 512 = 512 bytes
 Sector size (logical/physical): 512 bytes / 512 bytes
 I/O size (minimum/optimal): 512 bytes / 512 bytes
 Disklabel type: dos
 Disk identifier: 0x9730496b

 Device     Boot  Start     End Sectors  Size Id Type
 /dev/sda1         8192  532479  524288  256M  c W95 FAT32 (LBA)
 /dev/sda2       532480 3661823 3129344  1.5G 83 Linux
b. Once you have found the device partition name, mount it by running
sudo mount <device> root-mountHere
<device>is the device partition name (/dev/sda1 according to the above sample) androot-mountis the folder where we will mount the partition. -
Copy over the config and kernel image
Copy the
config.txtandkernel8.imgover toroot-mountfolder. If you have compiled the kernel image without making any modifications to this Github repos source or config then you will need to rename thekernel8.imgtokernel8-rpi4.imgas mentioned in the config.kernel=kernel8-rpi4.imgThe above line in
config.txtis used to reflect this change.Note: You'll need to execute the
cp/mvcommand as root, ie by usingsudo -
Unmount the partition
Unmount the partition by running
sudo umount root-mountWhere as mentioned,
root-mountis the mount directory of the boot partition.With this your SD Card is ready to be tested on the Raspberry Pi.
In this process we extract the required basic firmware files from the Raspbian OS images and use those to generate a barebones flashable image for our tiny kernel image.
- Download the latest Raspberry Pi OS Image
[Lite variant is recommended since our kernel is super bare bones and is not going to do much apart from just printing Hello World]
-
Mount the boot partition of Raspberry Pi OS Image
a. Find the start offset of boot partition by running fdisk on the downloaded image. example :
fdisk -l 2021-05-07-raspios-buster-armhf-lite.imgThis should print the partition table for the img
Sample output :
 Disk 2021-05-07-raspios-buster-armhf-lite.img: 1.75 GiB, 1874853888 bytes, 3661824 sectors
 Units: sectors of 1 * 512 = 512 bytes
 Sector size (logical/physical): 512 bytes / 512 bytes
 I/O size (minimum/optimal): 512 bytes / 512 bytes
 Disklabel type: dos
 Disk identifier: 0x9730496b

 Device                                    Boot  Start     End Sectors  Size Id Type
 2021-05-07-raspios-buster-armhf-lite.img1        8192  532479  524288  256M  c W95 FAT32 (LBA)
 2021-05-07-raspios-buster-armhf-lite.img2      532480 3661823 3129344  1.5G 83 Linux
Here our start offset for the boot partition is
8192b. To mount the partition, we find the byte offset by multiplying the start offset value with sector size. In this case it is going to be
8192 * 512 = 4194304After that you can mount the partition from the img by running the following command
sudo mount -v -o offset=4194304 -t vfat 2021-05-07-raspios-buster-armhf-lite.img root-mountSubstitute
2021-05-07-raspios-buster-armhf-lite.imgwith the name of your Raspbian OS image androot-mountwith the path / folder name of your mount point. -
Extract the required files
The following output of
treecommand depicts the files which needs to be extracted from the mounted boot partition. ├── bcm2711-rpi-4-b.dtb ├── bootcode.bin ├── cmdline.txt ├── overlays │ ├── miniuart-bt.dtbo │ └── overlay_map.dtb └── start4.elfCopy the above mentioned files / folder and place them in another directory with the same file structure as displayed. For the forthcoming steps I will refer to that safe keeping folder as
boot-bkp -
Unmount the boot partition of Raspberry Pi OS Image
Once your files are ready, you can safely unmount the folder by running :
sudo umount root-mountWhere as previously mentioned,
root-mountis the path of your mount point. -
Add your config and kernel image
Copy the
config.txtandkernel8.imgover toboot-bkpfolder. If you have compiled the kernel image without making any modifications to this Github repos source or config then you will need to rename thekernel8.imgtokernel8-rpi4.imgas mentioned in the config.kernel=kernel8-rpi4.imgThe above line in
config.txtis used to reflect this change.Once done, your file and directory structure inside
boot-bkpshould look something like this :. ├── bcm2711-rpi-4-b.dtb ├── bootcode.bin ├── cmdline.txt ├── config.txt ├── kernel8.img ├── overlays │ ├── miniuart-bt.dtbo │ └── overlay_map.dtb └── start4.elf -
Generating the OS Image
Steps can be referred from the following repository which I've created and contains a simple bash script to generate a flashable OS Image.
-
Flashing to an SD Card
The generated image file can be flashed using the official
Raspberry Pi Imagersoftware or viaddusing the following command :sudo dd if=generated.img of=<device path> bs=4Mwhere
<device path>is the path of your SD card interface (Example:/dev/sdb)
For this you will be requiring a USB to TTL Cable. I bought mine from Robu.in in India. Same thing is listed on Amazon.com aswell.
Note: Make sure the TTL cable you are purchasing has
PL2303mentioned in the details. This is the chipset which I've been working with and can confirm about it's functioning. Other chipsets might work but YMMV.
a. Setting up the TTL connection.
Adafruit has a great article for this. You can read that here.
In short you will need to wire up the GPIO RX TX pins and open the serial window on your machine.
b. Booting the Raspberry Pi
Insert your SD Card into the Pi and boot.
If the image is fine and everything else is OK, the serial window should start printing debug information at first and then
Hello World!
must be there at the bottom of your screen.
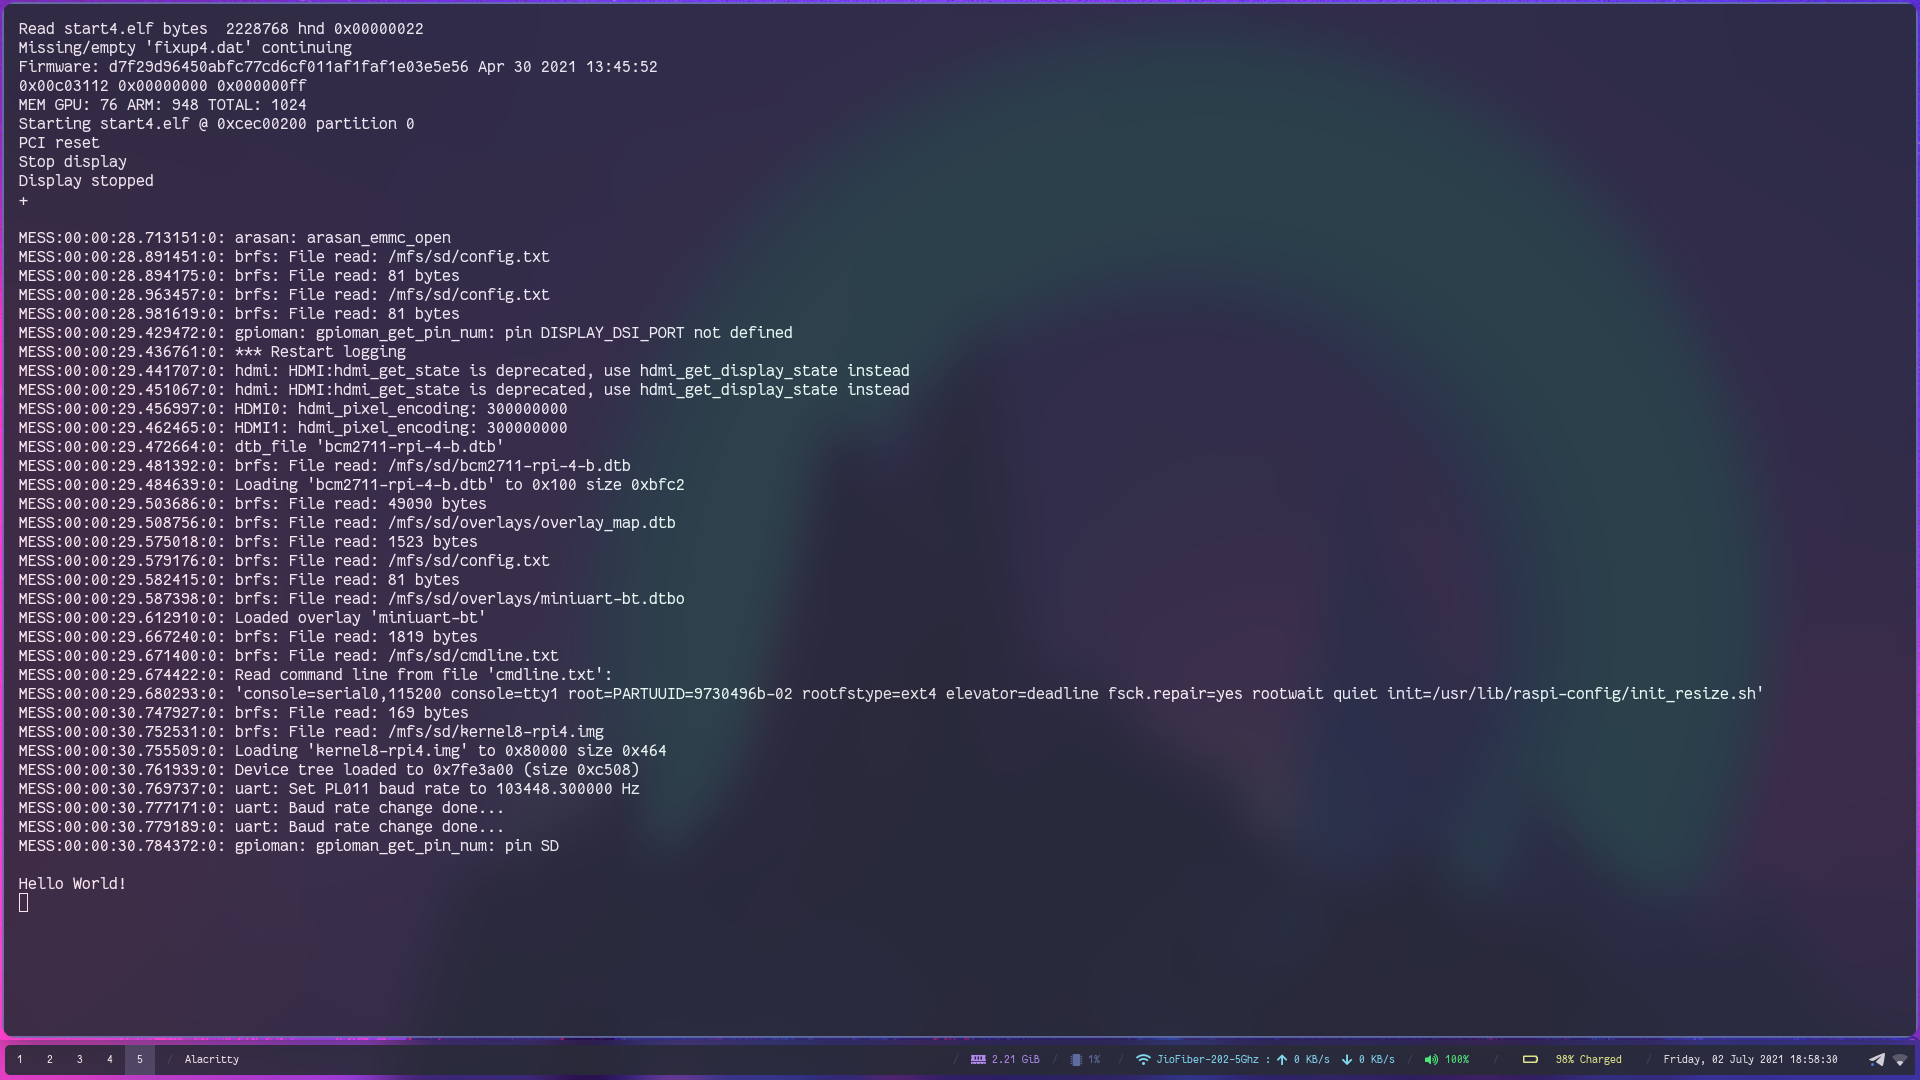
Here's a sample screenshot of the Pi booting:
This happens when the baud rate gets messed up via the initial serial communication. An easy way to fix this is to turn off the Pi, remove the TTL adapter from your machine, and re connect it to the machine.
If that does not fix it still and you know what you are doing, then you can edit the baud rate in the mini_uart.c file linked below :
https://github.com/oddlyspaced/rpi4-hello-world/blob/main/src/mini_uart.c#L22
This can happen for various reasons.
-
Check pin connections
Make sure to check if the cables are attached properly. -
Check if SD Card is flashed properly
Often times the process can lead to an incorrectly formatted card. Reformat it and test again. -
Check if Raspberry Pi is loading your OS
On the Pi, there is a red and green light present. If everything including your SD Card and kernel are fine, then the Green LED should blink repeatedly which indicates that the OS is being loaded by the Pi. If this happens and nothing is printed, check the Kernel code for mini_uart. If this however does not happen then check the SD Card again.
Learning OS Development by s-matyukevich
Raspberry PI Bare Metal Tutorial - Playlist by Low Level Devel