This guide will get you up and running on PowerVM server managed using HMC.
The playbooks will use the following projects:
- ocp4-helpernode to set up an "all-in-one" node (called ocp4-helpernode), that has all the infrastructure/services in order to install OpenShift 4.
- ocp4-playbooks to create the ignition and to monitor OCP installation progress and configure the cluster nodes as defined in
vars.yaml.
This playbook will boot up all cluster node with lpar_netboot on HMC to bootp in order to install Red Hat CoreOS (RHCOS) to disk and reboot from RHCOS to run ignition to setup the RHCOS. Then it will install the OpenShift 4 cluster with 3 master nodes and 2 worker nodes on the RHCOS LPARs. After you run the playbook, you'll be ready to logon to the OpenShift cluster.
A lot of OpenShift 4 specific jargon is used throughout this doc, so please visit the official documentation page to get familiar with OpenShift 4.
This playbook assumes the following:
- You're on a network that has access to the internet.
- The network you're on does NOT have DHCP (or you can block your existing DHCP from responding to the MAC addresses used for the OpenShift LPARs).
- The ocp4-helpernode will be your Load Balancer/DHCP/TFTP/DNS/HTTP and NFS server for the OpenShift cluster.
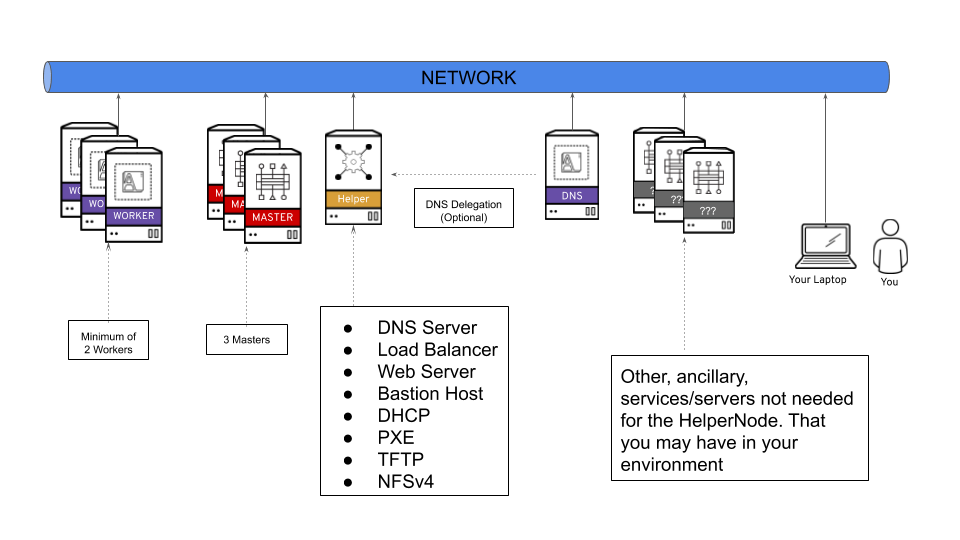
It's important to note that you can delegate DNS to the ocp4-helpernode if you don't want to use it as your main DNS server. You will have to delegate $CLUSTERID.$DOMAIN to this helper node.
For example; if you want a $CLUSTERID of ocp4, and you have a $DOMAIN of example.com. Then you will delegate ocp4.example.com to this ocp4-helpernode.
Each LPAR must meet the minimum resource requirements
| LPAR | OS | vCPU | Memory | Storage |
|---|---|---|---|---|
| Bastion/Helper | RHEL 8.x | 2 | 16GB | 120GB |
| Bootstrap | RHCOS | 2 | 32GB | 120GB |
| Master | RHCOS | 2 | 32GB | 120GB |
| Worker | RHCOS | 4 | 32GB | 120GB |
NOTE Above is the minimum requirements, but below use real world value for creating the LPARs.
Create helper LPAR using the HMC GUI or HMC mksyscfg command. To start, ssh to your HMC host to use the CLI. You can also use the HMC GUI. The steps in these guide are specific to CLI.
- 4 vCPUs (desired_procs)
- 64 GB of RAM (desired_mem)
- 120 GB HD (OS) + 880 GB HD (NFS)
$ mksyscfg -r lpar -m <managed_system> -i name=ocp4-helper, profile_name=default_profile, lpar_env=aixlinux, shared_proc_pool_util_auth=1, min_mem=8192, desired_mem=65536, max_mem=65536, proc_mode=shared, min_proc_units=0.2, desired_proc_units=0.4, max_proc_units=4.0, min_procs=1, desired_procs=4, max_procs=4, sharing_mode=uncap, uncap_weight=128, max_virtual_slots=64, boot_mode=norm, conn_monitoring=1
NOTE Make sure you attach the LPAR to the appropriate network and add storage (HMC GUI or chsyscfg command) after successful LPAR creation.
Install RHEL 8 in this PowerVM LPAR.
After helper is up and running, configure it with correct network configurations based on your network:
- IP - <helper_ip>
- NetMask - 255.255.255.0
- Default Gateway - <default_gateway>
- DNS Server - <default_DNS>
Create 6 LPARs using the HMC GUI or HMC mksyscfg command.
Bootstrap
Create one bootstrap LPAR.
- 2 vCPUs (desired_procs)
- 32 GB of RAM (desired_mem)
- 120 GB HD (OS)
$ mksyscfg -r lpar -m <managed_system> -i name=ocp4-bootstrap, profile_name=default_profile, lpar_env=aixlinux, shared_proc_pool_util_auth=1, min_mem=8192, desired_mem=32768, max_mem=32768, proc_mode=shared, min_proc_units=0.2, desired_proc_units=0.4, max_proc_units=4.0, min_procs=1, desired_procs=2, max_procs=4, sharing_mode=uncap, uncap_weight=128, max_virtual_slots=64, boot_mode=norm, conn_monitoring=1
NOTE Make sure you attach the LPAR to the appropriate network and add storage (HMC GUI or HMC chsyscfg command) after successful LPAR creation. NOTE No OS installation is needed at this point.
Masters
Create the three master LPARs.
- 2 vCPUs (desired_procs)
- 32 GB of RAM (desired_mem)
- 120 GB HD (OS)
$ for i in master{0..2}
do
  mksyscfg -r lpar -m <managed_system> -i name="ocp4-${i}", profile_name=default_profile, lpar_env=aixlinux, shared_proc_pool_util_auth=1, min_mem=32768, desired_mem=32768, max_mem=16384, proc_mode=shared, min_proc_units=0.2, desired_proc_units=0.2, max_proc_units=4.0, min_procs=2, desired_procs=2, max_procs=2, sharing_mode=uncap, uncap_weight=128, max_virtual_slots=64, boot_mode=norm, conn_monitoring=1
done
NOTE Make sure you attach the LPARs to the appropriate network and add storage (HMC GUI or HMC chsyscfg command) after successful LPAR creation. NOTE No OS installation is needed at this point.
Workers
Create the two worker LPARs.
- 4 vCPUs (desired_procs), more depending on the workload
- 256 GB of RAM (desired_mem), more depending on the workload
- 500 GB HD (OS), more depending on the workload
$ for i in worker{0..1}
do
  mksyscfg -r lpar -m <managed_system> -i name="ocp4-${i}", profile_name=default_profile, lpar_env=aixlinux, shared_proc_pool_util_auth=1, min_mem=16384, desired_mem=262144, max_mem=262144, proc_mode=shared, min_proc_units=0.2, desired_proc_units=0.8, max_proc_units=4.0, min_procs=1, desired_procs=4, max_procs=16, sharing_mode=uncap, uncap_weight=128, max_virtual_slots=64, boot_mode=norm, conn_monitoring=1
done
NOTE Make sure you attach the LPARs to the appropriate network and add storage (HMC GUI or HMC chsyscfg command) after successful LPAR creation. NOTE No OS installation is needed at this point.
$ for i in <managed_systems>
do
  lshwres -m $i -r virtualio --rsubtype eth --level lpar -F lpar_name,mac_addr
done
Or if using SRIOV's then run the following command:
$ for i in <managed_systems>
do
  lshwres -m $i -r sriov --rsubtype logport --level eth -F lpar_name,mac_addr
done
After the helper node OS is installed; login to it
$ ssh root@<helper_ip>
NOTE For RHEL 8 you will need to enable
rhel-8-for-ppc64le-baseos-rpms,rhel-8-for-ppc64le-appstream-rpms, andansible-2.9-for-rhel-8-ppc64le-rpms
Install EPEL
$ yum -y install https://dl.fedoraproject.org/pub/epel/epel-release-latest-$(rpm -E %rhel).noarch.rpm
Install ansible and git
$ yum -y install ansible git
Install firefox and X11 forwarding libs
$ yum -y install firefox xorg-x11-xauth dbus-x11
Change SELinux to permissive. The OpenShift installation fails if SELinux is disabled.
$ vi /etc/selinux/config # change "SELINUX=disabled" to "SELINUX=permissive"
$ grub2-mkconfig
$ reboot
$ getenforceCreate a place to store your pull-secret
$ mkdir -p ~/.openshift
Visit try.openshift.com and select "Run on Power". Download your pull secret and save it under ~/.openshift/pull-secret
$ ls -1 ~/.openshift/pull-secret
/root/.openshift/pull-secret
NOTE Do not manual download the OpenShift client or installer packages from this Web Page, The required packages are downloaded automatically later by the playbook.
You can use ssh-keygen to create the users ssh public key (change "user@sample.com" to the users eMail address).
$ ssh-keygen -t rsa -b 4096 -N '' -C "<user@sample.com>"
$ eval "$(ssh-agent -s)"
$ ssh-add ~/.ssh/id_rsa
$ ls -1 ~/.ssh/id_rsa
/root/.ssh/id_rsaLogin to HMC as <hmc_user>.
Authorize password-less ssh with the command mkauthkeys and the public ssh key from the root user of the helper node
hmc_user@hmc_hostname:~> mkauthkeys -a "ssh-rsa <secret_content_of_/root/.ssh/id_rsa.pub> <user@sample.com>"Login to helper node as root.
$ ssh hmc_user@hmc_hostname lshwres -m <managed_system> -r virtualio --rsubtype eth --level lpar -F lpar_name,mac_addr
ocp4-helper,664A9A48690B
ocp4-bootstrap,664A9EC9CE0B
ocp4-master0,664A91C9280B
ocp4-master1,664A927A570B
ocp4-master2,664A9838420B
ocp4-worker0,664A97C5BB0B
ocp4-worker1,664A949F5F0B$ git clone https://github.com/ocp-power-automation/ocp4-upi-powervm-hmc.git
$ cd ocp4-upi-powervm-hmc/
$ git submodule sync; git submodule update --init Here are sample files, you can modify them or use following templates to create your own:
$ cp examples/vars-powervm.yaml .
$ cp examples/inventory .
⚠️ Make sure you update all <values> which are marked with "less than" and "greater than" chars in followinginventoryandvars-powervm.yamlfile.
Template for inventory:
[bastion]
<helper.ipaddr> ansible_connection=local
Template for vars-powervm.yaml:
---

##########################################################
# Variables defined for used by ocp4-upi-powervm-playbooks
# pvm_hmc : The HMC host IP and user, it is used to run HMC CLI remotely, the helper need to be able to ssh to HMC without a password
##########################################################
pvm_hmc: <hmc_user>@<hmc_ip>

############################
# OCP4 helper node variables
# Doc: https://github.com/RedHatOfficial/ocp4-helpernode/blob/master/docs/vars-doc.md
# pvmcec : The physical machine where the LPAR(node) is running on
# pvmlpar: The LPAR(node) name in HMC
### Note: pvmcec and pvmlpar are required for all cluster nodes defined in this yaml file
disk: sda
helper:
  name: "<ocp4-helper_hostname>"
  ipaddr: "<helper_ip>"
dns:
  domain: "<sample.com>"
  clusterid: "ocp4"
  forwarder1: "<existing_dns_1_ip>"
  forwarder2: "<existing_dns_2_ip>"
dhcp:
  router: "<router_ip_c_net>.1"
  bcast: "<router_ip_c_net>.255"
  netmask: "255.255.255.0"
  poolstart: "<helper_ip>"
  poolend: "<worker2_ip>"
  ipid: "<router_ip_c_net>.0"
  netmaskid: "255.255.255.0"
bootstrap:
  name: "<ocp4-bootstrap_hostname>"
  ipaddr: "<bootstrap_ip>"
  macaddr: "<66:4a:9e:c9:ce:0b>"
  pvmcec: <managed_system>
  pvmlpar: ocp4-bootstrap
masters:
  - name: "<ocp4-master0_hostname>"
    ipaddr: "<master0_ip>"
    macaddr: "<66:4a:91:c9:28:0b>"
    pvmcec: <managed_system>
    pvmlpar: ocp4-master0
  - name: "<ocp4-master1_hostname>"
    ipaddr: "<master1_ip>"
    macaddr: "<66:4a:92:7a:57:0b>"
    pvmcec: <managed_system>
    pvmlpar: ocp4-master1
  - name: "<ocp4-master2_hostname>"
    ipaddr: "<master2_ip>"
    macaddr: "<66:4a:98:38:42:0b>"
    pvmcec: <managed_system>
    pvmlpar: ocp4-master2
workers:
  - name: "<ocp4-worker0_hostname>"
    ipaddr: "<worker0_ip>"
    macaddr: "<66:4a:97:c5:bb:0b>"
    pvmcec: <managed_system>
    pvmlpar: ocp4-worker0
  - name: "<ocp4-worker1_hostname>"
    ipaddr: "<worker1_ip>"
    macaddr: "<66:4a:94:9f:5f:0b>"
    pvmcec: <managed_system>
    pvmlpar: ocp4-worker1

###########################
# OCP 4 release to install
# Before changing check if new download location exists:
# https://mirror.openshift.com/pub/openshift-v4/ppc64le/dependencies/rhcos/{{ ocp_release }}/latest/
# https://mirror.openshift.com/pub/openshift-v4/ppc64le/clients/ocp/stable-{{ ocp_release }}/
ocp_release: 4.5

##########################################################
# The variables below should only be changed if needed.
##########################################################

ssh_gen_key: false
ppc64le: true

setup_registry:
  deploy: false

chronyconfig:
  enabled: false
  content:
    - server: 0.centos.pool.ntp.org
      options: iburst
    - server: 1.centos.pool.ntp.org
      options: iburst

###############################
# URL path to OCP download site
ocp_base_url: "https://mirror.openshift.com/pub/openshift-v4/ppc64le"
######################
# RHCOS server for OCP
ocp_rhcos_base: "dependencies/rhcos/{{ ocp_release }}"
ocp_rhcos_tag: "latest"
######################
ocp_bios: "{{ ocp_base_url}}/{{ ocp_rhcos_base }}/{{ ocp_rhcos_tag }}/rhcos-live-rootfs.ppc64le.img"
ocp_initramfs: "{{ ocp_base_url}}/{{ ocp_rhcos_base }}/{{ ocp_rhcos_tag }}/rhcos-live-initramfs.ppc64le.img"
ocp_install_kernel: "{{ ocp_base_url}}/{{ ocp_rhcos_base }}/{{ ocp_rhcos_tag }}/rhcos-live-kernel-ppc64le"
########################
# Client/install for OCP
ocp_client_base: "clients/ocp"
ocp_client_tag: "stable-{{ ocp_release }}"
########################
ocp_client: "{{ ocp_base_url}}/{{ ocp_client_base }}/{{ ocp_client_tag }}/openshift-client-linux.tar.gz"
ocp_installer: "{{ ocp_base_url}}/{{ ocp_client_base }}/{{ ocp_client_tag }}/openshift-install-linux.tar.gz"

helm_source: "https://get.helm.sh/helm-v3.2.4-linux-ppc64le.tar.gz"

# If "force_ocp_download: true" then download again all packages when calling playbook again
force_ocp_download: false

# End OCP4 helper node variables
################################


##########################################################
# Variables used by ocp4-playbook
# Doc: https://github.com/ocp-power-automation/ocp4-playbooks
# pull_secret : pull-secret file for access openshift repo
# public_ssh_key: the public key for ssh to access the cluster nodes from helper
##########################################################
install_config:
  cluster_domain: "{{ dns.domain }}"
  cluster_id: "{{ dns.clusterid }}"
  pull_secret: '{{ lookup("file", "~/.openshift/pull-secret") | from_json | to_json }}'
  public_ssh_key: "{{ lookup('file', '~/.ssh/id_rsa.pub') }}"

# workdir : is the working directory for openshift-install
workdir: "~/ocp4-pvm"
# storage_type: <Storage type used in the cluster. Eg: nfs (Note: Currently NFS provisioner is not configured using this playbook.
#                This variable is only used for setting up image registry to EmptyDir if storage_type is not nfs)>
storage_type:
# log_level: <Option --log-level in openshift-install commands. Default is 'info'>
log_level: debug
# release_image_override: '<This is set to OPENSHIFT_INSTALL_RELEASE_IMAGE_OVERRIDE while creating ign files.
#                           If you are using internal artifactory then ensure that you have added auth key to the pull_secret>'
release_image_override: ""
# node connection timeout
node_connection_timeout: 2700
# rhcos_kernel_options: <List of kernel options for RHCOS nodes eg: ["slub_max_order=0","loglevel=7"]>
rhcos_kernel_options: []
sysctl_tuned_options: false
enable_local_registry: "{{ setup_registry.deploy }}"
powervm_rmc: true

#####################################################
# setup the proxy server on bastion if set it to true
setup_squid_proxy: false

#################################
# using a predefined proxy server
#proxy_url: "<http://192.168.79.2:3128>"
#no_proxy: "127.0.0.1,localhost,192.168.0.0/16"
proxy_url: ""
no_proxy: ""
Run the playbook to install the complete OpenShift 4 cluster
$ ansible-playbook -e @vars-powervm.yaml playbooks/main.yamlOn your laptop/workstation visit the OpenShift installation status page. If you use a laptop/workstation with X11 server and a ssh session with X11 forwarding to connect to the helper node, then you can also launch firefox from the helper node.
$ firefox http://<helper_ip>:9000
You'll see the bootstrap turn "green" and then the masters turn "green", then the bootstrap turn "red". Next all worker turn "green".
Also you can check all cluster node LPAR status in HMC's partition list view.
Watch your CSRs without stopping the playbook in another shell session on the helper node. These can take some time; go get come coffee or grab some lunch. You'll see all your nodes CSRs in "AVAILABLE=False" turning to "AVAILABLE=True".
$ watch oc get csrSet the registry for your cluster
For PoCs, using emptyDir as image registry storage is ok (to use PVs follow this doc)
$ oc patch configs.imageregistry.operator.openshift.io cluster --type merge --patch '{"spec":{"storage":{"emptyDir":{}}, "managementState": "Managed"}}'
At this point you can stop and delete the bootstrap LPAR.
The OpenShift 4 web console will be running at https://console-openshift-console.apps.{{ dns.clusterid }}.{{ dns.domain }} (e.g. https://console-openshift-console.apps.ocp4.example.com)
- Username: kubeadmin
- Password: the output of
cat /root/ocp4-pvm/auth/kubeadmin-password
Your install should be done! You're a PowerVM/HMC master!
See LICENCE