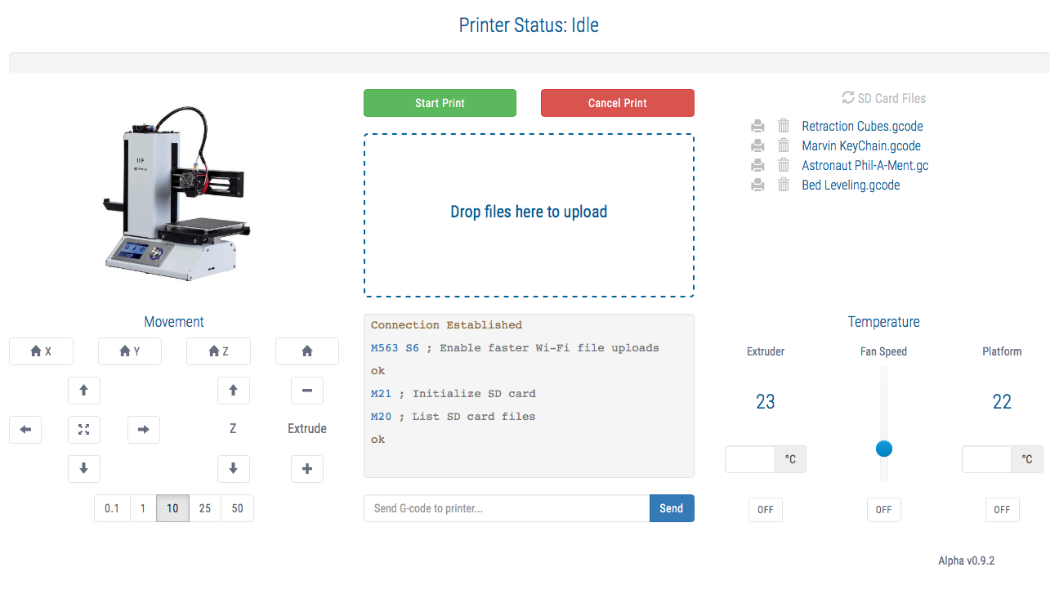
Upgrade for the Malyan M200 or the Monoprice Select Mini's Web UI and automatically enable faster Wi-Fi file uploads.
This Web UI is built using Bootstrap so it's mobile-friendly and tablet-friendly.
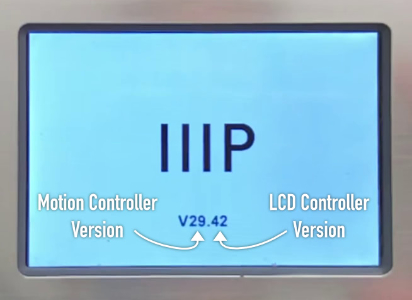
Note: Requires UI Controller firmware version 42 or greater to enable a custom Web UI.
- Create a new blank file and then copy & paste from the code block below.
- Replace “SSID” with the name of your WiFi network - don't leave spaces after the SSID name unless your SSID has spaces at the end.
- Replace “PASSWORD” with the password for your WiFi network - don't leave spaces after the password unless your password has spaces at the end.
- Verify there is a blank line for the last line. If there is not a blank line then add one.
- Save the file with the extension “.gcode” or ".gc" e.g., “wifi_setup.gcode”
- Copy the file onto a microSD card and insert the microSD card into the printer.
- From the Print menu select the file you just copied to the card.
- The printer will go through a short routine. The movement of the X & Y axis let the user know that process has started and ended.
- The hotend will move to the center of the bed to signify completion.
- Sometimes the LCD doesn't show the job as complete but you can cancel the job or power cycle the printer.
; G-Code
G28 X Y ; Home X & Y to signify start
;
M550 SSID
M551 PASSWORD
;
G1 X60 Y60 F1000 ; Center bed to signify completion
;
-
This method will not work if Wi-Fi password contains a semicolon “;” or for open Wi-Fi networks with no password.
-
Wi-Fi and USB cannot access the printer simultaneously. Disconnect USB cable from the printer if you want to use the Wi-Fi function. Wi-Fi only works with 2.4 GHz b/g/n networks.
-
microSD cards need to be formated in FAT16 or FAT32. Make sure that they are not labeled HC (High Capacity) as they may not be compatible with the printer.
- Download and unzip
MP-Select-Mini-Webfrom GitHub. - Point a web browser window to your printer's IP address.
http://IPAddressHereThis is the default Web UI. - Now browse to the upgrade page.
http://IPAddressHere/up - Click the third "Choose file" and select the "webui.html" file from the folder you unzipped earlier.
- Click "Upload web."
- If you see "OK" you are good to go!
- You can power cycle your printer, but it's not necessary.
- Once your printer is back online, browse to
http://IPAddressHere. You should see have the upgraded Web UI.
By default, the upgraded Web UI will send M563 S4 on each refresh to ensure faster Wi-Fi file uploads are enabled. This setting doesn't persist after the printer had been powered off. S4 provides the most compatibilty amoung the different version printers on the market.
M563 parameters can be values between S2 - S6. Transfers happen over telnet, which blocks the sending of any other GCode commands and limits how fast the files can be transferred. The sweet spot seems to be less then 12 MB of GCode. Files larger then that take over 2 minutes to transfer.
| M563 S# | Avg Transfer Speed | Supported On | |
|---|---|---|---|
| S2 | 39 Kbps | Same as Firmware Default | |
| S3 | 63 Kbps | V1 / V2 / Delta | |
| S4 | 91 Kbps | V1 / V2 / Delta | Default speed |
| S5 | 103 Kbps | V1 | |
| S6 | 112 Kbps | V1 |
The file listing loads when the refresh icon is clicked. File names in the Web UI will be limited to 21 characters. The printer can support longer names, but it cuts off the extension and name after 24 characters.
Files that are uploaded will be renamed from "cache.gc" to the original file name. If you are re-uploading a previous file, the old file is deleted first, then the file is renamed. The .gc extension is used to maximize file name length.
The print icon does two things: it selects the file M32 for print, and tells the printer to print it M24, but it won't set the target tempatures. Pre-heat before requesting to print a file. Once the extruder and bed are at the target temperatures, the printer LCD will display the printing screen.
The delete icon will delete the file, M30, and remove the entry from the listing. Frequent file listing refreshed have proven to be erradic.
While you may want to update the UI of the printer, you don't want the web server on the controller working too hard. This upgrade is designed to minimize the amount of data the web server has to output. You browser will be doing most of the heavy lifting.
But if you want to use the Web UI without an active internet connection, delete the webui.html file and rename webui-offline.html to webui.html.
-
GCode commands are sent via the REST API, since sending via Web Sockets is unreliable. The corresponding GCode responses are sent via Web Sockets so all browser windows will display the printer responses.
-
M503, print current settings, does not work via Wi-Fi or Web sockets with the V2 firmware. -
Like the progress bar on the printer, the progress bar on the UI is not an indicator of time remaining. It's showing the percentage of layers printed.
-
The websocket connection may be closed during long prints, but should attempt a reconnection once the print is complete.
-
There is definitely an output buffer bug in the stock firmware that causes the file listing output to be erradic. Sometimes, a truncated list is sent. Other times, only half of the output is sent.
Did something break? Here's how you can undo the Web UI upgrade.
- Turn off the printer. Wait about 10 seconds and then turn it back on.
- Once it's on and connected to Wi-Fi, browse to
http://IPAddressHere/up. - Just click the "Upload web" button without choosing a file and this will restore the factory Web UI.
If this project helps, you can buy me a cup of coffee. 😬 ☕

Joey Cortez
Jason Jones (Original Code)
Matthew Upp (Middle Man)
Mario Anthony Galliano (Facebook Group posting with upgrade/downgrade instructions.)