Paper Yolo v4: https://arxiv.org/abs/2004.10934
More details: medium link
Manual: https://github.com/AlexeyAB/darknet/wiki
Discussion:
About Darknet framework: http://pjreddie.com/darknet/
![]()


- YOLOv4 model zoo
- Requirements (and how to install dependecies)
- Pre-trained models
- FAQ - frequently asked questions
- Explanations in issues
- Yolo v4 in other frameworks (TensorRT, TensorFlow, PyTorch, OpenVINO, OpenCV-dnn, TVM,...)
- Datasets
- Improvements in this repository
- How to use
- How to compile on Linux
- How to compile on Windows
- Training and Evaluation of speed and accuracy on MS COCO
- How to train with multi-GPU:
- How to train (to detect your custom objects)
- How to train tiny-yolo (to detect your custom objects)
- When should I stop training
- How to improve object detection
- How to mark bounded boxes of objects and create annotation files
- How to use Yolo as DLL and SO libraries

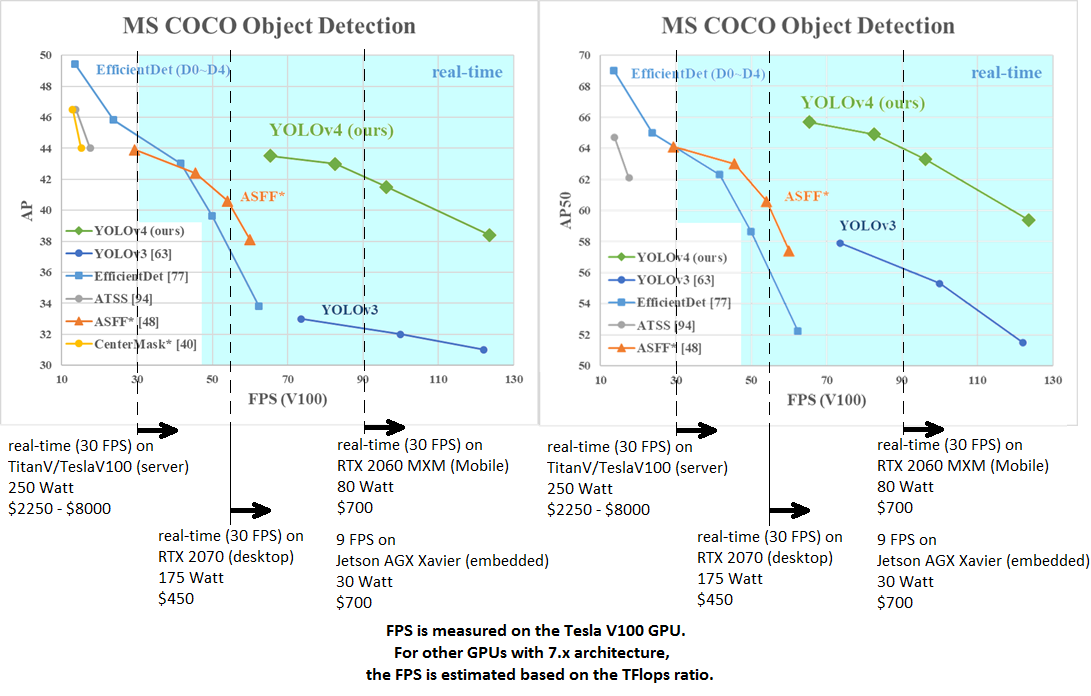 AP50:95 / AP50 - FPS (Tesla V100) Paper: https://arxiv.org/abs/2004.10934
tkDNN-TensorRT accelerates YOLOv4 ~2x times for batch=1 and 3x-4x times for batch=4.
- tkDNN: https://github.com/ceccocats/tkDNN
- OpenCV: https://gist.github.com/YashasSamaga/48bdb167303e10f4d07b754888ddbdcf
| Network Size | Darknet, FPS (avg) | tkDNN TensorRT FP32, FPS | tkDNN TensorRT FP16, FPS | OpenCV FP16, FPS | tkDNN TensorRT FP16 batch=4, FPS | OpenCV FP16 batch=4, FPS | tkDNN Speedup |
|---|---|---|---|---|---|---|---|
| 320 | 100 | 116 | 202 | 183 | 423 | 430 | 4.3x |
| 416 | 82 | 103 | 162 | 159 | 284 | 294 | 3.6x |
| 512 | 69 | 91 | 134 | 138 | 206 | 216 | 3.1x |
| 608 | 53 | 62 | 103 | 115 | 150 | 150 | 2.8x |
| Tiny 416 | 443 | 609 | 790 | 773 | 1774 | 1353 | 3.5x |
| Tiny 416 CPU Core i7 7700HQ | 3.4 | - | - | 42 | - | 39 | 12x |
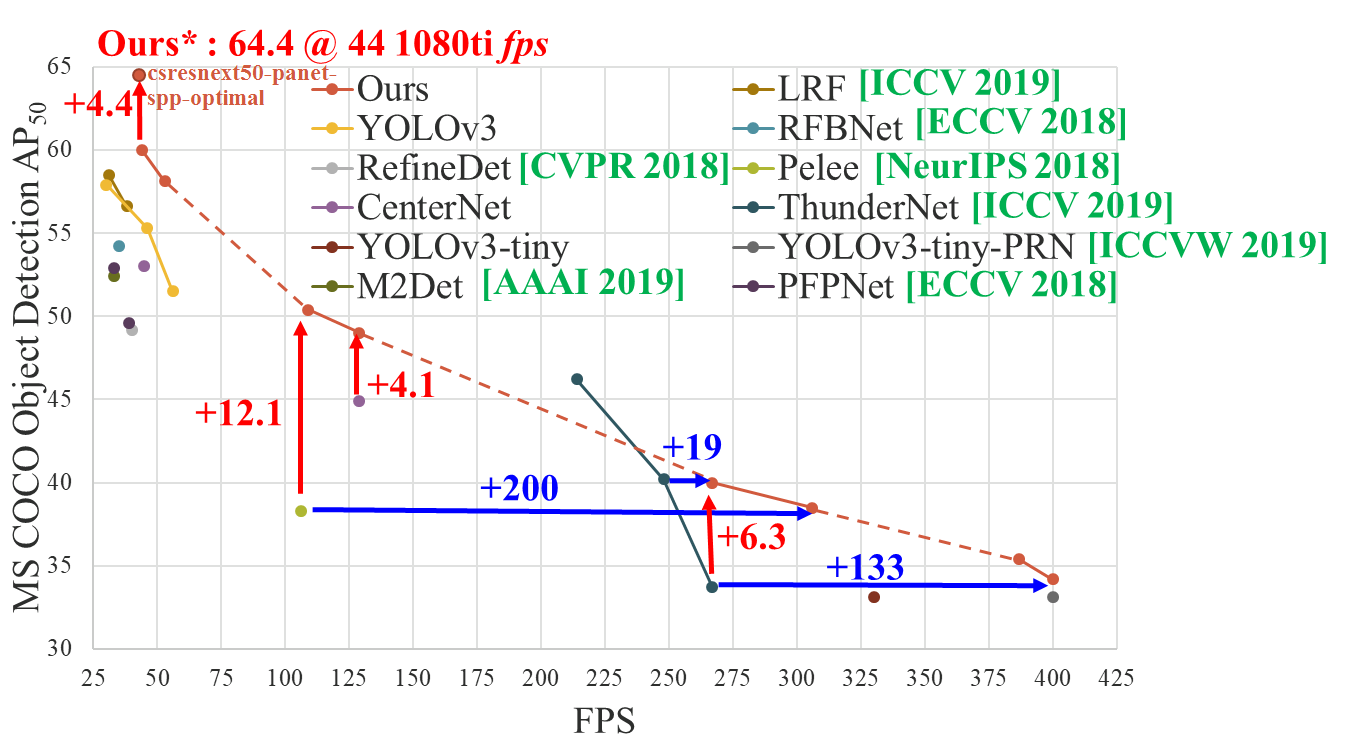
- Yolo v4 Full comparison: map_fps
- Yolo v4 tiny comparison: tiny_fps
- CSPNet: paper and map_fps comparison: https://github.com/WongKinYiu/CrossStagePartialNetworks
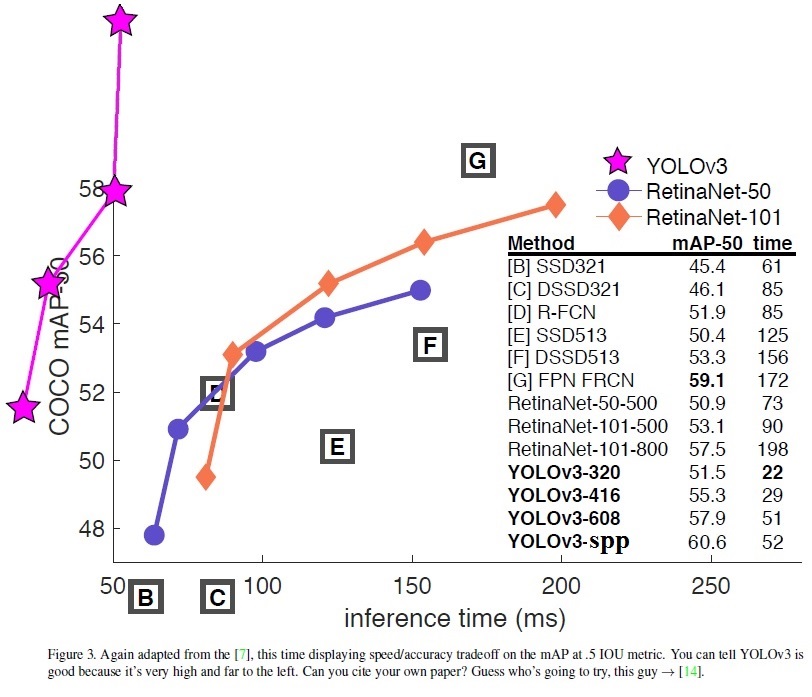
- Yolo v3 on MS COCO: Speed / Accuracy (mAP@0.5) chart
- Yolo v3 on MS COCO (Yolo v3 vs RetinaNet) - Figure 3: https://arxiv.org/pdf/1804.02767v1.pdf
- Yolo v2 on Pascal VOC 2007: https://hsto.org/files/a24/21e/068/a2421e0689fb43f08584de9d44c2215f.jpg
- Yolo v2 on Pascal VOC 2012 (comp4): https://hsto.org/files/3a6/fdf/b53/3a6fdfb533f34cee9b52bdd9bb0b19d9.jpg
Others: https://www.youtube.com/user/pjreddie/videos
- Download and unzip test-dev2017 dataset from MS COCO server: http://images.cocodataset.org/zips/test2017.zip
- Download list of images for Detection taks and replace the paths with yours: https://raw.githubusercontent.com/AlexeyAB/darknet/master/scripts/testdev2017.txt
- Download
yolov4.weightsfile 245 MB: yolov4.weights (Google-drive mirror yolov4.weights ) - Content of the file
cfg/coco.datashould be
classes= 80
train  = <replace with your path>/trainvalno5k.txt
valid = <replace with your path>/testdev2017.txt
names = data/coco.names
backup = backup
eval=coco- Create
/results/folder near with./darknetexecutable file - Run validation:
./darknet detector valid cfg/coco.data cfg/yolov4.cfg yolov4.weights - Rename the file
/results/coco_results.jsontodetections_test-dev2017_yolov4_results.jsonand compress it todetections_test-dev2017_yolov4_results.zip - Submit file
detections_test-dev2017_yolov4_results.zipto the MS COCO evaluation server for thetest-dev2019 (bbox)
- Compile Darknet with
GPU=1 CUDNN=1 CUDNN_HALF=1 OPENCV=1in theMakefile - Download
yolov4.weightsfile 245 MB: yolov4.weights (Google-drive mirror yolov4.weights ) - Get any .avi/.mp4 video file (preferably not more than 1920x1080 to avoid bottlenecks in CPU performance)
- Run one of two commands and look at the AVG FPS:
- include video_capturing + NMS + drawing_bboxes:
./darknet detector demo cfg/coco.data cfg/yolov4.cfg yolov4.weights test.mp4 -dont_show -ext_output - exclude video_capturing + NMS + drawing_bboxes:
./darknet detector demo cfg/coco.data cfg/yolov4.cfg yolov4.weights test.mp4 -benchmark
There are weights-file for different cfg-files (trained for MS COCO dataset):
FPS on RTX 2070 (R) and Tesla V100 (V):
-
yolov4.cfg - 245 MB: yolov4.weights (Google-drive mirror yolov4.weights ) paper Yolo v4 just change
width=andheight=parameters inyolov4.cfgfile and use the sameyolov4.weightsfile for all cases:width=608 height=608in cfg: 65.7% mAP@0.5 (43.5% AP@0.5:0.95) - 34(R) FPS / 62(V) FPS - 128.5 BFlopswidth=512 height=512in cfg: 64.9% mAP@0.5 (43.0% AP@0.5:0.95) - 45(R) FPS / 83(V) FPS - 91.1 BFlopswidth=416 height=416in cfg: 62.8% mAP@0.5 (41.2% AP@0.5:0.95) - 55(R) FPS / 96(V) FPS - 60.1 BFlopswidth=320 height=320in cfg: 60% mAP@0.5 ( 38% AP@0.5:0.95) - 63(R) FPS / 123(V) FPS - 35.5 BFlops
-
yolov4-tiny.cfg - 40.2% mAP@0.5 - 371(1080Ti) FPS / 330(RTX2070) FPS - 6.9 BFlops - 23.1 MB: yolov4-tiny.weights
-
enet-coco.cfg (EfficientNetB0-Yolov3) - 45.5% mAP@0.5 - 55(R) FPS - 3.7 BFlops - 18.3 MB: enetb0-coco_final.weights
-
yolov3-openimages.cfg - 247 MB - 18(R) FPS - OpenImages dataset: yolov3-openimages.weights
CLICK ME - Yolo v3 models
-
csresnext50-panet-spp-original-optimal.cfg - 65.4% mAP@0.5 (43.2% AP@0.5:0.95) - 32(R) FPS - 100.5 BFlops - 217 MB: csresnext50-panet-spp-original-optimal_final.weights
-
yolov3-spp.cfg - 60.6% mAP@0.5 - 38(R) FPS - 141.5 BFlops - 240 MB: yolov3-spp.weights
-
csresnext50-panet-spp.cfg - 60.0% mAP@0.5 - 44 FPS - 71.3 BFlops - 217 MB: csresnext50-panet-spp_final.weights
-
yolov3.cfg - 55.3% mAP@0.5 - 66(R) FPS - 65.9 BFlops - 236 MB: yolov3.weights
-
yolov3-tiny.cfg - 33.1% mAP@0.5 - 345(R) FPS - 5.6 BFlops - 33.7 MB: yolov3-tiny.weights
-
yolov3-tiny-prn.cfg - 33.1% mAP@0.5 - 370(R) FPS - 3.5 BFlops - 18.8 MB: yolov3-tiny-prn.weights
CLICK ME - Yolo v2 models
yolov2.cfg(194 MB COCO Yolo v2) - requires 4 GB GPU-RAM: https://pjreddie.com/media/files/yolov2.weightsyolo-voc.cfg(194 MB VOC Yolo v2) - requires 4 GB GPU-RAM: http://pjreddie.com/media/files/yolo-voc.weightsyolov2-tiny.cfg(43 MB COCO Yolo v2) - requires 1 GB GPU-RAM: https://pjreddie.com/media/files/yolov2-tiny.weightsyolov2-tiny-voc.cfg(60 MB VOC Yolo v2) - requires 1 GB GPU-RAM: http://pjreddie.com/media/files/yolov2-tiny-voc.weightsyolo9000.cfg(186 MB Yolo9000-model) - requires 4 GB GPU-RAM: http://pjreddie.com/media/files/yolo9000.weights
Put it near compiled: darknet.exe
You can get cfg-files by path: darknet/cfg/
- Windows or Linux
- CMake >= 3.12: https://cmake.org/download/
- CUDA >= 10.0: https://developer.nvidia.com/cuda-toolkit-archive (on Linux do Post-installation Actions)
- OpenCV >= 2.4: use your preferred package manager (brew, apt), build from source using vcpkg or download from OpenCV official site (on Windows set system variable
OpenCV_DIR=C:\opencv\build- where are theincludeandx64folders image) - cuDNN >= 7.0 https://developer.nvidia.com/rdp/cudnn-archive (on Linux copy
cudnn.h,libcudnn.so... as desribed here https://docs.nvidia.com/deeplearning/sdk/cudnn-install/index.html#installlinux-tar , on Windows copycudnn.h,cudnn64_7.dll,cudnn64_7.libas desribed here https://docs.nvidia.com/deeplearning/sdk/cudnn-install/index.html#installwindows ) - GPU with CC >= 3.0: https://en.wikipedia.org/wiki/CUDA#GPUs_supported
- on Linux GCC or Clang, on Windows MSVC 2017/2019 https://visualstudio.microsoft.com/thank-you-downloading-visual-studio/?sku=Community
- TensorFlow: YOLOv4 on TensorFlow 2.0 / TFlite / Andriod: https://github.com/hunglc007/tensorflow-yolov4-tflite
For YOLOv3 - convert
yolov3.weights/cfgfiles toyolov3.ckpt/pb/meta: by using mystic123 project, and TensorFlow-lite - OpenCV-dnn the fastest implementation of YOLOv4 for CPU (x86/ARM-Android), OpenCV can be compiled with OpenVINO-backend for running on (Myriad X / USB Neural Compute Stick / Arria FPGA), use
yolov4.weights/cfgwith: C++ example or Python example - Intel OpenVINO 2020 R4: (NPU Myriad X / USB Neural Compute Stick / Arria FPGA): read this manual (old manual )
- Tencent/ncnn: the fastest inference of YOLOv4 on mobile phone CPU: https://github.com/Tencent/ncnn
- PyTorch > ONNX:
- TensorRT YOLOv4 on TensorRT+tkDNN: https://github.com/ceccocats/tkDNN For YOLOv3 (-70% faster inference): Yolo is natively supported in DeepStream 4.0 read PDF. wang-xinyu/tensorrtx implemented yolov3-spp, yolov4, etc.
- TVM - compilation of deep learning models (Keras, MXNet, PyTorch, Tensorflow, CoreML, DarkNet) into minimum deployable modules on diverse hardware backends (CPUs, GPUs, FPGA, and specialized accelerators): https://tvm.ai/about
- OpenDataCam - It detects, tracks and counts moving objects by using YOLOv4: https://github.com/opendatacam/opendatacam#-hardware-pre-requisite
- Netron - Visualizer for neural networks: https://github.com/lutzroeder/netron
- MS COCO: use
./scripts/get_coco_dataset.shto get labeled MS COCO detection dataset - OpenImages: use
python ./scripts/get_openimages_dataset.pyfor labeling train detection dataset - Pascal VOC: use
python ./scripts/voc_label.pyfor labeling Train/Test/Val detection datasets - ILSVRC2012 (ImageNet classification): use
./scripts/get_imagenet_train.sh(alsoimagenet_label.shfor labeling valid set) - German/Belgium/Russian/LISA/MASTIF Traffic Sign Datasets for Detection - use this parsers: https://github.com/angeligareta/Datasets2Darknet#detection-task
- List of other datasets: https://github.com/AlexeyAB/darknet/tree/master/scripts#datasets
- developed State-of-the-Art object detector YOLOv4
- added State-of-Art models: CSP, PRN, EfficientNet
- added layers: [conv_lstm], [scale_channels] SE/ASFF/BiFPN, [local_avgpool], [sam], [Gaussian_yolo], [reorg3d] (fixed [reorg]), fixed [batchnorm]
- added the ability for training recurrent models (with layers conv-lstm
[conv_lstm]/conv-rnn[crnn]) for accurate detection on video - added data augmentation:
[net] mixup=1 cutmix=1 mosaic=1 blur=1. Added activations: SWISH, MISH, NORM_CHAN, NORM_CHAN_SOFTMAX - added the ability for training with GPU-processing using CPU-RAM to increase the mini_batch_size and increase accuracy (instead of batch-norm sync)
- improved binary neural network performance 2x-4x times for Detection on CPU and GPU if you trained your own weights by using this XNOR-net model (bit-1 inference) : https://github.com/AlexeyAB/darknet/blob/master/cfg/yolov3-tiny_xnor.cfg
- improved neural network performance ~7% by fusing 2 layers into 1: Convolutional + Batch-norm
- improved performance: Detection 2x times, on GPU Volta/Turing (Tesla V100, GeForce RTX, ...) using Tensor Cores if
CUDNN_HALFdefined in theMakefileordarknet.sln - improved performance ~1.2x times on FullHD, ~2x times on 4K, for detection on the video (file/stream) using
darknet detector demo... - improved performance 3.5 X times of data augmentation for training (using OpenCV SSE/AVX functions instead of hand-written functions) - removes bottleneck for training on multi-GPU or GPU Volta
- improved performance of detection and training on Intel CPU with AVX (Yolo v3 ~85%)
- optimized memory allocation during network resizing when
random=1 - optimized GPU initialization for detection - we use batch=1 initially instead of re-init with batch=1
- added correct calculation of mAP, F1, IoU, Precision-Recall using command
darknet detector map... - added drawing of chart of average-Loss and accuracy-mAP (
-mapflag) during training - run
./darknet detector demo ... -json_port 8070 -mjpeg_port 8090as JSON and MJPEG server to get results online over the network by using your soft or Web-browser - added calculation of anchors for training
- added example of Detection and Tracking objects: https://github.com/AlexeyAB/darknet/blob/master/src/yolo_console_dll.cpp
- run-time tips and warnings if you use incorrect cfg-file or dataset
- added support for Windows
- many other fixes of code...
And added manual - How to train Yolo v4-v2 (to detect your custom objects)
Also, you might be interested in using a simplified repository where is implemented INT8-quantization (+30% speedup and -1% mAP reduced): https://github.com/AlexeyAB/yolo2_light
On Linux use ./darknet instead of darknet.exe, like this:./darknet detector test ./cfg/coco.data ./cfg/yolov4.cfg ./yolov4.weights
On Linux find executable file ./darknet in the root directory, while on Windows find it in the directory \build\darknet\x64
- Yolo v4 COCO - image:
darknet.exe detector test cfg/coco.data cfg/yolov4.cfg yolov4.weights -thresh 0.25 - Output coordinates of objects:
darknet.exe detector test cfg/coco.data yolov4.cfg yolov4.weights -ext_output dog.jpg - Yolo v4 COCO - video:
darknet.exe detector demo cfg/coco.data cfg/yolov4.cfg yolov4.weights -ext_output test.mp4 - Yolo v4 COCO - WebCam 0:
darknet.exe detector demo cfg/coco.data cfg/yolov4.cfg yolov4.weights -c 0 - Yolo v4 COCO for net-videocam - Smart WebCam:
darknet.exe detector demo cfg/coco.data cfg/yolov4.cfg yolov4.weights http://192.168.0.80:8080/video?dummy=param.mjpg - Yolo v4 - save result videofile res.avi:
darknet.exe detector demo cfg/coco.data cfg/yolov4.cfg yolov4.weights test.mp4 -out_filename res.avi - Yolo v3 Tiny COCO - video:
darknet.exe detector demo cfg/coco.data cfg/yolov3-tiny.cfg yolov3-tiny.weights test.mp4 - JSON and MJPEG server that allows multiple connections from your soft or Web-browser
ip-address:8070and 8090:./darknet detector demo ./cfg/coco.data ./cfg/yolov3.cfg ./yolov3.weights test50.mp4 -json_port 8070 -mjpeg_port 8090 -ext_output - Yolo v3 Tiny on GPU #1:
darknet.exe detector demo cfg/coco.data cfg/yolov3-tiny.cfg yolov3-tiny.weights -i 1 test.mp4 - Alternative method Yolo v3 COCO - image:
darknet.exe detect cfg/yolov4.cfg yolov4.weights -i 0 -thresh 0.25 - Train on Amazon EC2, to see mAP & Loss-chart using URL like:
http://ec2-35-160-228-91.us-west-2.compute.amazonaws.com:8090in the Chrome/Firefox (Darknet should be compiled with OpenCV):./darknet detector train cfg/coco.data yolov4.cfg yolov4.conv.137 -dont_show -mjpeg_port 8090 -map - 186 MB Yolo9000 - image:
darknet.exe detector test cfg/combine9k.data cfg/yolo9000.cfg yolo9000.weights - Remeber to put data/9k.tree and data/coco9k.map under the same folder of your app if you use the cpp api to build an app
- To process a list of images
data/train.txtand save results of detection toresult.jsonfile use:darknet.exe detector test cfg/coco.data cfg/yolov4.cfg yolov4.weights -ext_output -dont_show -out result.json < data/train.txt - To process a list of images
data/train.txtand save results of detection toresult.txtuse:
darknet.exe detector test cfg/coco.data cfg/yolov4.cfg yolov4.weights -dont_show -ext_output < data/train.txt > result.txt - Pseudo-lableing - to process a list of images
data/new_train.txtand save results of detection in Yolo training format for each image as label<image_name>.txt(in this way you can increase the amount of training data) use:darknet.exe detector test cfg/coco.data cfg/yolov4.cfg yolov4.weights -thresh 0.25 -dont_show -save_labels < data/new_train.txt - To calculate anchors:
darknet.exe detector calc_anchors data/obj.data -num_of_clusters 9 -width 416 -height 416 - To check accuracy mAP@IoU=50:
darknet.exe detector map data/obj.data yolo-obj.cfg backup\yolo-obj_7000.weights - To check accuracy mAP@IoU=75:
darknet.exe detector map data/obj.data yolo-obj.cfg backup\yolo-obj_7000.weights -iou_thresh 0.75
-
Download for Android phone mjpeg-stream soft: IP Webcam / Smart WebCam
- Smart WebCam - preferably: https://play.google.com/store/apps/details?id=com.acontech.android.SmartWebCam2
- IP Webcam: https://play.google.com/store/apps/details?id=com.pas.webcam
-
Connect your Android phone to computer by WiFi (through a WiFi-router) or USB
-
Start Smart WebCam on your phone
-
Replace the address below, on shown in the phone application (Smart WebCam) and launch:
- Yolo v4 COCO-model:
darknet.exe detector demo data/coco.data yolov4.cfg yolov4.weights http://192.168.0.80:8080/video?dummy=param.mjpg -i 0
The CMakeLists.txt will attempt to find installed optional dependencies like CUDA, cudnn, ZED and build against those. It will also create a shared object library file to use darknet for code development.
Open a shell terminal inside the cloned repository and launch:
./build.shJust do make in the darknet directory. (You can try to compile and run it on Google Colab in cloud link (press «Open in Playground» button at the top-left corner) and watch the video link )
Before make, you can set such options in the Makefile: link
GPU=1to build with CUDA to accelerate by using GPU (CUDA should be in/usr/local/cuda)CUDNN=1to build with cuDNN v5-v7 to accelerate training by using GPU (cuDNN should be in/usr/local/cudnn)CUDNN_HALF=1to build for Tensor Cores (on Titan V / Tesla V100 / DGX-2 and later) speedup Detection 3x, Training 2xOPENCV=1to build with OpenCV 4.x/3.x/2.4.x - allows to detect on video files and video streams from network cameras or web-camsDEBUG=1to bould debug version of YoloOPENMP=1to build with OpenMP support to accelerate Yolo by using multi-core CPULIBSO=1to build a librarydarknet.soand binary runable fileuselibthat uses this library. Or you can try to run soLD_LIBRARY_PATH=./:$LD_LIBRARY_PATH ./uselib test.mp4How to use this SO-library from your own code - you can look at C++ example: https://github.com/AlexeyAB/darknet/blob/master/src/yolo_console_dll.cpp or use in such a way:LD_LIBRARY_PATH=./:$LD_LIBRARY_PATH ./uselib data/coco.names cfg/yolov4.cfg yolov4.weights test.mp4ZED_CAMERA=1to build a library with ZED-3D-camera support (should be ZED SDK installed), then runLD_LIBRARY_PATH=./:$LD_LIBRARY_PATH ./uselib data/coco.names cfg/yolov4.cfg yolov4.weights zed_camera
To run Darknet on Linux use examples from this article, just use ./darknet instead of darknet.exe, i.e. use this command: ./darknet detector test ./cfg/coco.data ./cfg/yolov4.cfg ./yolov4.weights
This is the recommended approach to build Darknet on Windows.
-
Install Visual Studio 2017 or 2019. In case you need to download it, please go here: Visual Studio Community
-
Install CUDA (at least v10.0) enabling VS Integration during installation.
-
Open Powershell (Start -> All programs -> Windows Powershell) and type these commands:
PS Code\>              git clone https://github.com/microsoft/vcpkg
PS Code\>              cd vcpkg
PS Code\vcpkg>         $env:VCPKG_ROOT=$PWD
PS Code\vcpkg>         .\bootstrap-vcpkg.bat
PS Code\vcpkg>         .\vcpkg install darknet[full]:x64-windows #replace with darknet[opencv-base,cuda,cudnn]:x64-windows for a quicker install of dependencies
PS Code\vcpkg>         cd ..
PS Code\>              git clone https://github.com/AlexeyAB/darknet
PS Code\>              cd darknet
PS Code\darknet> .\build.ps1-
Train it first on 1 GPU for like 1000 iterations:
darknet.exe detector train cfg/coco.data cfg/yolov4.cfg yolov4.conv.137 -
Then stop and by using partially-trained model
/backup/yolov4_1000.weightsrun training with multigpu (up to 4 GPUs):darknet.exe detector train cfg/coco.data cfg/yolov4.cfg /backup/yolov4_1000.weights -gpus 0,1,2,3
If you get a Nan, then for some datasets better to decrease learning rate, for 4 GPUs set learning_rate = 0,00065 (i.e. learning_rate = 0.00261 / GPUs). In this case also increase 4x times burn_in = in your cfg-file. I.e. use burn_in = 4000 instead of 1000.
https://groups.google.com/d/msg/darknet/NbJqonJBTSY/Te5PfIpuCAAJ
(to train old Yolo v2 yolov2-voc.cfg, yolov2-tiny-voc.cfg, yolo-voc.cfg, yolo-voc.2.0.cfg, ... click by the link)
Training Yolo v4 (and v3):
-
For training
cfg/yolov4-custom.cfgdownload the pre-trained weights-file (162 MB): yolov4.conv.137 (Google drive mirror yolov4.conv.137 ) -
Create file
yolo-obj.cfgwith the same content as inyolov4-custom.cfg(or copyyolov4-custom.cfgtoyolo-obj.cfg)and:
- change line batch to
batch=64 - change line subdivisions to
subdivisions=16 - change line max_batches to (
classes*2000but not less than number of training images, but not less than number of training images and not less than6000), f.e.max_batches=6000if you train for 3 classes - change line steps to 80% and 90% of max_batches, f.e.
steps=4800,5400 - set network size
width=416 height=416or any value multiple of 32: https://github.com/AlexeyAB/darknet/blob/0039fd26786ab5f71d5af725fc18b3f521e7acfd/cfg/yolov3.cfg#L8-L9 - change line
classes=80to your number of objects in each of 3[yolo]-layers:- https://github.com/AlexeyAB/darknet/blob/0039fd26786ab5f71d5af725fc18b3f521e7acfd/cfg/yolov3.cfg#L610
- https://github.com/AlexeyAB/darknet/blob/0039fd26786ab5f71d5af725fc18b3f521e7acfd/cfg/yolov3.cfg#L696
- https://github.com/AlexeyAB/darknet/blob/0039fd26786ab5f71d5af725fc18b3f521e7acfd/cfg/yolov3.cfg#L783
- change [
filters=255] to filters=(classes + 5)x3 in the 3[convolutional]before each[yolo]layer, keep in mind that it only has to be the last[convolutional]before each of the[yolo]layers.- https://github.com/AlexeyAB/darknet/blob/0039fd26786ab5f71d5af725fc18b3f521e7acfd/cfg/yolov3.cfg#L603
- https://github.com/AlexeyAB/darknet/blob/0039fd26786ab5f71d5af725fc18b3f521e7acfd/cfg/yolov3.cfg#L689
- https://github.com/AlexeyAB/darknet/blob/0039fd26786ab5f71d5af725fc18b3f521e7acfd/cfg/yolov3.cfg#L776
- when using
[Gaussian_yolo]layers, change [filters=57] filters=(classes + 9)x3 in the 3[convolutional]before each[Gaussian_yolo]layer- https://github.com/AlexeyAB/darknet/blob/6e5bdf1282ad6b06ed0e962c3f5be67cf63d96dc/cfg/Gaussian_yolov3_BDD.cfg#L604
- https://github.com/AlexeyAB/darknet/blob/6e5bdf1282ad6b06ed0e962c3f5be67cf63d96dc/cfg/Gaussian_yolov3_BDD.cfg#L696
- https://github.com/AlexeyAB/darknet/blob/6e5bdf1282ad6b06ed0e962c3f5be67cf63d96dc/cfg/Gaussian_yolov3_BDD.cfg#L789
So if classes=1 then should be filters=18. If classes=2 then write filters=21.
(Do not write in the cfg-file: filters=(classes + 5)x3)
(Generally filters depends on the classes, coords and number of masks, i.e. filters=(classes + coords + 1)*<number of mask>, where mask is indices of anchors. If mask is absence, then filters=(classes + coords + 1)*num)
So for example, for 2 objects, your file yolo-obj.cfg should differ from yolov4-custom.cfg in such lines in each of 3 [yolo]-layers:
[convolutional]
filters=21

[region]
classes=2-
Create file
obj.namesin the directorybuild\darknet\x64\data\, with objects names - each in new line -
Create file
obj.datain the directorybuild\darknet\x64\data\, containing (where classes = number of objects):
classes = 2
train  = data/train.txt
valid  = data/test.txt
names = data/obj.names
backup = backup/-
Put image-files (.jpg) of your objects in the directory
build\darknet\x64\data\obj\ -
You should label each object on images from your dataset. Use this visual GUI-software for marking bounded boxes of objects and generating annotation files for Yolo v2 & v3: https://github.com/AlexeyAB/Yolo_mark
It will create .txt-file for each .jpg-image-file - in the same directory and with the same name, but with .txt-extension, and put to file: object number and object coordinates on this image, for each object in new line:
<object-class> <x_center> <y_center> <width> <height>
Where:
<object-class>- integer object number from0to(classes-1)<x_center> <y_center> <width> <height>- float values relative to width and height of image, it can be equal from(0.0 to 1.0]- for example:
<x> = <absolute_x> / <image_width>or<height> = <absolute_height> / <image_height> - atention:
<x_center> <y_center>- are center of rectangle (are not top-left corner)
For example for img1.jpg you will be created img1.txt containing:
1 0.716797 0.395833 0.216406 0.147222
0 0.687109 0.379167 0.255469 0.158333
1 0.420312 0.395833 0.140625 0.166667
- Create file
train.txtin directorybuild\darknet\x64\data\, with filenames of your images, each filename in new line, with path relative todarknet.exe, for example containing:
data/obj/img1.jpg
data/obj/img2.jpg
data/obj/img3.jpg
-
Download pre-trained weights for the convolutional layers and put to the directory
build\darknet\x64- for
yolov4.cfg,yolov4-custom.cfg(162 MB): yolov4.conv.137 (Google drive mirror yolov4.conv.137 ) - for
yolov4-tiny.cfg,yolov4-tiny-3l.cfg,yolov4-tiny-custom.cfg(19 MB): yolov4-tiny.conv.29 - for
csresnext50-panet-spp.cfg(133 MB): csresnext50-panet-spp.conv.112 - for
yolov3.cfg, yolov3-spp.cfg(154 MB): darknet53.conv.74 - for
yolov3-tiny-prn.cfg , yolov3-tiny.cfg(6 MB): yolov3-tiny.conv.11 - for
enet-coco.cfg (EfficientNetB0-Yolov3)(14 MB): enetb0-coco.conv.132
- for
-
Start training by using the command line:
darknet.exe detector train data/obj.data yolo-obj.cfg yolov4.conv.137To train on Linux use command:
./darknet detector train data/obj.data yolo-obj.cfg yolov4.conv.137(just use./darknetinstead ofdarknet.exe)- (file
yolo-obj_last.weightswill be saved to thebuild\darknet\x64\backup\for each 100 iterations) - (file
yolo-obj_xxxx.weightswill be saved to thebuild\darknet\x64\backup\for each 1000 iterations) - (to disable Loss-Window use
darknet.exe detector train data/obj.data yolo-obj.cfg yolov4.conv.137 -dont_show, if you train on computer without monitor like a cloud Amazon EC2) - (to see the mAP & Loss-chart during training on remote server without GUI, use command
darknet.exe detector train data/obj.data yolo-obj.cfg yolov4.conv.137 -dont_show -mjpeg_port 8090 -mapthen open URLhttp://ip-address:8090in Chrome/Firefox browser)
- (file
8.1. For training with mAP (mean average precisions) calculation for each 4 Epochs (set valid=valid.txt or train.txt in obj.data file) and run: darknet.exe detector train data/obj.data yolo-obj.cfg yolov4.conv.137 -map
- After training is complete - get result
yolo-obj_final.weightsfrom pathbuild\darknet\x64\backup\
-
After each 100 iterations you can stop and later start training from this point. For example, after 2000 iterations you can stop training, and later just start training using:
darknet.exe detector train data/obj.data yolo-obj.cfg backup\yolo-obj_2000.weights(in the original repository https://github.com/pjreddie/darknet the weights-file is saved only once every 10 000 iterations
if(iterations > 1000)) -
Also you can get result earlier than all 45000 iterations.
Note: If during training you see nan values for avg (loss) field - then training goes wrong, but if nan is in some other lines - then training goes well.
Note: If you changed width= or height= in your cfg-file, then new width and height must be divisible by 32.
Note: After training use such command for detection: darknet.exe detector test data/obj.data yolo-obj.cfg yolo-obj_8000.weights
Note: if error Out of memory occurs then in .cfg-file you should increase subdivisions=16, 32 or 64: link
Do all the same steps as for the full yolo model as described above. With the exception of:
- Download file with the first 29-convolutional layers of yolov4-tiny: https://github.com/AlexeyAB/darknet/releases/download/darknet_yolo_v4_pre/yolov4-tiny.conv.29
(Or get this file from yolov4-tiny.weights file by using command:
darknet.exe partial cfg/yolov4-tiny-custom.cfg yolov4-tiny.weights yolov4-tiny.conv.29 29 - Make your custom model
yolov4-tiny-obj.cfgbased oncfg/yolov4-tiny-custom.cfginstead ofyolov4.cfg - Start training:
darknet.exe detector train data/obj.data yolov4-tiny-obj.cfg yolov4-tiny.conv.29
For training Yolo based on other models (DenseNet201-Yolo or ResNet50-Yolo), you can download and get pre-trained weights as showed in this file: https://github.com/AlexeyAB/darknet/blob/master/build/darknet/x64/partial.cmd If you made you custom model that isn't based on other models, then you can train it without pre-trained weights, then will be used random initial weights.
Example of custom object detection: darknet.exe detector test data/obj.data yolo-obj.cfg yolo-obj_8000.weights
 |
 |
|---|
- Before training:
-
set flag
random=1in your.cfg-file - it will increase precision by training Yolo for different resolutions: link -
increase network resolution in your
.cfg-file (height=608,width=608or any value multiple of 32) - it will increase precision -
check that each object that you want to detect is mandatory labeled in your dataset - no one object in your data set should not be without label. In the most training issues - there are wrong labels in your dataset (got labels by using some conversion script, marked with a third-party tool, ...). Always check your dataset by using: https://github.com/AlexeyAB/Yolo_mark
-
my Loss is very high and mAP is very low, is training wrong? Run training with
-show_imgsflag at the end of training command, do you see correct bounded boxes of objects (in windows or in filesaug_...jpg)? If no - your training dataset is wrong. -
for each object which you want to detect - there must be at least 1 similar object in the Training dataset with about the same: shape, side of object, relative size, angle of rotation, tilt, illumination. So desirable that your training dataset include images with objects at diffrent: scales, rotations, lightings, from different sides, on different backgrounds - you should preferably have 2000 different images for each class or more, and you should train
2000*classesiterations or more -
desirable that your training dataset include images with non-labeled objects that you do not want to detect - negative samples without bounded box (empty
.txtfiles) - use as many images of negative samples as there are images with objects -
What is the best way to mark objects: label only the visible part of the object, or label the visible and overlapped part of the object, or label a little more than the entire object (with a little gap)? Mark as you like - how would you like it to be detected.
-
for training with a large number of objects in each image, add the parameter
max=200or higher value in the last[yolo]-layer or[region]-layer in your cfg-file (the global maximum number of objects that can be detected by YoloV3 is0,0615234375*(width*height)where are width and height are parameters from[net]section in cfg-file) -
for training for small objects (smaller than 16x16 after the image is resized to 416x416) - set
layers = 23instead of https://github.com/AlexeyAB/darknet/blob/6f718c257815a984253346bba8fb7aa756c55090/cfg/yolov4.cfg#L895 -
for training for both small and large objects use modified models:
- Full-model: 5 yolo layers: https://raw.githubusercontent.com/AlexeyAB/darknet/master/cfg/yolov3_5l.cfg
- Tiny-model: 3 yolo layers: https://raw.githubusercontent.com/AlexeyAB/darknet/master/cfg/yolov4-tiny_3l.cfg
- YOLOv4: 3 yolo layers: https://raw.githubusercontent.com/AlexeyAB/darknet/master/cfg/yolov4-custom.cfg
-
If you train the model to distinguish Left and Right objects as separate classes (left/right hand, left/right-turn on road signs, ...) then for disabling flip data augmentation - add
flip=0here: https://github.com/AlexeyAB/darknet/blob/3d2d0a7c98dbc8923d9ff705b81ff4f7940ea6ff/cfg/yolov3.cfg#L17 -
General rule - your training dataset should include such a set of relative sizes of objects that you want to detect:
train_network_width * train_obj_width / train_image_width ~= detection_network_width * detection_obj_width / detection_image_widthtrain_network_height * train_obj_height / train_image_height ~= detection_network_height * detection_obj_height / detection_image_height
I.e. for each object from Test dataset there must be at least 1 object in the Training dataset with the same class_id and about the same relative size:
object width in percent from Training dataset~=object width in percent from Test datasetThat is, if only objects that occupied 80-90% of the image were present in the training set, then the trained network will not be able to detect objects that occupy 1-10% of the image.
-
to speedup training (with decreasing detection accuracy) set param
stopbackward=1for layer-136 in cfg-file -
each:
model of object, side, illimination, scale, each 30 gradof the turn and inclination angles - these are different objects from an internal perspective of the neural network. So the more different objects you want to detect, the more complex network model should be used. -
to make the detected bounded boxes more accurate, you can add 3 parameters
ignore_thresh = .9 iou_normalizer=0.5 iou_loss=giouto each[yolo]layer and train, it will increase mAP@0.9, but decrease mAP@0.5. -
Only if you are an expert in neural detection networks - recalculate anchors for your dataset for
widthandheightfrom cfg-file:darknet.exe detector calc_anchors data/obj.data -num_of_clusters 9 -width 416 -height 416then set the same 9anchorsin each of 3[yolo]-layers in your cfg-file. But you should change indexes of anchorsmasks=for each [yolo]-layer, so for YOLOv4 the 1st-[yolo]-layer has anchors smaller than 30x30, 2nd smaller than 60x60, 3rd remaining, and vice versa for YOLOv3. Also you should change thefilters=(classes + 5)*<number of mask>before each [yolo]-layer. If many of the calculated anchors do not fit under the appropriate layers - then just try using all the default anchors.
- After training - for detection:
-
Increase network-resolution by set in your
.cfg-file (height=608andwidth=608) or (height=832andwidth=832) or (any value multiple of 32) - this increases the precision and makes it possible to detect small objects: link -
it is not necessary to train the network again, just use
.weights-file already trained for 416x416 resolution -
to get even greater accuracy you should train with higher resolution 608x608 or 832x832, note: if error
Out of memoryoccurs then in.cfg-file you should increasesubdivisions=16, 32 or 64: link
Here you can find repository with GUI-software for marking bounded boxes of objects and generating annotation files for Yolo v2 - v4: https://github.com/AlexeyAB/Yolo_mark
With example of: train.txt, obj.names, obj.data, yolo-obj.cfg, air1-6.txt, bird1-4.txt for 2 classes of objects (air, bird) and train_obj.cmd with example how to train this image-set with Yolo v2 - v4
Different tools for marking objects in images:
- in C++: https://github.com/AlexeyAB/Yolo_mark
- in Python: https://github.com/tzutalin/labelImg
- in Python: https://github.com/Cartucho/OpenLabeling
- in C++: https://www.ccoderun.ca/darkmark/
- in JavaScript: https://github.com/opencv/cvat
- in C++: https://github.com/jveitchmichaelis/deeplabel
- in C#: https://github.com/BMW-InnovationLab/BMW-Labeltool-Lite
- DL-Annotator for Windows ($30): url