In this repo, I document the things I've learnt in Android Security and Android Reverse Engineering.
This guide was originally published by me in the form of a blogpost on 14th Feb 2022.
nandan@nandan-pc:~/Android/Sdk/emulator$ ./emulator -list-avds
Pixel_2_API_28
Pixel_2_API_R
Pixel_2_XL_API_29
Pixel_XL_API_25
nandan@nandan-pc:
~/Android/Sdk/emulator$ ./emulator -avd Pixel_XL_API_25 -writable-system
-
If you are connected to both wifi and mobile data in your emulator and wifi is showing 'no internet', then first turn off the wifi.
-
Next, run your mitmproxy. Preferably mitmweb.
-
Now, to connect to mitmproxy, we need to change our proxy settings. To do that, follow this article.
-
Now, open Chrome in your emulator and visit http://mitm.it. If you can see that certificate install page, then everything is fine. But don't install certificate there. Since Android 7, apps can opt-out of User added CAs and hence you can't see the HTTPS traffic of many of the apps if you install the certificate from mitm.it. We need to make the mitmproxy certificate as a system-added certificate authority.
-
To do that, follow this article.
-
Now, while following that article, I encountered several problems. My adb was not able to run as root and the
adb rootcommand was failing. That's when I read that emulators are of different types. We need to have emulators labelled as 'Google API' to get many debug options. On the other hand, the emulators which are labelled as 'Google Play' won't have many options as they are "production builds" of the Android OS. You can see this label while downloading a new emulator in AVD Manager in Android Studio. -
The emulator that ran flawlessly was Pixel_XL_API_25. Some other emulators even with 'Google API' label were encountering some kind of errors while following the article mentioned in point 5.
-
There is also a case where the app developer can get clever and add specific network configurations to trust certain standard certificates only. This way, even if you have made mitmproxy as a system certificate in the above steps, you'll still not be able to view that app's HTTPS traffic. To bypass this, you can change that configuration by decompiling the app, add your own configurations and then recompiling the apk. Although I have not tried this personally but there is a repo here that claims to do this for you.
EDIT: You will need to specify the mitmproxy IP address and port in the emulator settings. There, just enter 127.0.0.1 as IP and whatever the port mitmproxy is running on.
- I prefer to use Raccoon desktop app to download the APK file and then drag-n-drop the apk into the emulator to install it.
- But, recently, Android has introduced App Bundles. Which means the APK file is split into multiple files. And we can't just drag and drop the files to install the app. To install such split APK files, we will use Split APKs Installer (SAI).
- Now just drag and drop the whole folder that contains the split apks into the emulator.
- You will find that folder in Downloads folder in emulator.
- Open SAI and navigate to the split APKs folder and select the APKs of the app you want to install. Make sure you select the proper APKs (like when I selected armeabi apks, the installation was failing for my particular case).
- That's it! Now the installation is complete and you can run the app.
Now that you have followed the above explanation, here is a tip. Install NetGuard in the emulator. It will help you block all the other apps in the emulator from accessing the internet and you can single out your target app to access the internet. That will be very easy in mitmproxy web interface to study the traffic rather than filtering the traffic in mitmproxy itself.
After all the (above mentioned) setup is ready,
-
Turn on the mitmweb. It will serve proxy server on port 8080 and web interface on 8081
-
Turn on your emulator with the following command
./emulator -avd Pixel_XL_API_25 -writable-system -
Enjoy the network analysis of your target android app!
An app used to detect whether it's running on a rooted device or an emulator.
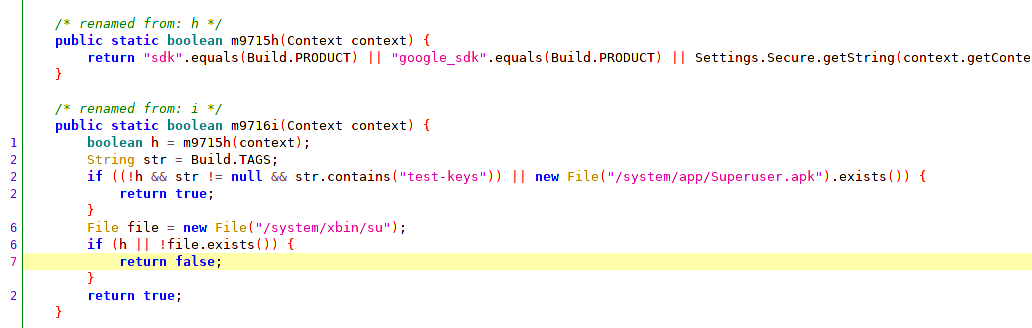
I used JADX to get the logic of how the app was checking the root and the emulator. But JADX can only be used for viewing and analyzing a decompiled APK. It can't be used for editing and recompiling it.
To edit the APK and recompile it, we need to use apktool jar file.
java -jar apktool_2.4.1.jar d target-app.apk
Decompiled version will be in smali. And the file names are obfuscated. So, by referring to JADX, we can find the right file and the right method to modify in smali. After the modification, we need to build back the APK.
java -jar apktool_2.4.1.jar b
The modified APK can be found in the dist/ folder inside the decompiled folder. Now, before we can install this modified APK in our emulator, we need to sign it.
Create a new keystore and add some dummy data in it.
keytool -genkey -v -keystore target.keystore -alias alias_name -keyalg RSA -keysize 2048 -validity 10000
Then sign the modified APK with the newly generated keystore. For that, install apksigner (sudo apt install apksigner)
apksigner sign --ks target.keystore
Verify the signature once again:
apksigner verify --verbose
Done! Now the modified app will run smoothly in the emulator!
Also, if there are any problems while installing it, try installing the app using adb into the emulator to get a detailed log.
adb -s emulator-5554 install
- Install Tor on your system (
sudo apt install tor). - Start Tor with it's HTTPTunnel proxy at any port (I will use 9060).
nandan@nandan-pc:~$ tor --HTTPTunnelPort 9060
- Start mitmproxy in upstream mode
./mitmweb --mode upstream:http://127.0.0.1:9060 --set termlog_verbosity=debug
That's it! Now the emulator's traffic will go through mitmproxy and then through Tor.

This entire GitHub repository is published under Creative Commons BY-NC-SA 4.0 license. "This license lets others remix, tweak, and build upon your work non-commercially, as long as they credit you and license their new creations under the identical terms."