

LaMa is a Thematic Labelling web application that can facilitate easier analysis of texts by allowing to add labels to these text artifacts and group the created labels into themes. This tool was developed by a team of nine students for the Final Bachelor Project at the Eindhoven University of Technology.
The tool was created to facilitate collaboration and peer feedback on labelled artifacts. LaMa allows for the user to label text in order to find patterns in qualitative data. Using this tool will allow for an easier, faster, and more structured way for one or more people to label a given text and resolve any conflicts that arise between labels. Additionally, it provides an free and open-source alternative for the commercial tools, such as Atlas.ti and maxQDA.
This project builds upon the already existing Labeling Machine tool by extending it and adding new functionalities, which include but are not limited to a new API and remaking the User Interface (UI).
For deployment using docker:
For development these are the dependencies/tools without which LaMa may not work:
- NodeJS ≥ 16.15
- AngularCLI ≥ 13.3.10
- Python ≥ 3.10
- pip ≥ 22.1.2
- Docker ≥ 20.10 (with compose plugin)
- IDE (optional, but recommended for easier development. We recommend PyCharm for Backend and VSCode for Frontend)
Assuming that you have all the necessary dependencies installed.
- Clone repository
- Navigate to the repository in a terminal
- To start the application run:
docker compose --env-file .env -f Docker/docker-compose.yml up --build -d
- To shut down the application run:
docker compose --env-file .env -f Docker/docker-compose.yml down
You should now have LaMa running in your browser. By default, the frontend server runs on localhost and default login credentials are admin as username & password as password.
Database:
- Open a terminal in the root directory of the repository
- Start the database with:
docker compose --env-file .env -f Docker/docker-compose-db.yml up --build -d
- Shut down the database with:
docker compose --env-file .env -f Docker/docker-compose-db.yml down
Frontend:
- Open a terminal in the frontend directory
- Run
npm i - Create the environment variables,
npx tsx .\src\setenv.ts - Run
ng serve - The frontend server will run on localhost:4200
Backend:
- Set the
FLASK_ENVenvironment variable todevelopment - Open a terminal in the backend directory
- On your first time create a virtual environment with
python -m venv venv - Activate your virtual environment,
.\venv\Scripts\activateon Windows orsource venv/bin/activateon Linux - Run
pip install -r requirements.txt - Run the following commands:
flask db-safe init
flask db migrate
flask db upgrade
flask db-safe add-super-admin
flask run --host=0.0.0.0
- On teardown do not forget to revert the
FLASK_ENVenvironment variable toproduction, and rundeactivateto deactivate the virtual environment
The Environment variables can be found in the .env file in the root of the repository. Here all of the default values for the necessary variables are set. If one wants to change any of these variables they should change the values in this file.
The file is divided into sections:
- Database - these are all the variables that have anything to do with the database, such as the database port, database login details etc.
- PhPMyadmin - this is where the port for the phpmyadmin is defined
- LaMa Config - these variables defines the superadmin username and password. Please, note that a superadmin is created by default who has access of all the projects and their contents. The AUTO_APPROVAL variable determines whether new accounts are approved by default, or must be approved by super admins, it should parse as a boolean.
- Flask Server - these are the variables needed to run the flask server.
- Frontend Server - these are two variables for the urls to the backend server. The frontend uses these variables to interact with the apis provided by the backend.
With the database running do the following:
- Go the PMA, which runs on localhost:81 by default.
- In the lama database, check all tables and drop them. You will lose all your data.
- Go to the import tab, choose the
sample.sqlfile found in the root of the repository, and press Go.
The sample database contains one project on the topic of restaurant reviews, and this project already has some labelled artifacts. The three main criteria for reviews are the food, service, and decor. There are two users with the following login details:
- Username:
adminPassword:password - Username:
John DoePassword:Testing123
Projects are the fundamental building block of the tool, functionalities are on a per project basis. There are 2 ways to participate in a project:
- Create your own project
- Join an existing project
Creating a project can be done through the Create project button at the top right of the screen, this opens a menu in which settings of the project can be configured.

To join an existing project the project admin of that project needs to add your account through the project setting menu of the project. The project settings menu can be opened through the setting (gear icon) in the menu bar on the left after opening the project.

After participating in a project, for any functionality first artifacts have to be added. Artifacts can be added by navigating to the Artifact management page, from the navigation menu on the left after opening the project. On the artifact management page click the Add artifact button at the top right, and upload a .txt file containing the artifact(s).

After having uploaded artifacts it is possible to start labelling them. Navigate using the navigation menu on the left to the labelling page. An artifact will be shown here. To label an artifact, select labels from the dropdown menu below the artifact text.
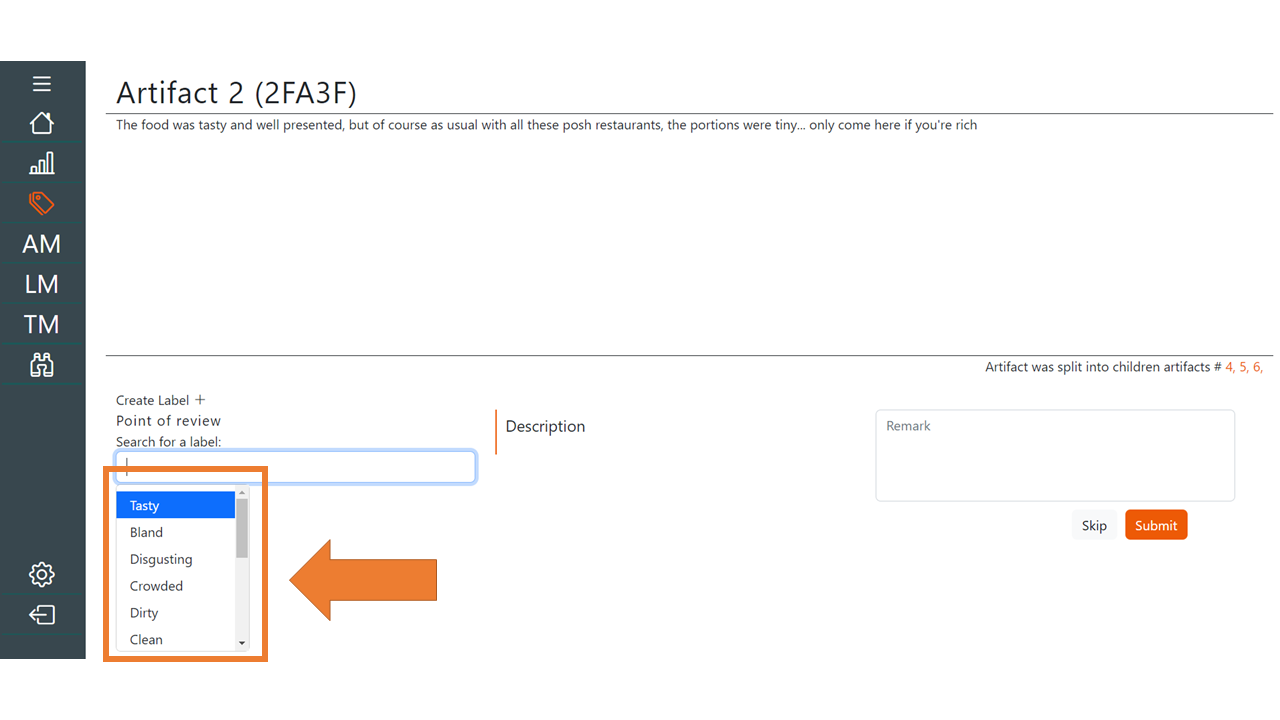
New labels can be created using the add label button above the dropdown menu. The remark text-field can be used to add comments on why a certain label was selected.

Note: Labels have a label type, this is a way grouping of labels. To label an artifact the user should select a label from each label type. Label types are specified during the project creation, and are not adjustable afterwards.
After different users have labelled an artifact there could be conflict between the labels that have been assigned. Artifacts with different labels appear in the conflict resolution page. Here users can modify the labelling given to ensure that there is conformity between the assigned labels.

Clicking the resolve conflict button will resolve the conflict if the labels are consistent.

For a full list of features we refer the reader to the Software User Manual (SUM), below we will briefly describe some of the more important advanced features for common use cases.
- Artifacts can be viewed on the artifact management page. Additional info about labels given to artifacts can be seen by clicking on an artifact.
- Segments from an artifact can be transformed into a new artifact, this operation is referred to as "split". Splitting of artifacts is done by highlighting the portion of the artifact to be split on the labelling page, and then clicking the scissor icon in the top right.
- The label management page displays all labels in a project, changes can be made to labels, such as editing names, merging labels.
- Themes can be created to provide a logical grouping of labels, allowing for better analysis. Themes are created on the theme management page. Labels are assigned to themes on the label management page, or the theme management page.
- Themes can be logically grouped with other themes to create a hierarchical view of the elements within a project.
- Artifacts, labels and themes store change history. This can be inspected by clicking the clock icon when viewing the aforementioned elements.
- Various project statistics can be viewed on the statistics page. The user can navigate to the statistics page using the navigation menu on the left side of the screen.
- The hierarchy and status of labels and themes can be visualized by clicking the Theme hierarchy button on the theme management page. A visualization will be displayed showing how the different elements are related to another, and their current status.
- Navigate to the frontend folder on the terminal
- To install the required libraries run the command:
npm install
- After this command has executed succesfully, run the front-end test cases using the command:
ng test
- Navigate to the backend folder on the terminal
- To install the required dependencies run the command:
pip install -r requirements.txt
- After this command has executed succesfully, run the back-end test cases using the command:
pytest -rA
(if pytest has not been added to your path, instead run: python -m pytest -rA)
Please use the following Bibtex for citing this work.
@article{lama2023,
  author = {Victoria Bogachenkova and Eduardo Costa Martins and Jarl Jansen and Ana-Maria Olteniceanu and Bartjan Henkemans and Chinno Lavin and Linh Nguyen and Thea Bradley and Veerle Fürst and Hossain Muhammad Muctadir and Mark van den Brand and Loek Cleophas and Alexander Serebrenik},
  title = {LaMa: a thematic labelling web application},
  journal = {Journal of Open Source Software},
  doi = {10.21105/joss.05135},
  url = {https://doi.org/10.21105/joss.05135},
  year = {2023},
  publisher = {The Open Journal},
  volume = {8},
  number = {85},
  pages = {5135}
}
LaMa was developed based on a web application called Labeling Machine, which is forked from an earlier version of the Labeling Machine. Development of LaMa was partially funded by NWO (the Dutch national research council) under the NWO AES Perspective program (Digital Twin), project code P18-03 P3. We acknowledge the contribution of the nine bachelor students from Eindhoven University of Technology, the Netherlands V. Bogachenkova, T. Bradley, E.J. Costa Martins, V. Fürst, B. Henkemans, J.L.O. Jansen, L.C. Lavin, L.V. Nguyen, and A. Olteniceanu, who contributed to this project significantly as part of their final project of the bachelors program in computer science.