


Copy Right 2020 Kevin Yu. All rights reserved.
Author: Kevin Yu
Release Date: 2020/04/25
Last Update Time: 2023/02/14
As of today, YOLOv3 stays one of the most popular object detection model architectures. Since NVIDIA already provided an Object Detection With The ONNX TensorRT Backend In Python (YOLOv3) sample code, it is possibly to implement YOLOv3 with TensorRT to massively accelerate the inference runtime. This repo demonstrates an example to apply TensorRT techniques to real-time Object Detection with YOLOv3, and YOLOv3-tiny models.
I am working on adding the training tool to the repo so that you may implement TensorRT with YOLO models that are trained with custom dataset. It will be released soon.
Notes: All the demos below are done on my Jetson AGX Xavier DevKit. Here is the quick wrap-up from the demo results:
- Run the detector with YOLOv3-416 model at 15~16 FPS on Jetson AGX Xavier
- Run the detector with YOLOv3-tiny-416 model at 46~53 FPS on Jetson AGX Xavier
Furthermore, all demos should work on x86_64 PC with NVIDIA GPU(s) as well. Make sure you have all the software dependencies installed correctly on your machine.
The demos below are tested with the default YOLOv3-416 model, you may change to other models with flag --model. You may find all available models in yolov3_onnx/.

The following packages are required for this project. If you are using a x86 PC, you have to make sure you have CUDA, cuDNN, and TensorRT installed.
For Jetson User, CUDA, cuDNN, and TensorRT are pre-installed with JetPack. Assuming you are using JetPack >=4.2, you should be good to go.
- Python>=3.6
- Onnx==1.4.1
- Protobuf==3.8.0
- Pycuda==2019.1.2
- OpenCV>=3.4
- CUDA>=10.0
- cuDNN>=7.5
- TensorRT>=6.0.1
- Numpy==1.16.0
Notes: You do not need to install the above dependencies separately, the installation script below will handle all the heavy-lifting installation work for you.
Simply run the following command, the script will lead you to the installation process.
$ bash <(wget -qO- https://raw.githubusercontent.com/yqlbu/TRT-yolov3/master/setup.sh)Notes:
- The script will run for around 10-15 minutes. Please wait with patience.
- If the script have successfully ran and finished without any errors, you may move on to test the results in the section below.
Now, the Docker version is online, whereas as for now, only the image for Jetson L4T (ARM64) Platform is supported.
To setup nvidia-docker runtime as the default runtime, folow the steps bellow:
$ sudo apt install -y nvidia-docker2
$ sudo nano /etc/docker/daemon.json
Copy & Paste the following content to daemon.json, then Save & Exit
{
  "default-runtime": "nvidia",
  "runtimes": {
     "nvidia": {
       "path": "/usr/bin/nvidia-container-runtime",
       "runtimeArgs": []
       }
     }
}
$ sudo systemctl daemon-reload
$ sudo systemctl restart docker$ export DISPLAY=:0
$ sudo xhost +si:localuser:root
$ sudo docker run --runtime nvidia --network host --rm -it -e DISPLAY=$DISPLAY -v /tmp/.X11-unix/:/tmp/.X11-unix hikariai/l4t-trt-yolov3:<MODEL> bashNotes:
- Please make sure you have a monitor connected to your device, or you have connected your device via VNC / Nomachine.
- The < MODEL > tag specifies your jetson model, the available option can be found in HERE.
- The container will lead you to a docker environment, but it does not make any difference when running the application. Simply follow Usage for guidance.
- The inference with YOLOv3-416 is not well performed on the Jetson Nano, so I recommend using the YOLOv3-tiny instead, you may specify the YOLOv3-tiny model as input by adding --model yolov3-tiny-416 in CLI.
CLI (Command Line Interface) Reference:
| flags | usage |
|---|---|
| --model | chose a network to load |
| --file | use a video file as input (remember to also set --filename) |
| --filename | video file name |
| --usb | use USB webcam (remember to also set --vid) |
| --vid | device # of USB webcam (/dev/video?) |
| --rtsp | use IP Camera (remember to also set --uri) |
| --uri | RTSP URI, e.g. rtsp://192.168.1.64:554 |
| --image | use an image file as input (remember to also set --filename) |
| --width | image width |
| --height | image height |
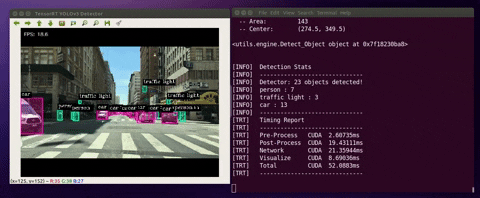
| --runtime | display detailed runtime information |
When the detector runs, the program would do the following:
(1) deserialize/load the TensorRT engine
(2) manage CUDA memory buffers using “pycuda”
(3) preprocess input image, run inference and postprocess YOLOv3 detection output.
Below are the cases where you can run the detector with different input stream sources:
$ python3 detector.py --usb --vid 0 --runtime$ python3 detector.py --file --filename ./data/videos/cars.mp4 --runtimeNotes: The project includes four sample videos for testing (cars.mp4, shinjuku.mp4, ped.mp4, and passby.mp4). They are located in ./data/videos/
$ python3 detector.py --image --filename ./data/images/human.jpgNotes: The project includes four sample images for testing (dog_1.jpg, dog_2.jpg, human.jpg). They are located in ./data/images/
Simply add --height and --width flags to specify the size of the input frames
To change the model to YOLOv3-tiny, specify the model with the flag --model
e.g.
$ python3 detector.py --file --filename ./data/videos/cars.mp4 --model yolov3-tiny-416 --runtimePlease check out details HERE
This project is built based on the source code provide by Mr. JkJung, you may find his wonderful TensorRT Tutorial HERE. I also referenced source code of NVIDIA/TensorRT samples to develop the ONNX >> TensorRT conversion.
Source: jkjung-avt tensorrt_demos