
This repository is no longer maintained. Please see the official release at https://github.com/Docmosis/tornado-docker.
Running Tornado using Docker is a simple way to get up and running quickly. Tornado can be launched via Docker with only a few steps with a default configuration and can also fully configured via the launching process.
This guide assumes the user is already familiar with Docker and focuses on the Docmosis Tornado specifics.
- Running Tornado using Docker
- Container Settings
- Running Tornado using Docker Compose
- Running the Server and Testing
- Generating Documents from Your Application
- Monitoring Tornado
- More Help
- All Configuration Options
- License
The following steps will create a running Tornado server for you to work with.
-
Obtain a Tornado Trial license key from https://www.docmosis.com/try/tornado.html
-
Create a folder on your computer (the docker host) where you will put your Docmosis templates. We will map this to a folder inside the Docker container and Tornado will find templates you place into this folder.
-
Build the Docmosis Tornado Docker image:
docker build --tag docmosis/tornado https://raw.githubusercontent.com/mikehhodgson/tornado/master/Dockerfile
-
Launch a Tornado container as follows, inserting your license key and path to templates folder.
For example, in Linux to use a folder /home/docmosisTemplates with a Tornado host running on port 8080:
Linux Shell:
docker run -p 8080:8080 \
  -v /home/docmosisTemplates:/home/docmosis/templates \
  -e DOCMOSIS_KEY=XXXX-XXXX-XXXX-XXXX-X-XXXX \
  -e DOCMOSIS_SITE="Free Trial License" \
  docmosis/tornado
For example, in Windows to use a folder C:\docmosisTemplates with a Tornado host running on port 8080:
Using Windows CMD:
docker run -p 8080:8080 ^
  -v C:\docmosisTemplates:/home/docmosis/templates ^
  -e DOCMOSIS_KEY=XXXX-XXXX-XXXX-XXXX-X-XXXX ^
  -e DOCMOSIS_SITE="Free Trial License" ^
  docmosis/tornado
Using Windows PowerShell:
docker run -p 8080:8080 `
  -v C:\docmosisTemplates:/home/docmosis/templates `
  -e DOCMOSIS_KEY=XXXX-XXXX-XXXX-XXXX-X-XXXX `
  -e DOCMOSIS_SITE="Free Trial License" `
  docmosis/tornado
The Docmosis Tornado Docker synopsis is (Linux style commands are used from here on):
docker run --name [container name] \
  -p [host port]:8080 \
  -v [host templates directory]:/home/docmosis/templates \
  -e DOCMOSIS_KEY=[license key] \
  -e DOCMOSIS_SITE=[license site] \
  docmosis/tornado

Parameters:
  --name  The name of the container (default: auto generated).
  -p      The port mapping of the host port to the container port.
          Port 8080 is used for both the REST service and the web console.
  -v      The absolute path to your templates directory on the host system.
  -e      Set environment variables inside the container.
The -e flag can be used multiple times to set different configuration values as shown by the examples and the synopsis above. There are a lot of parameters that can be configured, as detailed in the section titled All Configuration Options below. Some examples are listed here for typical use-cases.
The Tornado container will by default log to console. This is set by a log4j configuration file included in the image. You may instead wish to have the logs written to a file outside of the Docker container so they are accessible (and persistent). To write the logs to file, you can override the log4j configuration to a blank value, and then map a volume to the default log folder /home/docmosis/workingarea/logs.
To set the logging to write outside the container:
docker run --name [container name] \
  -p [host port]:8080 \
  -v [host templates directory]:/home/docmosis/templates \
  -e DOCMOSIS_KEY=[license key] \
  -e DOCMOSIS_SITE=[license site] \
  -e DOCMOSIS_LOG4J_CONFIG_FILE= \
  -v [host logging directory]:/home/docmosis/workingarea/logs \
  docmosis/tornado
To have more detailed logging enable debug by setting the log level as follows:
docker run --name [container name] \
  -p [host port]:8080 \
  -v [host templates directory]:/home/docmosis/templates \
  -e DOCMOSIS_KEY=[license key] \
  -e DOCMOSIS_SITE=[license site] \
  -e DOCMOSIS_LOG_LEVEL=DEBUG
  docmosis/tornado
It can be useful to define the launch configuration in a Docker Compose file. The following content could be placed in your docker-compose.yml file:
version: '3.3'

services:

  tornado:
    image: docmosis/tornado
    ports:
     - "[host port]:8080"
    volumes:
     - [host templates directory]:/home/docmosis/templates
    environment:
      DOCMOSIS_KEY: "[license key]"
      DOCMOSIS_SITE: "[license site]"
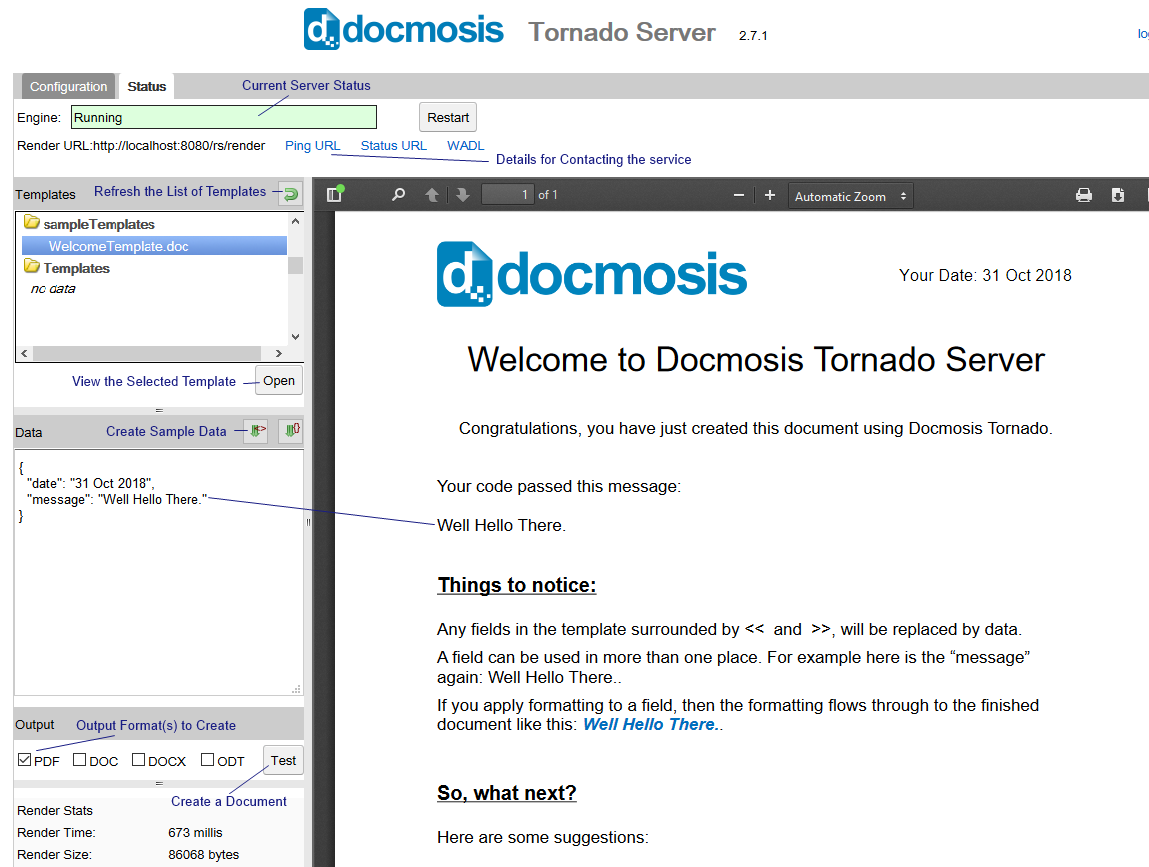
When Docmosis Tornado has started successfully, you can point your browser to Docker container to use the Tornado Web Console. If Tornado has started successfully, you will be navigated to the Status tab and the engine status will be Running. In this screen you can select templates and run test data to generate Documents. This is a useful test-platform that can assist development before generating documents via the API.
If the start up is not succesful review the ouput logged from the Docker command. This will typically indicate what has gone wrong.
The configuration that Tornado has started with can also be viewed via the configuration tab of the Web Console should you need to debug the settings are being correctly applied.
From the Tornado Status Page can create dummy data (either JSON or XML) based on the template you have selected. Tornado queries the template for fields and has its "best guess" at creating data that matches the template.
Templates can contain complicated structures for repeating and nested data, so you may need to adjust the generated data structure so that it looks like your expected data.
Tornado will generate data values: "value1", "value2" and so on – which you can change to look more like your data.
You can create a document from the Tornado Status Page.
If you render a PDF only and your browser is configured with a PDF viewer, the output file will be displayed in the browser panel on the right.
If you choose any other formats, or combinations of formats, you will receive the rendered document as a download.
The Tornado Status Page displays the Render URL to use for calling the Render service (just below the Engine status).
This is the URL to use with your client code / libraries to request documents to be rendered.
You should refer to the Tornado Web Services Guide in the Resources area of the Docmosis site https://www.docmosis.com/resources/tornado.html for details about invoking the render service.
Note that Docmosis Tornado provides only the render service. The Docmosis Cloud service provides other services to support producing documents in a cloud environment. The render service is identical to that provided by the cloud service except for:
-
The URL is different - you will direct the requests to your local Docmosis Tornado server instead of the public Cloud Service
-
The following REST web services are provided (more details are provided in the Tornado Web Services Guide):
a. "render" – create a document
b. "getTemplateStructure" – get a JSON description of the structure of a template
c. "convert" – convert the supplied document to another format (without any data merging)
d. "ping" and "status" – determine the Tornado operational status
-
Store-to directives for cloud and AWS (Amazon S3) storage are not available
-
REST clients do not need to supply an access key (unless you set one in the configuration tab)
-
Emailing documents is supported as long as you have configured an email gateway into Docmosis Tornado configuration
Tornado includes two web service end-points to support automated monitoring:
"ping" e.g. http://localhost:8080/rs/ping
"status" e.g. http://localhost:8080/rs/status
See the Tornado Web Services Guide for details about these monitoring end-points.
Docmosis document generation provides a large number of features controlled from both the templates and from the data. To get the most out of Docmosis, please read the Developer Guide and Template Guides on the Docmosis web site under the Resources area:
https://www.docmosis.com/resources/all-resources.html
We hope you enjoy using Tornado.
The following settings can be added to the Custom Settings on the Configuration page to enable
-
port
Specify the port on which the console and the web services will listen -
license
Specify the Tornado license all as one string. This includes the key and the site and overrides the key and site parameters below. "\n" is used to provide separate lines.
eglicense="docmosis.key=XXXX-XXXX-XXXX-XXXX-XXXX-XXXX-XXXX-XXXX-XXXX-X-XXXX\ndocmosis.site=Free Trial License" -
key
Specify the key part of the Tornado license. This requires the site or site1-3 parameters also.
egkey="docmosis.key=XXXX-XXXX-XXXX-XXXX-XXXX-XXXX-XXXX-XXXX-XXXX-X-XXXX" site="Docmosis.site=Free Trial License"or
key="docmosis.key=XXXX-XXXX-XXXX-XXXX-XXXX-XXXX-XXXX-XXXX-XXXX-X-XXXX" site1="Docmosis.site=Free Trial License" site2="next line of site string" (if required) site3="another line of site string" (if required) -
site
The full site string using "\n" to specify multiple lines as require (if key is multiple lines). Overrides the site1..site3 parameters and requires the key parameter. -
site1
Specify the first line of the site -
site2
Specify the second line of the site (if required) -
site3
Specify the third line of the site (if required) -
officeDir
Specify the office install location for LibreOffice -
templatesDir
Specify where templates will be sourced from (original templates) -
workingDir
Specify where logs and working caches are to be stored -
adminPw
Specify the admin password for access the web console. Optional. -
accessKey
Specify the access key for calling the web service end points. Optional. -
customSettings
Specify any custom settings using the format key=value and separating settings by "\n". For example:
customSettings="docmosis.xyz=abc\ndocmosis.xyz.2=def" -
templatePrefix
Specify the template field prefix. Defaults to <<. Must be at least 2 chars. -
templateSuffix
Specify the template field suffix. Defaults to >>. Must be at least 2 chars.
Logging of information by Tornado can be controlled by several command line settings:
-
log.level=debug|info|error
Specify the level of logging to the console and log files.
eg:java –Dlog.level=debug –jar docmosisTornado.war -
log4j.config.file=path
Specify log4j logging configuration file. Overrides log4j.level
eg:java –Dlog4j.config.file=c:/projects/log4j.properties –jar docmosisTornado.war -
java.util.logging.config.file=path
Specify the Java Util logging configuration file. Overrides log.level.
eg:java –Djava.util.logging.config.file=c:/logging.properties .. -
log.dir.override
Override the location where logs are to be written (default is[working area]/logs)
The following settings can be added to the Custom Settings on the Configuration page to enable SSL/TLS Encryption:
-
ssl.port=port
The port to listen for secured connections. -
javax.net.ssl.keyStore=path
The path to the key store file. -
javax.net.ssl.keyStorePassword=password
The key store file password. -
javax.net.ssl.trustStore=path
The path to the trust store file. -
javax.net.ssl.trustStorePassword=password
The trust store file password. -
http.disable=true|false
Determines whether the non-secure listener should be disabled. Defaults to false.
Please see your Java documentation for more information on the specifics of what these settings do.
-
mailEnabled
Enable the mail server. Default is false. -
mailHost
The mail server hostname -
mailPort
The mail server port -
mailUser
The mail server user name -
mailPw
The mail server password -
mailFrom
The from email address -
mailTimeout
The mail server connect-timeout in milliseconds -
mailUseTls
Enable TLS security on the connection to the mail server. Default false. -
mailUseSsl
Enable SSL security on the connection to the mail server. Default false.
By downloading Tornado you agree to our most recent License Agreement (PDF).
As with all Docker images, these likely also contain other software which may be under other licenses (such as Bash, etc from the base distribution, along with any direct or indirect dependencies of the primary software being contained).
As for any pre-built image usage, it is the image user's responsibility to ensure that any use of this image complies with any relevant licenses for all software contained within.