Portfolio of my work/what I learned connected to Neural Networks/Machine Learning while doing my Senior Project
This main document is split into two sections; the first describes the problem/goal of my project, the second describes my approach to it.
To begin, a Neural Network is computer code that is designed to function like the human brain. The network consists of several "layers," which takes a specific type of input data and transforms it into the desired output. Within these layers are "neurons," which are essentially mathematical functions that perform non-linearities on the weighted sum of their inputs. In order to reach the correct output, the neurons need their weights to be properly tuned. The values of those weights are calculated through a process called training.
- An input is given and evaluated by the network.
- The output of the network is evaluated; The “amount” of error made by the network is quantified as a quantity called loss (The ideal weights would produce a minimum loss value). Note: accuracy and loss are two seperate values. A model may have an accuracy of 100% but a non-zero loss.
- Weights are adjusted slightly to reduce the loss of the network. The way that weights are adjusted is done through a process called backpropagation. Backpropagation creates a gradient (multivariable derivative) by applying chain rule to each individual layer. The gradients give the "direction" that values need to be shifted towards. The amount that each value is shifted is decided by optimizers. There are many ways to adjust this loss via different optimizers, but I chose to use the common Adam Optimizer. As mentioned above, a inputs are needed to train the network. A large collection of images with corresponding is called a dataset. There are two main conditions that the dataset needs to meet to train a working network. These are:
- Size: Neural Networks are designed to work like the human brain does; this means that the network will take the easiest method to get correct answers. If a dataset that a network is training on is too small, then the network will end up simply memorizing the images (called overfitting) and their corresponding answers instead of learning why the answers correspond with images.
- Variance: If images within the dataset are similar to one another, then the network will struggle to identify images that are different from those it trained on.
I worked with Visual Neural Networks specifically, so I will describe how my neural network works as though it were a brain processing what the eyes send it.
Ideally, the process for a visual neural network would go like this:
-
- Image is fed to the network
-
- The first few layers of the network will identify the, for lack of a better term, "material" features such as edges, colors, etc. The image below shows an approximation of what the individual neurons within a layer may detect.
- The first few layers of the network will identify the, for lack of a better term, "material" features such as edges, colors, etc. The image below shows an approximation of what the individual neurons within a layer may detect.
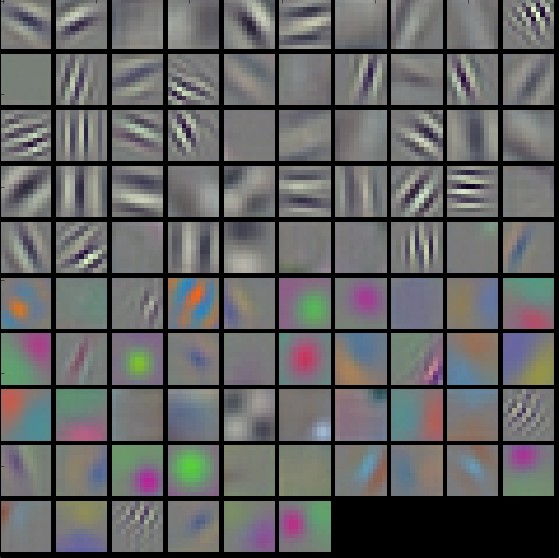
(Image taken from Andrea Vedaldi and Aravindh Mahendran https://arxiv.org/abs/1412.0035)
-
- The layers following the first few will identify how previous layers are interacting with each other, and will therefore be able to identify more abstract features, such as a face, an animal, etc.
-
- The final layers will use the outputs from the middle layers to provide an output that describes whatever the creator of the network wants it to describe.
To elaborate on step 4: If I wanted the network to tell me whether a picture is of a cat or of a dog, then it would do that. If I wanted the network to identify the location of an object in a picture, I could make it do that as well.
My final product consists of a script which generates my dataset and of a neural network that detects the position of a dog's tail. The dataset generator does what it name implies. means that the network would need to find a dog in an image, find the tail of the dog, and then find how the tail is positioned relative to the dog. It may not be clear how a program like this may be useful. To give an example, if a network can detect the position of a tail relative to a dog, then it would be able to detect other objects relative to another. The applications of such a network are easy to imagine; for example, a network that has been trained on MRI scans could learn to detect the position of tumors.
A detailed explanation of the creation of my dataset and my neural network can be found in each of their respective folders.
A collection of inputs that each have their corresponding output. For my dataset, I would need a collection of images of dogs as well for those images to have the location of the tail to be labeled.
Building a dataset was actually something that I would need to spend a lot of time on. For my network to be optimal, I would need a few hundred images with labels at least, and more if possible. Traditionally, a dataset is created by using brute-force (meaning that every image and label is created manually). I did not want to spend 3 months doing nothing but building a dataset, so I decided to take an alternative approach.

Blender (stylized as blender, lowercase) is a 3D modeling software that has an interesting upside compared to other software: every action in blender can be coded as a script. I took advantage of this by creating a script that would automatically generate a dog in a random position, with its tail wagged in a random direction. The script would also change the way that dog itself looks, from the color of the dog to the amount of hair it has and the length of its tail. Other factors such as the lighting of the scene as well as optional features that can be turned on or off, such as adding a background picture, changing the floor, and objects that could complicate the scene would help vary the scene. Along with the picture itself, a file that contains the correct labels for each picture is generated simultaneously. The advantages of my approach is that my database has an unlimited size. The primary disadvantage is that the amount of pictures produced is limited.
Squeezenet is a publicly available, open source neural network that is pretrained and is designed for classification. Squeezenet is the lower layers of my network; the top layers of Squeezenet which perform the final steps of classification were removed, and replaced with my layers. Squeezenet, like many neural networks, runs on TensorFlow, meaning that I also used TensorFlow for my layers.
Learning TensorFlow (an open-source software library designed for handling data) was something that I would do throughout the coding process. TensorFlow; the easiest way seems to be to learn through application, so I learned TensorFlow as I built variants of my layers.
Squeezenet is a pretrained model, meaning that the weights within it are very well optimized. This means that, during training, Squeezenet's values should be touched minimally or not at all (A less important but valid reason is that training a larger network requires more memory on a computer. While my computer may have been able to handle this training, it would also likely cause training to last longer). My approach was to have Squeezenet perform its work on the data, then have my model train on the outputs of Squeezenet.
TFRecords is a quick, efficient way of storing information obtained in TensorFlow onto a hard drive that will later be read by TensorFlow again. I learned how to use TFRecords for two reasons: 1) to save the outputs of Squeezenet to later run through my network and 2) to save the weights that were generated during training.
See an in-depth look of my variants in the History of Development directory
Loss did not decrease well with version 1. I later learned that the variance in my dataset resulted in about half of all images to be messed up. After solving this issue, I created version 2.
Version 2 was a repaired variant of version 1, but it had another upside; it took inputs from multiple layers of squeezenet, meaning that there was more information to work with. Unfortunately, version 2 did not work as well as I had hoped, and again had the problem of not being able to overfit datasets that were larger than miniscule.
Version 3 was a variant that I did not run much, as it was practically identical to version 2.
Version 4 was the first satisfactory variant of my layers. It had an excellent fit accuracy (it was able to overfit larger datasets) and reached reasonable accuracy during validation.
The model of version 5 was the best variant that I had built. It was able to reach a higher validation accuracy than any of the other variants on a very large dataset.