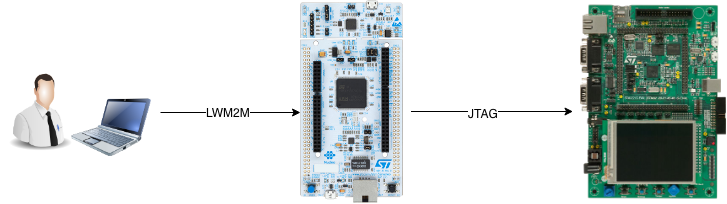
Remote programming and reconfiguration system with LWM2M for embedded devices.

Remote Programmer is an alternative, open-source, embedded solution for programming embedded devices remotly. Currently supported board families:
- STM32F4x
- STM32L4x
Advantages to existing solutions:
- cheaper than dedicated programmers (ex. XDS220 USB/Ethernet JTAGEmulator)
- energy-saving: does not use an operating system, FreeRTOS on board
- quicker for prototyping, than bootloader development
To use RemoteProgrammer you need to have:
- test board STM32 Nucleo-144 with microcontroller STM32F429ZI
- st-link to programm the board
- one of the supported boards to programm and some dupont cables for connection
- some basic knowledge about programming embedded devices (recommended)
- configured JRE (Java) for running the LWM2M server Optional:
- arm-none-eabi-gcc compiler (when compiling from sources)
- low-level programming skills when adapting the solution to other board families
- download the binary from https://github.com/maxiwoj/RemoteProgrammer/releases/latest (or compile from sources using
make) - program the board (later: Remote Programming Device) with
st-flashutility:st-flash write RemoteProgrammer.bin 0x8000000 - attach a flash memory stick to the Remote Programming Device's USB Host with a configuration file named
config. More about configuration you can find below - connect the target board to the Remote Programming Device using it's JTAG pins. Remote Programming Device pins are as follows:
--------------------TODO--------------------
To be able to use Remote Programmer you need a LWM2M server, we recommend using leshan with our custom object. To run this, type:
$ wget https://hudson.eclipse.org/leshan/job/leshan/lastSuccessfulBuild/artifact/leshan-server-demo.jar
$ wget https://gist.githubusercontent.com/maxiwoj/a60b566fd7fa6aec3a6e28f50640e631/raw/901798e0331a6429df3966f5616eb755b4c56098/31025.xml
$ java -jar ./leshan-server-demo.jar -m .
This will download run a demo leshan server with our custom model definition. The flag -m specifies custom models directory location.
Remote Programming Device requires a basic configuration file on attached USB memory. Possible fields are described below:
| field name | default value | description |
|---|---|---|
| device_name | Remote Programmer Device | Name of the LWM2M client. Should be unique |
| lwm2m_server_uri | coap://192.168.2.1:5683 | LWM2M server address |
| local_port | 5683 | Local port number, that is used to communicate with LWM2M server |
| wakaama_short_id | 123 | Cannot be equal to 0 |
| wakaama_company | AGH | Field required by Wakaama in the instance of device object |
| wakaama_model_number | Remote Programmer | Field required by Wakaama in the instance of device object |
| config_uri | URL address for another file containing additional configuration |
Example file looks like this:
device_name=Remote Programming Device
lwm2m_server_uri=coap://192.168.1.2:5683
local_port=5683
wakaama_short_id=123
wakaama_company=MyCompany
Using the config_uri parameter user is allowed to move configuration to a remote server or even to create configuration chain. After parsing the whole configuration file that contained the field config_uri Repote Programming Device will try to download the specified file and parse it in the same way.
As an example of using the configuration chain may be when more than 1 Remote Programming Device is used. The first one has a config file that contains only:
config_uri =http://file.server/config1
The second one's config file:
config_uri =http://file.server/config2
On the server file.server are the following files:
- config1
device_name =Dev1
config_uri =http://file.server/commonconfig
- config2
device_name =Dev2
config_uri =http://file.server/commonconfig
- commonConfig
lwm2m_server_uri =coap://10.0.0.10:5683
With such configuration, when changing the LWM2M server, the only file that needs to be changed is the commonConfig.
Having connected and setup the device, it's name should appear in the web interface provided by leshan. It is available on the machine, where it had been started at URL: http://localhost:8080.
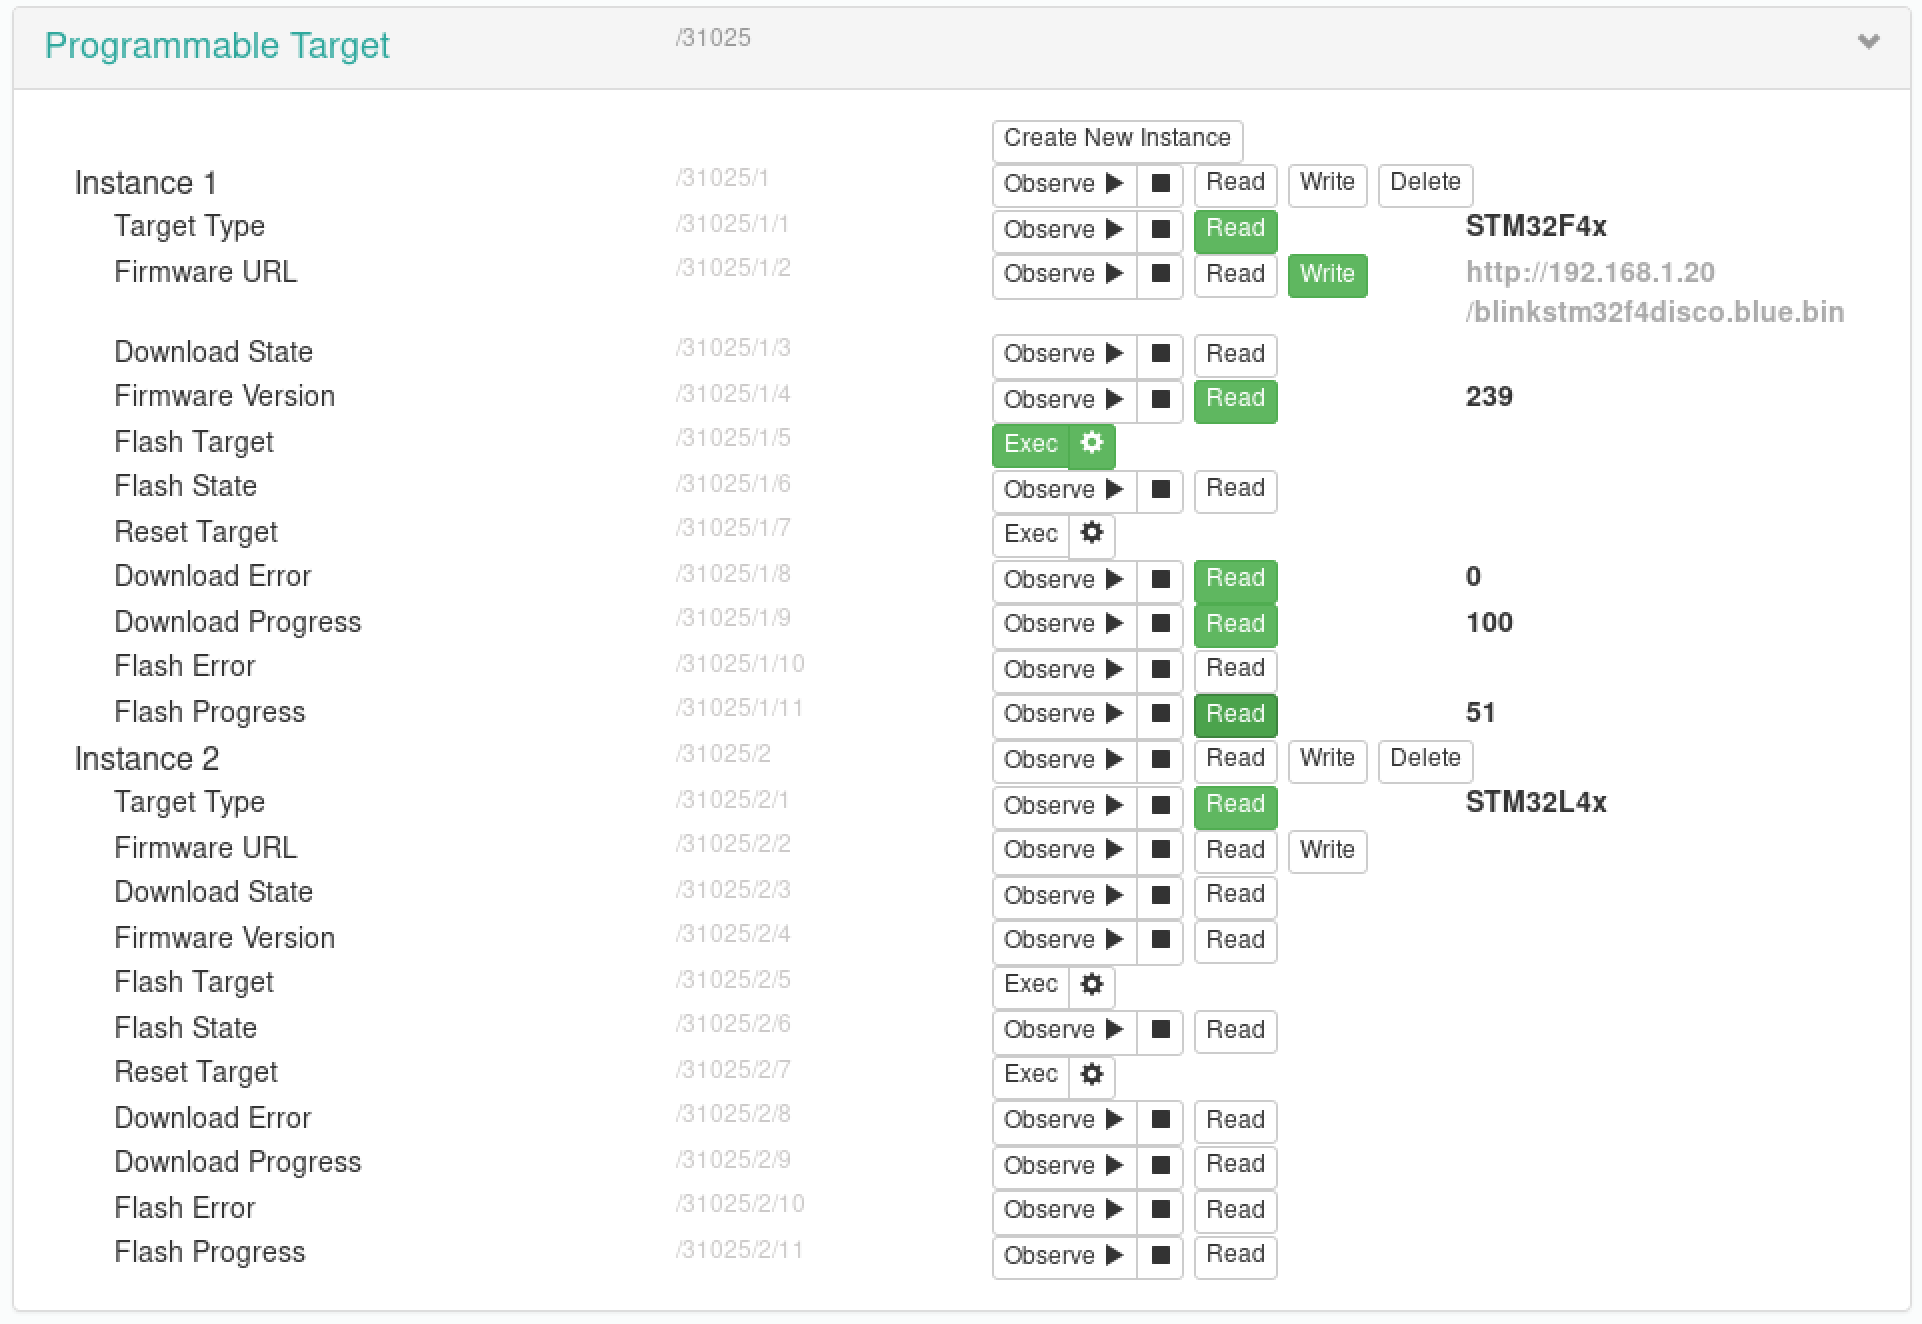
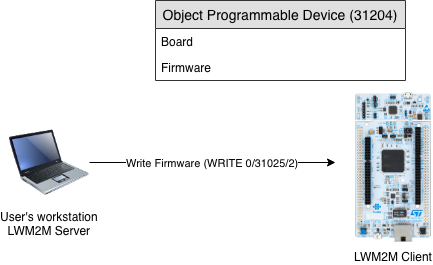
The RemoteProgrammer should appear as the device with a name specified in the config file. Using the Target objects you can programm the connected device. Each connected device is represented as an instance of an object. The structure of the object is described below:
| Name | ID | Operations | Instances | Mandatory | Type | Range | Units | Description |
|---|---|---|---|---|---|---|---|---|
| target_type | 1 | R/W | No | Yes | string | type of the programmable board | ||
| firmware_url | 2 | R/W | No | Yes | string | url to the Binary | ||
| download_state | 3 | R | No | Yes | integer | 0-255 | state of the download | |
| firmware_version | 4 | R | No | Yes | integer | timestamp of the latest binary | ||
| flash_target | 5 | E | No | Yes | - | programms the target | ||
| flash_state | 6 | R | No | Yes | integer | state of the last flashing | ||
| reset_target | 7 | E | No | Yes | - | resets the target | ||
| download_error | 8 | R | No | Yes | integer | download error | ||
| download_progress | 9 | R | No | Yes | integer | 0-100 | % | progress of binary download |
| flash_error | 10 | R | No | Yes | integer | flashing error | ||
| flash_progress | 11 | R | No | Yes | integer | 0-100 | % | progress of flashing the board |
Compiled Binary for the target device should be placed on a http server. To start the download to the Remote Programming Device, just click the WRITE button at the firmware_url field of your desired Target Instance. Before doing it, check the device type, that it has been auto-detected successfully and this is the device you want to programm.
------------------TODO: ERROR CODES?--------------
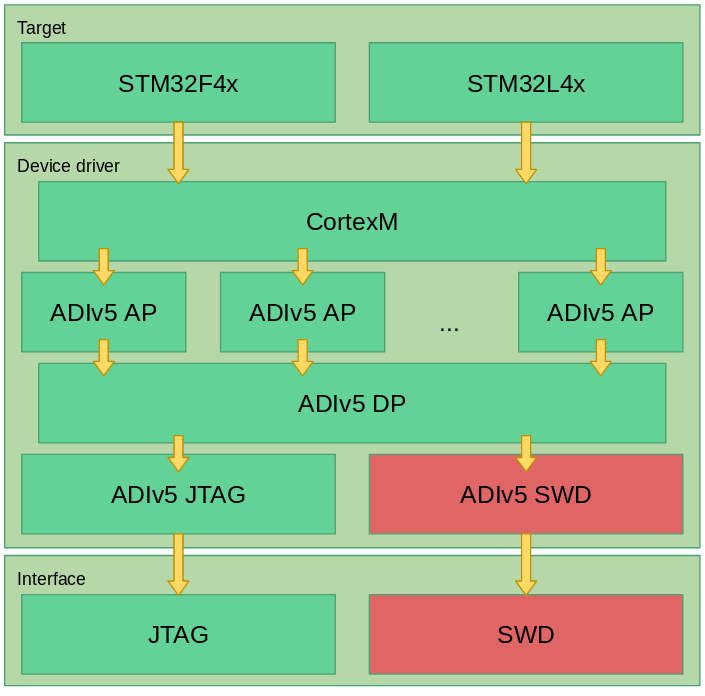
to compile the source just type:
$ cd STM32F429ZI
$ make
The programming algorithm is structured in layers, so as to maximize the number of reusing the code. Layers are shown below:
 .
.
--------------- TODO maybe something more? ----------
- Support for multiple boards
- connected board auto-detection
- support for remote configuration
- download and flash progress monitoring
- Programming borards from families:
- STM32F4x
- STM32L4x
- Adding support SWD interface
- USB operations optimalisation, parraleling some operations
- add possibility for monitoring connected devices
- Remote Programming Device management support (reset etc.)
- subscription for monitoring progress changes
- support for configuration the device over LWM2M
- intelligent reset implementation (when device has problems connecting to LWM2M server it should try to read the configuration again)