This projects presents you with a feature-complete Express API built with TypeScript.
You can test your API locally using terminal commands. Additionally, you can use a client application, the "Auth0 Eats Dashboard", as a testing harness to simulate production conditions and live user interactions.
The Auth0 Eats Dashboard application is available in React.
The sleek web player from Spotify inspired the design of the live demo application.
For simplicity, the API stores data in-memory and not in an external database. However, you can connect its data service to any database of your liking.
You can read Node.js and TypeScript Tutorial: Build a CRUD API to learn how to build this API.
For security, the API implements access control by following these business rules:
-
Anyone can read data.
-
Only authenticated users with a
menu-adminrole can create, update, or delete menu items. Themenu-adminrole bundles the necessary permissions to execute these write operations.
You can follow Node.js and TypeScript Tutorial: Secure an Express API to implement authorization in your API. You'll require users to log in to perform write operations on the API. Additionally, you'll further increase your API's security by requiring users to have a set of permissions (defined through a role) to perform any write operation.
You can clone this repo and run it locally or you can deploy it to a live server using Glitch.
Open this Glitch project:
https://glitch.com/edit/#!/api--express--typescript--menu
Click on the "Remix to Edit" button in the top-right corner.
Click on the .env file from your Glitch project. You'll need to add the values for AUTH0_AUDIENCE and AUTH0_DOMAIN from your Auth0 API configuration.
You'll get those values in the next section, "Set Up an Authorization Service".
Clone the project in a directory called menu-api and checkout its build-api branch:
git clone git@github.com:auth0-cookbook/api_express_typescript_menu.gitMake the project folder your current directory:
cd api_express_typescript_menuThen, install the project dependencies:
npm iOpen .env and add the following keys to it:
PORT=7070
AUTH0_AUDIENCE=
AUTH0_DOMAIN=With Auth0, you can manage the authorization requirements of an application stack easily. To start, you need to create a free Auth0 account if you don't have one yet.
Auth0 is a flexible, drop-in solution to add authentication and authorization services to your applications. Your team and organization can avoid the cost, time, and risk that comes with building your own solution to authenticate and authorize users. We offer tons of guidance and SDKs for you to get started and integrate Auth0 in your stack easily.
After you create your account, you'll create an Auth0 Tenant, which is a container that Auth0 uses to store your identity service configuration and your users in isolation — no other Auth0 customer can peek into or access your tenant. It's similar to you being a tenant in an apartment building. Auth0 looks after the building while the apartment is all yours to live in and customize. However, each apartment is fully isolated (no windows, soundproof walls, etc.) so that neighbors can't intrude on your privacy.
After creating your tenant, you need to create an API register with Auth0, which is an API that you define within your Auth0 tenant and that you can consume from your applications to process authentication and authorization requests.
After creating your account, head to the APIs section in the Auth0 Dashboard and hit the Create API button.
Then, in the form that Auth0 shows:
-
Add a Name to your API:
Auth0 Eats Menu API. -
Set its Identifier to
https://menu.example.com. -
Leave the signing algorithm as
RS256as it's the best option from a security standpoint.
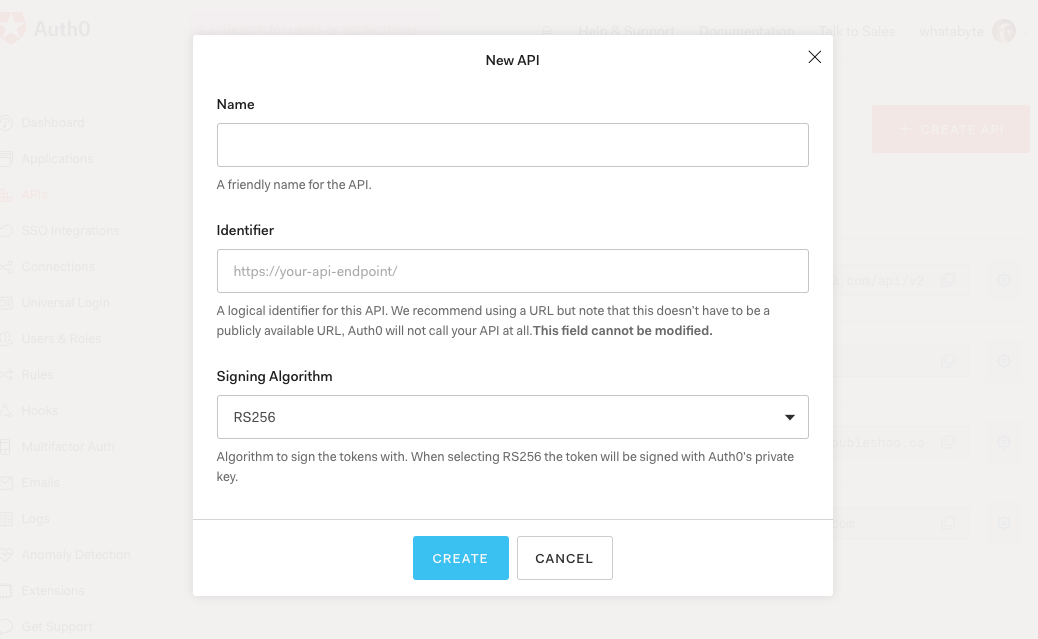
Identifiers are unique strings that help Auth0 differentiate between your different APIs. We recommend using URLs as they facilitate predictably creating unique identifiers; however, Auth0 never calls these URLs.
With these values in place, hit the Create button.
Your API needs some configuration variables to identity itself with Auth0: an Audience and a Domain value. The best place to store these values is within the .env file of your project.
Head back to your Auth0 API page, and follow these steps to get the Auth0 Audience:
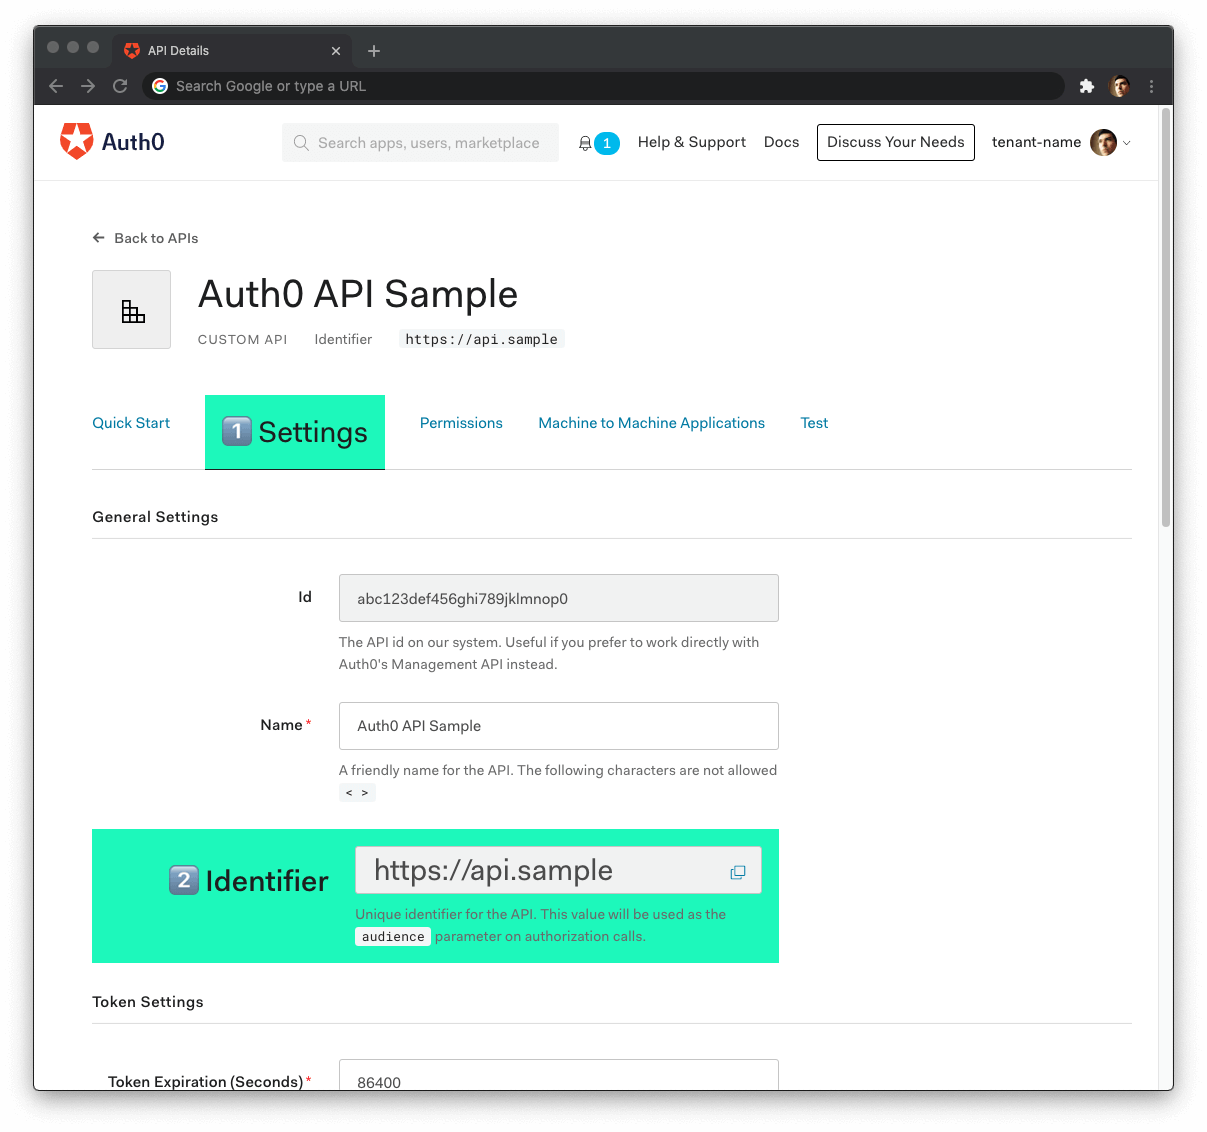
-
Click on the "Settings" tab.
-
Locate the "Identifier" field and copy its value.
-
Paste the "Identifier" value as the value of
AUTH0_AUDIENCEin.env.
Now, follow these steps to get the Auth0 Domain value:
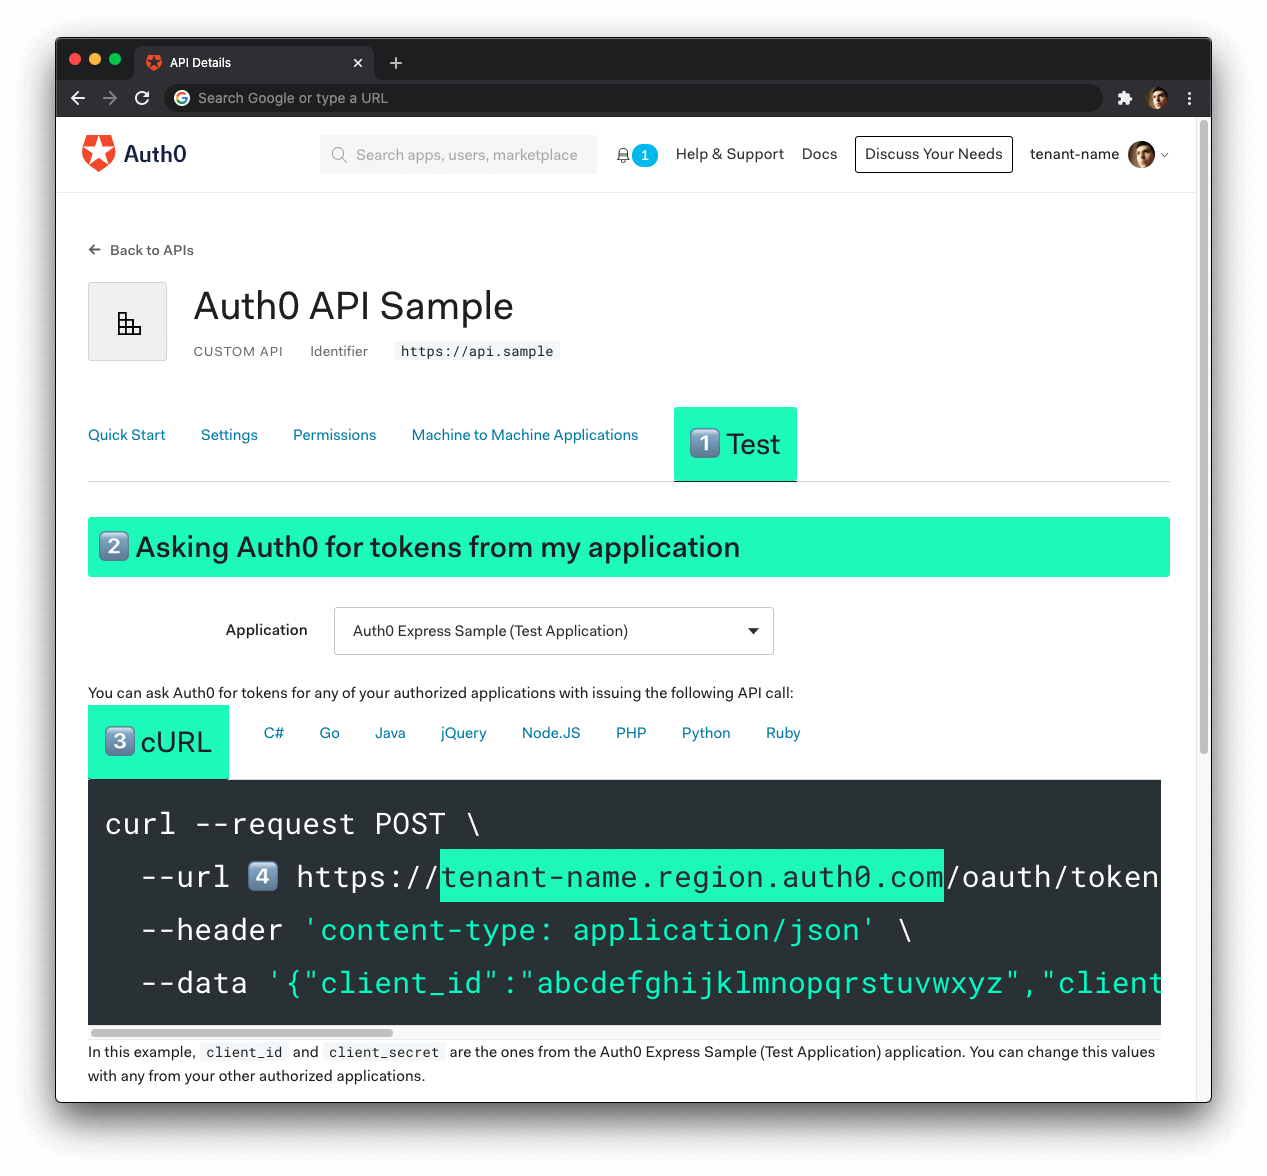
- Click on the "Test" tab.
- Locate the section called "Asking Auth0 for tokens from my application".
- Click on the cURL tab to show a mock
POSTrequest. - Copy your Auth0 domain, which is part of the
--urlparameter value:tenant-name.region.auth0.com. - Paste the Auth0 domain value as the value of
AUTH0_DOMAINin.env.
Tips to get the Auth0 Domain
The Auth0 Domain is the substring between the protocol,
https://and the path/oauth/token.The Auth0 Domain follows this pattern:
tenant-name.region.auth0.com.The
regionsubdomain (au,us, oreu) is optional. Some Auth0 Domains don't have it.
Glitch autosaves any changes that you make. As soon as you change the values of .env or any other file in your Glitch project, Glitch rebuilds and redeploys the project for you.
To test your API server hosted in Glitch, you need its "Live Site" URL.
In your Glitch project, click on the "Share" button, which you can find under the project name in the top-left corner.
Look for the Project links section and copy the "Live Site" link:
https://<random-long-string>.glitch.meThis is the root URL of your live API server that you can use to make requests.
Restart the server so that Express can recognize the changes you just made to .env. Stop the running process and execute npm run dev once again.
Finally, run the project by executing the following command:
npm run devThe root URL of your local server is:
http://localhost:7070You can use a demo application, the Auth0 Eats Dashboard, to interact with your Menu API like any user would. You'll create a user with Auth0, log in, and access pages that make requests to your API endpoints under the hood.
Follow the setup steps of the Auth0 Eats Dashboard version that you want to use:
Once set up, follow the next steps to learn how to use the dashboard.
Locate the navigation bar on the left side of the page. Then, click on the Menu tab. Three menu items from your server's store should load up:

On the "Menu Items" page, click on the Add Item button on the top-right corner. The "Add Menu Item" page should load up with a pre-populated form:

Click on the Save button to add a "Spring Salad" item to your menu.
Once the request-response cycle is complete between the client and the server, the client application loads the "Menu Items" page again. The menu grid now features four items, which includes the "Spring Salad":

Now, try updating the property of an item. Click on the "Tea" item to load its item page:
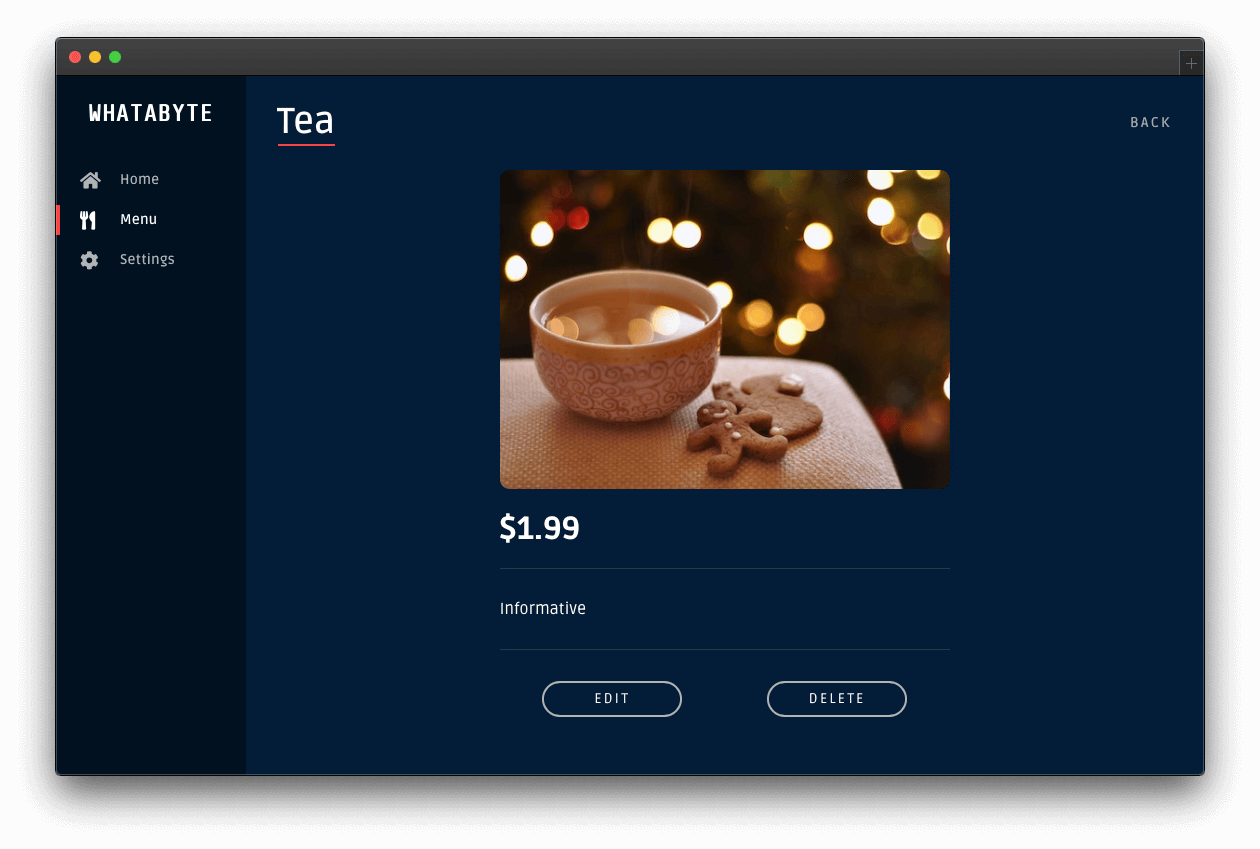
You'll notice two buttons at the bottom: Edit and Delete.
Click the Edit button and modify the form that loads up:
- Change the Name value from "Tea" to "Ginger Tea".
- Change the Description value from "Informative" to "Energizing".
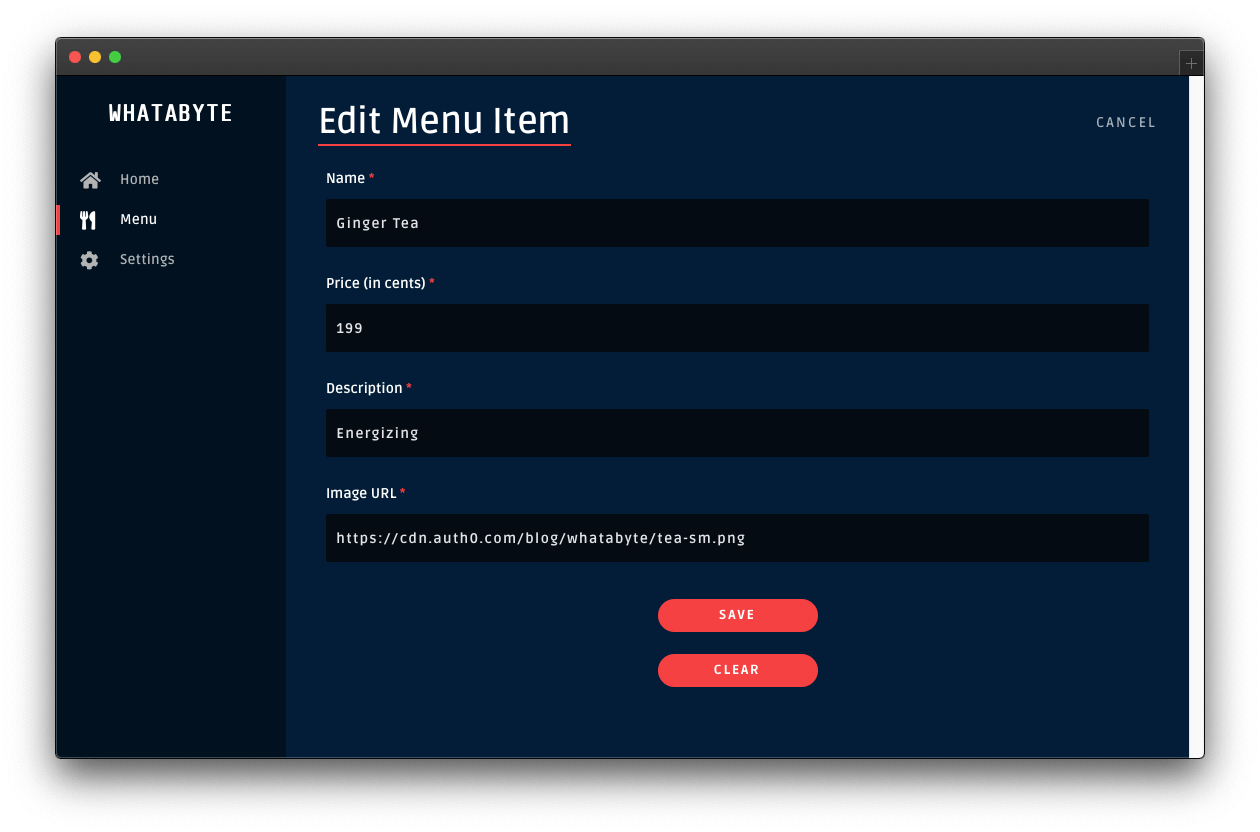
Then, click the Save button. Once the request-response cycle completes again, you'll see four items in the menu grid. However, the "Tea" item will show its new name and description:

Click on any item on the menu grid, such as the "Spring Salad". On the item page, click its Delete button. You'll load up the "Delete Menu Item" page, asking you to confirm if you what to delete the item:
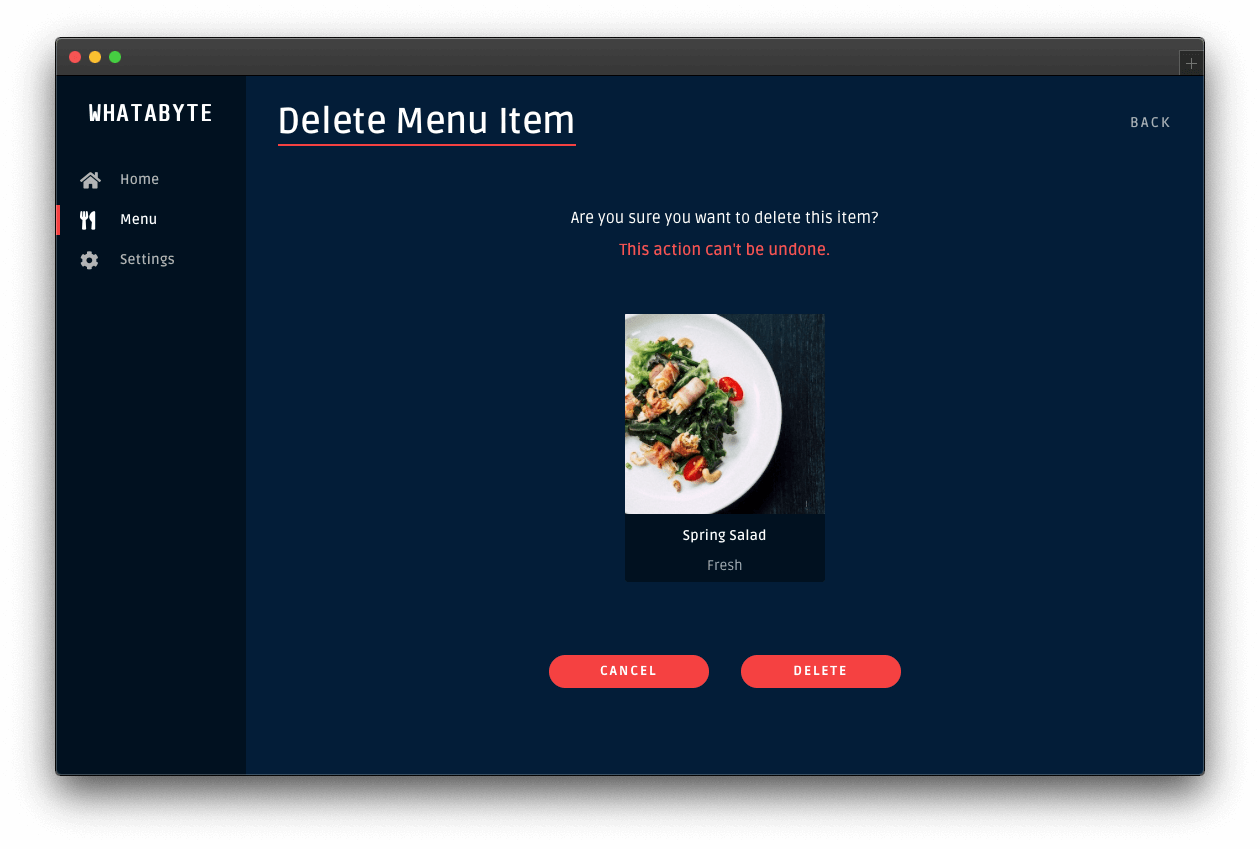
Click the Delete button to confirm the operation. After the request-response cycle completes, the menu grid loads up without that particular item:
