All the labs in this workshop are prepare for the assistants to develop them in order to learn more about Artificial Intelligence, Machine Learning & Deep Learning.
In this workshop, you are able to configure different resource to carry out the different labs on it.
The local setup without GPU is only required in case you want to configure your local machine to execute all the Labs in your laptop.
-
First of all, please do install Anaconda in your machine
-
Go to the ./scripts folder and run the script that will perform the environment setup:
- environment.bat (if you are running Windows)
- ./environment.sh (for you, Linux folks)
-
Once the script finishes running, that environment will be active. The name of the environment is aiworkshop, in case you want to activate it manually.
-
You can begin now with the first Lab. You should complete the script
./exercises/00 - SmokeTest.pyto print the versions of TensorFlow and Keras. Once you have completed it and checked the installed versions of these packages, you are done with the environment and ready for the next labs.
The local setup with GPU is only required in case you want to configure your local machine to execute all the Labs in your laptop.
-
First of all, please do install Anaconda in your machine
-
If you plan on using GPU - and you should! - install the CUDA toolkit from this link to the NVIDIA web page.
-
Go to the ./scripts folder and run the script that will perform the environment setup:
- environment_gpu.bat (if you are running Windows)
- ./environment_gpu.sh (for you, Linux folks)
-
Once the script finishes running, that environment will be active. The name of the environment is aiworkshop, in case you want to activate it manually.
-
You can begin now with the first Lab. You should complete the script
./exercises/00 - SmokeTest.pyto print the versions of TensorFlow and Keras. In addition, when you try to execute this script you will see if the GPU of your computer is detected. In case is not detected you should reinstall the CUDA toolkit of this tutorial. Once you have completed it and checked the installed versions of these packages, you are done with the environment and ready for the next labs.
In this case you are not going to use your local computer to train any model on it and decide to use Azure to do it. Well done, so this are the steps to do it:
-
Get an Azure subscription from the organizer of the workshop.
-
Then you are going to use the Jupyterhub. If you need more information about how to you use it, you can see this video
-
Finally, you should upload the code and exercises using the jupyterhub and
The workshop will use the following datasets:
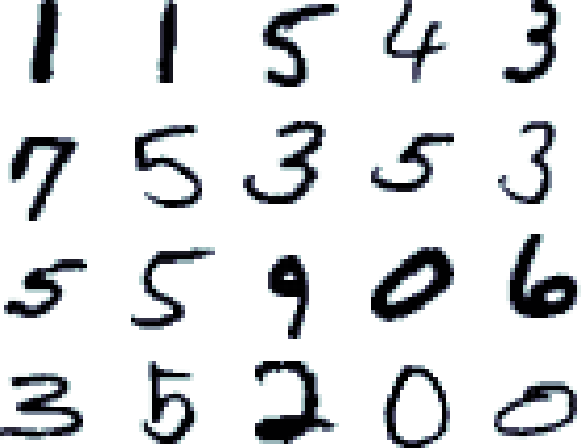
- MNIST Hand Written Digits
The data is not provided in this repo, but instead needs to be downloaded and processed sepparately. These can be downloaded, and have the needed transformations applied automatically, by running the following Python command from the utils directory:
python retrieve_datasets.py
Both datasets are described to a greater extent in the next sections:
The initial exercises of this workshop will use the MNIST Handwritten Digits database; this publicly available dataset has become a sort of de facto industry standard to test the performance of certain image classification algorithms. Even though a detailed description of this data set is not intended here (more information here), suffice to say that each image represents a handwrittend digit, from 0 to 9, as an array of 9x9 pixels.
- Eduardo Matallanas de Ávila - @matallanas
- Jose Fernández Vizoso - @jvizoso
- Pablo Álvarez Doval - @PabloDoval