This library heavily inspired this package: https://github.com/mindee/tawazi, and a little bit by Airflow.
You can easily install this in a separate conda envioronment with the following:
conda create -n easydags python=3.10 -y
conda activate easydags
pip install easydags
Now you can run your DAG's on your local envioronment
- Tutorial_ETL_with_doft_dependencies.ipnyb (Data Engineering + soft dependencies)
- Tutorial_imbalance_gs.ipnyb (Machine learning + hard dependencies)
- Tutorial_ML toy.ipnyb (Machine learning + hard dependencies)
Maybe all of you already know what a Directed Acyclic Graph (DAG) is..., but please think about this definition when using this library:
A DAG represents a collection of tasks you want to run; this is also organized to show relationships between tasks.
- Each node is a task (A, B)
- Each edge represents a dependency, A->B means we can only execute B after A finishes.
The concept of dependency, in general, is pretty simple: A->B means that A needs to run before B.
However, after we understand the concept of dependency, we might need to complicate that concept a little bit with these two definitions.
Hard dependency: B needs the output of the process A… and the output of A is an actual argument of the function that executes B
Soft dependency: B needs the output of process A… but the output is stored somewhere else; we just know that A has finished. For example, let's think about 2 queries where we need the table of the first query in the second one.
I am a developer that works a lot with data pipelines, which means that I usually encounter the following scenario:
- A query that creates: my_dataset.my_awesome_table
- A second query that creates another table that depends on my_dataset.my_awesome_table
So what can we do in those cases? If we want to have the most recent version of the second table, we will need to run the first query before! But I do not need any results in memory! That is a soft dependency.
On the other hand, I also had the following scenario:
- I have a pre-process function
- I need to run model 1 to get prediction 1
- I need to run model 2 to get my prediction 2
- My final prediction will be the mean between predictions 1 and 2 (a simple ensemble)
The first task leaves the resulting table in my_dataset.clean_data, which will create a soft dependency between nodes 2,3 and node 1.
Let's suppose that we receive the predictions from model 1 and model 2 in the final node in memory. (something like a pandas data frame)... that will create a hard dependency!
All complex dependencies can be re_writed as a soft dependency (using local files or databases), but there are some cases when it is easier/cheaper/faster to pass the data directly in memory... that's why we might encounter both kinds of dependencies out in the wild!
This library will help you get through all those challenges if you use it wisely; I really hope that this helps someone with a real-world problem.
This is a tricky question... after all, all your processes might be ok. But I will try to explain the main reason with one example:
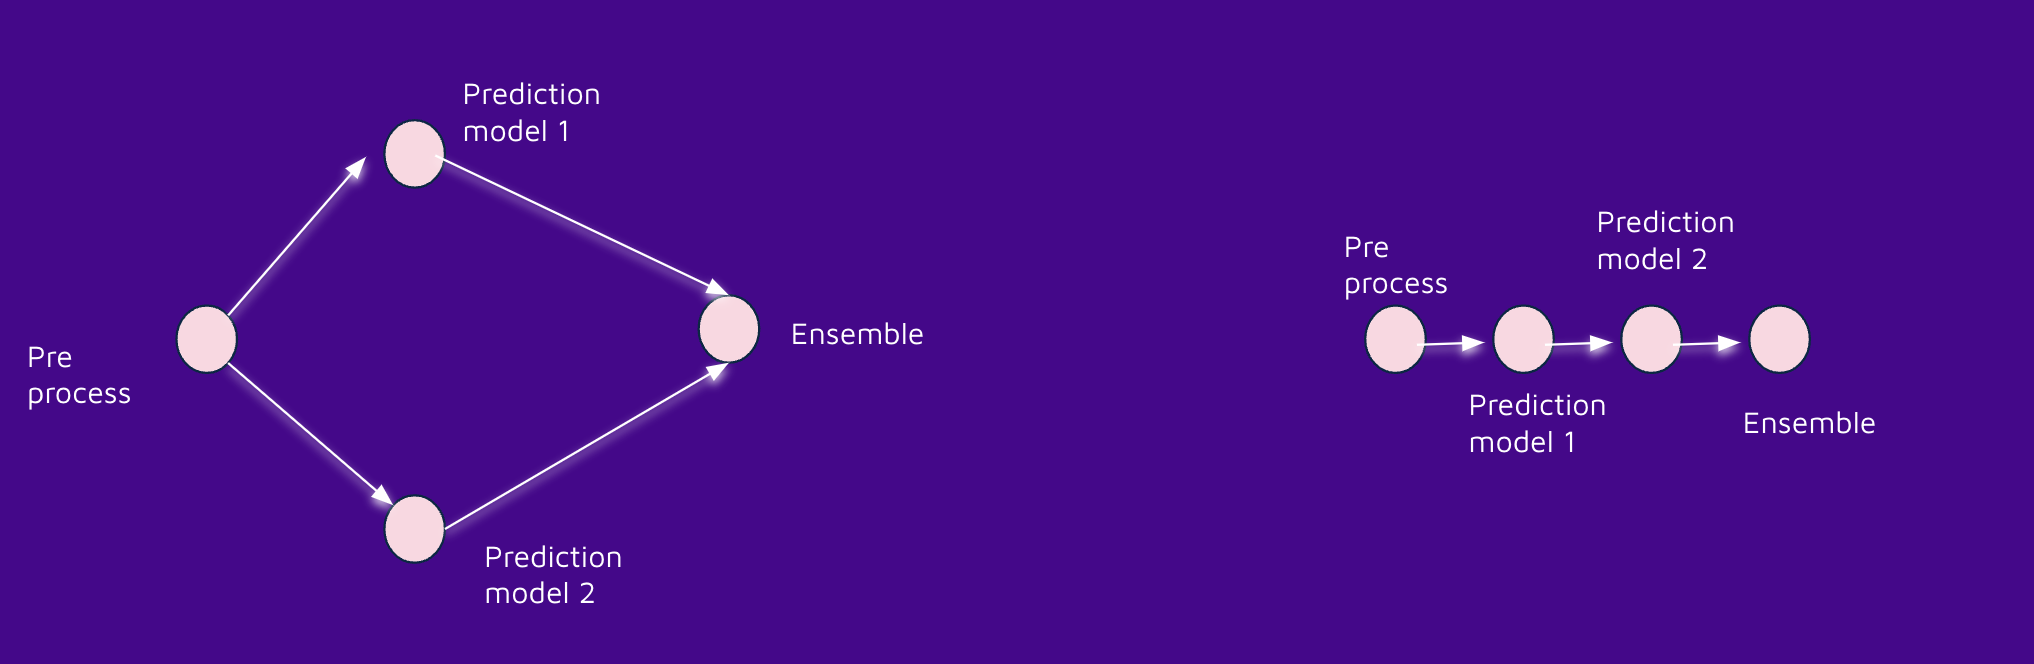
Unless you are using DAGs, there is a high possibility that you are following the lineal DAG.. but thats inefficient; there is a high possibility that you have a lot of processes that can run in parallel thats why DAGs are so useful; they do not only give us one execution order, they also help us realize which task can be parallelized... and of course, this library implements that using threads (we can define the maximum number of threads with the parameter max_concurrency in the DAG constructor)
As we said in the definition, a DAG is a list of tasks, and each node is a task with some dependencies (or none)... basically we can create a dag following that idea.
- import the node clase (ExecNode)
- import the DAG class
- Create an empty list and start populating it with nodes
- Create nodes, specify their tasks (a Python function), and define dependencies.
- Create a DAG using the list of nodes
Here are some examples:
from easydags import  ExecNode, DAG #import some functional classes
import time

nodes = [] #start the empty list


def example0():
    # A dummy function... we just create some "timeout" to clearly show that f1 will run just after f0
    print('beginning 0')
    time.sleep(3)
    print('end 0')


nodes.append( ExecNode(id_= 'f0',# we set the id of the task... must be unique
              exec_function = example0 # we set the task
              ) )


def example1():
     # A dummy function... this is just to show that f1 runs after f0
    print('beginning 1')
    print('end 1')

nodes.append( ExecNode(id_= 'f1',# we set the id of the task... must be unique
              exec_function = example1 ,# we set the task
              depends_on_soft= ['f0'] # Since we dont need the actual result from our dependency, this is a soft one
              ) )


dag = DAG(nodes,max_concurrency=2) #Create the DAG as the list of nodes

dag.execute() # execute the dagfrom easydags import ExecNode, DAG
import time
nodes = []
def example0():
print('beginning 0')
time.sleep(3)
print('end 0')
return 8
nodes.append( ExecNode(id_= 'f0',
exec_function = example0,
output_name = 'my_cool_varname' #we define how to retrieve this result in the following nodes with a hard dependency... if we do not define this, the default name is {self.id_}_result
) )
def example1(**kwargs):#result from previous nodes will be passed as kwargs
f0_result = kwargs['my_cool_varname'] #You just access to the variable that you want with the output name of the desired node
print('beginning 1')
print('end 1')
print(f0_result + 8 )
nodes.append( ExecNode(id_= 'f1',
exec_function = example1 ,
depends_on_hard= ['f0'],
n_trials= 3
) )
dag = DAG(nodes,max_concurrency=2) #Create the DAG as the list of nodes
dag.execute() # execute the dagFollowing the idea from airflow we can do the following
- A>B B depends on A (soft)
- A>>B B depends on A (hard)
For example we can define the soft dependecy as
from easydags import  ExecNode, DAG
import time

nodes = []


def example0():
    print('beginning 0')
    time.sleep(3)
    print('end 0')


node1= ExecNode(id_= 'f0',
              exec_function = example0
              )


def example1():
    print('beginning 1')
    print('end 1')

node2= ExecNode(id_= 'f1',
              exec_function = example1 ,
              )


node1 > node2

nodes = [node2,node1]
and the hard dependency as
from easydags import  ExecNode, DAG
import time

nodes = []


def example0():
    print('beginning 0')
    time.sleep(3)
    print('end 0')
    return 4


node0 = ExecNode(id_= 'f0',
              exec_function = example0
              )


def example1(**kwargs):
    f0_result = kwargs['f0_result']
    print('beginning 1')
    print('end 1')
    print(f0_result + 8 )

node1 = ExecNode(id_= 'last',
              exec_function = example1
              )

node0 >> node1

nodes = [node0,node1]from easydags import ExecNode, DAG
import time
nodes = []
def prepro():
print('beginning pre pro')
time.sleep(3)
print('end pre pro')
return 'df with cool features
nodes.append( ExecNode(id_= 'pre_process',
exec_function = prepro,
output_name = 'my_cool_df'
) )
def model1(**kwargs):
df = kwargs['my_cool_df']
print(f'i am using {df} in model 1')
time.sleep(3)
print('finish training model1')
return 'model 1 37803'
nodes.append( ExecNode(id_= 'model1',
exec_function = model1 ,
depends_on_hard= ['pre_process'],
output_name = 'model1'
) )
def model2(**kwargs):
df = kwargs['my_cool_df']
print(f'i am using {df} in model 2')
time.sleep(3)
print('finished training model2')
return 'model 2 78373'
nodes.append( ExecNode(id_= 'model2',
exec_function = model2 ,
depends_on_hard= ['pre_process'],
output_name = 'model2'
) )
def ensemble(**kwargs):
model1 = kwargs['model1']
model2 = kwargs['model2']
result = f'{model1} and {model2}'
print(result)
return result
nodes.append( ExecNode(id_= 'ensemble',
exec_function = ensemble ,
depends_on_hard= ['model1','model2'],
output_name = 'ensemble'
) )
dag = DAG(nodes,name = 'Ensemble example',max_concurrency=3, debug = False)
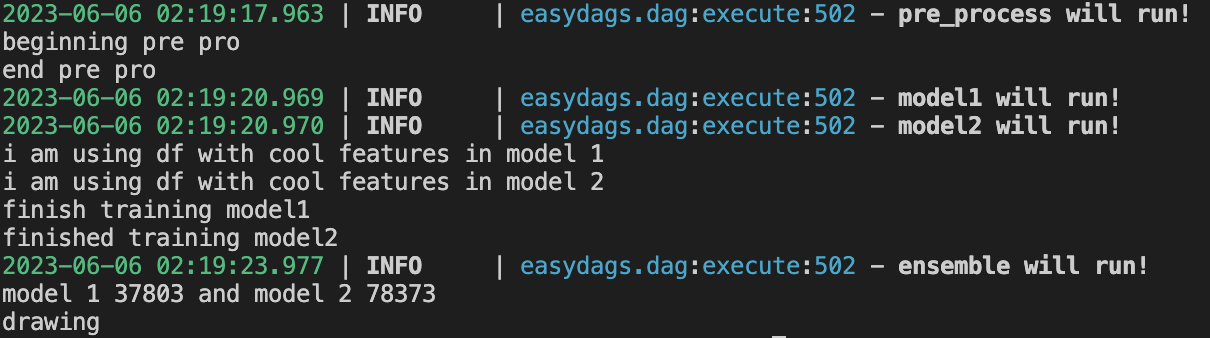
dag.execute()Please note that we can check the logs to verify that model 1 and model ran in parallel
from easydags import  ExecNode, DAG
import time

nodes = []


def prepro():
    #print('beginning pre pro')
    time.sleep(3)
    #print('end pre pro')
    return 'df with cool features'


node0 = ExecNode(id_= 'pre_process',
              exec_function = prepro,
              output_name = 'my_cool_df'
              )


def model1(**kwargs):
    df = kwargs['my_cool_df']

    #print(f'i am using {df} in model 1')
    time.sleep(3)
    print('finish training model1')

    return 'model 1 37803'

node1 = ExecNode(id_= 'model1',
              exec_function = model1 ,
              output_name = 'model1'
              )


def model2(**kwargs):
    df = kwargs['my_cool_df']

    #print(f'i am using {df} in model 2')
    time.sleep(3)
    print('finished training model2')

    return 'model 2 5678'

node2 = ExecNode(id_= 'model2',
              exec_function = model2 ,
              output_name = 'model2'
              )


def ensemble(**kwargs):
    model1 = kwargs['model1']
    model2 = kwargs['model2']

    result = f'{model1} and {model2}'

    print(result)

    return result

node3= ExecNode(id_= 'ensemble',
              exec_function = ensemble ,
              depends_on_hard= ['model1','model2'],
              output_name = 'ensemble'
              )

node0>>node1
node0>>node2

node1>>node3
node2>>node3

nodes = [node0, node1, node3, node2]


dag = DAG(nodes,name = 'Ensemble example2',max_concurrency=3, debug = False)

dag.execute()
One of the coolest features of Airflow is that once you have built your DAG, you can see it on their UI and check the status of the latest run!
Well, my friend, we can do it here too.
When you create the dag object, you can name the DAG as you want (by default, the name is DAG), and easy days will create an html file name {self.name}_states_run.html. For example, you can see there the following:
- The current structure
- Datetime of last execution
- States of each node:
- Green: ok
- Red: It failed
- Gray: Did not run because one of their dependencies failed
- On each node you can click/hover to check this info:
- Started at
- End at
- Execution time
- Log of error in case of an error
If you do not need or do not want the html output you can set the argument draw as false in the DAG inicialization
from easydags import  ExecNode, DAG
import time

nodes = []


def example0():
    print('beginning 0')
    time.sleep(3)
    print('end 0')


nodes.append( ExecNode(id_= 'f0',
              exec_function = example0
              ) )


def example1():
    print('beginning 1')
    print('end 1')

nodes.append( ExecNode(id_= 'f1',
              exec_function = example1 ,
              depends_on_soft= ['f0']
              ) )

dag = DAG(nodes,name = 'NO HTML OUTPUT',max_concurrency=8, debug = False, draw = False)

dag.execute()
You can also only draw your DAG without executing (maybe if you only want to show the structure of your dag to someone or to paste it on your documentation)
#See draw_ensemble.py
from easydags import  ExecNode, DAG
import time

nodes = []


def prepro():
    print('beginning pre pro')
    time.sleep(3)
    print('end pre pro')
    return 'df with cool features'


nodes.append( ExecNode(id_= 'pre_process',
              exec_function = prepro,
              output_name = 'my_cool_df'
              ) )


def model1(**kwargs):
    df = kwargs['my_cool_df']

    print(f'i am using {df} in model 1')
    time.sleep(3)
    print('finish training model1')

    return 'model 1 37803'

nodes.append( ExecNode(id_= 'model1',
              exec_function = model1 ,
              depends_on_hard= ['pre_process'],
              output_name = 'model1'
              ) )


def model2(**kwargs):
    df = kwargs['my_cool_df']

    print(f'i am using {df} in model 2')
    time.sleep(3)
    print('finished training model2')

    return 'model 2 78373'

nodes.append( ExecNode(id_= 'model2',
              exec_function = model2 ,
              depends_on_hard= ['pre_process'],
              output_name = 'model2'
              ) )


def ensemble(**kwargs):
    model1 = kwargs['model1']
    model2 = kwargs['model2']

    result = f'{model1} and {model2}'

    print(result)

    return result

nodes.append( ExecNode(id_= 'ensemble',
              exec_function = ensemble ,
              depends_on_hard= ['model1','model2'],
              output_name = 'ensemble'
              ) )


dag = DAG(nodes,name = 'Ensemble example',max_concurrency=3, debug = False)

dag.only_draw(name = 'green dag')

dag.only_draw(name = 'yellow dag', color = 'yellow')There are some cases where simply rerunning your task is enough... that is why we implemented this feature; we can set several trials with the parameters n_trials in the creations of each node.
node = ExecNode(id_= 'id',
              exec_function = your_function,
              n_trials= 3 # set number of trials
)When you call the execute method on a DAG object it will always run all the possible nodes... that means that if B depends on A and A fails we wont run A!.
When that happens we create the "gray" state in the html output but the execute method will raise an exception by default to alert that there was an error... in case you do not need that alert you can simply modify the DAG creation with one additional parameter called error_type_fatal and setting it as False (this is True by default)
dag = DAG(nodes,name = 'gray example',
              max_concurrency=3,
              debug = False,
              error_type_fatal= False)

dag.execute() # if there is an error we wont raise an exception because error_type_fatal= False This is a very important feature of this library, the dag object stores the states of the nodes after one execution... if you run/execute your dag for a second time we will only run the nodes that failed or that did not run in the previous execution. As an example you can execute the following code (Please note that when a node wont run you will see the follwing message: "{self.id} already in finished state, wont run")
from easydags import  ExecNode, DAG
import time

nodes = []


def prepro():
    #print('beginning pre pro')
    time.sleep(3)
    #print('end pre pro')
    return 'df with cool features'


node0 = ExecNode(id_= 'pre_process',
              exec_function = prepro,
              output_name = 'my_cool_df'
              )


def model1(**kwargs):
    df = kwargs['my_cool_df']

    #print(f'i am using {df} in model 1')
    time.sleep(3)
    print('finish training model1')

    return 'model 1 37803'

node1 = ExecNode(id_= 'model1',
              exec_function = model1 ,
              output_name = 'model1'
              )


def model2(**kwargs):
    df = kwargs['my_cool_df']

    #print(f'i am using {df} in model 2')
    time.sleep(3)
    print('finished training model2')

    return 'model 2 5678'

node2 = ExecNode(id_= 'model2',
              exec_function = model2 ,
              output_name = 'model2'
              )


def ensemble(**kwargs):
    model1 = kwargs['model1']
    model2 = kwargs['model2']

    result = f'{model1} and {model2}'

    print(result)

    return result

node3= ExecNode(id_= 'ensemble',
              exec_function = ensemble ,
              depends_on_hard= ['model1','model2'],
              output_name = 'ensemble'
              )

node0>>node1
node0>>node2

node1>>node3
node2>>node3

nodes = [node0, node1, node3, node2]


dag = DAG(nodes,name = 'Ensemble example2',max_concurrency=3, debug = False)

dag.execute()
Basically the idea is that you can run one API where each endpoint is a different dag... as an example you can have the following api_example.py
from fastapi import FastAPI
from easydags import  ExecNode, DAG
import time

app = FastAPI()


@app.get("/dag1")
async def dag1():

    nodes = []


    def example0():
        print('beginning 0')
        time.sleep(3)
        print('end 0')
        return 4

    nodes.append( ExecNode(id_= 'f0',
                exec_function = example0
                ) )

    def example1(**kwargs):
        f0_result = kwargs['f0_result']
        print('beginning 1')
        print('end 1')
        print(f0_result + 8 )

    nodes.append( ExecNode(id_= 'f1',
                exec_function = example1 ,
                depends_on_hard= ['f0']
                ) )


    dag = DAG(nodes,name = 'Example DAG hard dependency',max_concurrency=8, debug = False)

    dag.execute()

    #DO SOMETHING WITH "Example DAG hard dependency_states_run.html" in case you need it

    return {"message": "Updated!"}

@app.get("/dag2")
async def dag2():

    nodes = []
    def prepro():
        print('beginning pre pro')
        time.sleep(3)
        print('end pre pro')
        return 'df with cool features'


    nodes.append( ExecNode(id_= 'pre_process',
                exec_function = prepro,
                output_name = 'my_cool_df'
                ) )


    def model1(**kwargs):
        df = kwargs['my_cool_df']

        print(f'i am using {df} in model 1')
        time.sleep(3)
        print('finish training model1')

        return 'model 1 37803'

    nodes.append( ExecNode(id_= 'model1',
                exec_function = model1 ,
                depends_on_hard= ['pre_process'],
                output_name = 'model1'
                ) )


    def model2(**kwargs):
        df = kwargs['my_cool_df']

        print(f'i am using {df} in model 2')
        time.sleep(3)
        print('finished training model2')

        return 'model 2 78373'

    nodes.append( ExecNode(id_= 'model2',
                exec_function = model2 ,
                depends_on_hard= ['pre_process'],
                output_name = 'model2'
                ) )


    def ensemble(**kwargs):
        model1 = kwargs['model1']
        model2 = kwargs['model2']

        result = f'{model1} and {model2}'

        print(result)

        return result

    nodes.append( ExecNode(id_= 'ensemble',
                exec_function = ensemble ,
                depends_on_hard= ['model1','model2'],
                output_name = 'ensemble'
                ) )


    dag = DAG(nodes,name = 'Ensemble example',max_concurrency=3, debug = False)

    dag.execute()

    return {"message": "Updated!"}

@app.get("/ready")
async def ready():
    return {"ready"}
Then you can deploy your API on Cloud Run and schedule your DAGs with cloud scheduler (calling desired enpoint on the cloud run service).
For ease of reading the example i added the complete dag definition and execution in the same file... but in reality you can import the definition and execution from a module.
You can test this on your local machine following this steps:
- Install uvicorn and fastapi (you can do it with pip)
- Run the app with "uvicorn api_example:app --reload"
- Go to http://127.0.0.1:8000/dag1 or http://127.0.0.1:8000/dag2 and check the logs
Basically the idea here is that you can create a different conda envioronment for each dag (or just one... do what you need here) and create bash script that:
- Activate the conda envioronment
- Run a python script with your dag
After that you can use cronjobs to schedule your dags (please read how to use crontab -e on linux)
You will need to to make the bash and python script executables with chmod +x {file}