Body Architectures Workshop
In this workshop, we will be making some 3D printed bracelets using Processing (...with just a little help from Rhino & Grasshopper). This workshop is designed for people who are comfortable with more traditional 3D modeling software, but want to learn how they can start using code to bring their designs alive.


Some experience with Processing and 3D modeling is presumed. The code here will be fairly advanced for beginners, but the included example files give you places to mess around with a design to create unique, printable bracelets.
Included in the workshop files are code examples for:
- Connecting geometry from Rhino/Grasshopper to Processing
- Setting up a 3D modeling environment in Processing
- Building valid, 3D printable meshes in Processing
- Visualizing 3D geometry
- Exporting .stl's and png's
To get started, lets make sure we are all working with the same software versions. Just as a note, if you are more comfortable with programming than 3D modelling, feel free to skip the Rhino/Grasshopper steps; you can just modify the imported geometry using code.
- Download Processing 3.0
- Install the PeasyCam library (for 3D navigation)
- Install the Toxiclibs library (for 3D geometry, math, and .stl exporting)
- Download Rhinoceros 3D and its Grasshopper plug-in.
- Mac Users: Grasshopper is now shipped with Rhino for Mac WIP, but it is not a stable release.
- Mac & PC Users: Rhino 5.0 for PC has a free 90 day trial, and Grasshopper is a free plug-in
- Grab the files from this repo.
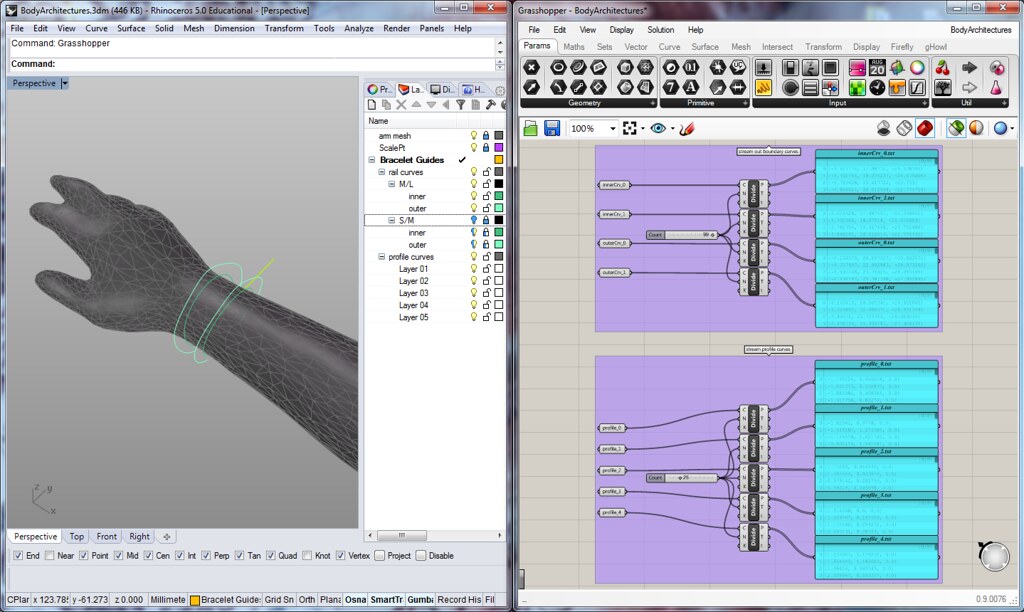
Open up BodyArchitectures.3dm. You should see a 3D scan of an arm with some 3D curves modelled around it.

The Layers pallette will give you a good idea of what the individual curves do for our bracelet, but basically, the 3D curves are the inner and outer boundary of bracelet. The 5 2D profile curves (located at the origin) are what we are going to use to generate our bracelet form.
These 3D inner and outer rail curves and 2D profile curves are what we are going to link to our Processing sketch to generate printable bracelets.
####Grasshopper
Now open BodyArchitectures.ghin Grasshopper. All this Grasshopper script does is convert each rail curve and profile curve into a set of 3D points, the stream those points out as .txt files.
This means that when you modify any of the assigned curves in Rhino, the text file with all the 3D points will also be modified.
By linking these text files to our Processing sketch, we build a pipeline for doing precise 3D modeling in a CAD program while having all the flexibility and extensibility of code-based form.
But before you can use this pipeline, we need configure BodyArchitectures.gh for your computer:
- Right-click each of the Panel objects, find
Stream Destination.

- After selecting
Stream Destination, navigate to the\data\geomfolder where you downloaded this project.

- Hit
enterto override the existing file.
Open BodyArchitectures.pde in Processing 3.0. Before we run our code, you'll need to add the PeasyCam and Toxiclibs libraries to your Contributed Libraries folder.
- PeasyCam can be installed using Processing 3.0's built-in
Add Libraryfeature. - Toxiclibs needs to be installed manually.
- Here's how: How to Install a Contributed Library
With the libraries added, you should be able to run the sketch:

Let me just briefly go over what some of the more important functions in BodyArchitectures.pde are doing:
- loadGHdata()
- Loads the text file points from the
\data\geomfolder - Converts the points from
stringtoVec3D - Stores the 3D points to build our 3D geometry
- createEnvelopeCrvs()
- Interpolates the curves brought in through
loadGHdata()into 5 inner and outer curves. - These 5 curves will guide how our
profileCrvswill be lofted into a 3D mesh.
- buildMesh()
- Reorients and translates each 2D
profileCrvto align with a point on its correspondinginnercurve - Scales the height of the reorineted profile curve to match the distance between the
innerandoutercurve - Builds a mesh from the list of reoriented profile curves
There are also some keyPressed controls for you to use:
- 'S' = save STL
- 'B' = rebuild geometry
- 'M' = show mesh
- 'W' = show wireframe
There are a few different ways you can modify these example files to make them your own.
Now that we have our Rhino file linked to our Processing sketch via Grasshopper, any manual changes we make to geometry in Rhino will also show up in Processing. Try this:
- In Rhino, grab one set of inner/outer curves and move them in the +X direction.
- In Processing, press 'B' to rebuild the mesh.
You should see that your bracelet is far wider than previously. If not, make sure that your .txt files in grasshopper are pointing to the \data\geom folder and are streaming properly:


You can also change the shape of the outer curves:
- Turn on the control points for one outer curve.
- Select and move individual points.


Lastly, you can also modify the overall design by changing the 2D profile curves:
- Turn off the
arm meshlayer in Rhino - You should see 5 small closed curves clustered at the origin. Each one of these is what we've been lofting around our interpolated rail curves.
- Design 5 new closed 2D curves and reassign the 5 profile curves streaming from our Grasshopper script.
With this method, you're getting an entirely new bracelet design with just a few quick modifications in Rhino. Here's an example using ovoid 2D profile curves with one set of inner/outer rail curves rotated:

For those who have some programming experience, here are some places to modify the code so you can customize your bracelet design even more.
In the existing code, we are scaling the 2D profile curves based on the distance between the inner and outer curves at a given point.
But this is fairly static. You could modify the scale factor by any sort of input; not just distance.

Scaling happens in alignProfiles(). Here are some other ideas for tweaking the scalar value:
- Add random noise or jitter to make the profiles more jagged.
- Use a mathematical function, like
sineorcosine, to add a cyclical undulation the scalar. - Integrate live data, like from sound, webcams, or even twitter, to visualize a data set as 3D form.
Currently our example reads and writes to text files to connect Processing to Rhino via Grasshopper. Although this is effective, it means we need to manually reload our data every time we update Rhino. But there is a much faster communication technique ... OSC!
Fortunately, both Processing and Grasshopper have ways to integrate OSC:
- In Processing, use the oscP5 library.
- In Grasshopper, use the gHowl plug-in.
- Modify
loadPtsto read incoming OSC messages, instead of text files. - Add the
rebuild()function intooscEvent()handler.
With this you'll see that any changes made in Rhino immediately update your Processing sketch.
The alignment method sweep() is currently uses 2D profiles to loft 3D geometry, but it also works used fully 3D meshes! For example, this bracelet design reorients 5 closed-solid meshes on the rail curves (instead of 5 2D profile curves). A rail is added on the edges to make sure everything connects:

To use meshes instead of profile curves, you'll need to modify how geometry from Rhino/Grasshopper is imported:
- 3D Model and save 5 mesh modules in the
\data\geomfolder. - You can import the meshes using an
STLReaderin toxiclibs. Save them to a list of typeTriangleMesh - In
alignProfiles(), copy and apply the reorientation matrix directly to the original mesh module - Be sure to add all the new meshes to the
modelslist.
When you've got a bracelt design that you like, you and press 'S' to save out the model. When saved, the 3D model (.stl) and screenshot (.png) are saved to the \data\prints folder.
- You can change the name of your files saving out in the
saveModels()function.
Although the bracelet geometry is challenging for desktop FDM printers (there are lots of overhangs that require support structures), I've had fairly good success printing variations on Ultimakers and Makerbots. However you'll need to do a little bit of post-processing to increase your chances of a successful print:
- Download Meshmixer
- Import your saved out .stl and add supports
- Save the .stl with supports as a brand new file
- Use this new file for whatever slicer you're using (e.g., Makerbot Desktop or Cura)
- Make sure you print with a raft, there's no need to generate additional supports
The Meshmixer supports use a branching structure that are quite minimal. This significantly reduces printing and clean up time!
I hope this has given you a good starting point for exploring 3D modeling and printing in Processing. By starting with geometry from Rhino/Grasshopper, we can precisely model components that need high precision (like the sizing or the opening of a bracelet). It also allows people without much programming experience can get a taste of how linking geometry to Processing can open many more streams of input for crafting 3D form.
Although we couldn't go into great detail about the code included in this tutorial, there are many additional functions you could be useful for future projects:
initCamera()anddrawAxes()setup a 3D camera and draws the world axesdrawCrvs()draws a list of pointsmesh()quad strips two lists of pointsinterpolateCrvs()makes any number of linearly interpolated curves between two edge curves