How It Works
Before jumping into the system architecture, it is important to cover some key StreamFlow concepts. You will see these terms mentioned throughout the documentation and the user interface.
Components represent business logic modules which are used in the StreamFlow UI to build topologies. Examples of components include Storm Spouts, Storm Bolts, and all other Trident base class types. This is typically where you will write your source code to drive your topologies. If possible, it is best to design your components to be generic and reusable for multiple data types and circumstances.
Resources are objects used by components in order to externalize common state. For example, a resource could represent a technical asset in the environment such as a database or Kafka queue. Resources should be used to encapsulate functionality outside of a component if that information is used in several places in a topology or within multiple topologies. Resources also provide a useful mechanism for injecting parameters, connections, or state into a component making it simpler, easier to write, and more testable.
Serializations allow for the definition of custom serializers and deserializers. Specifically, serializations should be implemented using the Kryo format to properly integrate with Storm and improve the performance when emitting tuples between components.
Frameworks are a StreamFlow specific topic and have no equivalent in standard Storm terminology. Frameworks simply are a grouping of components, serializations, and resources which are defined using a framework.yml configuration file. Frameworks are the primary output for developers building new features for StreamFlow. When a framework project is built, the final output should be a single JAR file which contains all dependencies for your Spouts, Bolts, Resources, and Serializations. This allows each framework to be completely self-contained and run independently of other frameworks. To add your framework to StreamFlow you can utilize the web UI to upload the framework JAR or you can use the REST endpoint to publish the JAR from the command line.
Topologies in Storm define the processing logic and the link between nodes which define a processing workflow. StreamFlow utilizes components registered in frameworks to dynamically build topologies in a drag and drop manner. Topologies must be submitted to a Storm cluster to start processing content and should be killed when no longer needed. All processing in Storm requires a topology and as such you will need to become comfortable building and testing them.
The image below outlines the general layout of the StreamFlow server and its dependencies.
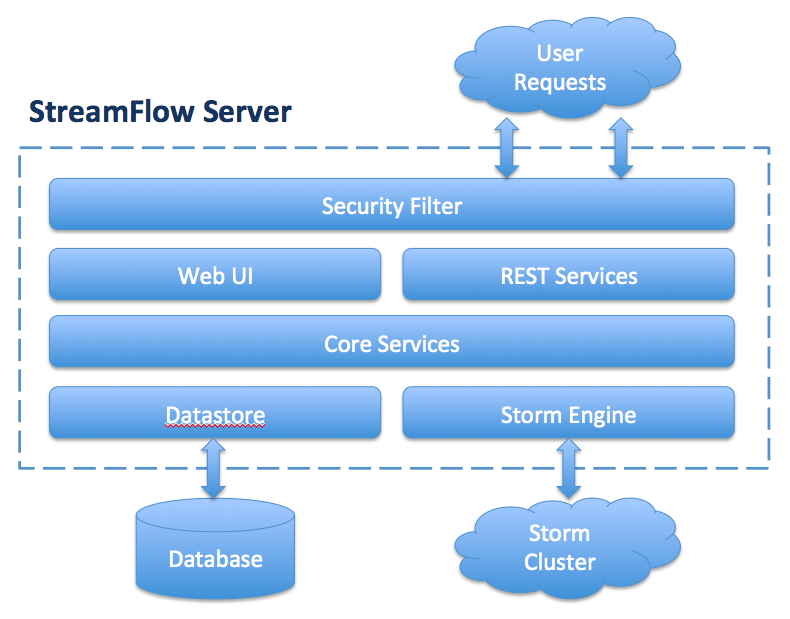
The following sections will provide an introduction for each of the major components of the system architecture.
The security filter is designed to protect the StreamFlow application from unauthorized requests. The implementation utilizes Apache Shiro to provide both authentication and authorization for the entire application. When an HTTP request is made to a protected resource in the UI, the user will be challenged with a login dialog. The security filter is optional and can be enabled, disabled, and configured in the streamflow.yml configuration file.
The StreamFlow UI allows you to manage your frameworks, resources, and topologies using a web based interface in the browser of your choice. The responsive web interface supports both desktop and mobile browsers allowing you to make quick changes on the go and manage the topologies on your cluster. The UI can also be protected by the optional authentication filters to allow multiple users to access the same instance of StreamFlow while maintaining separate user environments.
StreamFlow makes heavy use of AngularJS to build a responsive interface that makes building Topologies easy and fun. The StreamFlow UI is the preferred method to manipulate data in StreamFlow as it exposes all of the features that are available from the StreamFlow REST Services in a convenient manner. You can find a detailed tutorial on how to use each interface of the StreamFlow UI in the How To Use section of the wiki.
StreamFlow exposes all of it core capabilities as REST web services which accept and return JSON entities. The REST resource classes are simple wrappers around the core service controllers which contain most of the business logic. The Web UI makes heavy use of the REST services to retrieve data for display in the user interface. You can also directly use the REST API if you would like to automate some tasks or you have developed a custom user interface.
The Core Services primarily contain business logic to manipulate user created entities. The services contain important validation logic for entity manipulation such as setting default values and checking referential integrity. Typically, the core services should not require extension or modification unless you are adding a new core feature to the interface.
StreamFlow datastores are used to persist all user created entities and are required when running StreamFlow. A datastore is simply an implementation of the StreamFlow datastore interface which provides the API calls to properly integrate with a storage solution. The datastore interface allows you to dynamically swap out the storage mechanism for entities without requiring a rebuild of the software. The datastore architecture give you complete control to store the data in the database that best fits your environment. StreamFlow has inbuilt support for JDBC databases and MongoDB databases, but you can also implement a custom datastore if these options do not suit your needs. For a detailed description about each datastore and instructions on how to build your own please see the Datastores section
The Storm Engine is the most important component of the architecture. The features inside the engine make much of the dynamic topology assembly possible. As the dynamic class loader mechanism is a more complicated topic, it will be covered in detail in the Dynamic Framework Class Loader section.
StreamFlow utilizes a variety of important open source projects. Below is a list of a few key open source projects utilized by StreamFlow.
- Apache Storm
- Jersey REST Services
- Jackson JSON
- Eclipse Jetty Web Server
- Google Guice Dependency Injection
- Morphia MongoDB Client
- Apache Tika Document Processing
- Apache Curator Zookeper Client
- Codahale Metrics
- Apache Shiro Security Framework
- SLF4J Logging
- AngularJS
- Bootswatch Bootstrap Themes
- Font-Awesome Icons
StreamFlow is capable of dynamically building Storm topologies at runtime using a custom topology builder which can assemble a topology without the need for compilation. This section will walk you through the topology assembly and submission process in detail to give you a better understanding of how topologies are built in StreamFlow.
The first step in the assembly process requires copying a topology template JAR file to a the temporary folder ${STREAMFLOW_HOME}/temp/topologies on the local disk. StreamFlow uses the topology template JAR file as the baseline for each new StreamFlow topology. The topology template JAR is embedded within the StreamFlow distribution and is made available on the classpath to use for building topologies. The topology template contains a set of topology creators (Standard Storm and Trident) and a topology submitter which are used to build a valid StormTopology object and handle the submission and termination of the topology. All StreamFlow specific dependencies for the topology wrapper are built into the template topology keeping everything self-contained.
StreamFlow is able to dynamically build new topology jars by manually editing the JAR distribution to include any framework dependencies. Using the topology configuration as a guide, the StreamFlow service makes a list of all frameworks that were used in the topology. The service then iterates over each framework dependency and copies the raw framework JAR into the topology JAR. The framework jars are placed in a special path inside the JAR located at /STREAMFLOW-INF/frameworks/{FRAMEWORK-NAME}.jar. At runtime these JARs will be made available to Storm using the StreamFlow dynamic classloader.
StreamFlow includes the ability to upload arbitrary files to be used as inputs to properties in components and resources. These files must also be added to the topology jar so they will be available in the component inside the Storm cluster at runtime. Similar to the frameworks, the raw files are added to a special path located at /STREAMFLOW-INF/files/{FILE-MD5-HASH} where {FILE-MD5-HASH} is the calculated MD5 hash of the file content. This is used to ensure the same file is added only once and to prevent collisions with files that may have the same name.
The final stage in preparation of the topology JAR is to add the cluster configuration information located in streamflow.yml to the topology jar. This cluster configuration contains important information such as the logger properties and Storm nimbus location. Once this configuration has been added to the topology jar, it is ready for submission to the cluster.
Once the topology jar is built, it is ready to be sent to the cluster. As StreamFlow is capable of integrating with multiple Storm clusters at the same time, the user must select the Storm cluster to submit the topology to. StreamFlow checks the cluster configuration to obtain the Nimbus host and Nimbus port which are used to submit the topology to the cluster using the Thrift API. Storm handles the upload of the topology jar to the cluster and the eventual start of the topology. StreamFlow waits for this confirmation before returning the status of the topology submission back to the user.
Coming Soon!