- Build a picture game using a collection view controller
- Become familiar with data handling, view layout, and subclassing reusable views
- Determine the game winning sequence to trigger a segue and modally present another view controller
Be sure to download and use the project files from this repo, as opposed to your files from Part 1.
Each section of a collection view has the option of including supplementary views (header and/or footer) of type UICollectionReusableView.
- Add two variable properties on the
CollectionViewControllerclass: var headerReusableView: HeaderReusableView!var footerReusableView: FooterReusableView!- Add the following code snippet inside
viewDidLoad()of theCollectionViewControllerclass:
self.collectionView?.register(HeaderReusableView.self, forSupplementaryViewOfKind: UICollectionElementKindSectionHeader, withReuseIdentifier: "header")
self.collectionView?.register(FooterReusableView.self, forSupplementaryViewOfKind: UICollectionElementKindSectionFooter, withReuseIdentifier: "footer")- Add the following data source method below the existing data source methods in the
CollectionViewControllerclass:
override func collectionView(_ collectionView: UICollectionView, viewForSupplementaryElementOfKind kind: String, at indexPath: IndexPath) -> UICollectionReusableView {

   if kind == UICollectionElementKindSectionHeader {

       headerReusableView = (self.collectionView?.dequeueReusableSupplementaryView(ofKind: kind, withReuseIdentifier: "header", for: indexPath)) as! HeaderReusableView

       return headerReusableView

   } else {

       footerReusableView = (self.collectionView?.dequeueReusableSupplementaryView(ofKind: kind, withReuseIdentifier: "footer", for: indexPath)) as! FooterReusableView

       return footerReusableView
   }

}
There have been two subclasses created for you in this project that inherit from UICollectionReusableView, HeaderReusableView and FooterReusableView. These classes are being used programmatically in the project (i.e., not in storyboard). The method call used in viewDidLoad called register(_:forSupplementaryViewOfKind:withIdentifier:) registers the class with the collection view. The data source method, collectionView(_:viewForSupplementaryElementOfKind:at:), asks the data source object to provide the subclassed supplementary views to the collection view.
If you run the project you will not see any changes to the layout from part 1. Even though the header and footer views are included, they lack size. In fact, so far the only size information for the collection view is coming from default settings in interface builder. Let's change that.
- Inside the
CollectionViewControllerclass, declare a method calledconfigureLayout()that takes no arguments and has no return. Call this method insideviewDidLoad(). - Add the following variable properties to the
CollectionViewControllerclass: var sectionInsets: UIEdgeInsets!var spacing: CGFloat!var itemSize: CGSize!var referenceSize: CGSize!var numberOfRows: CGFloat!var numberOfColumns: CGFloat!
The goal for the configureLayout() method is to set up all the dimensions for the various reusable views and spaces around them in the collection view. Once the dimensions are calculated, the values should be assigned to the appropriate properties you just declared.
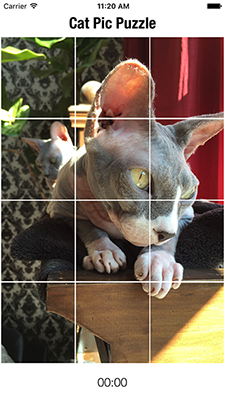
IMPORTANT: This particular grid layout should fit all the reusable views (items(cells), header, footer) inside the dimensions of the screen. The header should be at the top, then the items should form a 3x4 grid, and then the footer should be at the bottom.
Before you begin calculating dimensions, you will need to update the CollectionViewController class to adhere to the UICollectionViewDelegateFlowLayout protocol. This will allow you to add the delegate methods necessary to provide the collection view with layout information.
- Update your
CollectionViewControllerclass declaration to include adherence toUICollectionViewDelegateFlowLayout - Add the following methods to the
CollectionViewControllerclass: collectionView(_:layout:minimumLineSpacingForSectionAt:)returnspacingcollectionView(_:layout:minimumInteritemSpacingForSectionAt:)returnspacingcollectionView(_:layout:insetForSectionAt:)returnsectionInsetscollectionView(_:layout:sizeForItemAt:)returnitemSizecollectionView(_:layout:referenceSizeForHeaderInSection:)returnreferenceSizecollectionView(_:layout:referenceSizeForFooterInSection:)returnreferenceSize
If you try to run the application, it will crash. Since the properties related to the layout were declared as implicitly unwrapped optionals, they don't have any values yet. Those properties must have values before the flow layout methods are called. That's what the configureLayout() method is for and why it's called in viewDidLoad(). Let's define the dimensions inside configureLayout().
- Declare two variables for the width and height of the screen (Hint:
UIScreen.main.bounds...). - Assign a value of
4tonumberOfRows. - Assign a value of
3tonumberOfColumns. - Assign a value of
2tospacing(Thespacingvalue will be used for section insets, minimum interitem spacing, and minimum line spacing). - Assign a value to
sectionInsetsusing theUIEdgeInsetsinitializer (top, bottom, left, and right should all equalspacing). - Assign a value to
referenceSizeusing theCGSizeinitializer (use the initializer that takesCGFloat). The width should be the width of the screen and the height should be60.
The last layout dimension you need is the size for each item (cell) in the collection view. The item size is dependent on screen size, the numbers of rows/columns, and the space being used around each item (e.g., section insets, item spacing, line spacing, header/footer size).
- Using variables and calculations as needed, determine the item width. You will need to divide the screen width by the number of columns. You will also need to subtract an equal portion of the total amount of space being taken up by left/right insets and item spacing.
- Using variables and calculations as needed, determine the item height. You will need to divide the screen height by the number of rows. You will also need to subtract an equal portion of the total amount of space being taken up by top/bottom insets, line spacing, and header/footer height.
- Assign a value to
itemSizeusing the theCGSizeinitializer (use the initializer that takesCGFloat). Use the item width and height you calculated as your arguments. - Build and run the application. There should be 12 cat pictures taking up most of the screen with an equal amount of space on top and bottom for the header and the footer.
The collection view is currently using a static number, 12, for the number of items and the same picture for each cell. Let's provide an actual collection of data for the collection view. The assets folder has 12 picture slices to use in the collection view.
- Declare and initialize a variable property called
imageSlicesthat is an array of typeUIImage. - Inside
viewDidLoad()of theCollectionViewControllerclass, use a for loop with a range to populate theimageSlicesarray with the images from the assets folder (images 1 through 12). - Update
numberOfItems(inSection:)to return the count of theimageSlicesarray. - Update
collectionView(_:cellForItemAt:)to grab an image from theimageSlicesarray instead of the same image it's currently using. - Build and run the application. You should see all the image slices in order making up a completed picture.
When you use a UICollectionViewController it's simple to add the option to reorder cells. By calling another data source method, the collection view will allow items to be reordered. There's animation built in too. You may notice it's difficult to move cells at first. Since this is a starter approach to reordering cells, there is no control over the gesture used on the cells. The cells require a long press before they begin to move.
- Add the data source method
collectionView(_:moveItemAt:to:)to theCollectionViewControllerclass. Simply by overriding the method, the option to reorder cells is "turned on" therefore the body of the method can be left empty. - Build and run the application. You should be able to move cells to different locations within the collection view.
- Write a function to randomize the
imageSlicesarray after it's initially populated inviewDidLoad(). - Build and run the application to see if your randomizer is working.
There are a handful of other steps you can take to treat this even more like a game. Here's some hints to take this even further:
- The
FooterReusableViewclass has a timer and timer related functions. How could you incorporate those into theCollectionViewControllerclass? Remember you have thefooterReusableViewproperty that is of typeFooterReusableView.FooterReusableViewhas useful properties/methods likestartTimer(),timer, andtimerLabel. - How can you tell once a user has moved all the image slices back into order to complete the picture?
collectionView(_:moveItemAt:to:)supplies you with the source index path and the destination index path when a cell is being moved. This information allows you the option to reorder theimageSlicesarray. Here's a code snippet you can add inside ofcollectionView(_:moveItemAt:to:)to help you out:
self.collectionView?.performBatchUpdates({

  // reorder the imageSlices array here


  }, completion: { completed in

      // 1. Check for winning scenario
      // 2. Invalidate the timer
      // 3. Perform segue with identifier "solvedSegue"

})- There is a segue set up in
Main.storyboardto a second view controller calledSolvedViewController. Useprepare(for:sender:)to segue toSolvedViewController. In the prepare for segue method, assign values to the properties ofSolvedViewControllernamedimageandtime.imageshould be thecatsimage in the assets folder.timeshould be the value offooterReusableView.timerLabel.text(the current time at the moment the puzzle was solved).