Introductory Git Version Control Workshop taught at Timberline High School for my Project-Based Instruction Class.
Hello, students! By now, you should have created your own Github account and registered for the Github Student Developer Pack. Congratulations! You've taken your first steps towards managing your code efficiently and becoming part of the open source community. Now, it's time to learn how to better manage your class codebase using Git.
Git is what is known as version control software - it helps you manage your code by keeping track of its state over time, including additions, deletions, and changes. Github is a website that integrates with Git and functions a lot like Google Drive - but specifically for code. It lets you use the command line (or .zip files) to download your code, make changes, and save it on Github's servers, and serves as a backup if something happens to your files on your computer. A Git repository tracks all of the changes you make to your code, so that you can go back to a previous version of your project at any time! Having a copy of your code on Github's servers that you can access from anywhere also helps you manage your code across different computers efficiently. Professional coders and college students all over the world use Git to manage their code, and after this period you’ll have a valuable skill that will help you not only for the rest of AP CS, but for your whole coding career!
- Repository: A project folder or collection of project folders connected to Git where you put your code files.
- Local: Something residing on your computer - in this case, the copy of your repository saved on your laptop!
- Remote: Something residing on someone else's computer - in this case, the repository on your Github account!
- Commit: Recording the changes to the code in your local repository to be saved in your remote repository.
- Push: Saving the commited changes to your local repository in your remote repository by "pushing" them up to Github's servers.
- origin/master: "origin" is your remote repository, and "master" is the main branch of your remote and local repository. A "branch" is a specific version of your repository, but we'll get to that later if we have time! For now, just know that "origin/master" is your remote repository (the one on your Github account) :)
- To install Git, open up your command line and run the following two commands in the order shown below:
This installs Git using Ubuntu's package management system, a tool that helps you install and update programs on your computer via the command line. Note: The "
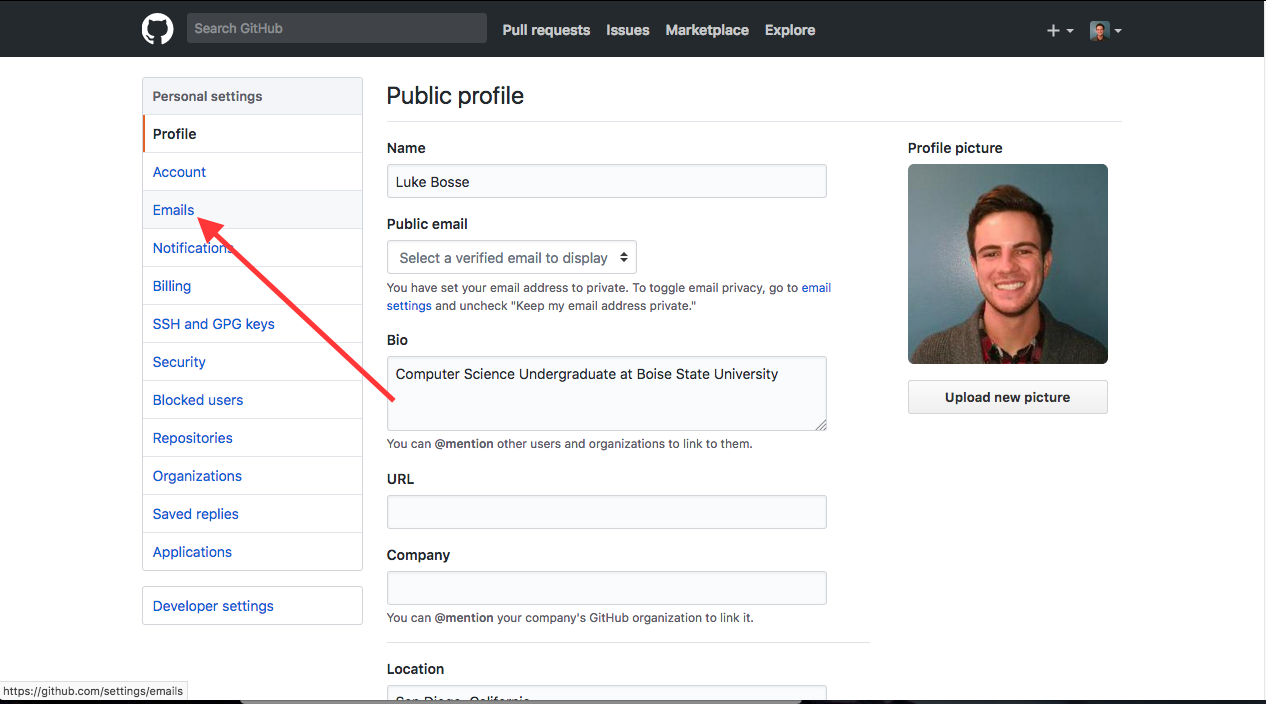
sudo apt-get update sudo apt-get install gitsudo" command will ask for a password. This is the administrator password for your computer. Luke or Ms. Pluska will give you the password at the beginning of class. - Anyone who has access to your repository can see your commits and the email address associated with them. Since we're using the free account right now, we need to use the no-reply email address that GitHub gives you as your commit email in order to stay safe online. To find it, go to the Email page under your account's Settings page and look at the "Primary Email" section below. Below are some pictures to help you find it:

- Set the Git commit username and email on your local computer to the ones you used on your GitHub account using the following commands:
git config --global user.name "<your-name-here>"
git config --global user.email "<your-email-here>"
Where<your-name-here>is your GitHub username and<your-email-here>is your GitHub no-reply email. You can check to see if you set your name and email correctly using the command:git config --list.
- Navigate to my Github repository for this lesson (If you're reading my README you should already be here...).
- Click the "Fork" button in the upper right hand corner of the screen. This will create your own personal copy of the repository in your account, where you can modify it freely without changing the code in my repository. This is often used when using someone else's code as a starting point for your own project or for proposing changes to their project. If you want to learn more about this after the lesson, check out this page.
- You should now see your own copy of this repository on your Github profile page! Click on the repository name to go to it's page.
- Click on the "Settings" tab right underneath the "Fork" button to go to the settings page. Then click the "Collaborators" button on the menu on the left side of the settings page. Use the search box to search for my username (lbosse) to add me as a collaborator on your repository. This will allow me to see your code and assess whether or not I did a good job teaching this lesson :)
- Click on the "Code" tab on the right side of the screen to go back to your files. You'll see a lot of buttons and options on this page! We'll get to those shortly. For now, click on the "Clone or Download" button and copy the link it gives you. You can also download it as a .zip file, but we're going to do things the cool way ;)
- Now that you've got the ".git" link to your repository, open up your terminal and navigate to the directory where you want to place your project folder. Once you're there, type this command into the terminal:
git clone https://github.com/lbosse/gitWorkshop-THS.git. - You're ready to start working!
-
Open up the file
Greeting.javawith your favorite text editor and add the following method to theGreetingclass:public void sayHello() { System.out.println("Hello!"); } -
Now, time for the good stuff! When we want to save, or "push" our code to our remote repository (the repository on Github where your code is stored), we first need to record our changes by "commiting" the changes we made to our code. This whole process takes four quick steps:
- Run the command
git statusin your project folder. This will show you both changes to "tracked" (files already being watched by git) and "untracked" (new) files. You should see the following message from this command:
On branch master Your branch is up-to-date with 'origin/master'. Changes not staged for commit: (use "git add <file>..." to update what will be committed) (use "git checkout -- <file>..." to discard changes in working directory) modified: Greeting.java no changes added to commit (use "git add" and/or "git commit -a") - Run the command
-
Git is telling us that changes to
Greeting.javaare not staged for commit. "Staging a file for commit" means that we tell Git we want to record changes to that file. Add the changes you want to record with your commit by runninggit add <file name>. Note that in coding directions, words inside angle brackets (< ... >) mean "fill in the blank with your file name, word, etc". -
Now, make your commit and record your changes by running the command
git commit -m <message>where "message" is a message describing the commit. These messages should be short (not much more than a sentence long) and describe what was accomplished with the commit. An example of a good commit message would be: "Made the greeting method in class Greeting static". -
You're finally ready to push your code to your Github repository! Run the command
git push origin masterto push the code. If you rungit statusagain you'll get a message saying you're up-to-date with origin/master! -
Congratulations! You've successfully updated your first Github repository :)
Now, we're going to create a repository where you can store all of your code for this class!
- Before we do anything on GitHub, we need to create a folder structure to organize your existing projects and homeworks for this class. Remember that to make a directory (folder) on the command line, you use the following commands:
- Create a directory:
mkdir <directory name> - Go into a directory:
cd <directory name> - Go up a directory:
cd ../
- Create a directory:
Now, you'll need to download all of your projects and homeworks from Google Drive and place them in a single set of directories (folders). This set of directories will be your local repository, and the repository name will be the name of the top level directory. I recommend creating a directory structure for your repository like this:
myAPCSRepo/
..............projects/
..........................project1/
..........................project2/
..............homework/
..........................hw1/
..........................hw2/
In this case, the name of the repository is "myAPCSRepo". If this step takes you a while, don't feel bad about using Ubuntu's file explorer program to create folders and move stuff around instead of the command line!
- Once you've created your directory structure, go to your GitHub account "Repositories" page and create a new repository! This repository will have the same name as the one you just created on your computer. Be sure to mark the repository as "public" (only public repositories are free until you have the Student Developer Pack) and un-check the box that says "initialize this repository with a README". Some images to guide you through this process are included below:
Go to the "Repositories" page:

Click the "New" repository button:

- Next, GitHub will show you the following commands to run in your local repository to link it to the remote repository you just created:
echo "# sample" >> README.md
git init
git add README.md
git commit -m "first commit"
git remote add origin https://github.com/lbosse/sample.git
git push -u origin master
go into the main directory (in the example above, myAPCSRepo/), and run the commands as shown. You've now got all of your code for this class saved in your own GitHub repository that you can easily access from anywhere!
Merge conflicts arise when different changes that have been made to two different local copies of the same file need to be reconciled. Imagine Alice and Bob are on a team working on the same software. If Alice makes changes to a file and pushes it to their shared GitHub repository, but Bob made different changes to the same lines of his copy of the file, and he tries to push his code, GitHub will ask Bob and Alice to choose which changes to incorporate into the file in the repository.
Merge conflicts happen most often when someone creates a branch off a repository. A branch is a copy of a project that can be edited and later incorporated back into the master branch, the definitive codebase of that repository. Branches have their name because if you model them as a tree structure, well, they look like branches!
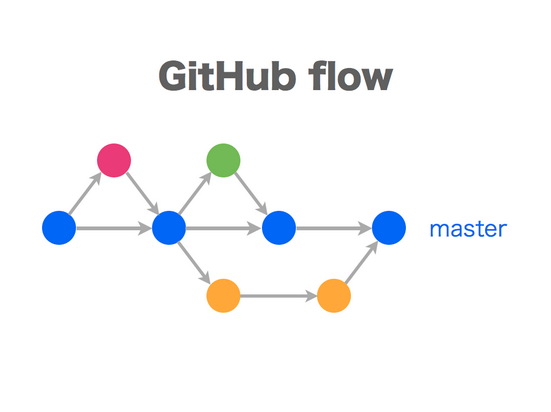
In the above diagram, each circle represents a commit.
To get practice resolving merge conflicts, follow the directions below:
- Using your favorite text editor, create a file named
hello.txtin your local repository.hello.txtshould contain the following:Hello. - Add and commit your changes using the following two commands in order:
git add hello.txt
git commit -m "first hello edit in master" - Create a new branch named
modifyHellousing this command:git checkout -b modifyHello.- The
git checkout <name>command switches to a branch of a givenname. Adding the-boption tells Git to first create this branch before switching into it.
- The
- Run to command
git branchto see which branch you're in. It should output the following:Themaster * modifyHello*tells you which branch you're in. - Now, in the
modifyHellobranch, edithello.txtto contain the following:Hello, world! - Add and commit your changes using the following two commands in order:
git add hello.txt
git commit -m "first hello edit in modifyHello" - Switch back into the master branch using this command:
git checkout master. - Modify
hello.txtone more time. Edit it to contain the following:Hello, world. - Add and commit your changes using the following two commands in order:
git add hello.txt
git commit -m "second hello edit in master" - Now, we're going to merge the code from our
modifyHellobranch into ourmasterbranch! This will try to incorporate any changes we made in ourmodifyHellobranch intomaster. If there are conflicting edits on the same lines of code (like we just created!) Git will ask us to resolve the conflicts! Merge the code by running the following command:
git merge modifyHello
The above command should produce this output:
Auto-merging hello.txt
CONFLICT (content): Merge conflict in hello.txt
Automatic merge failed; fix conflicts and then commit the result.
- Fix the merge conflicts. When merge conflicts occur in a file, Git marks them using the following markers:
The space between
<<<<<<< HEAD Hello, world. ======= Hello, world! >>>>>>> modifyHello<<<<<<< HEADand=======are the changes in master, and the changes between=======and>>>>>>> modifyHelloare the changes inmodifyHello. To resolve the merge conflict, delete the conflict markers and incorporate the changes you want to save!
Let's delete the conflict markers to leave just the following:Hello, world!That's a nice, friendly message! :) - After merge conflicts have been resolved, add and commit your changes using the following commands:
git add hello.txt
git commit -m "modifyHello merged into master"Git will tell you after you commit that your branch has been merged.
Congratulations! You just solved your first merge conflict, a major step in your journey with Git!
If you want a really cool intro to the GitHub workflow and another explanation of the branching and merging process, checkout this article from GitHub!
You can also check out GitHub's article on resolving merge conflicts.
Merge conflict tutorial informed by JonathanMH's tutorial.