A Mario + Slime Rancher parody, Sanrio is a multilevel sidescrolling platformer where the player aims to reach the end of a level, collecting coins for maximum points, while deflecting enemy obstacles.
- Player creation and movement
- Procedural level generation
- Enemy obstacles
- Player shooting
- Items and powerups
Bonus
- Level map
- Enemy projectiles + diversified attacks
- Boss battles


- HTML/CSS/Javascript
- Vanilla Javascript for game logic
- HTML5 Canvas for rendering
- Webpack to bundle various scripts
-
Character collision and boundaries against platform planes
-
Procedural level generation
-
Seamless character movement + interaction
-
Keyboard generation
- For the controls instruction, I wanted to do something a little different than a literal image diagram. By making an interactive keyboard that instantly reflected the result, I thought learning the controls would come much more intuitively than having to memorize and reference the menu.
- I wanted to reflect changes in the keyboard without having to load multiple static images and so ended up generating one in JS. I was able to avoid hard-coding html for each key by creating an array of arrays that represented each row of keys, with each number reflecting a different type of key (ex. 1 = numbers, 2 = letters) and relying on styling to create the correct configuration.
   generateControls() {
     let keyboard = 'QWERTYUIOPASDFGHJKLZXCVBNM';
     let nums = '1234567890';
     let number = 0;
     let letter = 0;
     let keyArray = [
         [4, 3, 3, 3, 3, 3, 3, 3, 3, 3, 3, 3, 4, 12],
         [5, 1, 1, 1, 1, 1, 1, 1, 1, 1, 1, 5, 5],
         [0, 2, 2, 2, 2, 2, 2, 2, 2, 2, 2, 5, 5, 0],
         [8, 2, 2, 2, 2, 2, 2, 2, 2, 2, 0, 5, 5, 5],
         [6, 2, 2, 2, 2, 2, 2, 2, 0, 0, 0, 6],
         [0, 0, 0, 0, 7, 0, 0, 9, 10, 11]
     ];

     for (let row = 0; row < keyArray.length; row++) {
         let list = document.getElementById(`row${row}`);
         keyArray[row].forEach(key => {
             let element = document.createElement('LI');
             switch (key) {
                 // number keys
                 case 1:
                     element.setAttribute("class", "keyboardKey");
                     element.setAttribute("id", `key${nums[number]}`);
                     let textnode = document.createElement('P');
                     let textContent = document.createTextNode(`${nums[number]}`);
                     textnode.setAttribute("class", "keyNumberContent");
                     textnode.appendChild(textContent);
                     element.appendChild(textnode);
                     list.appendChild(element);
                     number += 1;
                     break;
                 // letter keys
                 case 2:
                     element.setAttribute("class", "keyboardKey");
                     element.setAttribute("id", `key${keyboard[letter]}`);
                     let letternode = document.createElement('P');
                     let letterContent = document.createTextNode(`${keyboard[letter]}`);
                     letternode.setAttribute("class", "keyLetterContent");
                     letternode.appendChild(letterContent);
                     element.appendChild(letternode);
                     list.appendChild(element);
                     letter += 1;
                     break;
                 case 7:
                     element.setAttribute("id", "space");
                     list.appendChild(element);
                     break;

                 // arrow keys
                 // blank keys

                 default:
                     break;
             }
         });
      }
   }
- For the controls instruction, I wanted to do something a little different than a literal image diagram. By making an interactive keyboard that instantly reflected the result, I thought learning the controls would come much more intuitively than having to memorize and reference the menu.
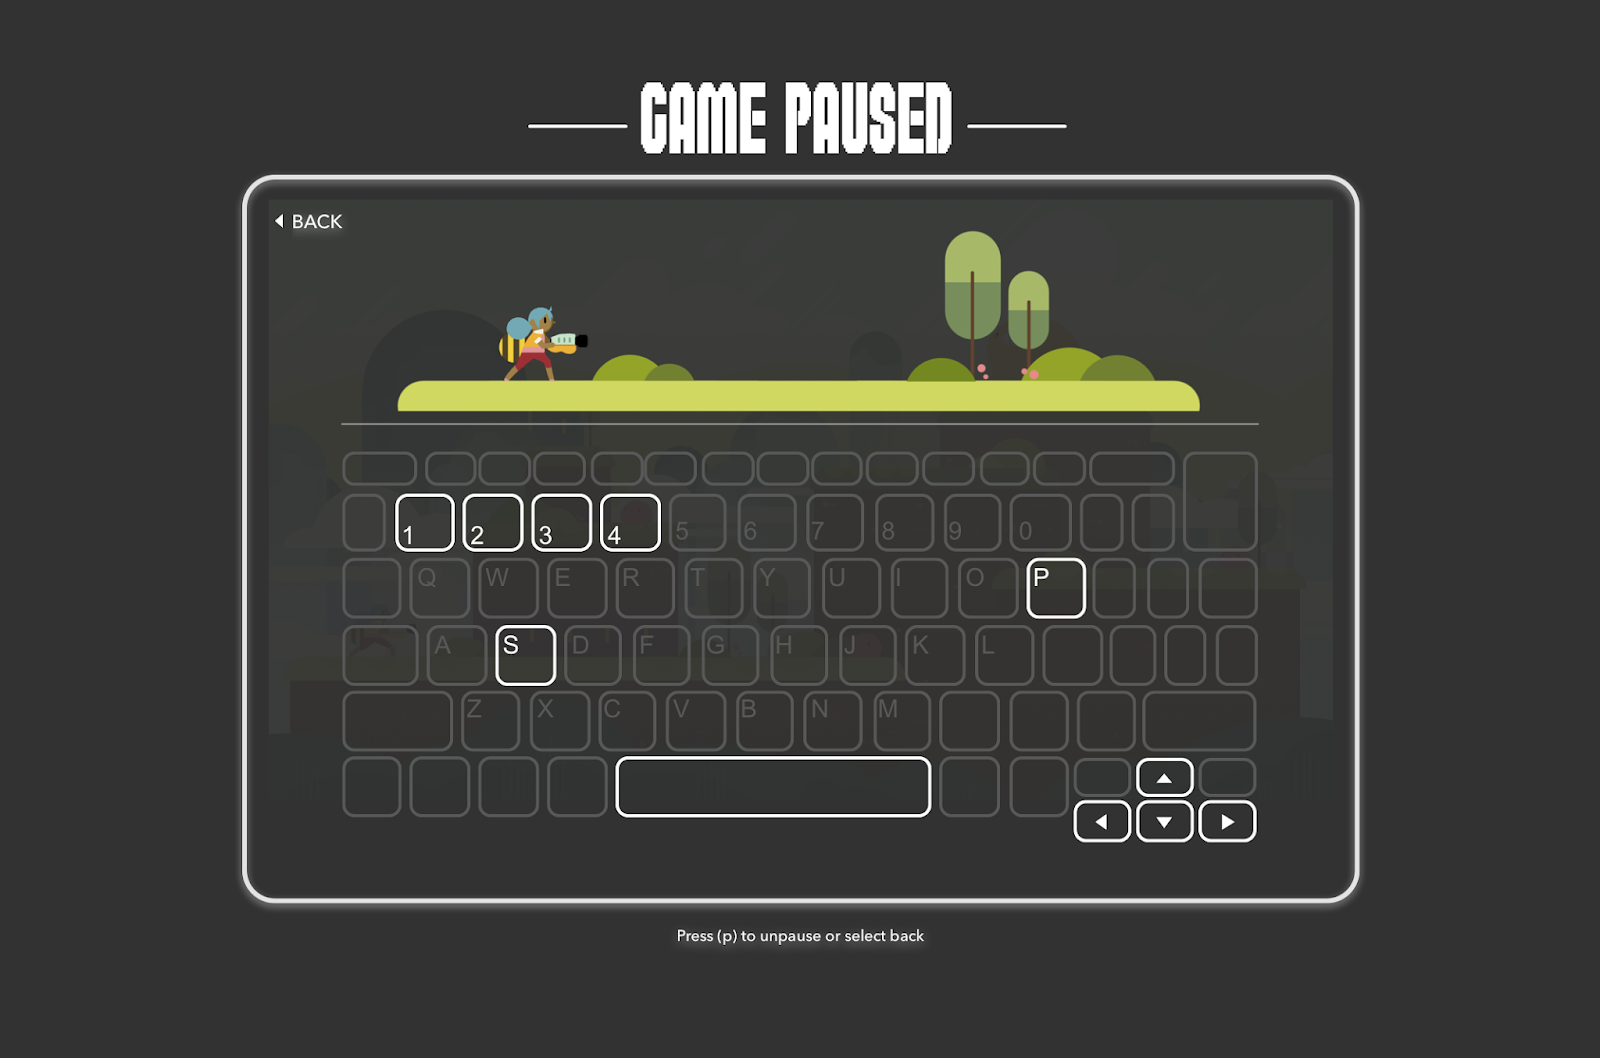
The reactive tutorial image was rendered in another HTML canvas, similar to the game but limited within the confines of the menu box, instantiating a new character and therefore able to map to the same controls but under a different state.
For scene generation, I wanted to be able to quickly generate multiple maps, without having to calculate the positions of each decorative element or platform. Using a text file where I could easily see layout provided a visual display for level creation.

By parsing a text file, I was able to use a simple switch case statement to create objects mapping different categories of elements that could be manipulated in the main game code. Keeping track of how many lines have been parsed in an independent variable, I was then able to instantiate elements at different 'depths' with respective colors.
    for (let i = 0; i < level.length; i++){
      switch (level[i]){
          case ' ':
              width += WIDTHSPAN;
              break;
          case '\n':
              height += HEIGHTSPAN;
              width = 0;
              break;
          case '\t':
              width += WIDTHSPAN*4;
              break;
                case 'c':
              items[itemCount] = (new Coin(width, height - HEIGHTSPAN, itemCount));
              itemCount += 1;
              width += WIDTHSPAN;
              break;
          case 'T':
              deco.push(new Tree(width, height + HEIGHTSPAN, 1.5));
              width += WIDTHSPAN;
              break;
          case 't':
              deco.push(new Tree(width, height + HEIGHTSPAN, 1));
              width += WIDTHSPAN;
              break;
          case 'b':
              deco.push(new Bush(width, height + HEIGHTSPAN, randomInt(0,5)));
              width += WIDTHSPAN;
              break;
          case 'x':
              blockCount += 1;
              break;
          case 'X':
              blockCount += 1;
              let depth = 5;
              switch (height > 0) {
                  case (height >= 0 && height < 100):
                      depth = 5;
                      break;
                  case (height >= 100 && height < 200):
                      depth = 4;
                      break;
                  case (height >= 200 && height < 300):
                      depth = 3;
                      break;
                  case (height >= 300 && height < 400):
                      depth = 2;
                      break;
                  case height >= 400:
                      depth = 1;
                      break;
              }
              sceneObjects.push(new PlatformBuilder(blockCount, width, height, depth));
              width += WIDTHSPAN*blockCount;
              blockCount = 0;
              break;
          default:
      }
}- Establish webpack + file structure set up
- Establish Git workflow and branching strategies
- Wireframes, art assets, review resources
- Scene rendering + basic shapes
- Placeholder platforms for character interaction
- Player movement: left, right, jump
- Game loop: player lives
- Procedural platform generation
- Game loop: win/lose cycle
- Player loses lives when falling off screen
- Github pages deployment
- Enemies and obstacles
- Player shooting
- Improve UX/UI
- Items + powerups
- *Bonus features: Enemy shooting
- *Bonus features: Boss battles
- Production README