This is the sourcecode for the Pandemic shuffle board. The code is written for this purpose only. The code is public for you to learn from or to be inspired. You may use it, but only at your own risk. There is no warranty. Feel free to use the discussions section in GitHub for questions.
The IOModule code is made for the Arduino Nano Every. The Pandemic code is for the Raspberry Pi running Raspbian Lite (but it might work on other distros, I don't know). But the software is pretty useless without the hardware setup as described in the article. It needs the LED display and sensors and buttons via the Arduino, etc.
The IOModule code is easiest to compile and upload with the Arduino IDE, or with Visual Micro. It doesn't get more straight forward.
The Pandemic code is compiled on the Raspberry Pi using Visual Studio from a Windows machine connected to the same network. To make this work, you need to install the following packages on the Raspberry Pi:
sudo apt install zip rsync openssh-server build-essential gdbserver git
Visual Studio automatically copies the changed files to the Raspberry Pi and remotely builds the project. The binaries are built in ~/projects/Pandemic/bin/... with a Debug or Release subdirectory depending on the chosen build configuration.
There is a post-build action which should copy the required librgbmatrix.so library to the same output directory. This was previously built from Henner Zeller's rpi-rgb-led-matrix library. Follow his instructions to build that library.
To install fmod, download the fmod engine version 2.02.11 to the Raspberry Pi and unzip it in the ~/projects directory. This will create a subdirectory named fmodstudioapi20211linux which contains headers and dynamic link libraries. You may also choose to get a newer version or unzip it in any other location, but then don't forget to update the include paths in the project file before building. In the file /etc/ld.so.conf add a line to the directory containing the .so files: /home/pi/projects/fmodstudioapi20211linux/api/core/lib/arm64. Then run sudo ldconfig to apply the changes. You should now be able to compile and link fmod.
The file pandemic.toml is copied to the output directory on build. This file is read by the software on startup. You may want to make changes to this file depending on platform (RPI or VM) and personal preferences.
The data files must be in the directory /usr/local/games/data/, however, this is configurable in pandemic.toml. There is a handy batch file named Deploy_Data.bat to copy the data.
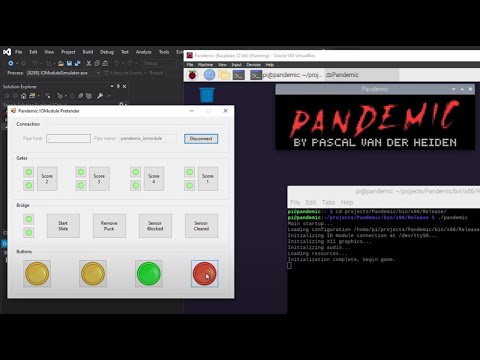
To work on the software without any of the hardware, you must use the IOModule simulator and Raspberry Pi Desktop OS in a virtual machine.
Here is how to set it up:
-
Get VirtualBox and create a virtual machine with the Raspberry Pi Desktop OS. When creating the virtual machine in VirtualBox, make sure to select "Expert Mode", choose the Raspberry Pi Desktop OS installer ISO file and then select that the machine version is "Debian 32-bit". Otheriwse, VirtualBox will create a Debian 64-bit machine with a 32-bit OS installed and your software builds will go haywire.
-
When installed, I like to change the hostname to
pandemicand login topito match with my real Rapsberry Pi, but I don't think this is really needed. -
In the virtual machine settings (with the virtual machine turned off), go to "Serial Ports" and configure Port 1 as follows:
- Port number: COM1
- Port mode: Host Pipe
- Connect to existing pipe/socket: Unchecked
- Path/Address:
\\.\pipe\pandemic_iomodule
This will allow the IOModule simulator to talk with the virtual machine.
-
In Visual Studio, use the x86 build profile instead of the ARM profile and build according to the instructions above, as-if your virtual machine is your Raspberry Pi.
-
Because you chose the x86 build profile, the graphics will show in an X11 window and you don't need the rpi-rgb-led-matrix library.
-
In your
pandemic.tomlfile, in theIOsection, setSerialPort = "/dev/ttyS0". This makes the software talk with the configured COM1 port. -
On the Raspberry Pi Desktop (vm) run
xhost +si:localuser:$USERand in Visual Studio, go to the project properties, then to Debugging and addexport DISPLAY=:0to the Pre-Launch Command. This allows you to open an X11 window from a remote SSH connection. -
Connect your IOModule simulator to the virtual machine before launching the game.
If you did everything above, you should now be able to do this:
Credit to whom credit is due. I'm using the following software libraries:
- rpi-rgb-led-matrix library for the LED-matrix display control (not included in this repository).
- fmod for sound & music playback and recording (not included in this repository).
- GLM library for vector math.
- tweeny for smooth animations movements.
- nanopb for communication protocol between Raspberry Pi and Arduino.
- cpptoml for the TOML configuration file format.
- lodepng for PNG file writing.
- cxxopts for command line parameter parsing.
The following tools and resources were used:
- AngelCode BMFont to generate the font atlas images.
- Paint.NET for the images.
- Audacity for sound editing.
- Shadertoy for experimenting with visual effects.