In this project, you'll label the pixels of a road in images using a Fully Convolutional Network (FCN).
This is the general view of FCN Neural network architecture:

Tensorflow impementation of Fully Convolutional Network (FCN) for Image Segmentation Model (Paper : Link)
| CityScapeVideo 2-classes | CityScapeVideo 29-classes |
|---|---|
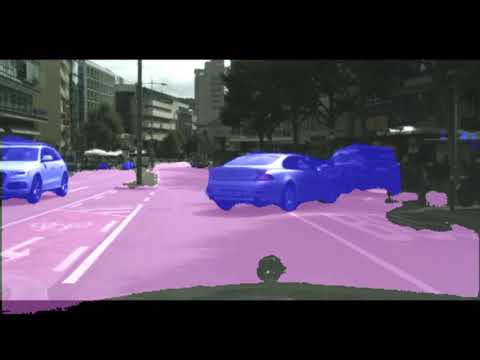 |
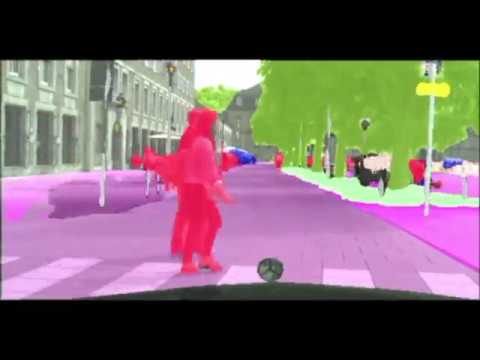 |
Once you download pretrained model and dataset, please follow this project structure:
├── main.py               (Training FCN on Kitti Road dataset)
├── helper.py             (Helper preprocessing/postprocessing functions for Kitti Road dataset)
├── project_tests.py      (Unit tests for main.py)
├── cityscapes_train.py   (Training FCN on Cityscapes  dataset)
├── cityscapes_helper.py  (Helper preprocessing/postprocessing functions for Cityscapes dataset)
├── cityscapes_config.py  (Config file for training FCN on CItyscapes dataset)
├── cityscapes_predict.py (Perform image segmentation on custom image/video file)
|── "runs"
|   ├── kitti_output      (Examples of outputed files from trained model on kitti dataset)
|   ├── cityscapes_output (Examples of outputed files from trained model on cityscapes dataset)
├── "data"                (Folder for dataset storage Kitti/Citiscapes according to the config)
|   ├── leftImg8bit_trainvaltest
|     |      ├── sky-data
|     |      |    ├── train       (train  gt labels)
|     |      |    ├── val         (validation gt labels)
|     |      |    ├── test         (test gt labels)
|     |      |
|     |      ├── leftImg8bit
|     |      |    ├── train       (train  input images)
|     |      |    ├── val         (validation input images)
|     |      |    ├── test         (test input images)
- First trained my model on Kitti dataset, achieved some results which were fair enough for passing this project
- Trained my model on 10 epocchs with 2 classes(road/car) on Citiscapes dataset, I got better results
- Trained my model on 60 epochs with 29 classes on Citiscapes dataset
- Solved problem of exploding gradients with adding relu activations on all convolution layers
- Added data augmentation
- Random shadow pieces
- Random brightness
- Added video/image processing script called
cityscapes_preddict(see examples below)
Prediction supports the following file formats : (Video : Mp4, Avi, Picture : PNG/JPEG)
mandatory arguments:
  -media MEDIA_DIR, --media_dir MEDIA_DIR
                        Media Directorium for prediction (mp4,png)
optional arguments:
  -save SAVE_DIR, --save_dir SAVE_DIR
                        Save Directorium
  -model MODEL_DIR, --model_dir MODEL_DIR
                        Model Directorium
python cityscapes_predict.py -media test_img.png
python cityscapes_predict.py -media test_video.mp4
| Kitti Test Output1 | Kitti Test Output 2 | Kitti Test Output 3 |
|---|---|---|
 |
 |
[ |
| CityScape test output1 | CityScape test output2 | CityScape test output3 |
|---|---|---|
 |
 |
[ |
main.py will check to make sure you are using GPU - if you don't have a GPU on your system, you can use AWS or another cloud computing platform.
Make sure you have the following is installed:
You may also need Python Image Library (PIL) for SciPy's imresize function.
Download the Kitti Road dataset from here. Extract the dataset in the data folder. This will create the folder data_road with all the training a test images.
Download the Cityscapes dataset from here.
- Download gtFine_trainvaltest.zip (Annotated data)
- Extract the train/val/test datasets in the
data/leftImg8bit_trainvaltest/sky-datafolder. - Download leftImg8bit_trainvaltest.zip (Image data)
- Extract the train/val/test datasets in the
data/leftImg8bit_trainvaltest/leftImg8bitfolder.
Implement the code in the main.py module indicated by the "TODO" comments.
The comments indicated with "OPTIONAL" tag are not required to complete.
Run the following command to run the project:
python main.py
Note: If running this in Jupyter Notebook system messages, such as those regarding test status, may appear in the terminal rather than the notebook.
Here are examples of a sufficient vs. insufficient output from a trained network:
| Sufficient Result | Insufficient Result |
|---|---|
 |
 |
- Ensure you've passed all the unit tests.
- Ensure you pass all points on the rubric.
- Submit the following in a zip file.
helper.pymain.pyproject_tests.py- Newest inference images from
runsfolder (all images from the most recent run)
- The link for the frozen
VGG16model is hardcoded intohelper.py. The model can be found here. - The model is not vanilla
VGG16, but a fully convolutional version, which already contains the 1x1 convolutions to replace the fully connected layers. Please see this post for more information. A summary of additional points, follow. - The original FCN-8s was trained in stages. The authors later uploaded a version that was trained all at once to their GitHub repo. The version in the GitHub repo has one important difference: The outputs of pooling layers 3 and 4 are scaled before they are fed into the 1x1 convolutions. As a result, some students have found that the model learns much better with the scaling layers included. The model may not converge substantially faster, but may reach a higher IoU and accuracy.
- When adding l2-regularization, setting a regularizer in the arguments of the
tf.layersis not enough. Regularization loss terms must be manually added to your loss function. otherwise regularization is not implemented.
In main.py, you'll notice that layers 3, 4 and 7 of VGG16 are utilized in creating skip layers for a fully convolutional network. The reasons for this are contained in the paper Fully Convolutional Networks for Semantic Segmentation.
In section 4.3, and further under header "Skip Architectures for Segmentation" and Figure 3, they note these provided for 8x, 16x and 32x upsampling, respectively. Using each of these in their FCN-8s was the most effective architecture they found.