https://www.jhanley.com/google-cloud-run-getting-started-with-python-and-flask/
On August 15, 2018, Google released the Alpha release of Google Cloud Run. Many of us saw the potential and went to work learning this new platform. Everything serverless gets our attention. Cloud Run is Google's entry into serverless containers. On April 9, 2019, Cloud Run went into Beta and has lit on fire. To say that I am impressed is an understatement.

What is Google Cloud Run? Cloud Run is a managed compute platform for running stateless containers in the cloud. The only serious requirements are that your container must be invocable via HTTP requests and not require long running or background processes as they put the container to sleep in between HTTP requests. Cloud Run also makes deploying HTTPS and SSL certificates easy.
- Run HTTP apps and services
- Simple developer experience
- Fast auto-scaling
- Scales to zero
- Almost any language, any library, any runtime
- HTTP and HTTPS
- SSL certificates for your domain name
- Integrated logging and monitoring - Stackdriver
- Pay per use - no traffic equals no cost
- Optional authentication
Cloud Run also supports Kubernetes, which I am not covering in this article. However, redeploying from Cloud Run to Cloud Run on GKE is a simple as adding one command line option. That is what I call elegant simplicity.
In this article, we will create a Python Flask web application and deploy into a Docker container. Then we will take this container and deploy to Cloud Run. Once we have everything working, we will create a domain name in our DNS server and deploy an SSL certificate.
This article covers development and deployment from a Windows 10 Professional desktop. Linux is similar but not covered in this article.
We will work with several products and services. Having a basic understanding will be helpful.
The final result will be a simple web application that responds at https://flask-python-example.jhanley.dev. Your endpoint will be different.- You have gcloud installed and configured with the correct credentials and project
- You have Docker installed
- You have Python 3 installed
- Build and deploy with Cloud Run - 4:24
- Differences between Cloud Run and Cloud Run on GKE - 5:23
- Cloud Run QuickStart - Docker to Serverless - 7:49
- Run Containers on GCP's Serverless Infrastructure (Cloud Next '19) - 48:32
I have published the files for this article on GitHub. https://github.com/jhanley-com/google-cloud-run-getting-started-python-flask
License: MIT License
Clone my repository to your system:
git clone https://github.com/jhanley-com/google-cloud-run-getting-started-python-flask.gitFor this article, we will write a simple Python Flask application that displays "Hello Google Cloud Run World!" with a link to the Cloud Run website. We will write and test this from our Windows 10 desktop. The steps are similar for Linux and are not covered in this article.
For this application we just need Flask. Create the requirements.txt file with this content:
Flask==1.0.2
Install/verify that that Flask is installed:
pip install -r requirements.txt
Let's look at a simple Flask application. We will not be using this example, this is to simplify understanding Flask. This is a seven-line web server application! This example will listen on 127.0.0.1 port 5000:
from flask import Flask
app = Flask(__name__)
@app.route("/")
def home():
    return "Hello, World!"
if __name__ == "__main__":
    app.run(debug=True)
We will use an expanded version. Create the application file app.py with this content:
import os
import logging

from flask import Flask

# Change the format of messages logged to Stackdriver
logging.basicConfig(format='%(message)s', level=logging.INFO)

app = Flask(__name__)

@app.route('/')
def home():
	html = """
<html>
 <head>
  <title>
   Google Cloud Run - Sample Python Flask Example
  </title>
 </head>
 <body>
  <p>Hello Google Cloud Run World!</p>
  <a href="https://cloud.google.com/run/" target="_blank">Google Cloud Run Website</a>
 </body>
</html>
"""
	return html

if __name__ == '__main__':
	app.run(debug=True, host='0.0.0.0', port=int(os.environ.get('PORT', 8080)))
Execute this code:
python app.py
Click this link or open a web browser to http://localhost:8080/
You should see a page similar to this:
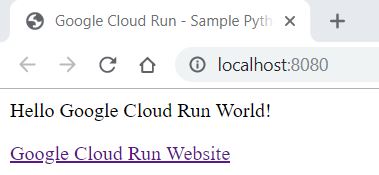
Press CTRL-C to kill the Flask web server.
I will not go into detail about Flask as there are extensive documentation and examples on the Internet. At this point, we have created a simple web server and ran it on our local desktop. I like to develop and test as much as possible locally as this is easier and faster than waiting for deployments to complete.
The next step is to take the website application and deploy it as a Docker container.Create the Dockerfile file with this content:
# Use the official Python 3 image.
# https://hub.docker.com/_/python
#
# python:3 builds a 954 MB image - 342.3 MB in Google Container Registry
# FROM python:3
#
# python:3-slim builds a 162 MB image - 51.6 MB in Google Container Registry
# FROM python:3-slim
#
# python:3-alpine builds a 97 MB image - 33.2 MB in Google Container Registry
FROM python:3-alpine

# RUN apt-get update -y
# RUN apt-get install -y python-pip

COPY . /app

# Create and change to the app directory.
WORKDIR /app

RUN pip install --no-cache-dir -r requirements.txt

RUN chmod 444 app.py
RUN chmod 444 requirements.txt

# Service must listen to $PORT environment variable.
# This default value facilitates local development.
ENV PORT 8080

# Run the web service on container startup.
CMD [ "python", "app.py" ]
Notice I have some lines commented out. The reason is that I like to start with a full container build (FROM python:3) and when deploying switch to a minimal build (FROM python:3-alpine). Sometimes I need to connect inside the container to debug, install tools, etc. Before deploying production code, build the smallest container you can. This will decrease costs, minimize the testing footprint, reduce data transfer time to start the container and improve security.
Build the container:
docker build -t sample-flask-example:latest .
You will receive a security warning from Docker on Windows:
SECURITY WARNING: You are building a Docker image from Windows against a non-Windows Docker host. All files and directories added to build context will have '-rwxr-xr-x' permissions. It is recommended to double check and reset permissions for sensitive files and directories.
This issue is handled in the Dockerfile with these lines:
RUN chmod 444 app.py
RUN chmod 444 requirements.txt
The problem is that the Dockerfile COPY statements add execution permission to files. The chmod commands change the file permissions back to read-only. If you forget to do this, you will have Python execute errors.
Next, run the container and verify that everything works.
docker run -it --rm -p 8080:8080 sample-flask-example:latest
Click this link or open a web browser to http://localhost:8080/
You should see the same content again.
Press CTRL-C to kill the container.
Everything we have done up to this point has not involved Google Cloud. Now we will switch and build our container in the cloud as the first step to deploy with Cloud Run.Build the container using Cloud Build and store in Cloud Container Registry. Replace my-project with your Google Cloud Project ID:
gcloud builds submit --tag gcr.io/my-project/sample-flask-example
Once the build completes, you can list the containers is Container Registry:
gcloud container images listDeploy the container from Container Registry to Cloud Run. Replace my-project with your Google Cloud Project ID:
gcloud beta run deploy sample-flask-example --image gcr.io/my-project/sample-flask-example --allow-unauthenticatedWhen this command completes, you will see a message similar to:
Service [sample-flask-example] revision [sample-flask-example-00001] has been deployed and is serving traffic at https://sample-flask-example-x5yqob7qaq-uc.a.run.appMake a note of the endpoint in the message. Open a new browser and enter the URL.
https://sample-flask-example-x5yqob7qaq-uc.a.run.appIf you are just creating an API, then making your Cloud Run instance easily accessible is not important. For websites, customers will expect a URL that is recognizable. I don't like to click on weird URLs - you never know what is behind them. So, let's go thru the process to create a custom domain and SSL certificate and make our website available as a subdomain.
Open a web browser and go to the Google Cloud Run console https://console.cloud.google.com/run. Click on Manage Custom Domains.

Click Add Mapping. Select the Cloud Run service we just deployed. Select your domain name. Enter your subdomain. In this example "flask-python-example".
If your domain name does not appear, select "Verify a new domain ..." and follow the prompts.

Click Continue. The next step is to create a CNAME in your DNS server with the information from this screen:
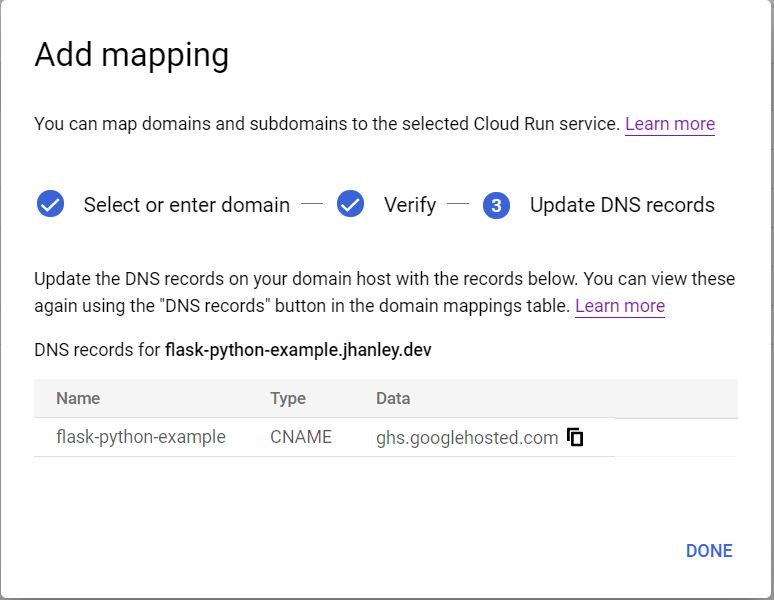
You will need to wait about ten to thirty minutes for Google to deploy the SSL certificate and for your DNS server to start responding to requests for the new domain name.
Open a web browser and go to your new domain. For this example: https://flask-python-example.jhanley.dev.
In a future article, I will cover HTTPS and SSL for Cloud Run including HTTPS redirection, secure headers, HSTS and some suggestions for Google to improve Cloud Run security.
Congratulations, you have deployed a simple containerized website to Google Cloud Run.There are many more features of Google Cloud Run we have not covered in this introductory article. In future articles, I will cover more details including combining Cloud Run with other Google Cloud services for automation.
We can combine Cloud Run with other Google Cloud services, such as Cloud Storage and Pub/Sub to monitor the security settings on storage objects. This just scratches the surface of what we can do beyond just websites.
Date created: May 10, 2019
Last updated: May 16, 2019