The article contains a step-by-step guide on how to implement a BPMN Event-based Gateway in Camunda making use of a Spring Boot Application.
Java Nibble Article: https://www.javanibble.com/implement-bpmn-event-based-gateway-in-camunda/
The following is required to run the Spring Boot example:
The Event-Based Gateway represents a branching point in the Process where the alternative paths that follow the Gateway are based on Events that occur, rather than the evaluation of Expressions using Process data. A specific Event, usually the receipt of a Message, determines the path that will be taken. Basically, the decision is made by another Participant, based on data that is not visible to Process, thus, requiring the use of the Event-Based Gateway.
Use Camunda Modeller to model the process. The process model is composed of four tasks, an event-based gateway, timer event and two message events:
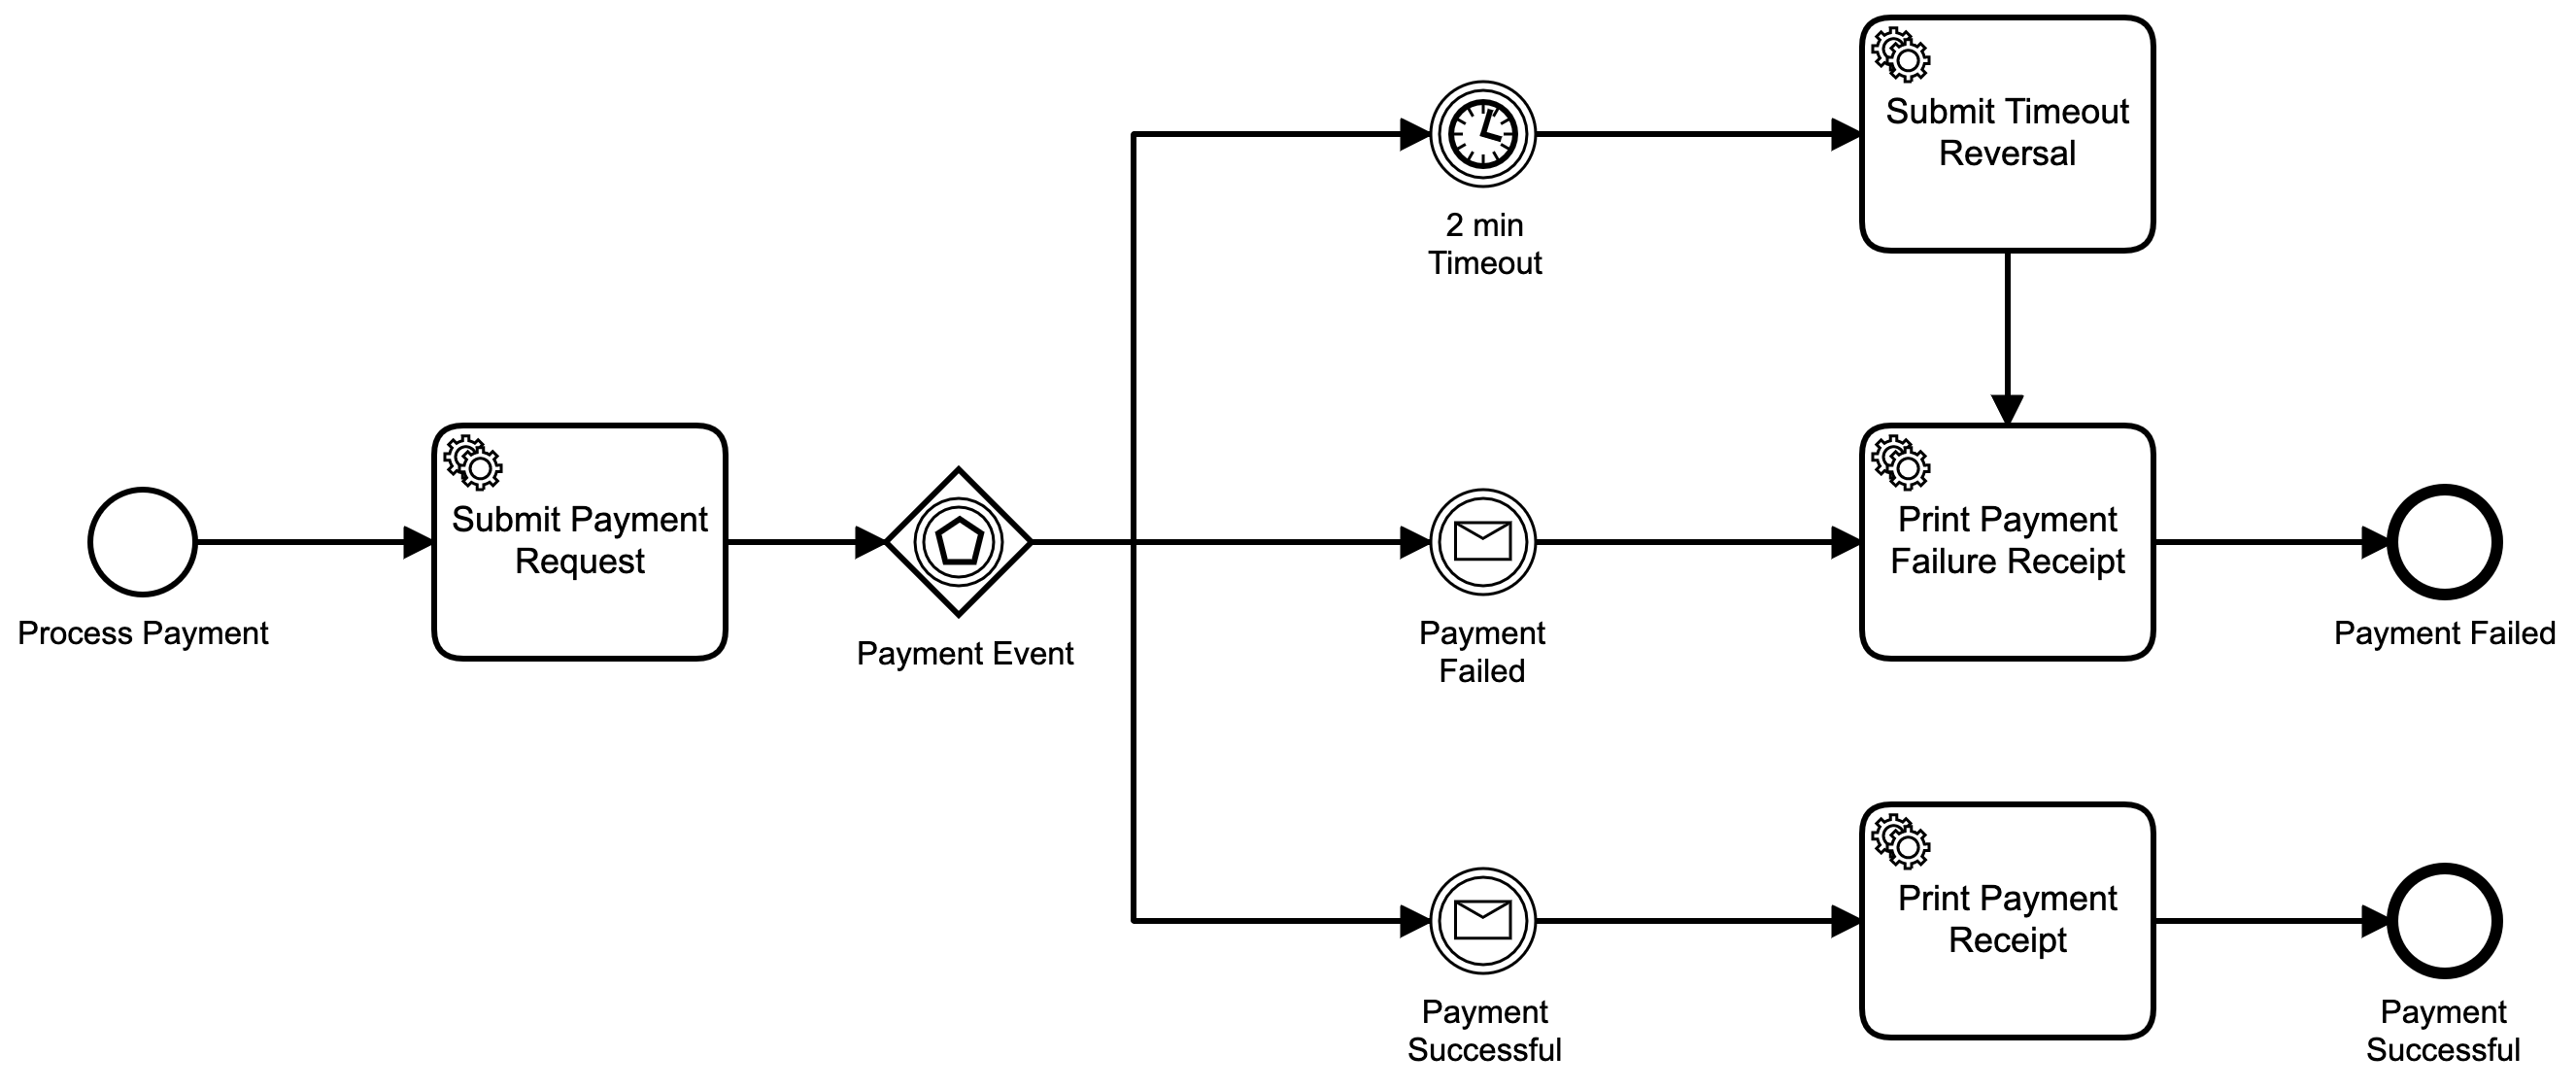
- Submit Payment Request: Is a
Service Tasklinked to a Delegate Expressions with the name${logger}. - Payment Event: Is an
Event-based Gatewaywith three sequence flows. - 2 min Timeout: Is a
Timer Eventwith a duration ofPT1M. - Payment Failed: Is a
Message Eventwith a message name ofpayment-failed-message. - Payment Successful: Is a
Message Eventwith a message name ofpayment-successful-message. - Submit Timeout Reversal: Is a
Service Tasklinked to a Delegate Expressions with the name${logger}. - Print Payment Failure Receipt: Is a
Service Tasklinked to a Delegate Expressions with the name${logger}. - Print Payment Receipt: Is a
Service Tasklinked to a Delegate Expressions with the name${logger}.
Use the following command to compile the Spring Boot application making use of maven:
$ mvn clean installAfter you have successfully built the Camunda BPM Spring Boot application, the compiled artifact can be found in the target directory. Use the following command to start the Camunda BPM Spring Boot Application.
$ mvn spring-boot:runAfter the application has started, run the following command in another terminal:
Run the command: Scenario 1 - Timeout
Scenario 1 is starting the Payment process and passing in the businesskey with a value of business-key-123. The event-based gateway waits for either the timer event to occur, or one of the two message events.
After two minutes the timer event is triggered and the payment is reversed.
$ ./start_process_scenario_01.shThe script performs the following commands:
$ curl --location --request POST 'http://localhost:8080/engine-rest/process-definition/key/payment-process/start' --header 'Content-Type: application/json' --data-raw '{
       "businessKey": "business-key-123"
  }'
The following is the output to the console after running the above command.

Run the command: Scenario 2 - Payment Failed
Scenario 2 is starting the Payment process and passing in the businesskey with a value of business-key-123. The event-based gateway waits for either the timer event to occur, or one of the two message events.
A payment-failed-message message is sent to the process instance with businesskey of value business-key-123 to indicate the payment has failed.
$ ./start_process_scenario_02.shThe script performs the following commands:
$ curl --location --request POST 'http://localhost:8080/engine-rest/process-definition/key/payment-process/start' --header 'Content-Type: application/json' --data-raw '{
     "businessKey": "business-key-123"
}'

sleep 5

$ curl --location --request POST 'http://localhost:8080/engine-rest/message' --header 'Content-Type: application/json' --data-raw '{
     "messageName": "payment-failed-message",
     "businessKey": "business-key-123"
}'
The following is the output to the console after running the above command.

Run the command: Scenario 3 - Payment Successful
Scenario 2 is starting the Payment process and passing in the businesskey with a value of business-key-123. The event-based gateway waits for either the timer event to occur, or one of the two message events.
A payment-successful-message message is sent to the process instance with businesskey of value business-key-123 to indicate the payment was successful.
$ ./start_process_scenario_03.shThe script performs the following commands:
$ curl --location --request POST 'http://localhost:8080/engine-rest/process-definition/key/payment-process/start' --header 'Content-Type: application/json' --data-raw '{
     "businessKey": "business-key-123"
}'

sleep 5

$ curl --location --request POST 'http://localhost:8080/engine-rest/message' --header 'Content-Type: application/json' --data-raw '{
     "messageName": "payment-successful-message",
     "businessKey": "business-key-123"
}'
The following is the output to the console after running the above command.

To view the Camunda Admin Console, type the following url in your browser while the application is running. You will be prompted with the login screen.
After you have typed the above URL in a browser while the application is running, you will be prompted with the login screen. Type the Username and Password you set within the application properties file.
To view the H2 Console, type the following url in your browser while the application is running. You will be prompted with the login screen.
After you have typed the above URL in a browser while the application is running, you will be prompted with the login screen. Press the connect button since there is no password specified.