Created by James M Roden
Version==0.2.0 // Jan 2019
An ArcGIS toolbox to convert RGB values to their corresponding z-values as denoted in the map’s legend. Input: georectified RGB image. Output: Z-value raster & point shapefile.
 Figure 1: Georectified composite RGB image
 Figure 2: Z-Value raster derived from composite RGB image
Composite images, like that in figure 1, more often than not contain three channels: red, green, blue (RGB). In a 24-bit RGB image each channel has 8-bits – in other words the image is composed of three images (one for each channel). Each of these channels has varying intensities between 0 and 255. The combination of these 3 channels results in a possible 16,777,216 colours.
When the original map was created in GIS software however, the raster (the bathymetry in figure 1) would have been a single channel raster where its values would not have been representing intensities of red, green or blue; but representing the sea floor depth in meters (z-value). The map creator will have chosen a colour-ramp to stretch over the raster’s z-values, in this example where red corresponds to a z-value of 0, yellow corresponds to a z-value of -50 and so on. Only when the map was exported to an image format did it become an RGB composite image, but this means we don’t have access to the original z-values to use in GIS or 3D modelling software. This tool aims to reverse engineer the image to its original single band z-value raster by mapping the pixels RGB value to its z-value equivalent by using the map legend as a guide.
- Georectify the RGB composite image in ArcMap
- Using the eye-dropper tool carefully select RGB colours along the grids colour ramp in the legend. Copy and paste the RGB value into a new line in a blank text document followed by its corresponding Z value. Each new RGB-to-Z pairing needs to be on a new line as in figure 3 below. If you do not have the eye-dropper available in your toolbar already, please find instructions here
- Once all RGB to Z values are ready and your text file is saved, follow the instructions in the ArcGIS Toolbox.
- Output: A z-value raster & point dataset.
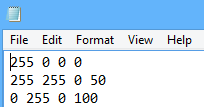
Figure 3: Text File Example