![]()
GPU-Jupyter: Leverage Jupyter Notebooks with the power of your NVIDIA GPU and perform GPU calculations using Tensorflow and Pytorch in collaborative notebooks.
![]()
Welcome to this project, which provides a GPU-capable environment based on NVIDIA's CUDA Docker image and the popular docker-stacks. Our toolstack enables GPU calculations in Jupyter notebooks, while the use of containers and versioned tags ensures the reproducibility of experiments. By utilizing version control for the source code, tagged data spaces, seeds for the random functions, and tagged environments as provided here, our solution empowers researchers to conduct highly complex big data experiments that are fully reproducible.
The images of this repository are available on Dockerhub. A big thank you to docker-stacks for creating and maintaining a robust Python, R, and Julia toolstack for Data Science.
-
Ensure that you have access to a computer with an NVIDIA GPU. If you don’t have your own setup, you can try Saturn Cloud for a free GPU-powered Jupyter solution.
-
Install Docker version 1.10.0+ and Docker Compose version 1.28.0+.
-
Get access to your GPU via CUDA drivers within Docker containers. For this, follow the installation steps in this Medium article. You can confirm that you can access your GPU within Docker if the command below returns a result similar to this one:
docker run --gpus all nvidia/cuda:12.3.2-cudnn9-runtime-ubuntu22.04 nvidia-smi
Mon Apr  8 16:19:10 2024
+---------------------------------------------------------------------------------------+
| NVIDIA-SMI 545.23.05              Driver Version: 545.84       CUDA Version: 12.3     |
|-----------------------------------------+----------------------+----------------------+
| GPU  Name                 Persistence-M | Bus-Id        Disp.A | Volatile Uncorr. ECC |
| Fan  Temp   Perf          Pwr:Usage/Cap |         Memory-Usage | GPU-Util  Compute M. |
|                                         |                      |               MIG M. |
|=========================================+======================+======================|
|   0  NVIDIA GeForce RTX 3060 ...    On  | 00000000:01:00.0 Off |                  N/A |
| N/A   46C    P8              10W /  60W |    105MiB /  6144MiB |      0%      Default |
|                                         |                      |                  N/A |
+-----------------------------------------+----------------------+----------------------+

+---------------------------------------------------------------------------------------+
| Processes:                                                                            |
|  GPU   GI   CI        PID   Type   Process name                            GPU Memory |
|        ID   ID                                                             Usage      |
|=======================================================================================|
|  No running processes found                                                           |
+---------------------------------------------------------------------------------------+
It is important to keep your installed CUDA version in mind when you pull images. Note that you can't run images based on
nvidia/cuda:11.2if you have only CUDA version 10.1 installed, usenvcc --versionto get the correct cuda version. Additionally, a NVIDIA driver version of at least 520 is suggested, as the images are built and tested using this and later versions. -
Pull and run the GPU-Jupyter image. This may take some time as the whole environment for data science will be downloaded:
cd your-working-directory
ll data  # this path will be mounted by default
docker run --gpus all -d -it -p 8848:8888 -v $(pwd)/data:/home/jovyan/work -e GRANT_SUDO=yes -e JUPYTER_ENABLE_LAB=yes --user root cschranz/gpu-jupyter:v1.7_cuda-12.3_ubuntu-22.04
This starts an instance of GPU-Jupyter with the tag
v1.7_cuda-12.3_ubuntu-22.04at http://localhost:8848 (port8848). To log into Jupyterlab, you have to specify a token that you get from:docker exec -it [container-ID/name] jupyter server list # [JupyterServerListApp] Currently running servers: # [JupyterServerListApp] http://791003a731e1:8888/?token=5b96bb15be315ccb24643ea368a52cc0ba13657fbc29e409 :: /home/jovyan
You can optionally set a password in http://localhost:8848/login or as described below (former default password
gpu-jupyter). Additionally, data within the host'sdatadirectory is shared with the container.The following images of GPU-Jupyter are available on Dockerhub:
v1.7_cuda-12.3_ubuntu-22.04(full image)v1.7_cuda-12.3_ubuntu-22.04_python-only(only with a python interpreter and without Julia and R)v1.7_cuda-12.3_ubuntu-22.04_slim(only with a python interpreter and without additional packages)v1.6_cuda-12.0_ubuntu-22.04(full image)v1.6_cuda-12.0_ubuntu-22.04_python-only(only with a python interpreter and without Julia and R)v1.6_cuda-12.0_ubuntu-22.04_slim(only with a python interpreter and without additional packages)v1.6_cuda-11.8_ubuntu-22.04(full image)v1.6_cuda-11.8_ubuntu-22.04_python-only(only with a python interpreter and without Julia and R)v1.6_cuda-11.8_ubuntu-22.04_slim(only with a python interpreter and without additional packages)
Older images
v1.5_cuda-12.0_ubuntu-22.04(full image)v1.5_cuda-12.0_ubuntu-22.04_python-only(only with a python interpreter and without Julia and R)v1.5_cuda-12.0_ubuntu-22.04_slim(only with a python interpreter and without additional packages)v1.5_cuda-11.8_ubuntu-22.04(full image)v1.5_cuda-11.8_ubuntu-22.04_python-only(only with a python interpreter and without Julia and R)v1.5_cuda-11.8_ubuntu-22.04_slim(only with a python interpreter and without additional packages)v1.5_cuda-11.6_ubuntu-20.04(full image)v1.5_cuda-11.6_ubuntu-20.04_python-only(only with a python interpreter and without Julia and R)v1.5_cuda-11.6_ubuntu-20.04_slim(only with a python interpreter and without additional packages)v1.4_cuda-11.6_ubuntu-20.04(full image)v1.4_cuda-11.6_ubuntu-20.04_python-only(only with a python interpreter and without Julia and R)v1.4_cuda-11.6_ubuntu-20.04_slim(only with a python interpreter and without additional packages)v1.4_cuda-11.2_ubuntu-20.04(full image)v1.4_cuda-11.2_ubuntu-20.04_python-only(only with a python interpreter and without Julia and R)v1.4_cuda-11.2_ubuntu-20.04_slim(only with a python interpreter and without additional packages)v1.4_cuda-11.0_ubuntu-20.04(full image)v1.4_cuda-11.0_ubuntu-20.04_python-only(only with a python interpreter and without Julia and R)v1.4_cuda-11.0_ubuntu-20.04_slim(only with a python interpreter and without additional packages)v1.4_cuda-11.0_ubuntu-18.04(full image)v1.4_cuda-11.0_ubuntu-18.04_python-only(only with a python interpreter and without Julia and R)v1.4_cuda-11.0_ubuntu-18.04_slim(only with a python interpreter and without additional packages)v1.4_cuda-10.1_ubuntu-18.04(full image)v1.4_cuda-10.1_ubuntu-18.04_python-only(only with a python interpreter and without Julia and R)v1.4_cuda-10.1_ubuntu-18.04_slim(only with a python interpreter and without additional packages)
The version, e.g.
v1.7, declares the version of the generator setup. The Cuda version, e.g.cuda-12.3, must match the CUDA driver version and be supported by the GPU libraries. These and older versions of GPU-Jupyter are listed on Dockerhub. In case you are using another version or the GPU libraries don't work on your hardware, please try to build the image on your own as described below. Note that the images built for Ubuntu 20.04 LTS work also on Ubuntu 22.04 LTS is currently not supported.
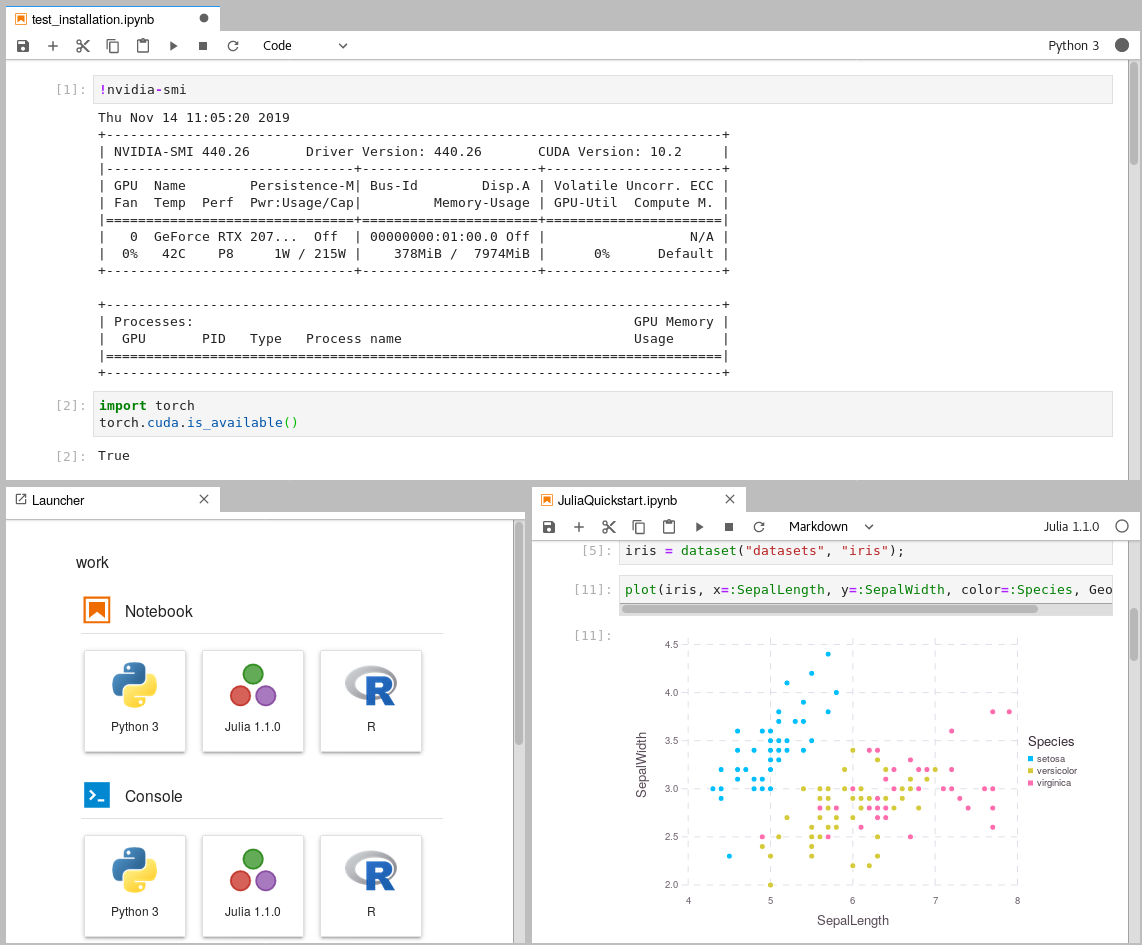
Within the Jupyterlab UI, ensure you can access your GPU by opening a new Terminal window and running nvidia-smi.
Here, you can also install additional packages on top of the built image.
To help you get started with using the GPU, the repository includes some sample code located in extra/Getting_Started.
If you're new to JupyterLab or want to learn more about its features,
we recommend checking out this tutorial.
Building a custom Docker image is the recommended option if you have a different GPU architecture or if you want to customize the pre-installed packages. The Dockerfiles in custom/ can be modified to achieve this. To use a custom base image, modify custom/header.Dockerfile. To install specific GPU-related libraries, modify custom/gpulibs.Dockerfile, and to add specific libraries, append them to custom/usefulpackages.Dockerfile.
After making the necessary modifications, regenerate the Dockerfile in /.build. Once you have confirmed that your GPU is accessible within Docker containers by running docker run --gpus all nvidia/cuda:12.3.2-cudnn9-runtime-ubuntu22.04 nvidia-smi and seeing the GPU statistics, you can generate, build, and run the Docker image.
The following commands will start GPU-Jupyter on localhost:8848 with the default password gpu-jupyter.
git clone https://github.com/iot-salzburg/gpu-jupyter.git
cd gpu-jupyter
git branch  # Check for extisting branches
git checkout v1.7_cuda-12.3_ubuntu-22.04  # select or create a new version
# generate the Dockerfile with python and without Julia and R (see options: --help)
./generate-Dockerfile.sh --python-only
docker build -t gpu-jupyter .build/  # will take a while
docker run --gpus all -d -it -p 8848:8888 -v $(pwd)/data:/home/jovyan/work -e GRANT_SUDO=yes -e JUPYTER_ENABLE_LAB=yes -e NB_UID="$(id -u)" -e NB_GID="$(id -g)" --user root --restart always --name gpu-jupyter_1 gpu-jupyter
This command starts a container with GPU support and a shared local data volume /data, along with other necessary configurations, such as root permissions to install packages within the container. For more configuration options, see Configuration of the Dockerfile-Generation below.
To start GPU-Jupyter using docker-compose.yml, run the following command:
docker-compose up --build -d  # build and run in detached mode
docker-compose ps  # check if was successful
docker-compose logs -f  # view the logs
docker-compose down  # stop the container
This step requires a docker-compose version of at least 1.28.0,
as the Dockerfile requests GPU resources (see this changelog).
To update docker-compose, this discussion may be useful.
With these commands we can investigate the container:
docker ps  # use the flat '-a' to view all
docker stats
docker logs [service-name | UID] -f  # view the logs
docker exec -it [service-name | UID] bash  # open bash in the container
To stop the local deployment, run:
docker rm -f [service-name | UID] # orTo generate a Dockerfile for GPU-Jupyter, you can use the script generate-Dockerfile.sh. It generates a Dockerfile in the .build/ directory, which is overwritten with each new generation and entries within this directory should not be modified manually.
The script has the following parameters:
-
-h|--help: Show a help message. -
-p|--pw|--password: Set the password for GPU-Jupyter by updating the salted hashed token incustom/jupyter_notebook_config.json. -
-c|--commit: specify a commit or"latest"for thedocker-stacks, the default commit is a working one. -
-s|--slim: Generate a slim Dockerfile. As some installations are not needed by everyone, there is the possibility to skip some installations to reduce the size of the image. Here thedocker-stackscipy-notebookis used instead ofdatascience-notebookthat comes with Julia and R. Moreover, none of the packages withincustom/usefulpackages.Dockerfileis installed. -
--python-only|--no-datascience-notebook: As the name suggests, thedocker-stackdatascience-notebookis not installed on top of thescipy-notebook, but the packages withincustom/usefulpackages.Dockerfileare. -
--no-useful-packages: On top of thedocker-stackdatascience-notebook(Julia and R), the essentialgpulibsare installed, but not the packages withincustom/usefulpackages.Dockerfile.
Note that only one of the parameters --slim, --python-only, and --no-useful-packages can be used at the same time:
If you need to install custom packages within the container, you can modify the custom/usefulpackages.Dockerfile file or do it directly within the container.
Keep in mind that every time a Dockerfile is generated, the file .build/Dockerfile is overwritten, so it's best to append custom installations in custom/usefulpackages.Dockerfile or generate-Dockerfile.sh.
Some useful packages are suggested in the Extension docs and in this blog article from neptune.ai. If you notice that an important package is missing in the default stack, please let us know so we can update it.
Jupyter by default regenerates a new token on each new start.
GPU-Jupyter provides the environment variable JUPYTER_TOKEN to set a customized static token.
This option is practicable if the host machine is periodically restartet.
It is suggested to use a long token such as a UUID:
export JUPYTER_TOKEN=$(uuidgen)
echo $JUPYTER_TOKEN-
For Docker add the parameter
-e JUPYTER_TOKEN=${JUPYTER_TOKEN}, e.g.:docker run --gpus all -d -it -p 8848:8888 -v $(pwd)/data:/home/jovyan/work -e GRANT_SUDO=yes -e JUPYTER_ENABLE_LAB=yes -e NB_UID="$(id -u)" -e NB_GID="$(id -g)" -e JUPYTER_TOKEN=${JUPYTER_TOKEN} --user root --restart always --name gpu-jupyter_1 gpu-jupyter
-
In
docker-compose.yml, the environment variable can be set underENVIRONMENT:JUPYTER_TOKEN: ${JUPYTER_TOKEN}Please note that environment variables might not be accessable for all docker-compose versions. Consider to setting
JUPYTER_TOKENin a separate.env-file and usingenv_filein docker-compose or a hard-coded token.
The static token can be requested using docker exec:
docker exec -it gpu-jupyter_1 jupyter server listThere are two ways to set a password for GPU-Jupyter:
-
Go to the login page (http://192.168.48.48:8848/login) when logged out and setup a Password in the corresponding field.
-
Use the
--passwordor--pwoption in the generate-Dockerfile.sh script to specify your desired password, like so:bash generate-Dockerfile.sh --password [your_password]
This will update automatically the salted hashed token in the
.build/jupyter_notebook_config.jsonfile. Note that the specified password may be visible in your account's bash history.
Both TensorFlow and PyTorch support tensorboard. This packages is already installed in the GPU-packages and can be used with these settings:
- Forward the port in the docker command using
-p 6006:6006(only for usage outside of Juypterlab). - Starting tensorboad with port binding within a container or Jupyterlab UI. Make sure the parameter
--bind_allis set.
docker exec -it [container-name/ID] bash
root@749eb1a06d60:~# tensorboard --logdir mylogdir --bind_all
%tensorboard --logdir logs/[logdir] --bind_all
- Writing the states and results in the tensorboard log-dir, as described in the tutorials for TensorFlow and PyTorch or in the Getting Started section
data/Getting_Started. If the port is exposed, tensorboard can be accessed in the browser on localhost:6006.
The GPU-libraries such as PyTorch and Tensorflow in custom/Docker.gpulibs must support the CUDA version and NVIDIA drivers on the host machine. Check out the compatibility lists for PyTorch and Tensorflow or search online for the explicit versions. In this setup, the NVIDIA Driver has version 530.30.02 and CUDA version 11.6.2 is used, which is compatible with Tensorflow 2.10 and PyTorch 1.12.
The host's CUDA version must be equal to or higher than that used by the container (set within custom/header.Dockerfile).
Check the host's version with nvcc --version and the version compatibilities
for CUDA-dependent packages as Pytorch
respectively Tensorflow previously.
Then modify, if supported, the CUDA-version (find all tags here)
in custom/header.Dockerfile to, e.g.:
the line:
FROM nvidia/cuda:X.Y-base-ubuntu20.04
Then re-generate, re-build and run the updated image. Note that a change in the first line of the Dockerfile will re-build the whole image.
./generate-Dockerfile.sh --slim  # generate the Dockerfile with only a python interpreter, --python-only is default
docker build -t gpu-jupyter .build/  # will take a while
docker run --gpus all -d -it -p 8848:8888 -v $(pwd)/data:/home/jovyan/work -e GRANT_SUDO=yes -e JUPYTER_ENABLE_LAB=yes -e NB_UID="$(id -u)" -e NB_GID="$(id -g)" --user root --restart always --name gpu-jupyter_1 gpu-jupyterThe docker-stacks is used as a submodule within .build/docker-stacks. Per default, the head of the commit is reset to a commit on which gpu-jupyter runs stable.
To set the docker-stacks to a specific version generate the Dockerfile with a specific docker-stacks commit, run:
./generate-Dockerfile.sh --commit c1c32938438151c7e2a22b5aa338caba2ec01da2To update the generated Dockerfile to the latest commit, run:
./generate-Dockerfile.sh --commit latestA new build can last some time and may consume a lot of data traffic. Note, that untested versions often result in a version conflict, as some files have to be adapted. Here are some examples of solutions:
-
Some file is not found:
Step 22/64 : COPY --chown="${NB_UID}:${NB_GID}" initial-condarc "${CONDA_DIR}/.condarc"
COPY failed: file not found in build context or excluded by .dockerignore: stat initial-condarc: file does not exist
→ Adapt
generate-Dockerfile.shso that it copiesinitial-condarcinto the working directory as it does with other files. Renamed files result in a similar issue and solution. -
The specified package version is not compatible with the drivers.
Step 56/64 : RUN pip install --upgrade pip &&     pip install --no-cache-dir "tensorflow==2.6.2" &&     pip install --no-cache-dir keras
 ---> Running in 7c5701a3d780
Requirement already satisfied: pip in /opt/conda/lib/python3.10/site-packages (22.1.2)
ERROR: Could not find a version that satisfies the requirement tensorflow==2.6.2 (from versions: 2.8.0rc0, 2.8.0rc1, 2.8.0, 2.8.1, 2.8.2, 2.9.0rc0, 2.9.0rc1, 2.9.0rc2, 2.9.0, 2.9.1)
ERROR: No matching distribution found for tensorflow==2.6.2
→ Just update the package to a version that is compatible, here tensorflow 2.8.2 was.
-
Branch
masteris not known:error: pathspec 'master' did not match any file(s) known to git.→ The default branch of docker-stacks were renamed from
mastertomain. Delete the subdirectory.build/docker-stacksand regenerate the the Dockerfile. General information on submodules can be found in this tutorial.
A Jupyter instance often requires data from other services. If that data source is containerized in Docker and sharing a port for communication shouldn't be allowed, e.g., for security reasons, then connecting the data source with GPU-Jupyter within a Docker Swarm is a great option!
This step requires a running Docker Swarm on a cluster or at least on this node. In order to register custom images in a local Docker Swarm cluster, a registry instance must be deployed in advance. Note that we are using port 5001, as many services use the default port 5000.
sudo docker service create --name registry --publish published=5001,target=5000 registry:2
curl 127.0.0.1:5001/v2/
This should output {}. \
Afterward, check if the registry service is available using docker service ls.
Additionally, GPU-Jupyter is connected to the data source via the same docker-network. Therefore, This network must be set to attachable in the source's docker-compose.yml:
services:
  data-source-service:
  ...
      networks:
      - default
      - datastack
  ...
networks:
  datastack:
    driver: overlay
    attachable: true
In this example,
- The docker stack was deployed in Docker swarm with the name elk (
docker stack deploy ... elk), - The docker network has the name datastack within the
docker-compose.ymlfile, - This network is configured to be attachable in the
docker-compose.ymlfile - and the docker network has the name elk_datastack, see the following output:
sudo docker network ls
# ...
# [UID]        elk_datastack                   overlay             swarm
# ...
The docker network name elk_datastack is used in the next step as a parameter.
Finally, GPU-Jupyter can be deployed in the Docker Swarm with the shared network, using:
./generate-Dockerfile.sh
./add-to-swarm.sh -p [port] -n [docker-network] -r [registry-port]
# e.g. ./add-to-swarm.sh -p 8848 -n elk_datastack -r 5001
where:
- -p: port specifies the port on which the service will be available.
- -n: docker-network is the name of the attachable network from the previous step, e.g., here it is elk_datastack.
- -r: registry port is the port that is published by the registry service, the default is
5000.
Now, GPU-jupyter will be accessible here on localhost:8848
with the default password gpu-jupyter and shares the network with the other data source, i.e.,
all ports of the data source will be accessible within GPU-Jupyter,
even if they aren't routed it the source's docker-compose file.
Check if everything works well using:
sudo docker service ps gpu_gpu-jupyter
docker service ps gpu_gpu-jupyter
To remove the service from the swarm, use:
./remove-from-swarm.sh-
Can't execute the bash scripts.
$ bash generate-Dockerfile.sh
generate-Dockerfile.sh: line 2: cd: $'/path/to/gpu-jupyter\r': No such file or directory
generate-Dockerfile.sh: line 3: $'\r': command not found
generate-Dockerfile.sh: line 9: $'\r': command not found
generate-Dockerfile.sh: line 11: syntax error near unexpected token `$'in\r''
generate-Dockerfile.sh: line 11: `while [[ "$#" -gt 0 ]]; do case $1 in
The reason for this issue is that the line breaks between Unix and Windows-based systems are different and in the current version different.
Solution: Change the line endings of the bash scripts. This can be done e.g. in the Notepad++ under Edit - EOL Conversion, or using
dos2unixsudo apt install dos2unix dos2unix generate-Dockerfile.sh
-
No GPU available - error The docker-compose start breaks with:
ERROR: for fc8d8dfbebe9_gpu-jupyter_gpu-jupyter_1  Cannot start service gpu-jupyter: OCI runtime create failed: container_linux.go:370: starting container process caused: process_linux.go:459: container init ca
used: Running hook #0:: error running hook: exit status 1, stdout: , stderr: nvidia-container-cli: initialization error: driver error: failed to process request: unknown
Solution: Check if the GPU is available on the host node via
nvidia-smiand run with the describeddocker-commands. If the error still occurs, so try there could be an issue that docker can't use the GPU. Please try this or similar tutorials on how to install the required drivers.
This project has the intention to create a robust image for CUDA-based GPU applications, which is built on top of the docker-stacks. Please help us to improve this project, by:
For commercial support, please contact b-data by email: support@b-data.ch.
b-data maintains its own CUDA-enabled JupyterLab docker stacks and tailors them to your needs, e.g.
- Integration of self-signed CA certificates to enable communication with web services on the intranet.
- Setting up the necessary environment variables so that everything works behind a corporate proxy server.
Additionally, the JupyterHub setup can be customised to allow
- authentication with AD/LDAP
- mounting CIFS/SMB file shares
and much more.