


Mobile Messaging SDK is designed and developed to easily enable push notification channel in your mobile application. In almost no time of implementation you get push notification in your application and access to the features of Infobip Mobile Apps Messaging. The document describes library integration steps. Additional information can be found in our Wiki.
- Xcode 15+
- Swift 4.2, Swift 5
- iOS 12.0+
This guide is designed to get you up and running with Mobile Messaging SDK integrated into your iOS application.
-
Make sure to setup application at Infobip portal, if you haven't already.
-
Configure your project to support Push Notifications:
- Click on "Capabilities", then turn on Push Notifications. Entitlements file should be automatically created by Xcode with set
aps-environmentvalue.
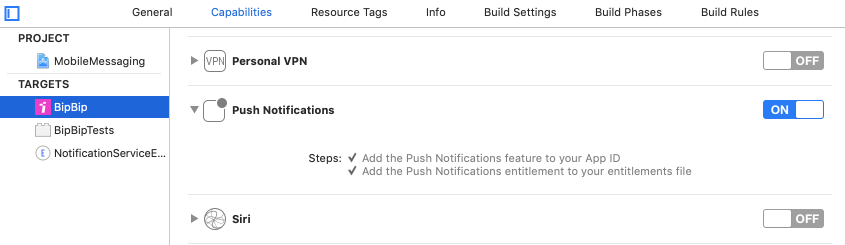
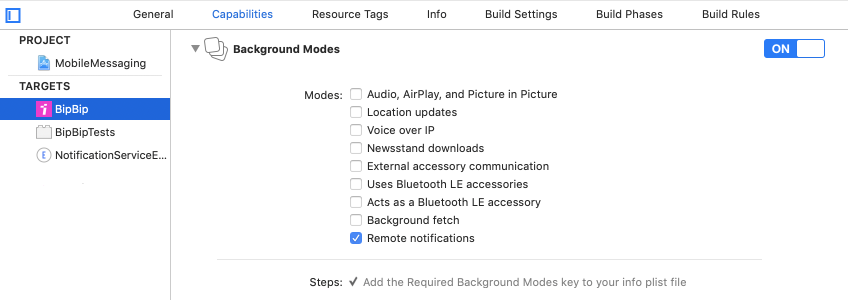
- Turn on Background Modes and check the Remote notifications checkbox.
- Click on "Capabilities", then turn on Push Notifications. Entitlements file should be automatically created by Xcode with set
-
Using CocoaPods, specify it in your
Podfile:source 'https://github.com/CocoaPods/Specs.git' platform :ios, '12.0' use_frameworks! pod 'MobileMessaging'
CocoaLumberjack logging used by default, in order to use other logging or switch it off follow this guide.
If you use Carthage, see Integration via Carthage guide.
-
Import the library into your AppDelegate file:
// Swift
import MobileMessaging
expand to see Objective-C code
@import MobileMessaging;
-
Start MobileMessaging service using your Infobip Application Code, obtained in step 1, and preferable notification type as parameters:
// Swift
func application(_ application: UIApplication, didFinishLaunchingWithOptions launchOptions: [UIApplication.LaunchOptionsKey : Any]? = nil) -> Bool {
    MobileMessaging.withApplicationCode(<#your application code#>, notificationType: <#for example MMUserNotificationType(options: [.alert, .sound])#>)?.start()
    ...
}
expand to see Objective-C code
- (BOOL)application:(UIApplication *)application didFinishLaunchingWithOptions:(NSDictionary *)launchOptions {
    MMUserNotificationType *userNotificationType = [[MMUserNotificationType alloc] initWithOptions:<#for example @[MMUserNotificationType.alert, MMUserNotificationType.sound]#>;
    [[MobileMessaging withApplicationCode: <#your application code#> notificationType: userNotificationType] start:nil];
    ...
}
In case you already use other Push Notifications vendor's SDK, add
withoutRegisteringForRemoteNotifications()to the start call:// Swift func application(_ application: UIApplication, didFinishLaunchingWithOptions launchOptions: [UIApplication.LaunchOptionsKey : Any]? = nil) -> Bool { MobileMessaging.withApplicationCode(<#your application code#>, notificationType: <#for example MMUserNotificationType(options: [.alert, .sound])#>)?.withoutRegisteringForRemoteNotifications()?.start() ... }
Please note that it is not very secure to keep your API key (Application Code is an API key in fact) hardcoded so if the security is a crucial aspect, consider obfuscating the Application Code string (we can recommend UAObfuscatedString for string obfuscation).
-
Add one line of code
MobileMessaging.didRegisterForRemoteNotificationsWithDeviceToken(deviceToken)to your AppDelegate methodapplication:didRegisterForRemoteNotificationsWithDeviceToken:in order to inform Infobip about the new device registered:// Swift func application(_ application: UIApplication, didRegisterForRemoteNotificationsWithDeviceToken deviceToken: Data) { MobileMessaging.didRegisterForRemoteNotificationsWithDeviceToken(deviceToken) // other push vendors might have their code here and handle a Device Token as well }
expand to see Objective-C code
- (void)application:(UIApplication *)application didRegisterForRemoteNotificationsWithDeviceToken:(NSData *)deviceToken {
    [MobileMessaging didRegisterForRemoteNotificationsWithDeviceToken:deviceToken];

    // other push vendors might have their code here and handle a Device Token as well
}
-
Add one line of code
MobileMessaging.didReceiveRemoteNotification(userInfo, fetchCompletionHandler: completionHandler)to your AppDelegate methodapplication:didReceiveRemoteNotification:fetchCompletionHandler:in order to send notification's delivery reports to Infobip:// Swift func application(_ application: UIApplication, didReceiveRemoteNotification userInfo: [AnyHashable : Any], fetchCompletionHandler completionHandler: @escaping (UIBackgroundFetchResult) -> Void) { MobileMessaging.didReceiveRemoteNotification(userInfo, fetchCompletionHandler: completionHandler) // other push vendors might have their code here and handle a remove notification as well }
expand to see Objective-C code
- (void)application:(UIApplication *)application didReceiveRemoteNotification:(NSDictionary *)userInfo fetchCompletionHandler:(void (^)(UIBackgroundFetchResult result))completionHandler {
    [MobileMessaging didReceiveRemoteNotification:userInfo fetchCompletionHandler:completionHandler];

    // other push vendors might have their code here and handle a remove notification as well
}
-
Integrate Notification Service Extension into your app in order to obtain:
- more accurate processing of messages and delivery stats
- support of rich notifications on the lock screen
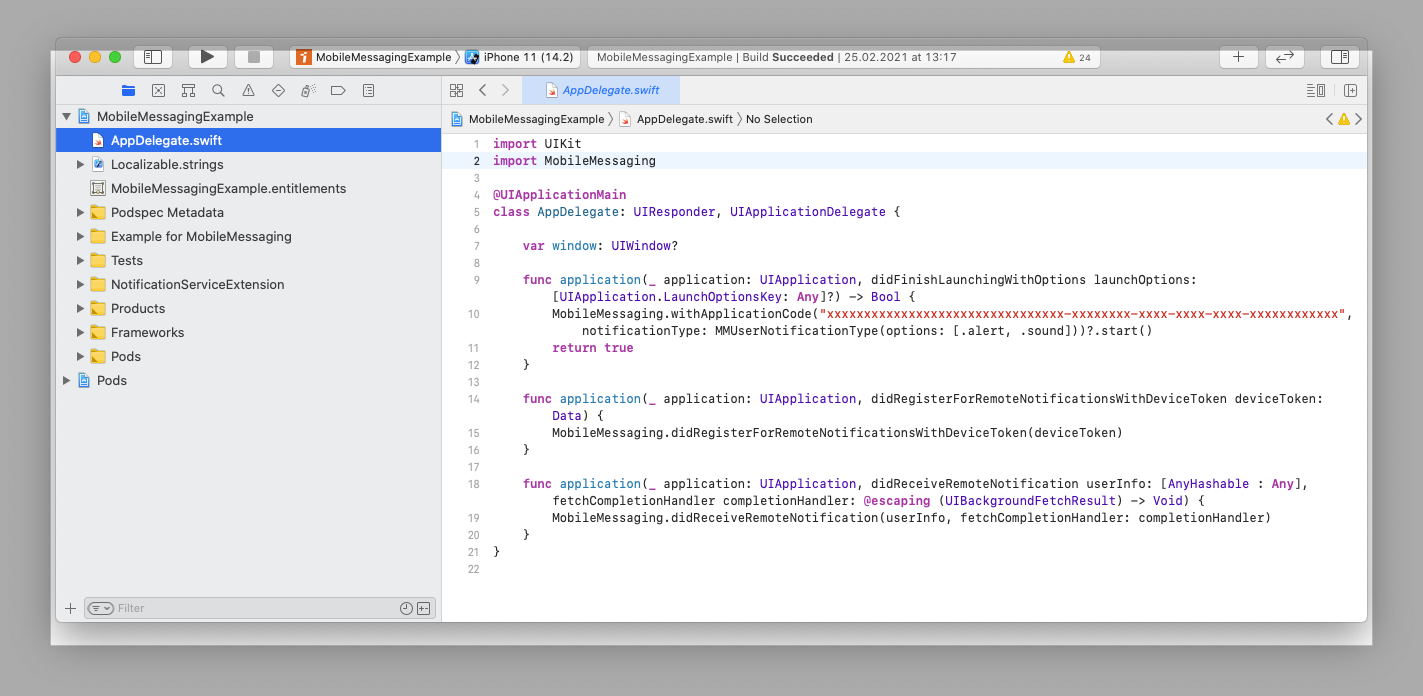
In case of a clean project, your AppDelegate.swift code should look like following:
If all the steps implemented correctly, run your application on a real device, you should see the logs in Xcode console confirming that the MobileMessaging SDK has been initialized succesfully and the device has been registered on APNS to receive Push messages:
2023-01-28 18:24:16:003 [MobileMessaging] ℹ️ SDK successfully initialized!
...
2023-01-28 18:25:44:144 [MobileMessaging] ℹ️ [APNS reg manager] Application did register with device token <...>
If you don't see any logs, set up the default logger before starting the SDK: MobileMessaging.logger = MMDefaultLogger(). Please note that the logs are only collected while your project is in "debug" configuration.
Please pay close attention to a Provisioning Profile that is used for your project build. It must match the APNs environment! If they don't, we'll invalidate the device push registration (more information here I don't receive push notifications!
Push notifications (if they are not in-app) are not displayed automatically when the app is on the foreground. For further information check FAQ - How to display messages when app is running in the foreground?.
NEXT STEPS: User profile
| If you have any questions or suggestions, feel free to send an email to support@infobip.com or create an issue. |
|---|