Use Aruco markers (binary square markers that can be used for camera pose estimation) to make an autonomous drone that cant detect markers, hover, and do cool stuff!
Who doesn't love drones? Maybe the ATF, but that's beside the point. I think autonomous computer vision projects are pretty cool and python libraries such as OpenCV make it semi-easy to have object tracking with just a few lines of code.
opencv-contrib - OpenCV-contrib is needed because regular open-cv does not have the aruco module, which will be needed for this project. Unless you are using the Conda environment, install py-OpenCV, which will contain the aruco module as well.
pip install opencv-contrib-python
numPy - numPy should be installed with OpenCV, so there is no need to install it explicitly, but if for some reason it doesn't install, you can install it with the following command.
pip install NumPy
djiTelloPy - Python wrapper to interact with the Ryze Tello drone using the official Tello API. If you're not using a Tello drone, this package is not required.
pip install djitellopy
When trying to use cameras for computer vision applications, the camera you are using needs to be calibrated so that the pose estimations and distance calculations can be as accurate as possible. Naturally, all cameras have a distortion effect on them, some cameras may pull the picture at the frame, and some may squeeze the image at the center. To fix this, we need to counteract the image distortion; luckily, OpenCV makes this quite easy for us using the calibrateCamera() function.
There are multiple methods of calibrating a camera, we will be using the checkerboard method.
Checkerboards for calibration can be obtained at this website https://markhedleyjones.com/projects/calibration-checkerboard-collection
This is the exact checkerboard I used.
To calibrate the camera, we need around 100 - 200 images of the checkerboard at lots of different angles and different distances. So, there is a script called CameraCap.py. If you're using a Tello drone, everything is already set up to run; all you need to do is connect the drone to your PC's wifi and run the script.
If you are not using a Tello drone, comment out the drone camera configs and uncomment the code block that sets up the camera for a native camera device.
# If not using a DJI Tello drone, comment this code block out, and uncomment code below
drone = tello.Tello()
drone.connect()
print(drone.get_battery())
drone.streamon()

# If using a webcam or a raspberry pi, uncomment this for camera setup
'''
cam = cv2.VideoCapture(0)
cam.set(cv.CAP_PROP_FRAME_WIDTH, 640)
cam.set(cv.CAP_PROP_FRAME_WIDTH, 480)
cam.set(cv.CAP_PROP_FPS, 30)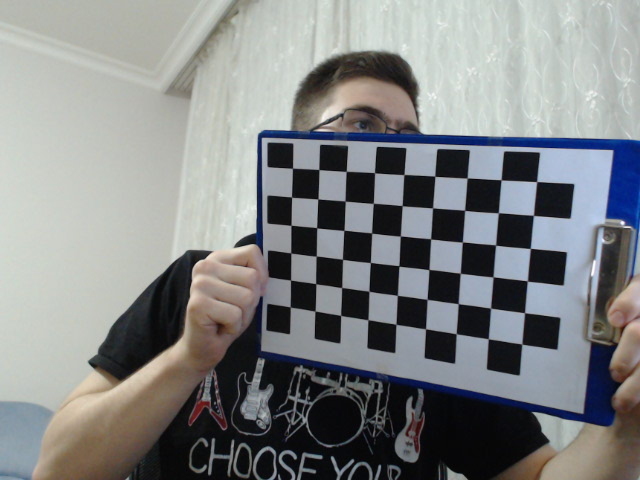
'''You have two options for deciding how you want to take the pictures. You can either paste the checkerboard on a board (refer to the image below) for maximum contrast. Then hold the board in your hands and move it around the camera frame like the guy pictured below ⬇️
Alternatively, you can put the checkerboard on a wall, and move the camera around the checkerboard. If you use this method make sure the surface the checkerboard is on has enough contrast so the calibration doesn't mistake the surroundings as part of the checkerboard.
When you think you have taken enough images, press "q" on your keyboard to terminate the script, and in the working directory, you will see all of the images the camera took.
After going through all your images and making sure they are high quality, run the distortion calibration script. Make sure your images are in the same working directory as the script. If they are not, edit the path in the script to reflect the actual location.
# Pulls all .jpg files in working directory
list_images = glob.glob('*.jpg')
When you run the script you will see drawing rainbow lines onto the checkerboard, once this fisnishes the window will close, but the script is not done running. Depending on the number of images you have the script will compute the distortion calibration and write it to a .npy file. When the program ends you will see printed values in the console. The program should look like this:
