TL;DR: Motivated partly by FLAN and partly by InstructPix2Pix, we explore a way to instruction-tune Stable Diffusion. This allows us to prompt our model using an input image and an “instruction”, such as - Apply a cartoon filter to the natural image.
You can read our blog post to know more details.
🐶 Motivation
📷 Data preparation
💺 Training
🎛 Models, datasets, demo
⭐️ Inference
🧭 Results
🤝 Acknowledgements
Instruction-tuning is a supervised way of teaching language models to follow instructions to solve a task. It was introduced in Fine-tuned Language Models Are Zero-Shot Learners (FLAN) by Google. From recent times, you might recall works like Alpaca and FLAN V2, which are good examples of how beneficial instruction-tuning can be for various tasks.
On the other hand, the idea of teaching Stable Diffusion to follow user instructions to perform edits on input images was introduced in InstructPix2Pix: Learning to Follow Image Editing Instructions.
Our motivation behind this work comes partly from the FLAN line of works and partly from InstructPix2Pix. We wanted to explore if it’s possible to prompt Stable Diffusion with specific instructions and input images to process them as per our needs.
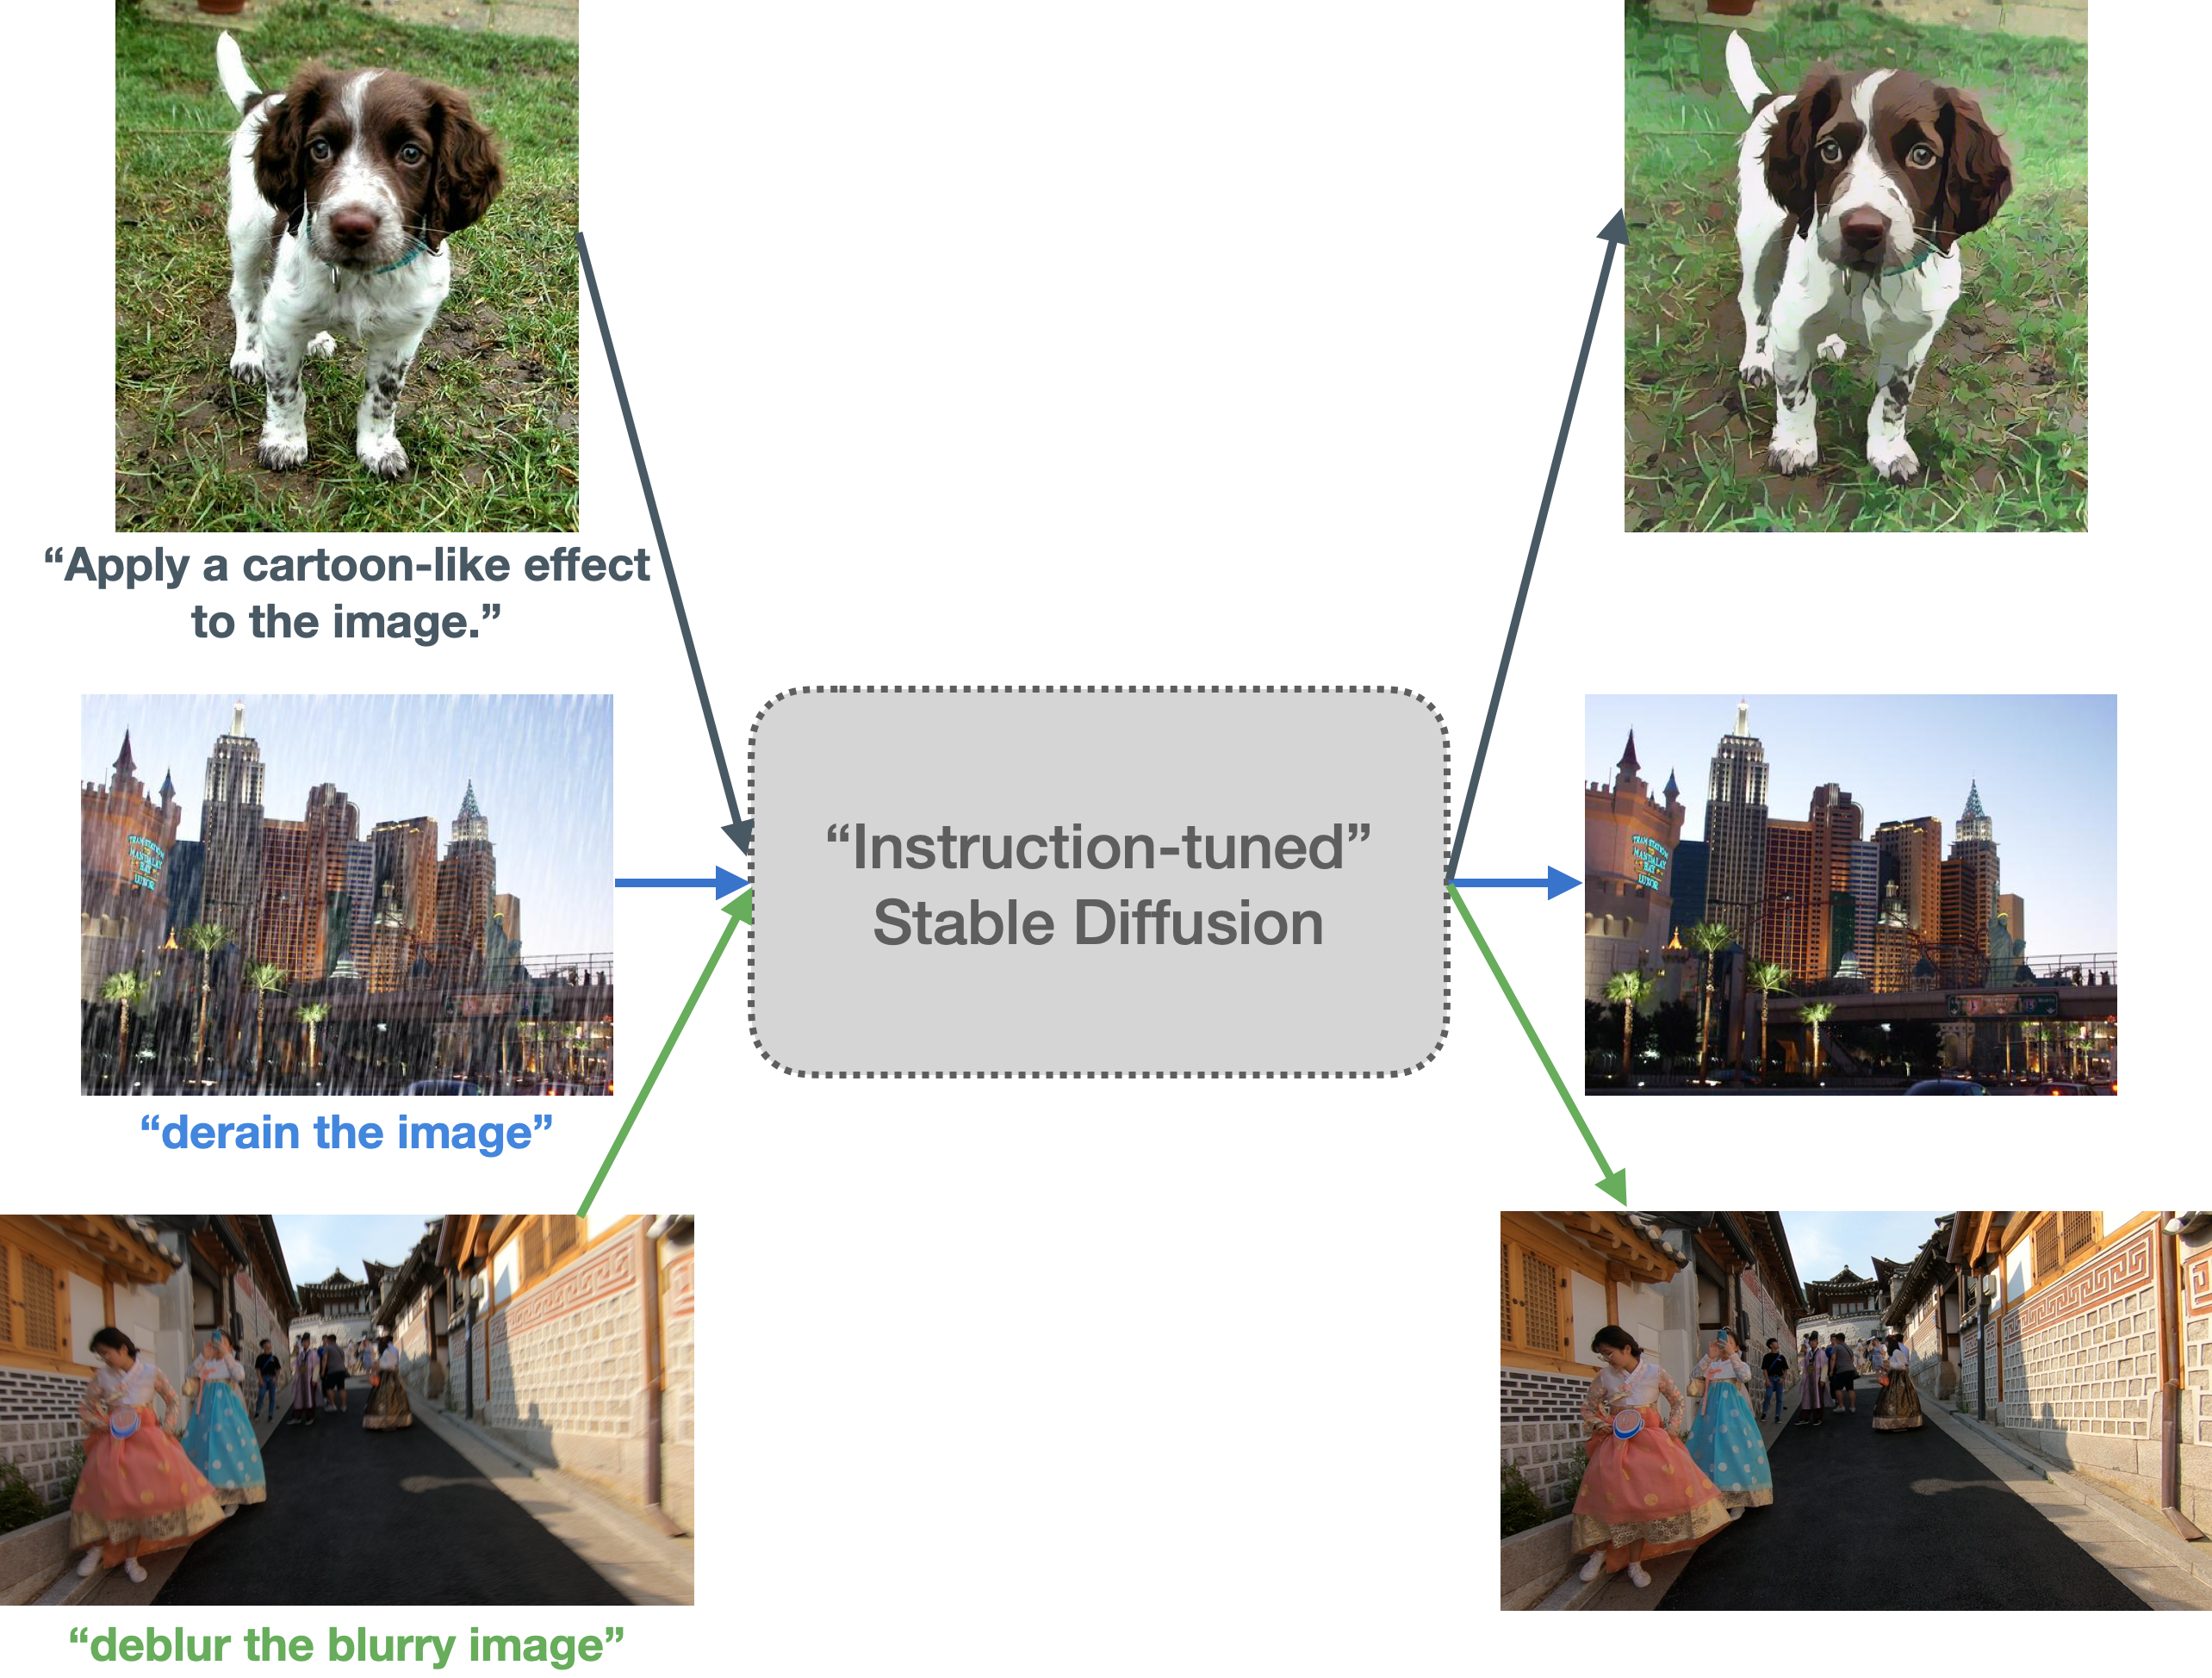
Our main idea is to first create an instruction prompted dataset (as described in our blog and then conduct InstructPix2Pix style training. The end objective is to make Stable Diffusion better at following specific instructions that entail image transformation related operations.
Our data preparation process is inspired by FLAN. Refer to the sections below for more details.
- Cartoonization: Refer to the
data_preparationdirectory. - Low-level image processing: Refer to the dataset card.
Tip
In case of using custom datasets, one needs to configure the dataset as per their choice as long as you maintain the format presented here. You might have to configure your dataloader and dataset class in case you don't want to make use of the datasets library. If you do so, you might have to adjust the training scripts accordingly.
We recommend using a Python virtual environment for this. Feel free to use your favorite one here.
We conducted our experiments with PyTorch 1.13.1 (CUDA 11.6) and a single A100 GPU. Since PyTorch installation can be hardware-dependent, we refer you to the official docs for installing PyTorch.
Once PyTorch is installed, we can install the rest of the dependencies:
pip install -r requirements.txtAdditionally, we recommend installing xformers as well for enabling memory-efficient training.
💡 Note: If you're using PyTorch 2.0 then you don't need to additionally install xformers. This is because we default to a memory-efficient attention processor in Diffusers when PyTorch 2.0 is being used.
Our training code leverages 🧨 diffusers, 🤗 accelerate, and 🤗 transformers. In particular, we extend this training example to fit our needs.
export MODEL_ID="runwayml/stable-diffusion-v1-5"
export DATASET_ID="instruction-tuning-sd/cartoonization"
export OUTPUT_DIR="cartoonization-scratch"

accelerate launch --mixed_precision="fp16" train_instruct_pix2pix.py \
  --pretrained_model_name_or_path=$MODEL_ID \
  --dataset_name=$DATASET_ID \
  --use_ema \
  --enable_xformers_memory_efficient_attention \
  --resolution=256 --random_flip \
  --train_batch_size=2 --gradient_accumulation_steps=4 --gradient_checkpointing \
  --max_train_steps=15000 \
  --checkpointing_steps=5000 --checkpoints_total_limit=1 \
  --learning_rate=5e-05 --lr_warmup_steps=0 \
  --mixed_precision=fp16 \
  --val_image_url="https://hf.co/datasets/diffusers/diffusers-images-docs/resolve/main/mountain.png" \
  --validation_prompt="Generate a cartoonized version of the natural image" \
  --seed=42 \
  --output_dir=$OUTPUT_DIR \
  --report_to=wandb \
  --push_to_hub
💡 Note: Following InstructPix2Pix, we train on the 256x256 resolution and that doesn't seem to affect the end quality too much when we perform inference with the 512x512 resolution.
Once the training successfully launched, the logs will be automatically tracked using Weights and Biases. Depending on how you specified the checkpointing_steps and the max_train_steps, there will be intermediate checkpoints too. At the end of training, you can expect a directory (namely OUTPUT_DIR) that contains the intermediate checkpoints and the final pipeline artifacts.
If --push_to_hub is specified, the contents of OUTPUT_DIR will be pushed to a repository on the Hugging Face Hub.
Here is an example run page on Weights and Biases. Here is an example of how the pipeline repository would look like on the Hugging Face Hub.
export MODEL_ID="timbrooks/instruct-pix2pix"
export DATASET_ID="instruction-tuning-sd/cartoonization"
export OUTPUT_DIR="cartoonization-finetuned"

accelerate launch --mixed_precision="fp16" finetune_instruct_pix2pix.py \
  --pretrained_model_name_or_path=$MODEL_ID \
  --dataset_name=$DATASET_ID \
  --use_ema \
  --enable_xformers_memory_efficient_attention \
  --resolution=256 --random_flip \
  --train_batch_size=2 --gradient_accumulation_steps=4 --gradient_checkpointing \
  --max_train_steps=15000 \
  --checkpointing_steps=5000 --checkpoints_total_limit=1 \
  --learning_rate=5e-05 --lr_warmup_steps=0 \
  --mixed_precision=fp16 \
  --val_image_url="https://hf.co/datasets/diffusers/diffusers-images-docs/resolve/main/mountain.png" \
  --validation_prompt="Generate a cartoonized version of the natural image" \
  --seed=42 \
  --output_dir=$OUTPUT_DIR \
  --report_to=wandb \
--push_to_hubexport MODEL_ID="runwayml/stable-diffusion-v1-5"
export DATASET_ID="instruction-tuning-sd/low-level-image-proc"
export OUTPUT_DIR="low-level-img-proc-scratch"
accelerate launch --mixed_precision="fp16" train_instruct_pix2pix.py \
--pretrained_model_name_or_path=$MODEL_ID \
--dataset_name=$DATASET_ID \
--original_image_column="input_image" \
--edit_prompt_column="instruction" \
--edited_image_column="ground_truth_image" \
--use_ema \
--enable_xformers_memory_efficient_attention \
--resolution=256 --random_flip \
--train_batch_size=2 --gradient_accumulation_steps=4 --gradient_checkpointing \
--max_train_steps=15000 \
--checkpointing_steps=5000 --checkpoints_total_limit=1 \
--learning_rate=5e-05 --lr_warmup_steps=0 \
--mixed_precision=fp16 \
--val_image_url="https://hf.co/datasets/sayakpaul/sample-datasets/resolve/main/derain_the_image_1.png" \
--validation_prompt="Derain the image" \
--seed=42 \
--output_dir=$OUTPUT_DIR \
--report_to=wandb \
--push_to_hubexport MODEL_ID="timbrooks/instruct-pix2pix"
export DATASET_ID="instruction-tuning-sd/low-level-image-proc"
export OUTPUT_DIR="low-level-img-proc-finetuned"
accelerate launch --mixed_precision="fp16" finetune_instruct_pix2pix.py \
--pretrained_model_name_or_path=$MODEL_ID \
--dataset_name=$DATASET_ID \
--original_image_column="input_image" \
--edit_prompt_column="instruction" \
--edited_image_column="ground_truth_image" \
--use_ema \
--enable_xformers_memory_efficient_attention \
--resolution=256 --random_flip \
--train_batch_size=2 --gradient_accumulation_steps=4 --gradient_checkpointing \
--max_train_steps=15000 \
--checkpointing_steps=5000 --checkpoints_total_limit=1 \
--learning_rate=5e-05 --lr_warmup_steps=0 \
--mixed_precision=fp16 \
--val_image_url="https://hf.co/datasets/sayakpaul/sample-datasets/resolve/main/derain_the_image_1.png" \
--validation_prompt="Derain the image" \
--seed=42 \
--output_dir=$OUTPUT_DIR \
--report_to=wandb \
--push_to_hub- instruction-tuning-sd/scratch-low-level-img-proc
- instruction-tuning-sd/scratch-cartoonizer
- instruction-tuning-sd/cartoonizer
- instruction-tuning-sd/low-level-img-proc
Try out the models interactively WITHOUT any setup: Demo
import torch
from diffusers import StableDiffusionInstructPix2PixPipeline
from diffusers.utils import load_image

model_id = "instruction-tuning-sd/cartoonizer"
pipeline = StableDiffusionInstructPix2PixPipeline.from_pretrained(
    model_id, torch_dtype=torch.float16, use_auth_token=True
).to("cuda")

image_path = "https://hf.co/datasets/diffusers/diffusers-images-docs/resolve/main/mountain.png"
image = load_image(image_path)

image = pipeline("Cartoonize the following image", image=image).images[0]
image.save("image.png")import torch
from diffusers import StableDiffusionInstructPix2PixPipeline
from diffusers.utils import load_image
model_id = "instruction-tuning-sd/low-level-img-proc"
pipeline = StableDiffusionInstructPix2PixPipeline.from_pretrained(
model_id, torch_dtype=torch.float16, use_auth_token=True
).to("cuda")
image_path = "https://hf.co/datasets/sayakpaul/sample-datasets/resolve/main/derain%20the%20image_1.png"
image = load_image(image_path)
image = pipeline("derain the image", image=image).images[0]
image.save("image.png")💡 Note: Since the above pipelines are essentially of type
StableDiffusionInstructPix2PixPipeline, you can customize several arguments that the pipeline exposes. Refer to the official docs for more details.


Refer to our blog post for more discussions on results and open questions.
Thanks to Alara Dirik and Zhengzhong Tu for the helpful discussions.
@article{
  Paul2023instruction-tuning-sd,
  author = {Paul, Sayak},
  title = {Instruction-tuning Stable Diffusion with InstructPix2Pix},
  journal = {Hugging Face Blog},
  year = {2023},
  note = {https://huggingface.co/blog/instruction-tuning-sd},
}