Runs a ceiling sculpture using a Raspberry Pi as a master and multiple Arduinos as slaves. Thanks to the way the code is written, it's trivial to adapt code for any project that uses a text ui and cvs to send commands to as many Arduinos as you want!
Because the code is heavily commented, the focus of this README will be to get the code installed and then how to use the text ui to send commands to the Arduinos.
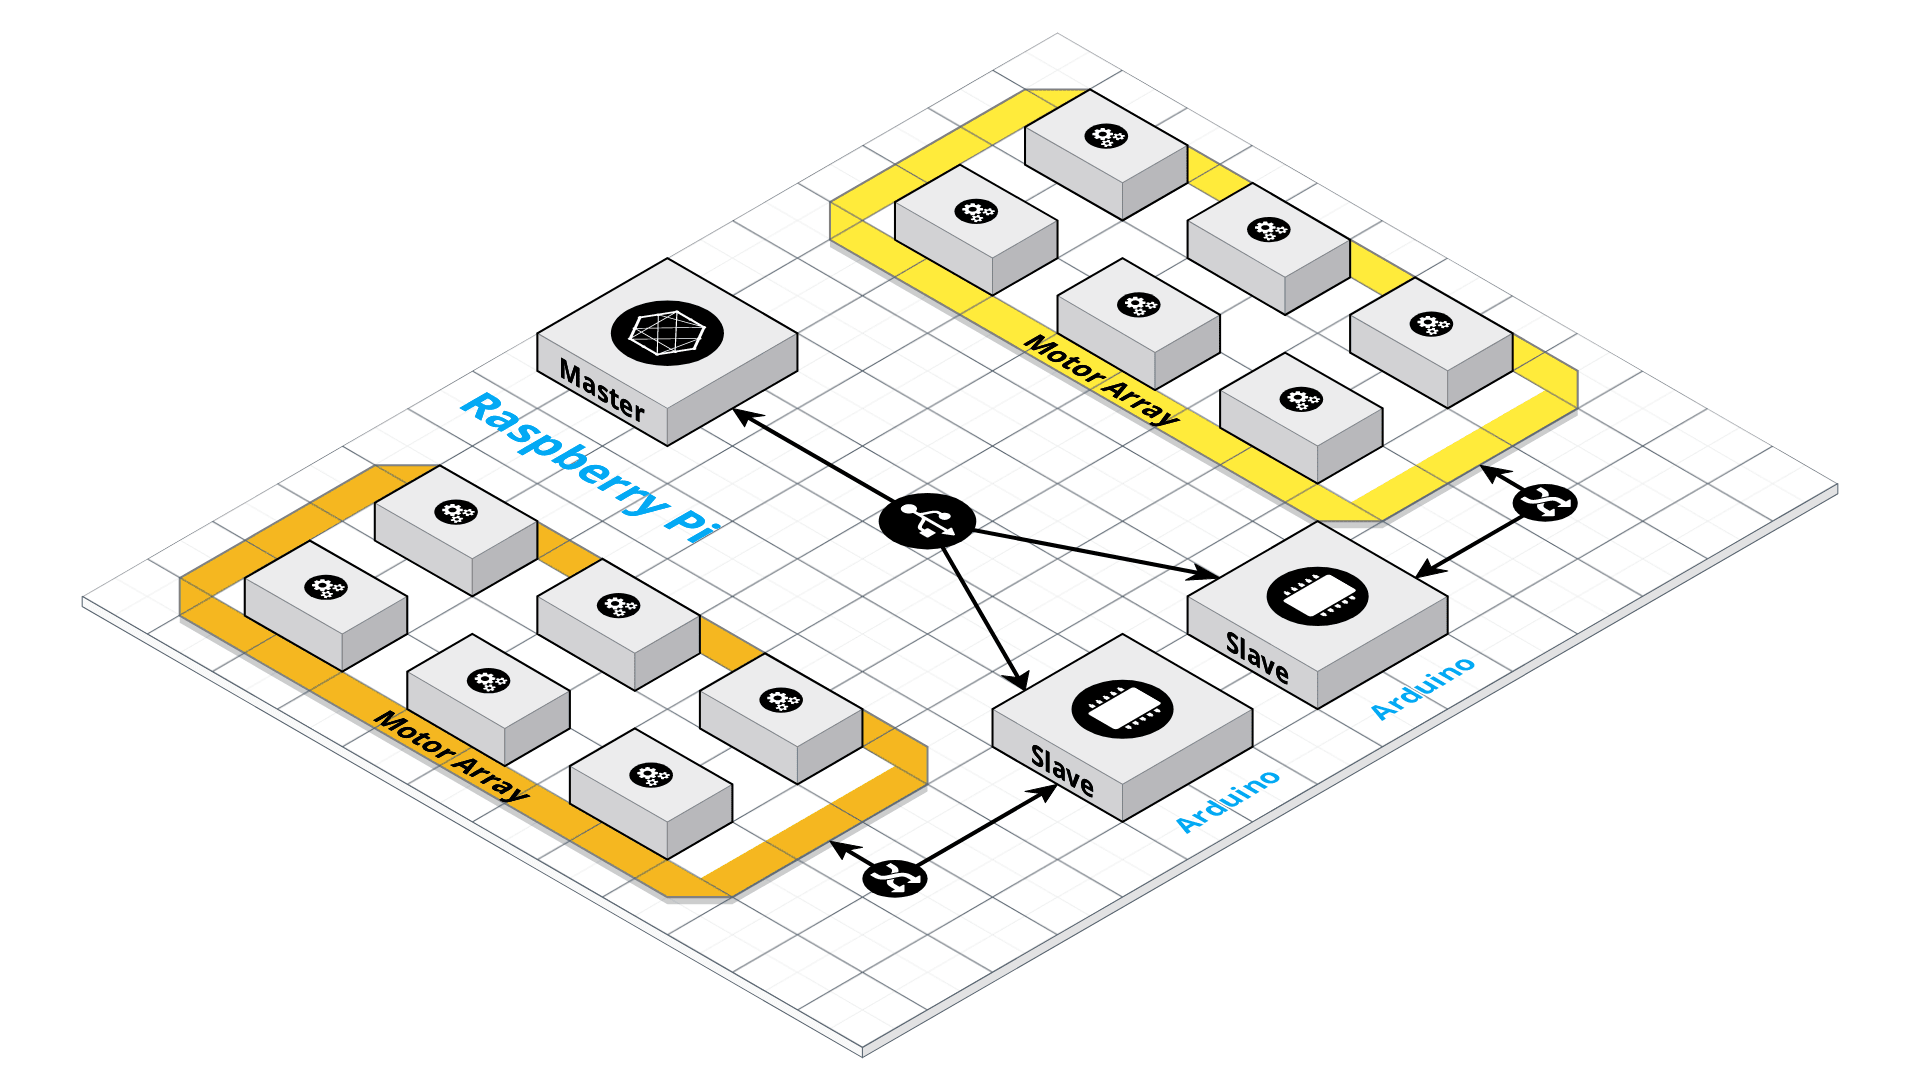
Entire system
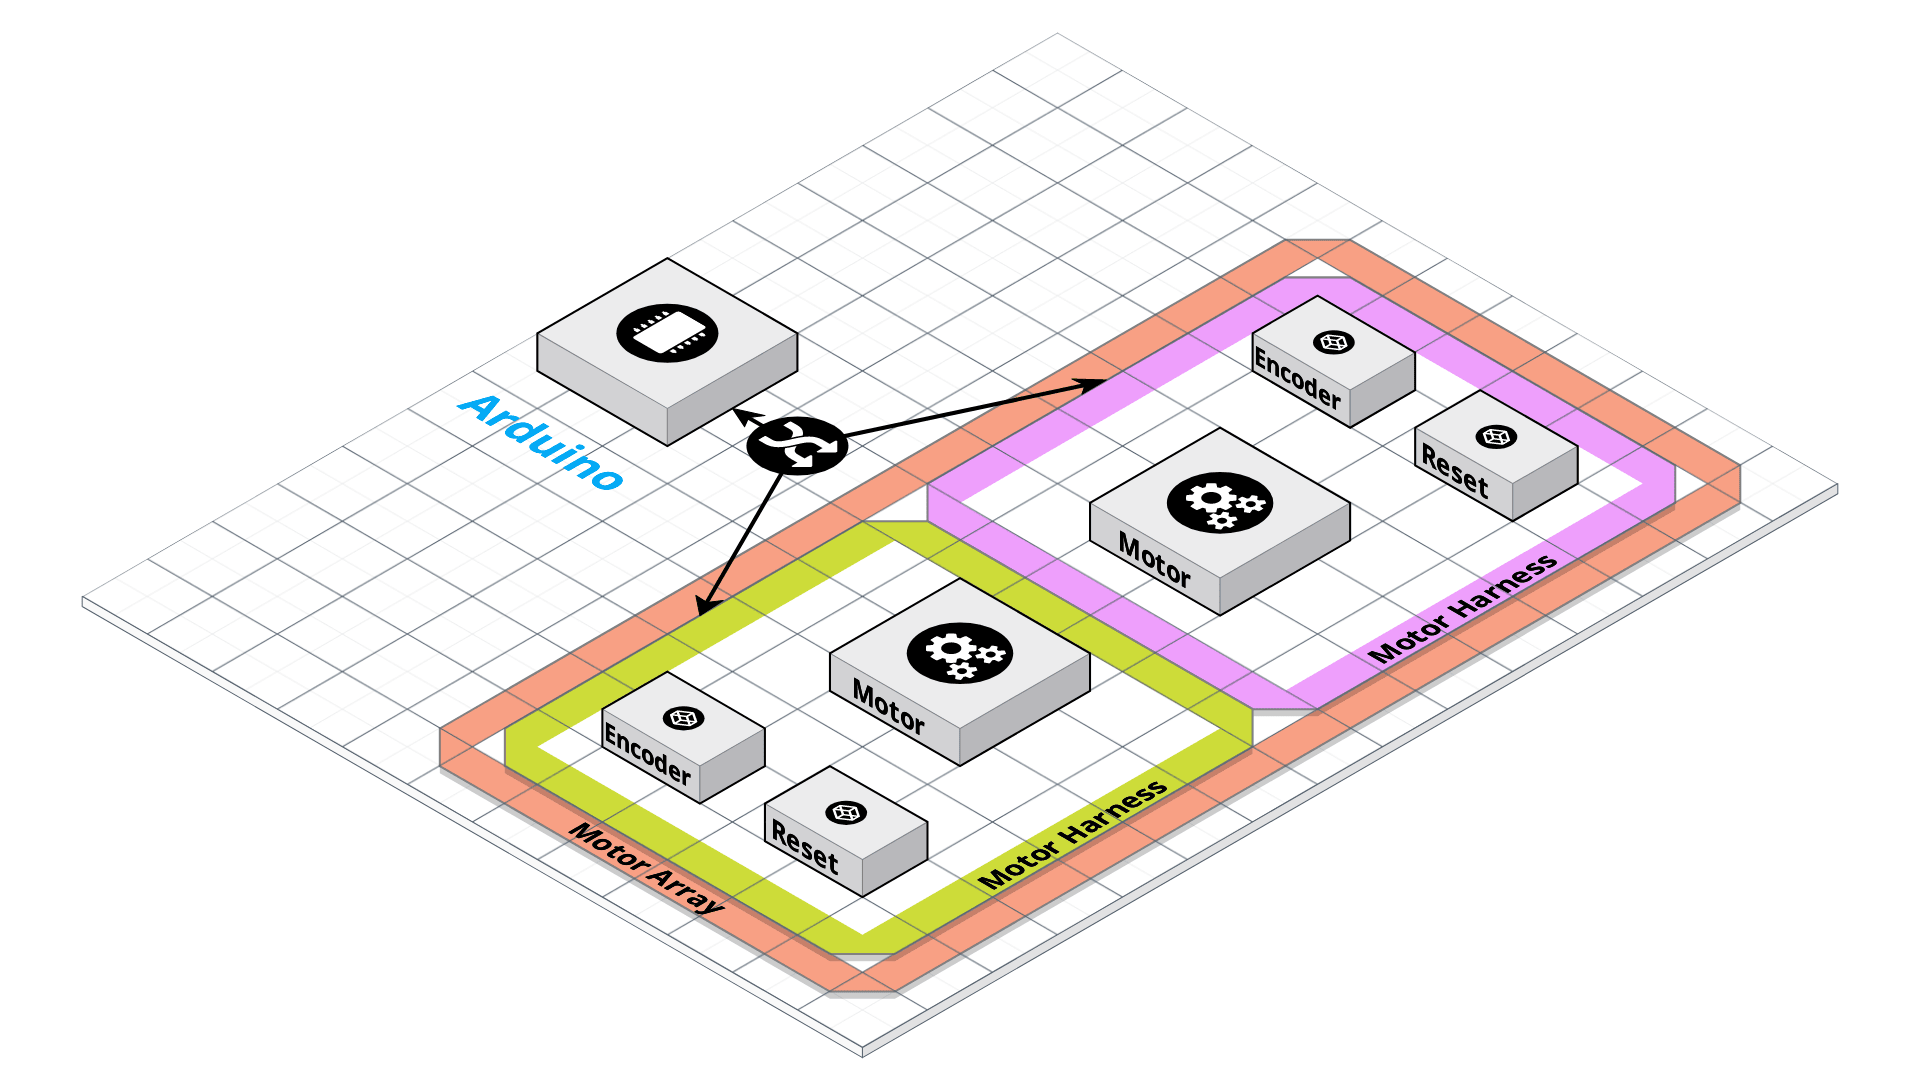
Close up of an motor array
In the repo you will find the Arduino code under arduino/arduino.ino. Open this in the Arduino IDE or CLI and flash to the devices you are using.

Steps using the Arduino CLI
There are only a few variables that can to be modified. Note that in this project and array refers to the combination of an Arduino and the motors that are connected to it. Each motor consists of a servo motor, and encoder switch, and a reset switch.
| Variable | Default | Description |
|---|---|---|
| DEBOUNCE_TIME | 0.4 | modifies the debounce time of the switches in the encoder. It is an arbitrary number and changed depending on the switches used for the encoder and reset |
| ARRAY_NUMBER | 0 | every array in the installation must have a unique array number that is between 0 and MAX_ARRAY_NUMBER (set on the Raspberry Pi) |
| NUMBER_OF_MOTORS | 1 | number of motors that you want to connect to this array |
| NUMBER_OF_MOTORS_MOVING | 1 | the execution of the commands is staggered/ cascaded from motor number 0 to NUMBER_OF_MOTORS. This is done to limit the amount of power being drawn at any one time |
| TIMEOUT | 50000 | this number counts the number of loops before the array returns a timeout error to the raspberry pi. The mount of time a loop takes is arbitrary and this number should be adjusted depending on what you need |
| IGNORE_INPUT_TIME | 150 | once the reset is hit we ignore inputs from the encoder switch for a certain number of loops. This is done so we skip an edge when moving down one turn from a reset event |
| ports | {array} | array that contains the mapping of port number, function, and motor number |
The Raspberry Pi setup is mostly automated using the script found at raspberry-pi/image-setup/firstboot.sh. In the current setup I have an Raspberry connected to an Adafruit PiTFT Plus screen (https://www.adafruit.com/product/2298). If you aren't using the screen you can comment out those parts of the firstboot.sh script. Also you can comment out the parts where it sets up the /raspberry-pi/gui.py file for the screen.
Note: The firstboot.sh pulls files from Github when running. The default is to pull from https://raw.githubusercontent.com/himalayanelixir/arduino-pi-ceiling-sculpture/master/ change this if you want to pull from your own repo.
The best way to get everything working properly is to follow these steps:
- Download the latest image from https://github.com/nmcclain/raspberian-firstboot/releases
- Use etcher to write to the SD card (https://www.balena.io/etcher/)
- Copy over
raspberry-pi/image-setup/firstboot.shandraspberry-pi/image-setup/wpa_supplicant.confto boot partition of SD card. Remember to edit thewpa_supplicant.conffile with the details for your wifi network - Put the SD card into Raspberry Pi and boot. This will take a while but shouldn't take more than 30 mins. If it does, something probably went wrong.
It is important to note that firstboot.sh configures UFW (Uncomplicated Firewall) to block all outgoing and incoming network connections other than port 22 (SSH) from 192.168.1.0/24 (local network). This is done since we don't want the Raspberry Pi being accessed outside the local network or to pull updates which might break the applications. To connect to disable UFW run sudo ufw disable and enable using sudo ufw enable.
There are a few variables that can be changed.
| Variable | Default | Description |
|---|---|---|
| MAX_TURNS | 10 | maximum number of turns a motor can take from 0 position used when linting csv files |
| MAX_NUMBER_OF_ARRAYS | 4 | maximum number of arrays allowed. Used then linting csv files |
| MAX_NUMBER_OF_MOTORS | 10 | maximum number of motors allowed. Used when linting csv file |
| USB_PATH | "/dev/ttyU*" | path the code looks for Arduinos at. All USB devices found will be considered to be Arduinos. |
| DESIRED_STATE_FILENAME | "desired-state.csv" | CSV file we are using to store our desired state for the ceiling |
| CURRENT_STATE_FILENAME | "current-state.csv" | CSV file we are using to store the current state of the ceiling |
Once the Arduinos are flashed and the Raspberry Pi is setup you plug the Arduinos into the Raspberry Pi. When you SSH into the Raspberry Pi using the pi user controller.pi will automatically run.
The messages between the Raspberry Pi and the Arduinos are formatted in strings. For example the string <Up,1,Down,1> will tell the Arduino to move motor 0 up one turn and move motor 1 down 1 turn. You can even try this using the serial monitor in the Arduino IDE.
controller.py uses two CSVs to figure out what messages to send to the Arduinos. desired-state.csv contains a CVS which is used by the user to specify how many turns from 0 they want each motor to be at.
current-state.csv contains the data on where each motor is currently. Both files are linted for size and contents before they are diffed and instructions are created. Any values that are out of the range of MAX_NUMBER_OF_MOTORS and MAX_NUMBER_OF_ARRAYS will be dropped. Any values that are blank, not integers, or don't exist will be filled with zeros. Values that are to large and too small will be replaced with MAX_TURNS or zero accordingly.
Running controller.py