


![]()
HomeWidget is a Plugin to make it easier to create HomeScreen Widgets on Android and iOS. HomeWidget does not allow writing Widgets with Flutter itself. It still requires writing the Widgets with native code. However, it provides a unified Interface for sending data, retrieving data and updating the Widgets
| iOS | Android |
|---|---|
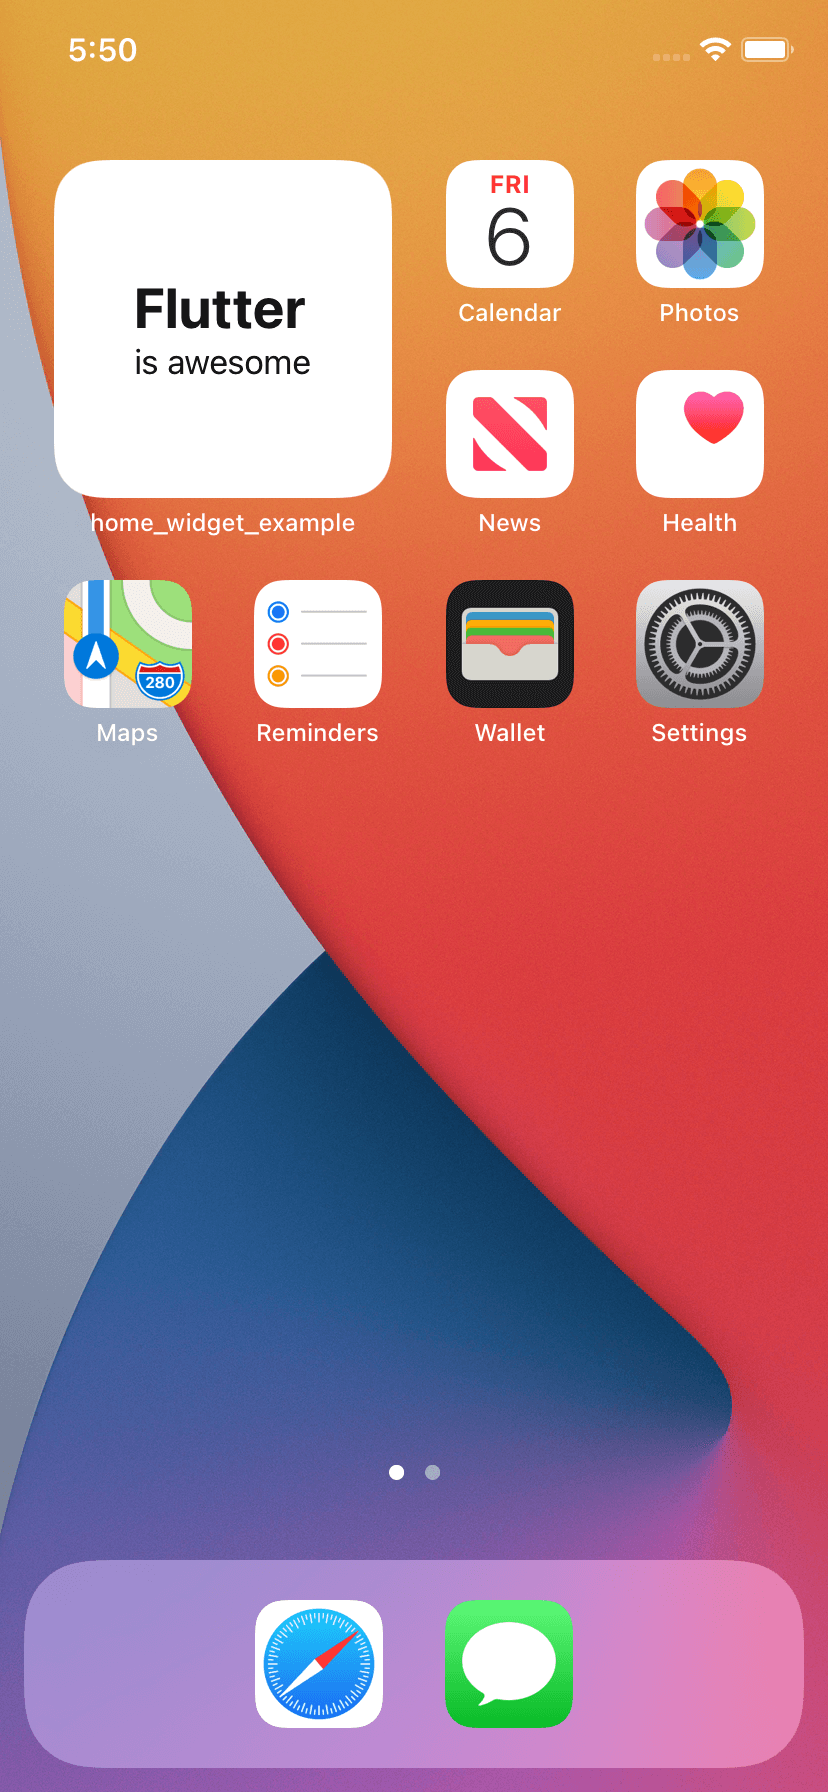 |
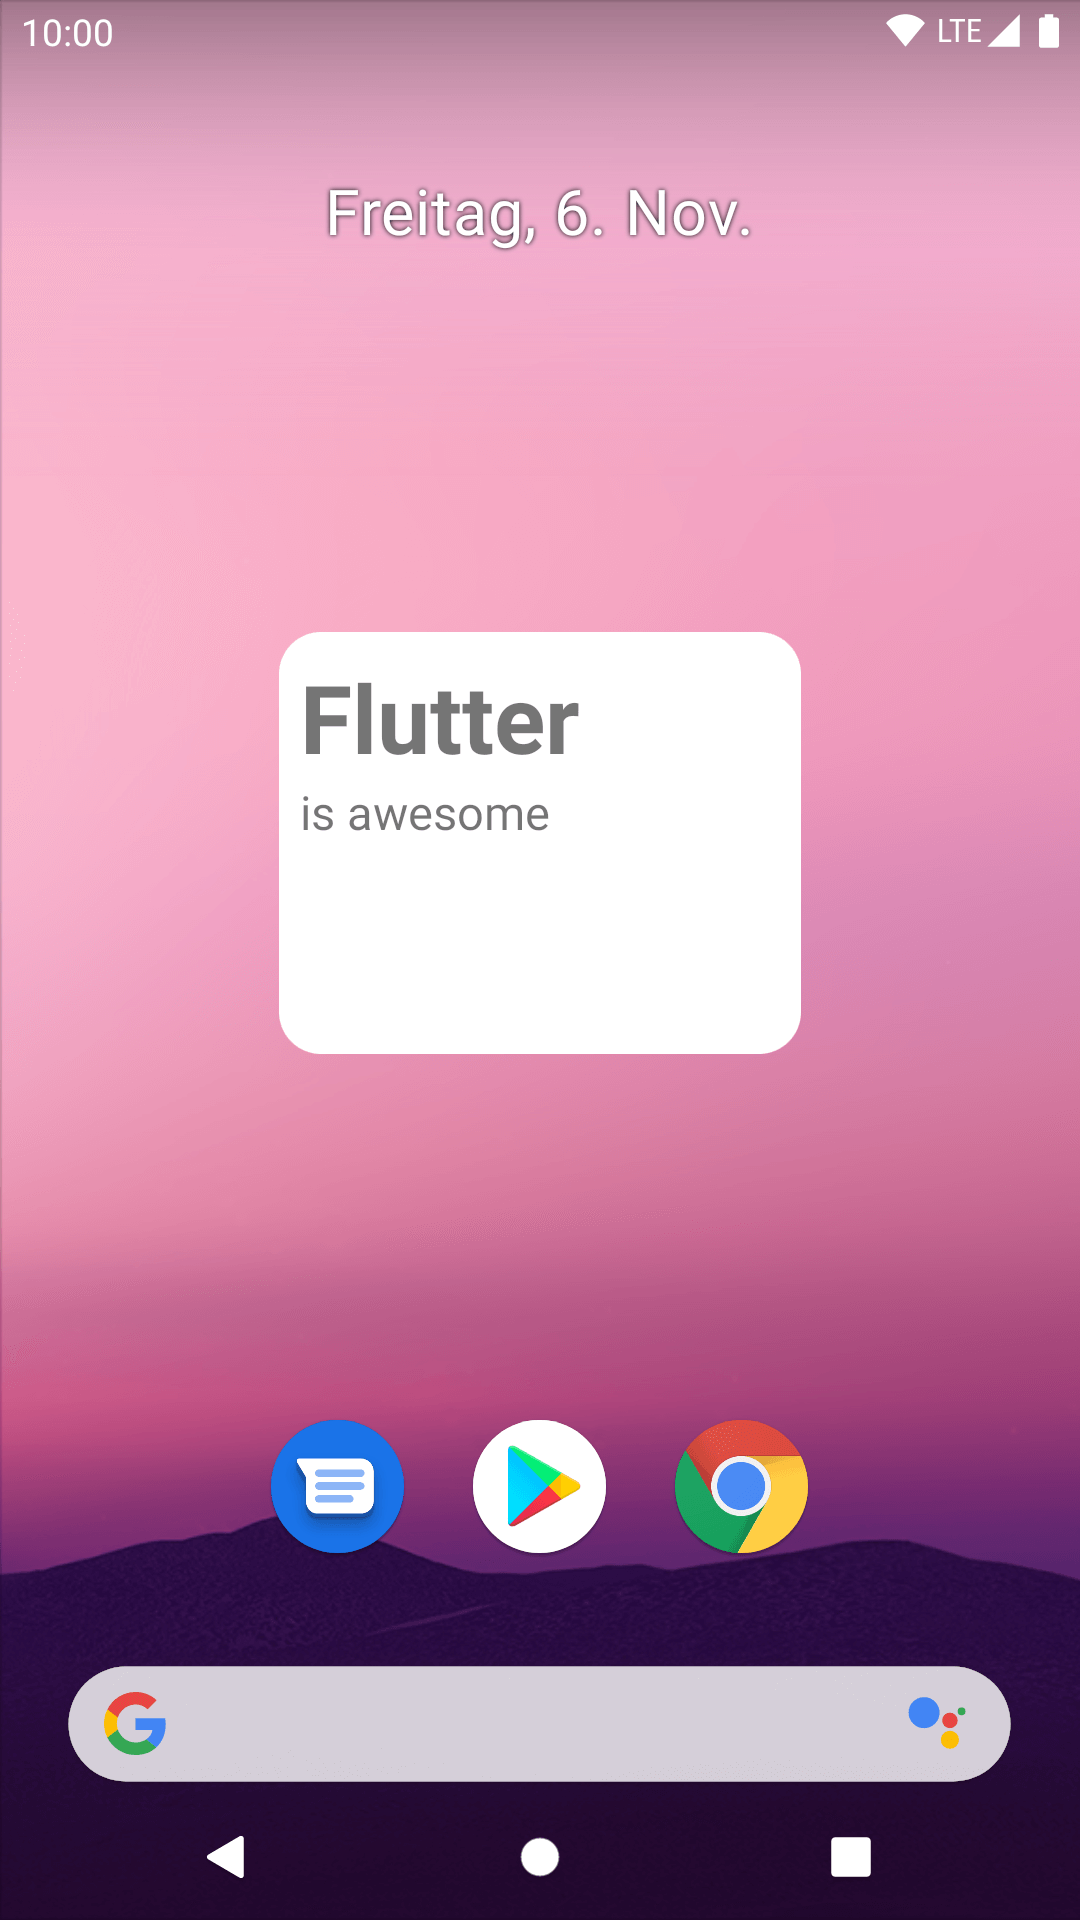 |
In order to work correctly there needs to be some platform specific setup. Check below on how to add support for Android and iOS
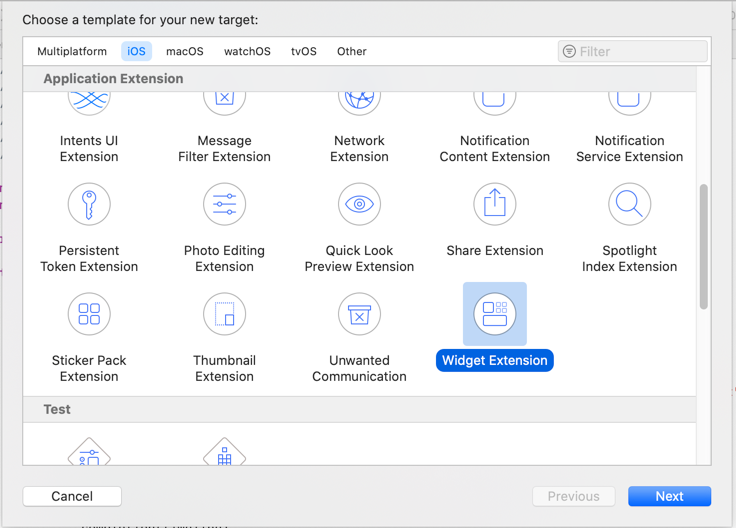
iOS
Add a widget extension by going File > New > Target > Widget Extension
You need to add a groupId to the App and the Widget Extension
Note: in order to add groupIds you need a paid Apple Developer Account
Go to your Apple Developer Account and add a new group
Add this group to you Runner and the Widget Extension inside XCode Signing & Capabilities > App Groups > +

(To swap between your App, and the Extension change the Target)
This step is optional, this will sync the widget extension build version with your app version, so you don't get warnings of mismatch version from App Store Connect when uploading your app.
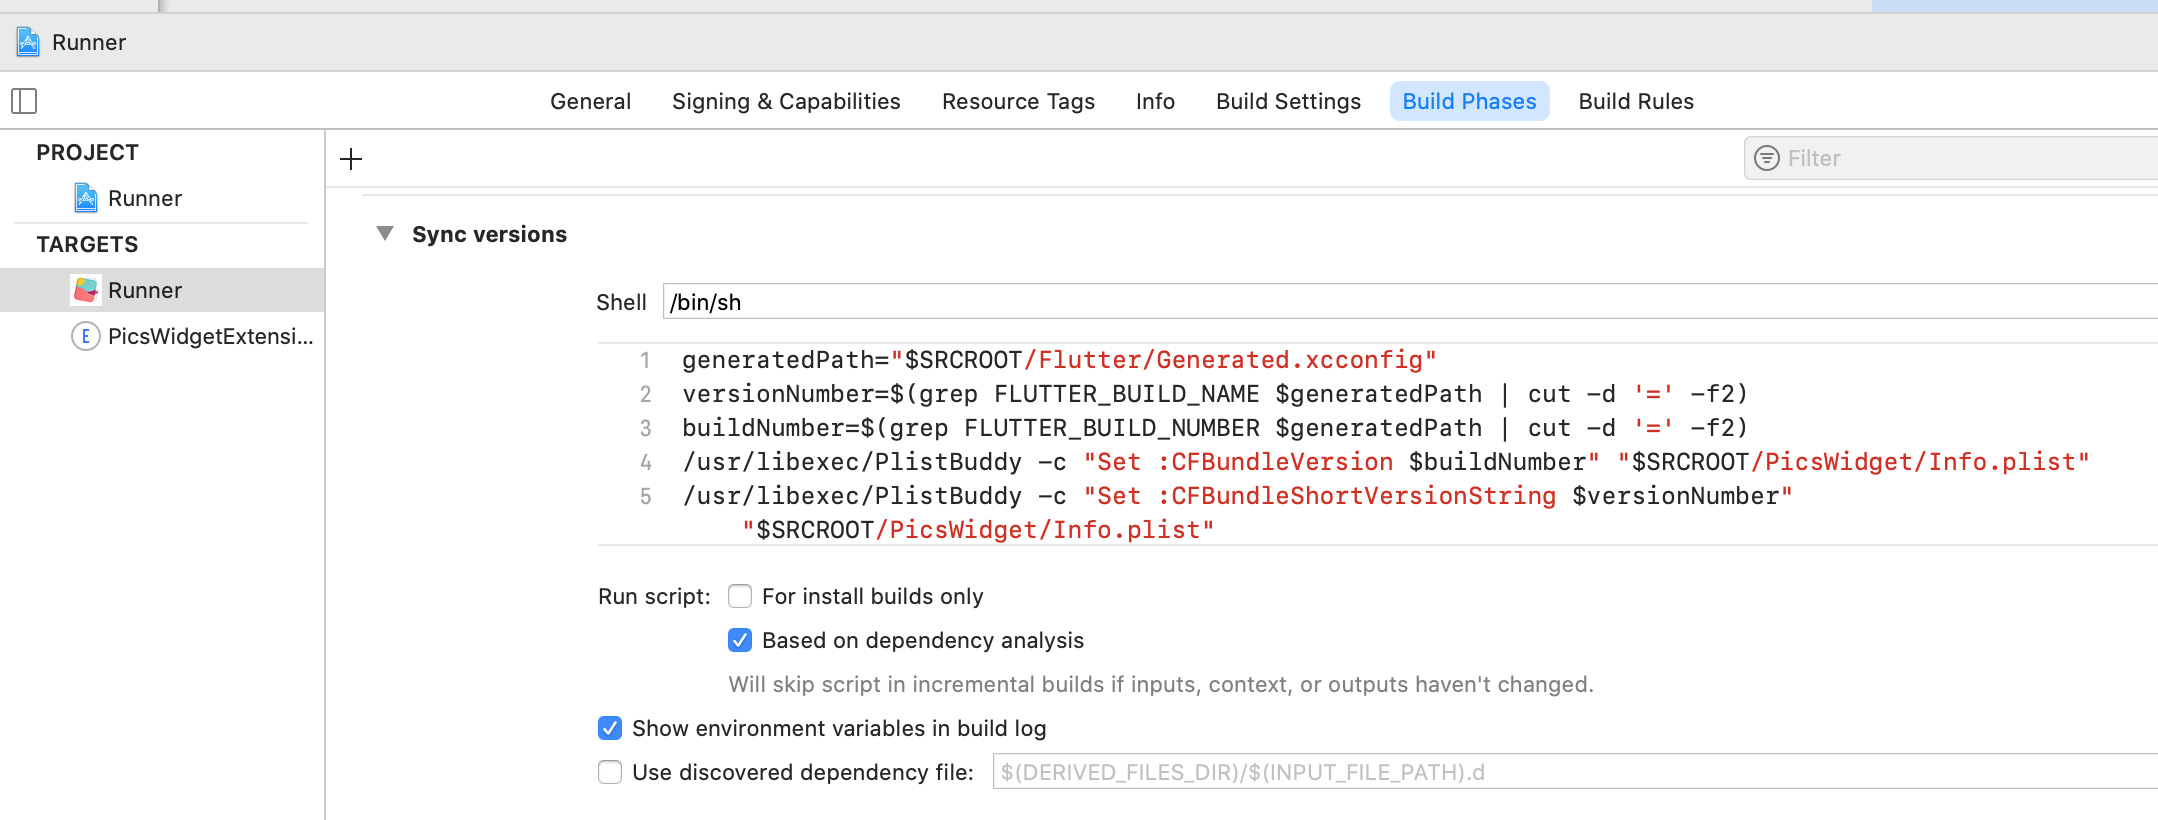
In your Runner (app) target go to Build Phases > + > New Run Script Phase and add the following script:
generatedPath="$SRCROOT/Flutter/Generated.xcconfig"
versionNumber=$(grep FLUTTER_BUILD_NAME $generatedPath | cut -d '=' -f2)
buildNumber=$(grep FLUTTER_BUILD_NUMBER $generatedPath | cut -d '=' -f2)
/usr/libexec/PlistBuddy -c "Set :CFBundleVersion $buildNumber" "$SRCROOT/HomeExampleWidget/Info.plist"
/usr/libexec/PlistBuddy -c "Set :CFBundleShortVersionString $versionNumber" "$SRCROOT/HomeExampleWidget/Info.plist"
Replace HomeExampleWidget with the name of the widget extension folder that you have created.
Check the Example App for an Implementation of a Widget. A more detailed overview on how to write Widgets for iOS 14 can be found on the Apple Developer documentation. In order to access the Data send with Flutter can be access with
let data = UserDefaults.init(suiteName:"YOUR_GROUP_ID")Android
<?xml version="1.0" encoding="utf-8"?>
<appwidget-provider xmlns:android="http://schemas.android.com/apk/res/android"
    android:minWidth="40dp"
    android:minHeight="40dp"
    android:updatePeriodMillis="86400000"
    android:initialLayout="@layout/example_layout"
    android:resizeMode="horizontal|vertical"
    android:widgetCategory="home_screen">
</appwidget-provider><receiver android:name="HomeWidgetExampleProvider" android:exported="true">
<intent-filter>
<action android:name="android.appwidget.action.APPWIDGET_UPDATE" />
</intent-filter>
<meta-data android:name="android.appwidget.provider"
android:resource="@xml/home_widget_example" />
</receiver>For convenience, you can extend from HomeWidgetProvider which gives you access to a SharedPreferences Object with the Data in the onUpdate method.
In case you don't want to use the convenience Method you can access the Data using
import es.antonborri.home_widget.HomeWidgetPlugin
...
HomeWidgetPlugin.getData(context)
which will give you access to the same SharedPreferences
For more Information on how to create and configure Android Widgets, check out this guide on the Android Developers Page.
In Jetpack Glance, you have to write your receiver (== provider), that returns a widget. Add it to AndroidManifest the same way as written above for android widgets.
class MyReceiver : GlanceAppWidgetReceiver() {
    override val glanceAppWidget: GlanceAppWidget get() = MyWidget()
}
If you need to access HomeWidget shared preferences, use this:
HomeWidgetPlugin.getData(context)iOS
For iOS, you need to call `HomeWidget.setAppGroupId('YOUR_GROUP_ID');` Without this you won't be able to share data between your App and the Widget and calls to `saveWidgetData` and `getWidgetData` will return an errorIn order to save Data call HomeWidget.saveWidgetData<String>('id', data)
In order to force a reload of the HomeScreenWidget you need to call
HomeWidget.updateWidget(
    name: 'HomeWidgetExampleProvider',
    androidName: 'HomeWidgetExampleProvider',
    iOSName: 'HomeWidgetExample',
    qualifiedAndroidName: 'com.example.app.HomeWidgetExampleProvider',
);
The name for Android will be chosen by checking qualifiedAndroidName, falling back to <packageName>.androidName and if that was not provided it
will fallback to <packageName>.name.
This Name needs to be equal to the Classname of the WidgetProvider
The name for iOS will be chosen by checking iOSName if that was not provided it will fallback to name.
This name needs to be equal to the Kind specified in you Widget
Calling HomeWidget.updateWidget only notifies the specified provider.
To update widgets using this provider,
update them from the provider like this:
class HomeWidgetExampleProvider : HomeWidgetProvider() {

    override fun onUpdate(context: Context, appWidgetManager: AppWidgetManager, appWidgetIds: IntArray, widgetData: SharedPreferences) {
        appWidgetIds.forEach { widgetId ->
            val views = RemoteViews(context.packageName, R.layout.example_layout).apply {
                // ...
            }

            // Update widget.
            appWidgetManager.updateAppWidget(widgetId, views)
        }
    }
}Updating widgets in Jetpack Glance is a bit more tricky, widgets are only updated when their state changes, therefore simple update will not refresh them. To update them, you have to fake state update like this:
class MyWidgetReceiver : GlanceAppWidgetReceiver() {
    override val glanceAppWidget: GlanceAppWidget get() = MyWidget()

    override fun onUpdate(context: Context, appWidgetManager: AppWidgetManager, appWidgetIds: IntArray) {
        super.onUpdate(context, appWidgetManager, appWidgetIds)

        runBlocking {
            appWidgetIds.forEach {
                val glanceId = GlanceAppWidgetManager(context).getGlanceIdBy(it)
                MyWidget().apply {
                    // Must update widget state otherwise it update has no effect for some reason.
                    updateAppWidgetState(context, glanceId) { prefs ->
                        prefs[stringPreferencesKey("___FAKE_UPDATE___")] = Random.nextULong().toString()
                    }

                    // Update widget.
                    update(context, glanceId)
                }
            }
        }
    }
}To retrieve the current Data saved in the Widget call HomeWidget.getWidgetData<String>('id', defaultValue: data)
Android and iOS (starting with iOS 17) allow widgets to have interactive Elements like Buttons
Dart
-
Write a static function that takes a Uri as an argument. This will get called when a user clicks on the View
@pragma("vm:entry-point")
FutureOr<void> backgroundCallback(Uri data) async {
  // do something with data
  ...
}
@pragma('vm:entry-point')must be placed above thecallbackfunction to avoid tree shaking in release mode. -
Register the callback function by calling
HomeWidget.registerInteractivityCallback(backgroundCallback);
iOS
- Adjust your Podfile to add
home_widgetas a dependency to your WidgetExtensiontarget 'YourWidgetExtension' do use_frameworks! use_modular_headers! pod 'home_widget', :path => '.symlinks/plugins/home_widget/ios'
end
2. To be able to use plugins with the Background Callback add this to your AppDelegate's `application` function
```swift
if #available(iOS 17, *) {
 HomeWidgetBackgroundWorker.setPluginRegistrantCallback { registry in
     GeneratedPluginRegistrant.register(with: registry)
 }
}
-
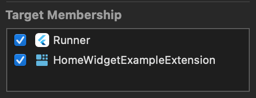
Create a custom
AppIntentin your App Target (Runner) and make sure to select both your App and your WidgetExtension in the Target Membership panel
In this Intent you should import
home_widgetand callHomeWidgetBackgroundWorker.run(url: url, appGroup: appGroup!)in the perform method.urlandappGroupcan be either hardcoded or set as parameters from the Widgetimport AppIntents import Flutter import Foundation import home_widget @available(iOS 16, *) public struct BackgroundIntent: AppIntent { static public var title: LocalizedStringResource = "HomeWidget Background Intent" @Parameter(title: "Widget URI") var url: URL? @Parameter(title: "AppGroup") var appGroup: String? public init() {} public init(url: URL?, appGroup: String?) { self.url = url self.appGroup = appGroup } public func perform() async throws -> some IntentResult { await HomeWidgetBackgroundWorker.run(url: url, appGroup: appGroup!) return .result() } }
-
Add a Button to your Widget. This Button might be encapsulated by a Version check. Pass in an instance of the
AppIntentcreated in the previous stepButton( intent: BackgroundIntent( url: URL(string: "homeWidgetExample://titleClicked"), appGroup: widgetGroupId) ) { Text(entry.title).bold().font( /*@START_MENU_TOKEN@*/.title /*@END_MENU_TOKEN@*/) }.buttonStyle(.plain)
-
With the current setup the Widget is now Interactive as long as the App is still in the background. If you want to have the Widget be able to wake the App up you need to add the following to your
AppIntentfile@available(iOS 16, *) @available(iOSApplicationExtension, unavailable) extension BackgroundIntent: ForegroundContinuableIntent {}
This code tells the system to always perform the Intent in the App and not in a process attached to the Widget. Note however that this will start your Flutter App using the normal main entrypoint meaning your full app might be run in the background. To counter this you should add checks in the very first Widget you build inside
runAppto only perform necessary calls/setups while the App is launched in the background
Android
- Add the necessary Receiver and Service to you
AndroidManifest.xmlfile<receiver android:name="es.antonborri.home_widget.HomeWidgetBackgroundReceiver" android:exported="true"> <intent-filter> <action android:name="es.antonborri.home_widget.action.BACKGROUND" /> </intent-filter> </receiver> <service android:name="es.antonborri.home_widget.HomeWidgetBackgroundService" android:permission="android.permission.BIND_JOB_SERVICE" android:exported="true"/> - Add a
HomeWidgetBackgroundIntent.getBroadcastPendingIntent to the View you want to add a click listener toval backgroundIntent = HomeWidgetBackgroundIntent.getBroadcast( context, Uri.parse("homeWidgetExample://titleClicked") ) setOnClickPendingIntent(R.id.widget_title, backgroundIntent)
In some cases, you may not want to rewrite UI code in the native frameworks for your widgets.
Dart
For example, say you have a chart in your Flutter app configured with `CustomPaint`:class LineChart extends StatelessWidget {
const LineChart({
super.key,
});
@override
Widget build(BuildContext context) {
return CustomPaint(
painter: LineChartPainter(),
child: const SizedBox(
height: 200,
width: 200,
),
);
}
}
Rewriting the code to create this chart on both Android and iOS might be time consuming. Instead, you can generate a png file of the Flutter widget and save it to a shared container between your Flutter app and the home screen widget.
var path = await HomeWidget.renderFlutterWidget(
  const LineChart(),
  key: 'lineChart',
  logicalSize: const Size(400, 400),
);LineChart()is the widget that will be rendered as an image.keyis the key in the key/value storage on the device that stores the path of the file for easy retrieval on the native side
iOS
To retrieve the image and display it in a widget, you can use the following SwiftUI code:-
In your
TimelineEntrystruct add a property to retrieve the path:struct MyEntry: TimelineEntry { … let lineChartPath: String }
-
Get the path from the
UserDefaultsingetSnapshot:func getSnapshot( ... let lineChartPath = userDefaults?.string(forKey: "lineChart") ?? "No screenshot available"
-
Create a
Viewto display the chart and resize the image based on thedisplaySizeof the widget:struct WidgetEntryView : View { … var ChartImage: some View { if let uiImage = UIImage(contentsOfFile: entry.lineChartPath) { let image = Image(uiImage: uiImage) .resizable() .frame(width: entry.displaySize.height*0.5, height: entry.displaySize.height*0.5, alignment: .center) return AnyView(image) } print("The image file could not be loaded") return AnyView(EmptyView()) } … }
-
Display the chart in the body of the widget's
View:VStack { Text(entry.title) Text(entry.description) ChartImage }

Android
- Add an image UI element to your xml file:
<ImageView
       android:id="@+id/widget_image"
       android:layout_width="200dp"
       android:layout_height="200dp"
       android:layout_below="@+id/headline_description"
       android:layout_alignBottom="@+id/headline_title"
       android:layout_alignParentStart="true"
       android:layout_alignParentLeft="true"
       android:layout_marginStart="8dp"
       android:layout_marginLeft="8dp"
       android:layout_marginTop="6dp"
       android:layout_marginBottom="-134dp"
       android:layout_weight="1"
       android:adjustViewBounds="true"
       android:background="@android:color/white"
       android:scaleType="fitCenter"
       android:src="@android:drawable/star_big_on"
       android:visibility="visible"
       tools:visibility="visible" />
- Update your Kotlin code to get the chart image and put it into the widget, if it exists.
class NewsWidget : AppWidgetProvider() {
   override fun onUpdate(
       context: Context,
       appWidgetManager: AppWidgetManager,
       appWidgetIds: IntArray,
   ) {
       for (appWidgetId in appWidgetIds) {
           // Get reference to SharedPreferences
           val widgetData = HomeWidgetPlugin.getData(context)
           val views = RemoteViews(context.packageName, R.layout.news_widget).apply {
               // Get chart image and put it in the widget, if it exists
               val imagePath = widgetData.getString("lineChart", null)
               val imageFile = File(imagePath)
               val imageExists = imageFile.exists()
               if (imageExists) {
                  val myBitmap: Bitmap = BitmapFactory.decodeFile(imageFile.absolutePath)
                  setImageViewBitmap(R.id.widget_image, myBitmap)
               } else {
                  println("image not found!, looked @: $imagePath")
               }
               // End new code
           }
           appWidgetManager.updateAppWidget(appWidgetId, views)
       }
   }
}
To detect if the App has been initially started by clicking the Widget you can call HomeWidget.initiallyLaunchedFromHomeWidget() if the App was already running in the Background you can receive these Events by listening to HomeWidget.widgetClicked. Both methods will provide Uris, so you can easily send back data from the Widget to the App to for example navigate to a content page.
In order for these methods to work you need to follow these steps:
iOS
Add .widgetUrl to your WidgetComponent
Text(entry.message)
    .font(.body)
    .widgetURL(URL(string: "homeWidgetExample://message?message=\(entry.message)&homeWidget"))
In order to only detect Widget Links you need to add the queryParameterhomeWidget to the URL
Android
Add an `IntentFilter` to the `Activity` Section in your `AndroidManifest` ``` ```In your WidgetProvider add a PendingIntent to your View using HomeWidgetLaunchIntent.getActivity
val pendingIntentWithData = HomeWidgetLaunchIntent.getActivity(
        context,
        MainActivity::class.java,
        Uri.parse("homeWidgetExample://message?message=$message"))
setOnClickPendingIntent(R.id.widget_message, pendingIntentWithData)Create an ActionCallback:
class OpenAppAction : ActionCallback {
    companion object {
        const val MESSAGE_KEY = "OpenAppActionMessageKey"
    }

    override suspend fun onAction(
        context: Context, glanceId: GlanceId, parameters: ActionParameters
    ) {
        val message = parameters[ActionParameters.Key<String>(MESSAGE_KEY)]

        val pendingIntentWithData = HomeWidgetLaunchIntent.getActivity(
            context, MainActivity::class.java, Uri.parse("homeWidgetExample://message?message=$message")
        )

        pendingIntentWithData.send()
    }
}
and use it like this:
Button(
    text = "Open App",
    onClick = actionRunCallback<OpenConfigurationAction>(
        actionParametersOf(
            ActionParameters.Key<String>(OpenAppAction.MESSAGE_KEY) to "your message"
        )
    )
)As the methods of HomeWidget are static it is possible to use HomeWidget in the background to update the Widget even when the App is in the background.
The example App is using the flutter_workmanager plugin to achieve this. Please follow the Setup Instructions for flutter_workmanager (or your preferred background code execution plugin). Most notably make sure that Plugins get registered in iOS in order to be able to communicate with the HomeWidget Plugin. In case of flutter_workmanager this achieved by adding:
WorkmanagerPlugin.setPluginRegistrantCallback { registry in
    GeneratedPluginRegistrant.register(with: registry)
}Requests to Pin (Add) the Widget to the users HomeScreen by pinning it to the users HomeScreen.
HomeWidget.requestPinWidget(
    name: 'HomeWidgetExampleProvider',
    androidName: 'HomeWidgetExampleProvider',
    qualifiedAndroidName: 'com.example.app.HomeWidgetExampleProvider',
);
This method is only supported on Android, API 26+. If you want to check whether it is supported on current device, use:
HomeWidget.isRequestPinWidgetSupported();Please add to this list if you have interesting and helpful resources