This setup allows to easily develop python enimga2 plugins under Windows or Linux. In this guide I will explain how it works.
This guide may become obsolete because of new feature.
You will need the following tools:
- The IDE, that will provide easy source navigation, auto-completion, linting and debugging. We will use Visual Studio Code.
- Of course we will need python extension for VS Code.
- Python interpreter, required for IDE to be able to work with local source files. On Windows you can download it from python.org.
- Docker containerization software, required to run enigma2 isolated.
- VNC client to connect to enigma2 GUI. Under Windows VNC Viewer looks nice.
To begin with, create new directory and open it in VS Code. It will be your "Workspace". I suggest to create the src sub-directory where python sources such as plugin.py will be located. Initialize a git or other VCS system of your choice (if you like).
It is considered to be a good practice to create python virtual environment for different projects. I prefer to use pipenv for this purpose, which is combination of pip and virtualenv.
Initialize virtual environment with pipenv install. The default Pipfile will be created. Currently enigma2 sources are using Python 2 standard, make sure you have the correct python version. Select new virtual environment as your python interpreter in the VS Code by clicking on "Python" button in the bottom left. You would notice several popups suggesting to install necessary python packages, go ahead.
NOTE: You may want to first create .venv folder under the project root, otherwise virtual environment will end up under your home directory.
If you are not familiar with VS Code yet the main point is to learn Ctrl+Shift+P shortcut that opens a command prompt and you can just type things you want to do.
You will notice that there is a .vscode folder created in your workspace, with the settings. We will modify them later.
Download enigma2 source code from git. For example put it adjacent to the project workspace root location. Create the .env file in order to tell the IDE where it can find necessary imports. In my case the relative path is:
PYTHONPATH=../enigma2/lib/python;../enigma2
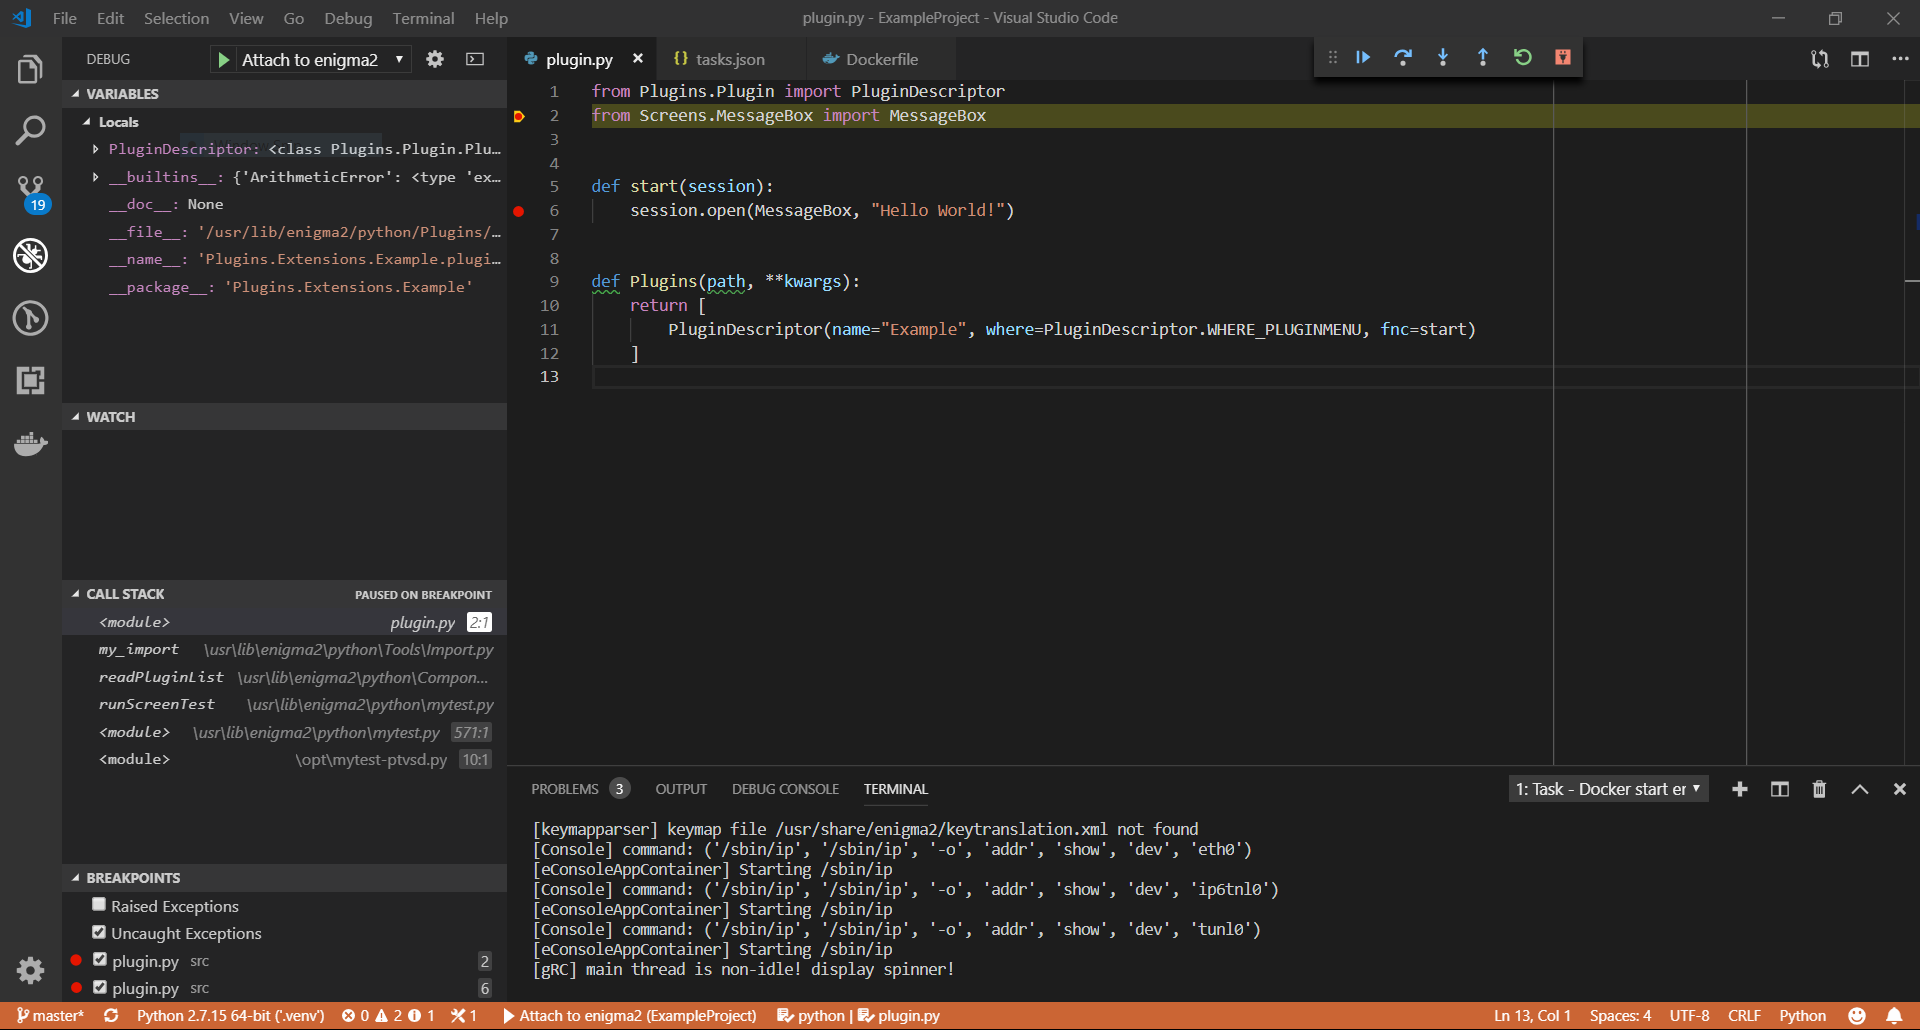
Now IDE restart ("Reload window") is required. Create a src/plugin.py, start typing what every plugin should have:
from Plugins.Plugin import PluginDescriptor... enjoy how auto-completion and code navigation feature works.
 It is easier to write something meaningful now.
First we will need an enigma2 container. Complete Dockerfile for the base image you can find in the repository. It builds enigma2 with SDL support and allows to start it under headless Xvfb XServer.
We need to extend this image, so lets create a new Dockerfile:
FROM technic93/e2xvfb:latest
CMD [ "x11vnc", "-forever" ]
At the moment it only defines that we run x11vnc for exposing enigma2 GUI. To utilize it we write a docker-compose.yml:
version: '2'
services:
  enigma2:
    container_name: enigma2
    build:
      context: .
    ports:
      - 5900:5900
      - 5678:5678
    volumes:
      - './src:/usr/lib/enigma2/python/Plugins/Extensions/Example'
Here we expose VNC and debugger ports and mount our source code to the Plugins directory. We can start it with "Docker: Compose Up". Now it is possible to connect to localhost:5900 with a VNC client and see a XServer's black screen. You can bring up enigma2 there by docker exec -it enigma2 /usr/bin/enigma2. You should be able to navigate enigma2 menu ("space" button) and find your plugin.
VS Code provides the ptvsd package which can intercept python interpreter and will listen on port 5678 for the IDE to start debug session. Let's add it to the container:
RUN pip install ptvsd
EXPOSE 5678
COPY mytest-ptvsd.py /opt/mytest-ptvsd.py
The mytest-ptvsd.py initializes debugger and then calls usual enigma2 "main function"
from __future__ import print_function
import ptvsd

if __name__ == "__main__":
    print("mytest-ptvsd: Enable debugger")
    ptvsd.enable_attach(address=('0.0.0.0', 5678), redirect_output=True)
    print("mytest-ptvsd: Waiting debugger...")
    ptvsd.wait_for_attach()
    print("mytest-ptvsd: Debugger connected")
    import mytest  # start enigma2
Print functions are there for special purpose, which I will tell you right in the next paragraph. Don't forget to restart container to apply all changes to Dockerfile.
We will add a task to VS Code that will start enigma2 in the background so we can attach a debugging session. The following entry is required in .vscode/tasks.json.
{
    "label": "Docker start enigma2",
    "type": "process",
    "presentation": {
        "reveal": "always"
    },
    "isBackground": true,
    "command": "docker",
    "args": [
        "exec",
        "-it",
        "-e",
        "ENIGMA_DEBUG_LVL=5",
        "enigma2",
        "/usr/bin/enigma2",
        "/opt/mytest-ptvsd.py"
    ],
    "problemMatcher": {
        "background": {
            "beginsPattern": {
                "regexp": "^mytest-ptvsd: Enable debugger"
            },
            "endsPattern": {
                "regexp": "^mytest-ptvsd: Waiting debugger..."
            }
        },
        "pattern": [
            {
                "regexp": "^$",
                "file": 1,
                "location": 2,
                "message": 3
            }
        ]
    }
}
Here we set up a docker exec command which we already familiar with. The crucial part is isBackground and the problemMatcher settings. By beginsPattern and endsPattern we specify when the process should go to background. After "Waiting debugger..." is printed it is possible to attach. This means that we can go to the background and allow launching of IDE debugger, defined below.
NOTE: the pattern option is required by VS Code, so we put some dummy things there.
Finally, add the following to .vscode/launch.json. Actually, most of this can be created by navigating VS Code command menus.
{
    "name": "Attach to enigma2",
    "type": "python",
    "request": "attach",
    "pathMappings": [
        {
            "localRoot": "${workspaceRoot}\\src",
            "remoteRoot": "/usr/lib/enigma2/python/Plugins/Extensions/Example",
        },
    ],
    "port": 5678,
    "host": "localhost",
    "justMyCode": false, // Need this because our code is under /usr/lib
    "preLaunchTask": "Docker start enigma2",
    "postDebugTask": "Docker kill enigma2",
}
It is important to add correct pathMappings and pre/post tasks that we defined earlier, so that we can start debug with F5.