My blog's repo, based on https://github.com/georgekosmidis/Geko.BlogBuilder
![]()
![]()
This is the repo of my blog! Visit blog.net's Quick Start Guide to start your own!
The following instructions are a copy of blog.net README.md file
- Table of Contents
- Quick Start Guide
- Background
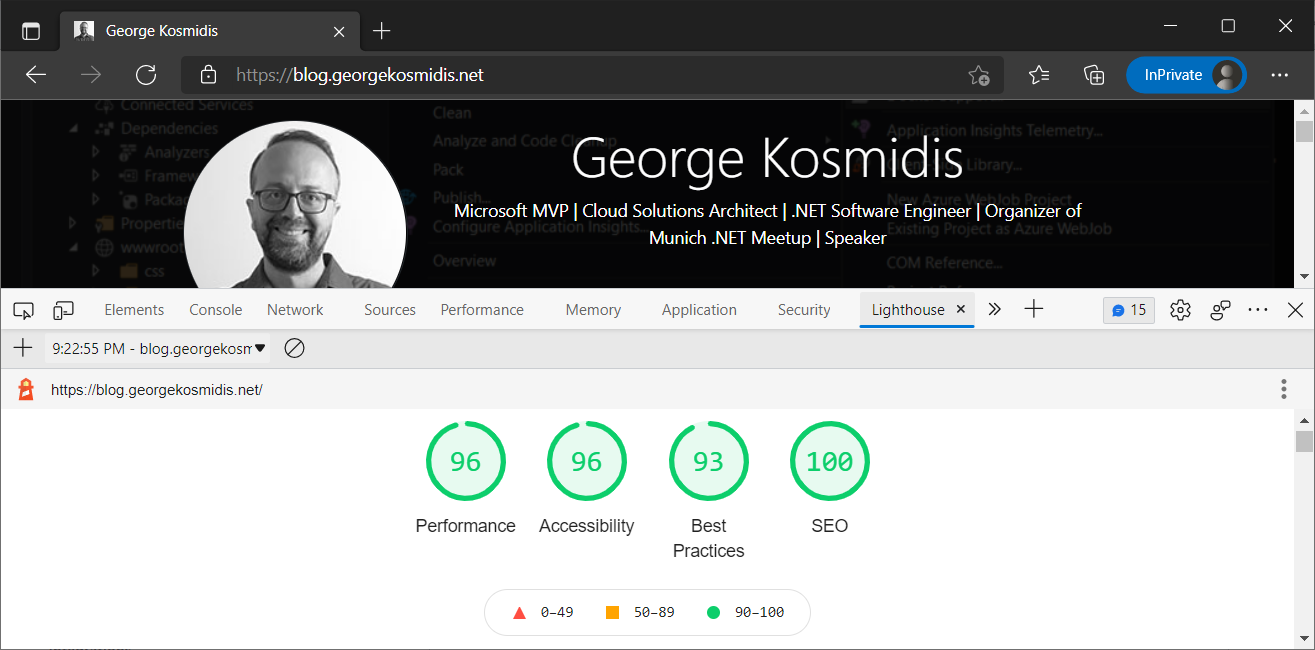
- Lighthouse report of the index page
- Short description of features
- There is no UI to push changes!
- Folder Structure
- Templating
- Index Page
- Writing a new article
- Adding a "standalone" page
- The "Just Copy Me" folder
- Additional Cards
- Commenting System
- Migrating from WordPress
- That's it!
- And that is how my blog looks like!
- Fork this repo
- Create the necessary Azure Static Web App by clicking here:
- Go to the newly create resource, the new Azure Static Web App, click on
Manage Deployment Token, and copy it - Return to your forked repo, go to
Settings>Secrets>Actions, add a new secret with the nameAZURE_DEPLOYMENT_TOKENand paste the deployment token from the previous step.
You 're done!
Test it by going to Actions > Prepare Static App > Run Workflow and approve the newly created Pull Request. Once these steps are completed go the the assigned URL (it's where the Manage Deployment Token was) and voila! Your Sample Blog is ready. If you need support feel free to reach out: https://georgekosmidis.net.
And by the way, my blog is using this solution: https://blog.georgekosmidis.net
It started as my nullable reference types playground, because this option is now enabled by default (C# 10 project templates), but it evolved as a command-line static blog builder project! So yes, a clone of this repo is used to automatically build my very own blog that you can find at https://blog.georgekosmidis.net :)
The solution follows fail-fast and throws an
Exceptionwhen something is not as it should. This is by design because I wouldn't want to go forward and automatically publish my blog unless the process completed smoothly and with no errors at all. If you find that an error is forgiven, please let me know and I will immediately throw an exception :)
- Completely free, builds and deploys automatically with
Azure DevOpsto anAzure Static Web App. - Fast and minified, loads in milliseconds (Check the lighthouse report)
- Featuring a templating system based on
Razor EngineandBootstrap. - Article and additional pages can be simple
HTMLwithBootstrapandhighlightjs. - There are different templates for every page group (e.g. article pages, index pages etc).
- Index pages are using a
masonrycard (grid) system. - A card and an article page generated for each article.
- There are additional card templates, like image cards and events cards.
- There are can be additional pages like a privacy page.
- SEO was in mind during building, with
Open Graphtags andsitemap.xmlbuild automatically in the root of the website.
The builder is actually a Console App, which you can use as a step in Github Actions and automate the build and publishing of your static website. If you want to build your site locally, either open the _src/Blog.Builder.sln solution and run it or just run the /ManualBuild.ps1 powershell.
It is building a fresh _src/Blog.Builder, and uses the fresh baked assembly to build the static files, push the into a new feature branch and open a pull request. It is triggering when changes happen to the workables folder.
As the name implies, it is used to push the data of a fresh _output to the Azure Static Web App. It needs additionaly the deployment token of your Azure Static Web App as a Github Secret by the name: AZURE_STATIC_APP_KEY
* There is a nighlty build trigger that tries to push a fresh copy of your website at around 03:00 UTC. If you dont want that, you would need to open /.github/workflows/prepare-static-app.yml and manually remove the trigger.
- _output
This is where the final HTML goes after the builder runs. The contents are picked up by a pipeline step and pushed to an (yours)
Azure Static Web App. - _readme Nothing special, just the mediaof this README
- _src
Contains source code of the following solutions
- _src/Blog.Builder.sln This is the blog builder.
- _src/Wordpress.ContentMigrator.sln This is a helper solution I used to migrate my content from Wordpress. More on that in the Migrating from WordPress section.
- workables
I don't even know if this is an existing word, but it means that in this folder you should find everything you want to for everyday(?) work with your blog.
- workables/articles Contains your precious blog posts. More on that in the Writing a new article section.
- workables/cards Contains all the additional cards of the blog, since each article already is also a card. More on that in the Additional Cards section.
- workables/justcopyme If you want anything copied unprocessed in the final HTML build, just put it here. More on that in the The "Just Copy Me" folder section.
- workables/standalones Contains standalone pages, like privacy.html. More on that in the Adding a "standalone" page section.
- workables/templates Contains all the available razor templates. More on that in the Templating section.
Although templating should be the last thing to check because the default ones work great, there are some mandatory changes you should make in the template-layout.cshtml because it contains my social media links! In some future version these will be parameterized in the appsettings.json, but for now just go in there and change them!
Besides these mandatory changes, you can use the rest of the templates as is or change them to meet your requirements:
- Bootstrap v5.1.3 - https://getbootstrap.com/
- Masonry v4.2.2 - https://masonry.desandro.com/
- highlightjs v11.4.0 - https://highlightjs.org/
- cookieconsent v3.1.1 - https://www.osano.com/cookieconsent
- template-layout.cshtml, is the main layout template. All other templates are build and then used as a body for this template.
- template-index.cshtml, this is the body of the index templates. Not much going on here because of the masonry card system that leaves no space for other stuff. The cards are a combination of the article cards and other cards as described later on.
- template-article.cshtml, this is the body of an article page. In the right hand column there is a list of cards that have been selected as
RightColumnPositionfrom theircard.json. Check Additional Cards in this guide for more information. - template-standalone.cshtml, this is the template of a standalone page, e.g. the privacy.html.
- template-sitemap.cshtml, this is the template that builds the
sitemap.xml.
- template-card-article.cshtml, this is the card for an article, which contains the title of the article, a description, the publishing date and optionally a featuring image.
- template-card-calendar-events.cshtml, this is the calendar events card, which can be used to automatically retrieve and display the next usegroup events or conferences that I (you) will participate.
- template-card-image.cshtml, this is a simple image card with a link. For example, in my blog I use it to display my MVP award with a link towards mvp.microsoft.com.
- template-card-search.cshtml, this is a search engine for the site. Since it is a static website, this is using google. If you want to use this you should register with google and change the
cxparameter.
The template that comes with this solution presents the articles as Bootstrap Cards which are laid out using Masonry; you can find a guide for both of them in the Bootstrap and Masonry bootstrap page. Besides the articles card, additional cards can be added by following the guide that follows later in this page: Additional Cards.
Not all of the cards are displayed in the index page. The index page is paged into several depending on the property CardsPerPage that can be found in the appsettings.json. Extra attention have to be paid for the sticky cards, cards that appear in every paged index page. Check the properties of the card.json from the Additional Cards section.
The name of the produced index is index.html and the rest are named following the pattern index-page-{PAGE_NUMBER}.html. A paging is added at the end of each index page.
Everything is done from the file system using HTML or Mark Down, Razor and JSON files, so you can use your favorite HTML editor!
The process includes creating a folder in the articles folder and then creating a file named content.html or content.md to write the body of your article using HTML or Mark Down, Razor, highlightjs and Bootstrap styling.
Once done you should then create a content.json file for the article metadata with the following properties:
| Property | Description |
|---|---|
| RelativeUrl | This is the relative url that will be created for this article, e.g. /csharp10.html. |
| Title | This is the title of the article. It will also be the title of the page (<title></title>), the og.title meta tag and the tile of the card in the index page (check https://getbootstrap.com/docs/4.0/components/card/#titles-text-and-links). |
| Description | This is the description of the article. It will also be the meta description (<meta name="description" content="" />), the og:description, and the card in the index page. HTML is stripped for the meta tags. Check https://getbootstrap.com/docs/4.0/components/card/#titles-text-and-links. |
| DatePublished | This is the published date of the article, in ISO-8601 format. |
| DateModified | This is the modified date of the article in ISO-8601 format. |
| RelativeImageUrl | This is the relative URL of the feature image, in the media folder, e.g. /media/unique-name-feature-image.png. |
| Tags | This is an arry of tags describing this article. They will be used in the og:article:tag meta tag. |
Although you can find many examples in the articles folder, here is one:
{
  "RelativeUrl": "/secrets-management-for-asp-net-core-and-azure-devops.html",
  "Title": "Secrets management for ASP.NET Core and Azure DevOps",
  "Description": "<p>In this post we will discover how to handle <em>appsettings.json</em> secrets (like API keys, passwords etc.) in a .NET app and eventually how to deploy a protected app and let <em>Azure DevOps</em> handle the secret replacement.</p>",
  "DatePublished": "2021-12-05T19:28:04+01:00",
  "DateModified": "2022-01-16T14:21:19+01:00",
  "RelativeImageUrl": "/media/100490-feature.png",
  "Tags": [
    "ASP.NET Core",
    "Azure DevOps",
    "Azure DevOps Variables",
    "Secrets",
    "user-secrets",
    "ASP.NET Core"
  ]
}
And at the end, if your new article contains media, create a folder named media and add everything in there. Paths in your article should be relative to that folder. Try to have unique names for the media files, but if you miss it no worries. No override is happening by default; if the builder finds a file with the same name it stops and throws an exception.
It's a nice idea all paths to be relative!
You can find many articles as examples here: workables/articles. Numbering is not mandatory (like the 100490 in
100490-secrets-management-for-asp-net-core-and-azure-devops), but it makes my life easier in finding them in Windows Explorer.
In case you want to add a static page like privacy.html it's fairly simple and very similar with the articles. Just visit the standalones folder, add a new folder and in there add the content.html, the content.json and optionally the media folder. The standalones folder already contains an example!
This a special folder that its contents will be copied directly to the output folder. Usefull for configs, additional media, etc. Check mine for an example: justcopyme.
The builder will automatically create a card for the UI for each article added, but it is a common need to add more than article cards.
To add a new card, create a new folder in the cards folder with whatever name you wish and add in there a card.json with the following information:
| Property | Description |
|---|---|
| TemplateDataModel | This is the model of the card and it can either be CardCalendarEventsModel, CardImageModel or CardSearchModel |
| Title | The title of the card. Check https://getbootstrap.com/docs/4.0/components/card/#titles-text-and-links |
| Description | The description of the card. Check https://getbootstrap.com/docs/4.0/components/card/#body |
| Footer | Optionally, the footer of the card. Check https://getbootstrap.com/docs/4.0/components/card/#header-and-footer |
| Link | Optionally, the link where this card will lead. Check https://getbootstrap.com/docs/4.3/utilities/stretched-link/ |
| LinkTarget | Optionally, the link tarket. Check https://developer.mozilla.org/en-US/docs/Web/HTML/Element/a#attr-target |
| ImageUrl | Optionally, the the feature image of the card. Check https://getbootstrap.com/docs/4.0/components/card/#images |
| Position | The position within the masonry grid of the index pages. Article cards will be added automatically to "fill-in" the gaps of the additional cards. For example, if you wish to have 10 cards per page, and an additional image card to position index 0, the next 9 positions will be filled with article cards. |
| IsSticky | The position 0 of the previous hypothetical image card applies only to the first page of index. The next paged indexes (e.g. index-page-2.html) will not have it unless this IsSticky is set to true. So a bit simpler, if you want the image card to be in the position 0 of every paged index this should be true. If set to false the hypothetical image card will only appear in index.html. |
| RightColumnPosition | This card should also appear in the right column of the templates that support it. If you don't want to have this card anywhere else, add -1 here. |
And here is an example, although you can find more in the cards folder:
{
  "TemplateDataModel": "CardImageModel",
  "Title": "Microsoft MVP - George Kosmidis",
  "Description": "Microsoft MVP - George Kosmidis",
  "Footer": "",
  "Link": "https://mvp.microsoft.com/en-us/PublicProfile/5004591",
  "LinkTarget": "_blank",
  "ImageUrl": "/media/mvp.png",
  "Position": 3,
  "IsSticky": true,
  "RightColumnPosition" : 1
}This is a special card that code-wise depends on external services (specifically meetup.com), and also on events described as json files. The folder for this card is at cards/events. A card.json describes the produced card the exact same way as in the additional cards above, but the additional events are described in folders within the cards/events folder.
If you want to add an event, just add a folder in the cards/events folder and in there add an event.json with the following information:
| Property | Description |
|---|---|
| Organizer | The name of the entity that organizes this specific event. |
| OrganizerUrl | A URL for the organizer's webpage. |
| Title | The title of the event. |
| DateTime | The date or the datetime of the event in ISO-8601 format. |
| Place | A string for the place of the event. |
| Url | A URL for the event description. |
An example for an event.json file is the following:
{
	"Organizer": "Munich .NET Meetup",
	"OrganizerUrl": "https://georgekosmidis.net",
	"Title" : "title",
    "DateTime" : "2022-01-18",
    "Place" : "Online",
    "Url" : "https://google.com"
}User commenting and interaction is super important but unfortunatelly I haven't found something I like yet. Since this is a static build, the only solution would be an online commenting system but it seems there is nothing good enough! In case you have a favorite one, feel free to change the templates and add it.
Just as a sample, follows a list of online commenting systems that you can choose from (the order is random):
| Commenting System | Description |
|---|---|
| Disqus | It's popular but not lightweight at all. |
| Hyvor Talk | Same as Disqus, packed with features but it's just too much. |
| Commento | This one focuses a lot on privacy but it's kind of expensive. Nevertheles, a good candidate. |
| Staticman | Staticman is interesting as it is using Github for comments and builds a static HTML for comments, but it requires write access to my repo, which is not something I am willing to give. Good approach though, that sparks ideas. |
| ReplyBox | Again privacy oritented, simple commenting system but I couldn't find a way to backup my comments and the developer never answers! |
| GitTalk | Gitalk is a modern comment component based on GitHub Issue and Preact. It's very interesting but unfortunatelly you have to have your Github API secret in public view, which is not cool at all. |
| Having twitter for a commenting system is an interesting idea, but this is a dev oriented blog and twitter offers just a few characters per comment. Anyway, interesting idea, you just need a developer account. |
There is a solution in the folder _src named Wordpress.ContentMigrator that can help you exactly with that, by producing the contents of the folder Workables\articles. The only requirement is to add a plugin that returns the wordpress XML feed in a JSON format (I used https://wordpress.org/plugins/jsonfeed/ but there are a ton!).
You made it so far, I am surprised :) Maybe I should do a shorter version! If you have any comments just reach out! You can find my social media handlers here: https://georgekosmidis.net.
