This tutorial is aimed for anyone who wants to learn how to build an iOS Application. This tutorial will guide users on how to build a calculator application for iPhone in order to teach the basic building blocks of mobile application development.
- Mac Computer with Xcode installed
- Xcode can be found in the Mac App store.
- Internet Connection
- Basic skills on how to user a computer (i.e. how to use a mouse / keyboard)
In this section you will create the Xcode project and get yourself familiar with the development environment.
-
Open Xcode
-
Select "Create a new Xcode Project"
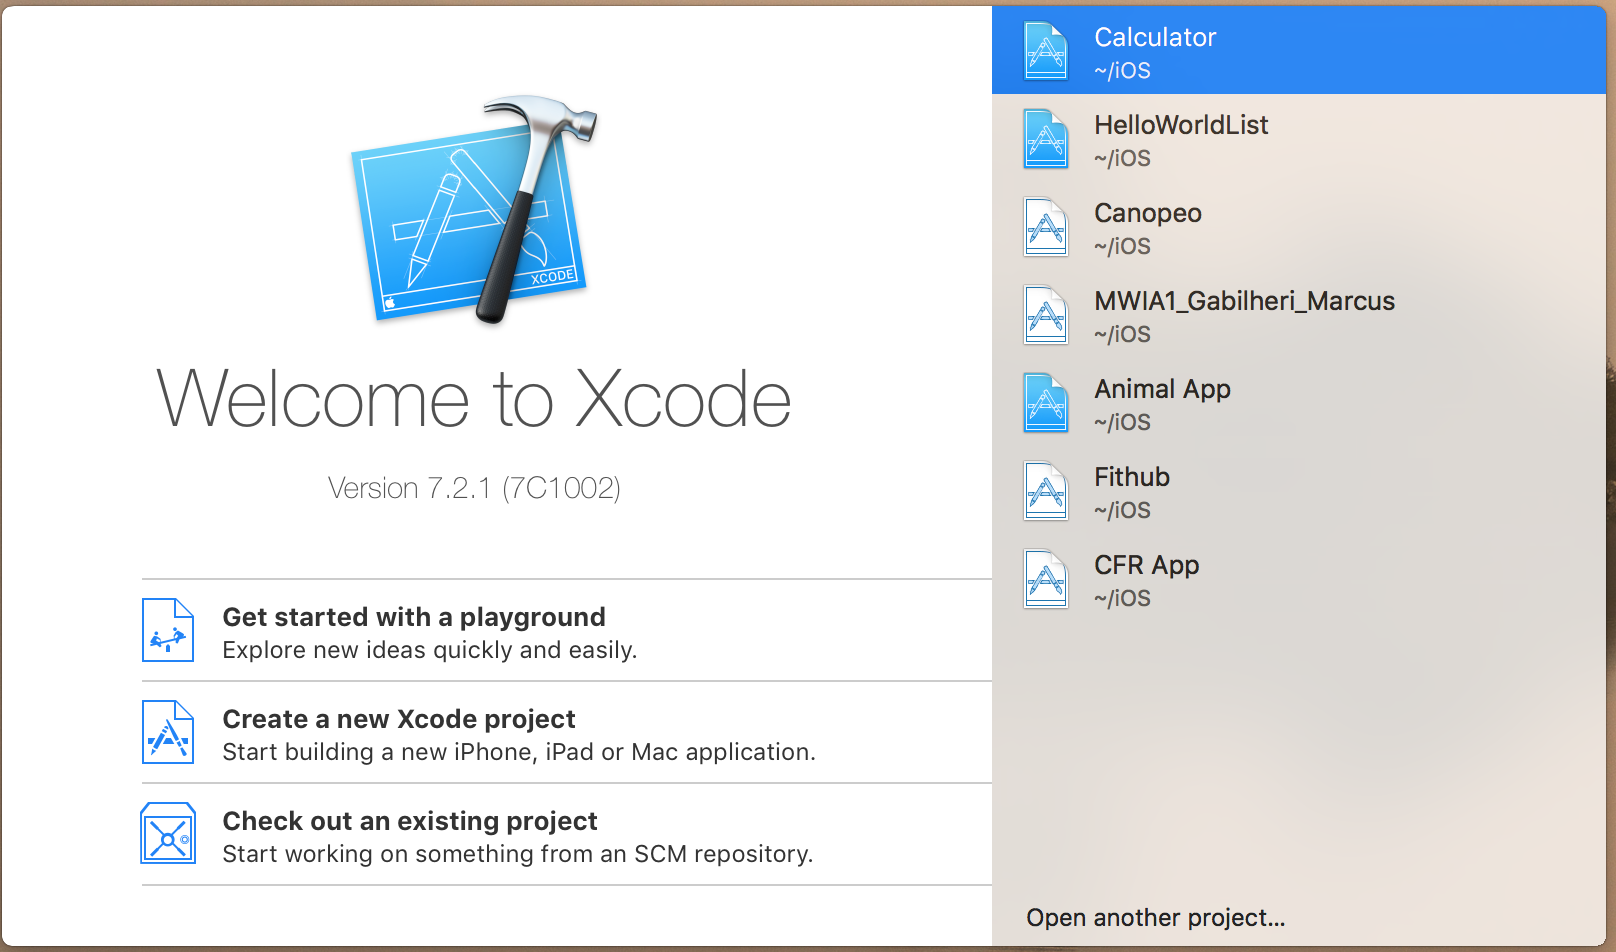
Figure 1 -
Select "Single View Application" and click "Next"
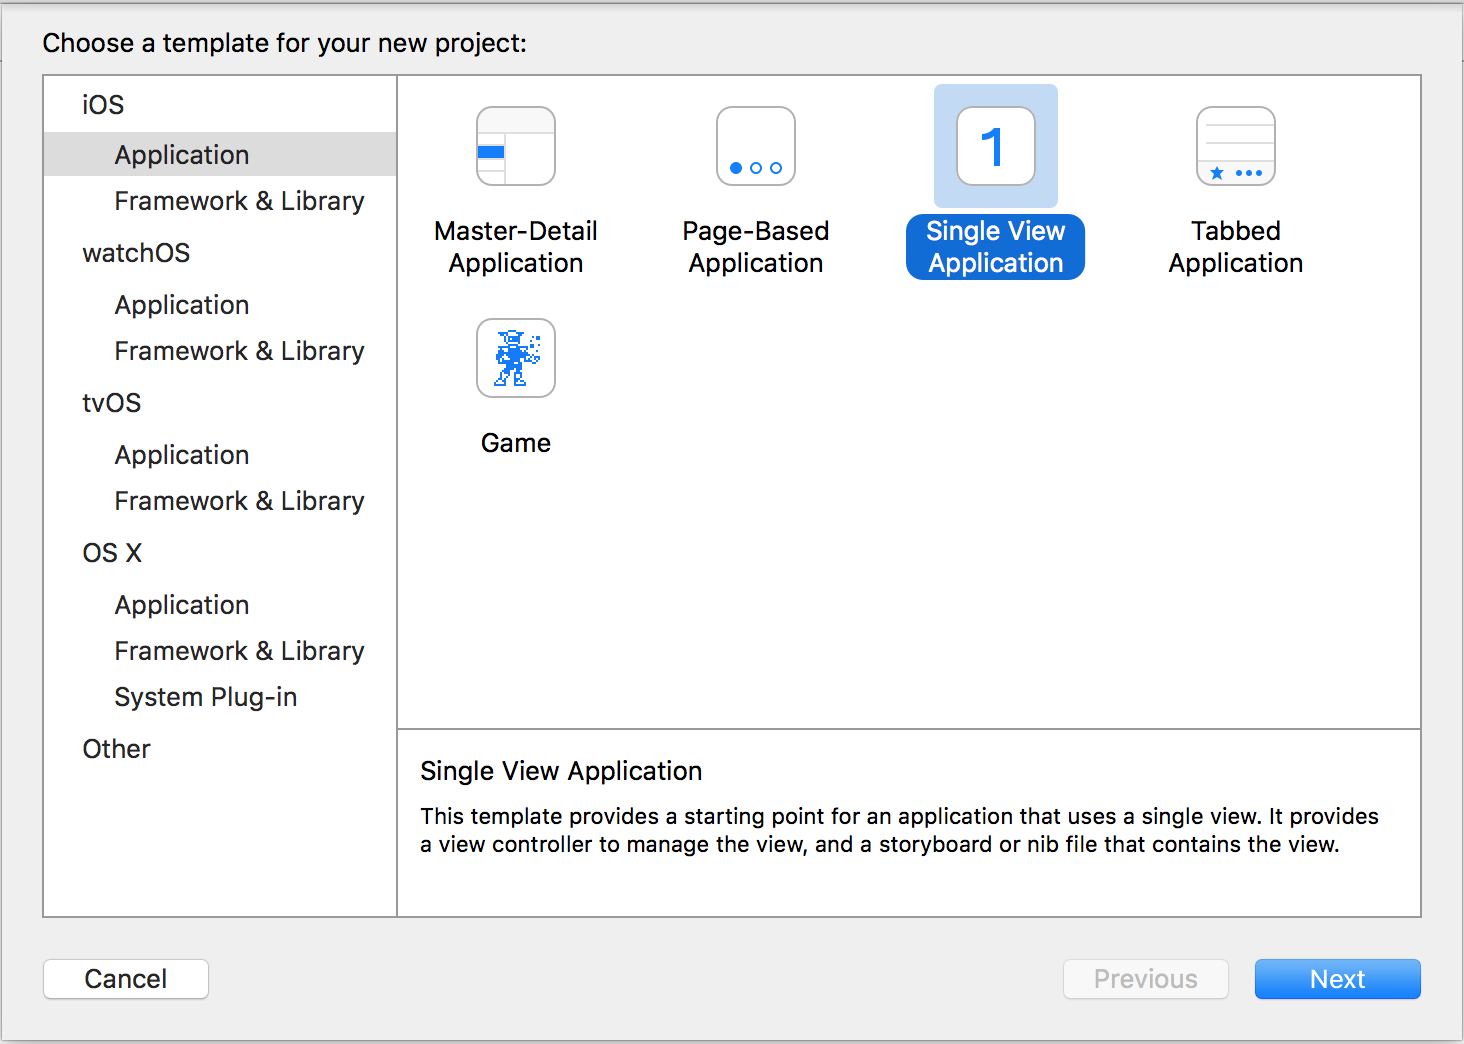
Figure 2 -
Give the App (i.e. Product Name) a name and a organization identifier.
Note: The organization is usually a company's domain name in reverse, but for our purposes we will justbe using com.last name. In my case it will be com.gabilheri -
Select the language to be Swift
-
Select iPhone in the devices Dropdown. You should now have something similar to Figure 3.
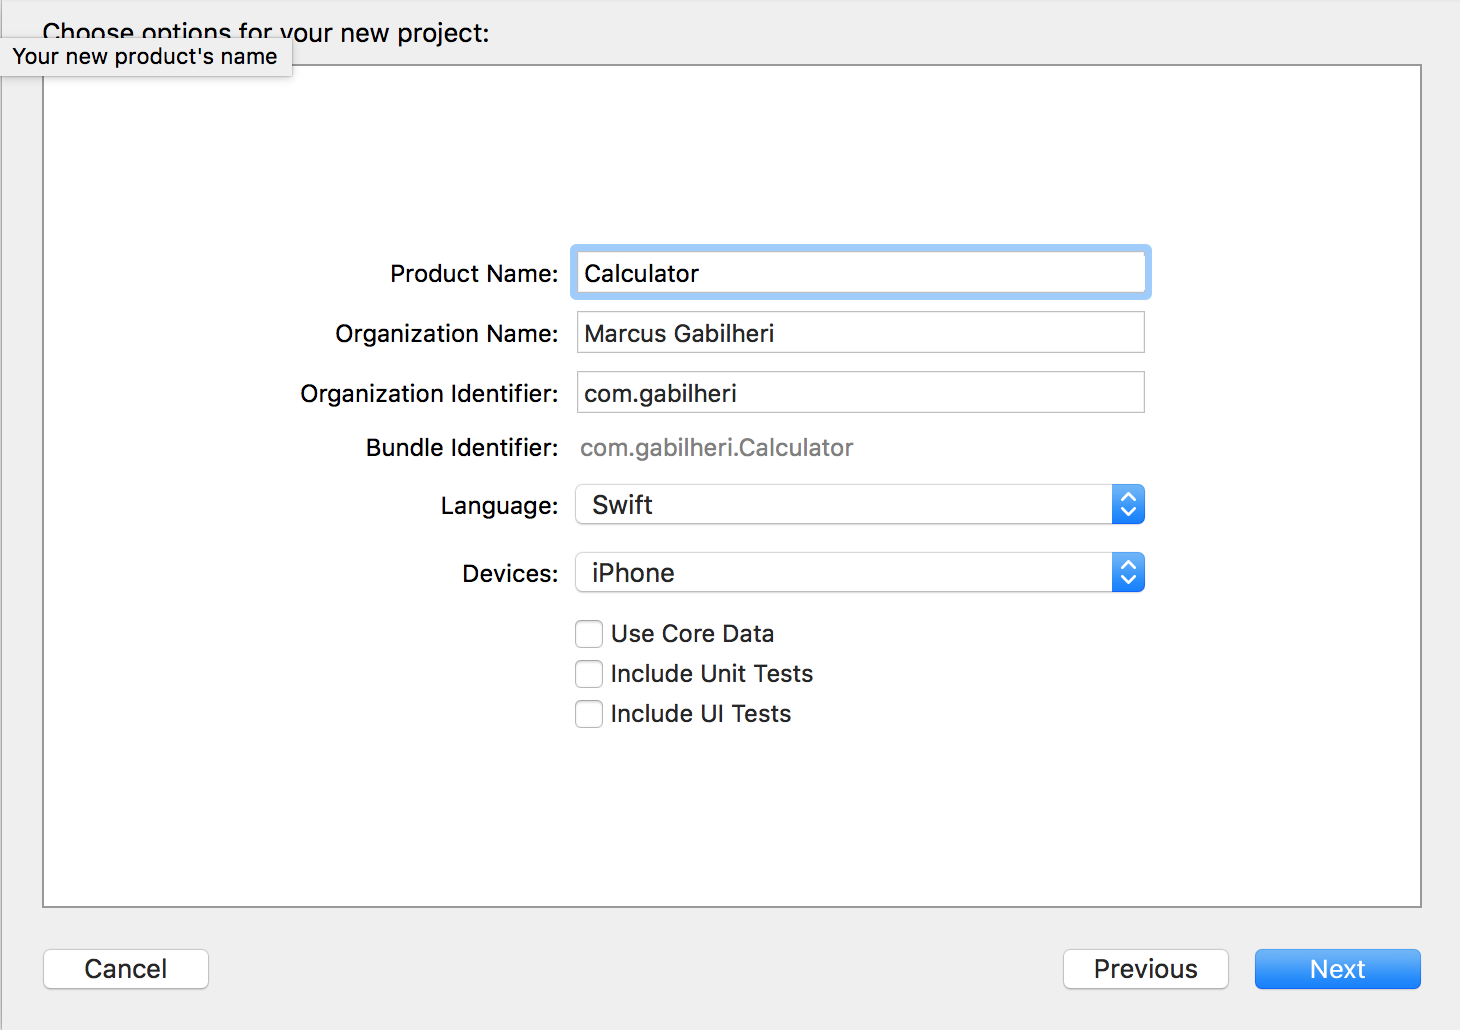
Figure 3 -
Click next to select where to save and then create to create the project. Depending on the speed of your computer this might take a couple of minutes.
-
After the project has been created, Xcode will open the project and you should see something like Figure 4.
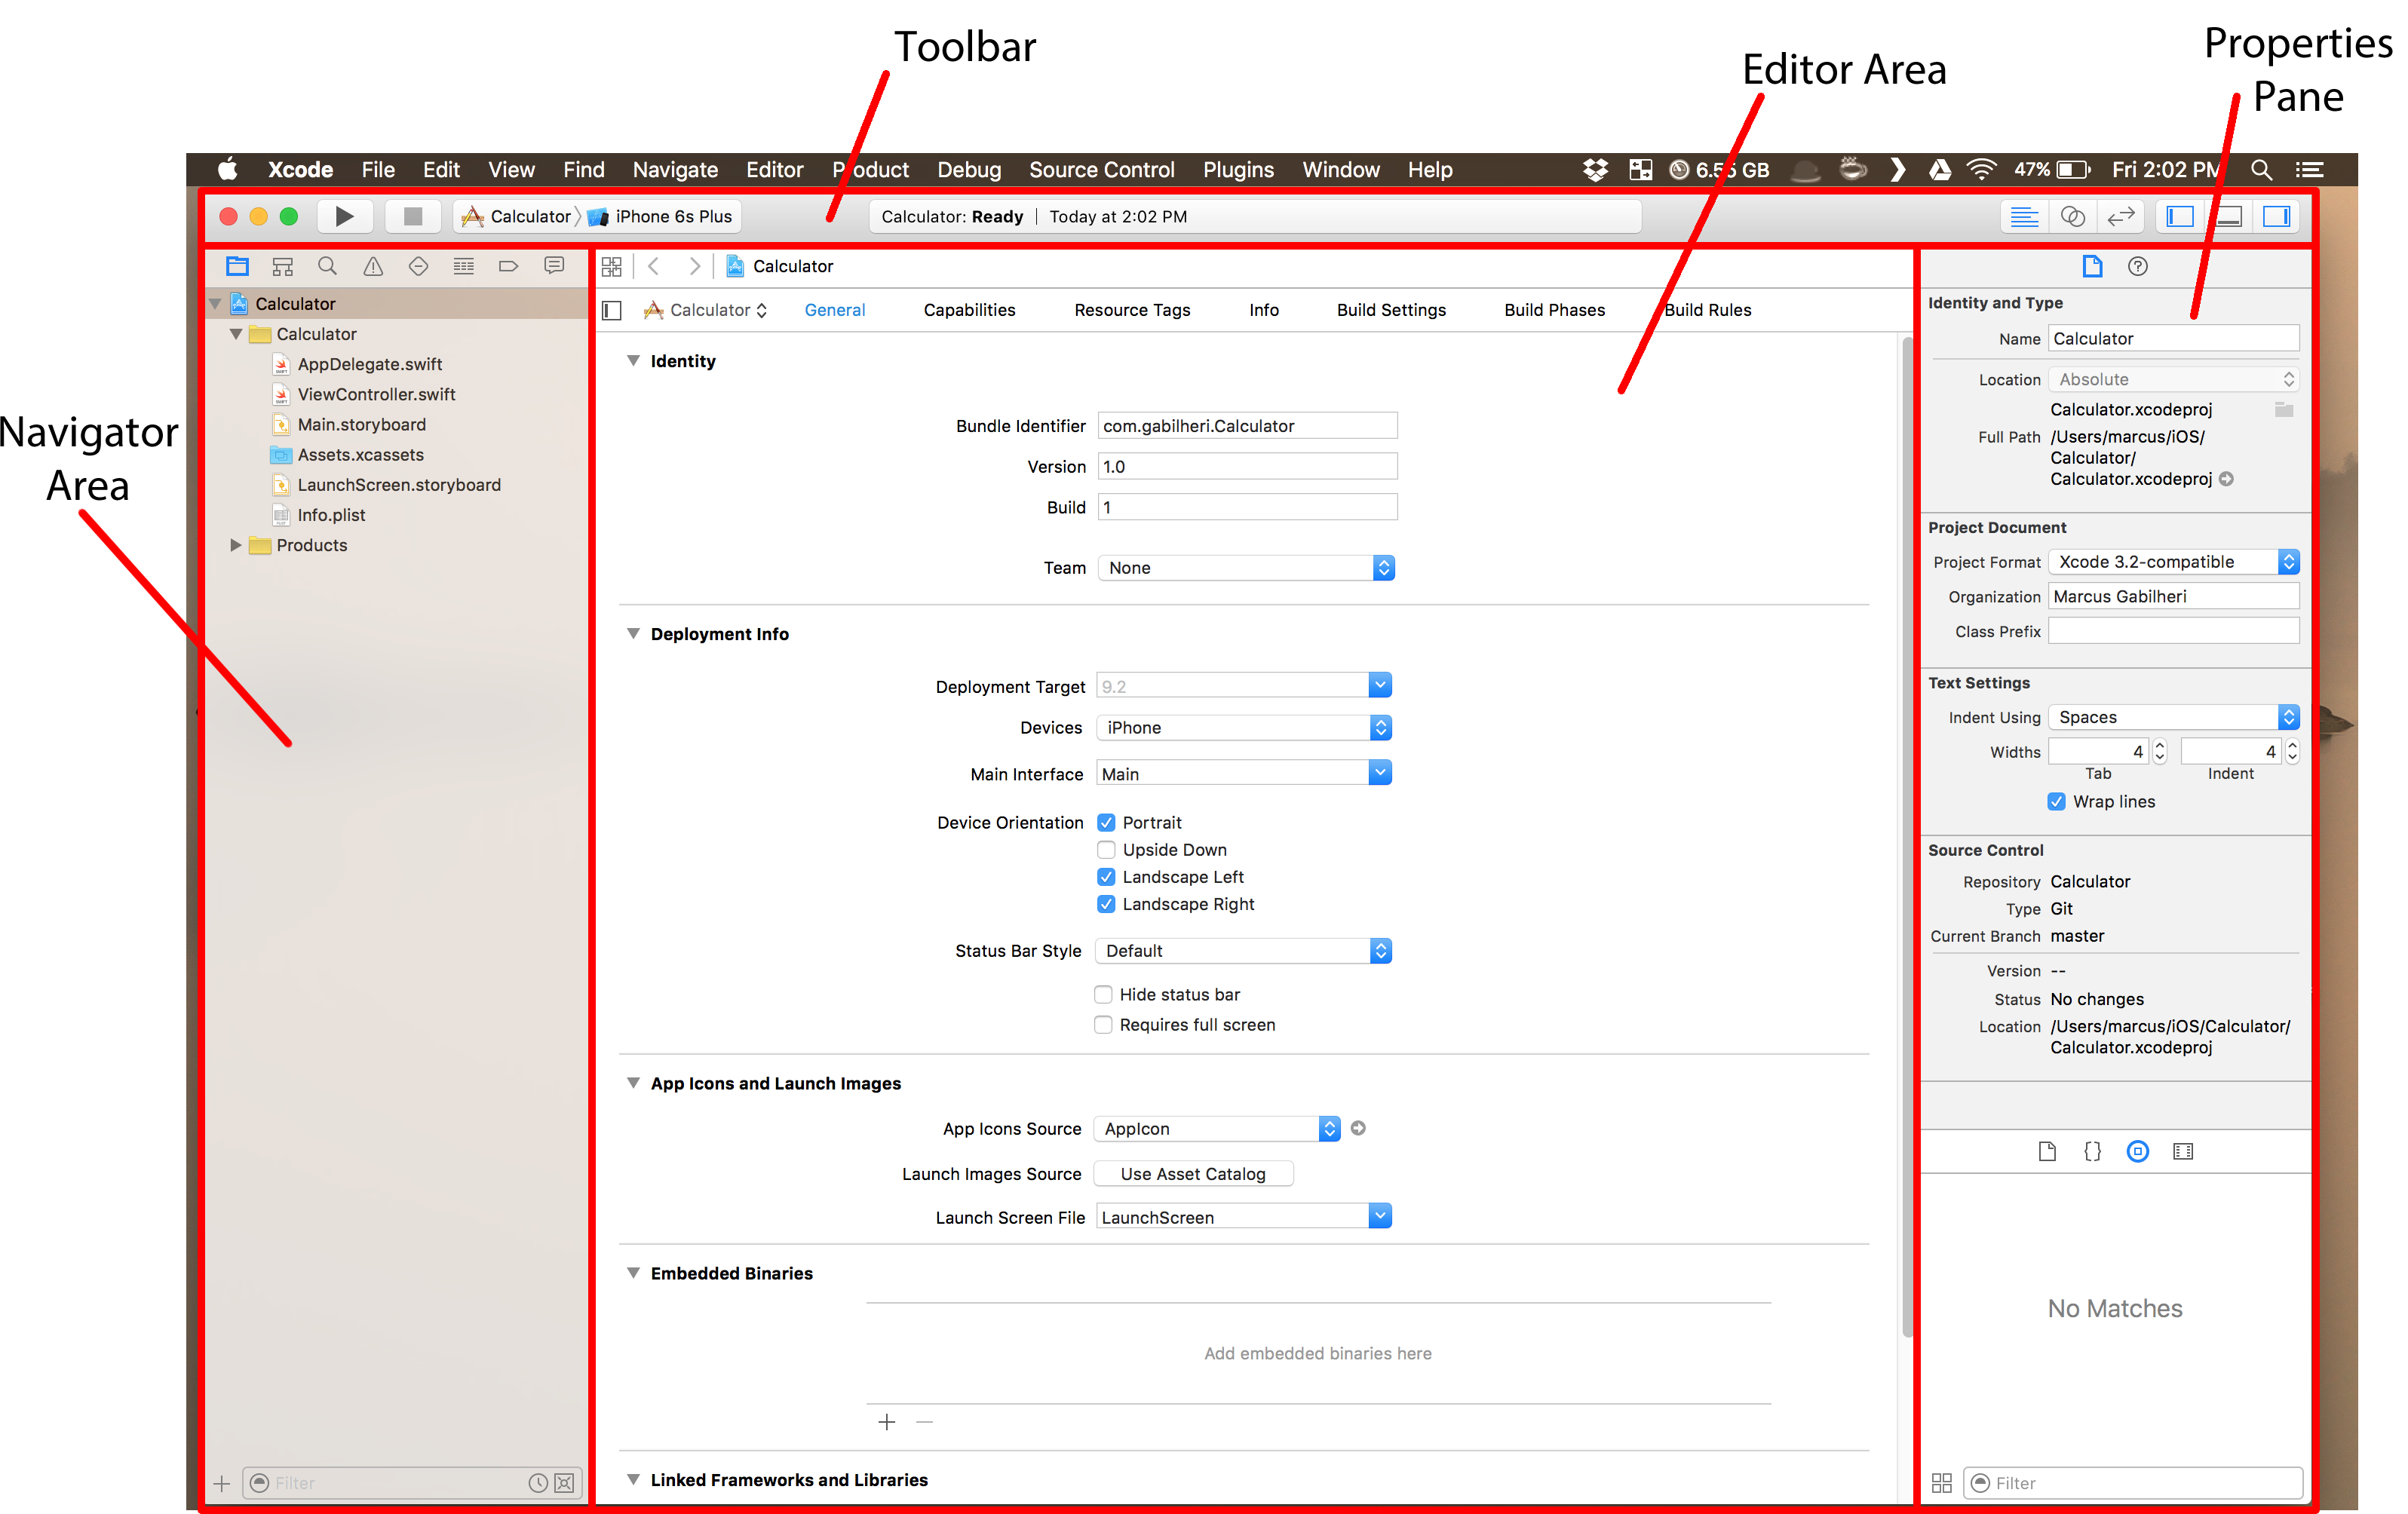
Figure 4 -
In the second section of that screen where it says "Deployment Info" uncheck the boxes that says "Landscape Left" and "Landscape Right". We only want to support portrait orientantion in this calculator. See figure 5.
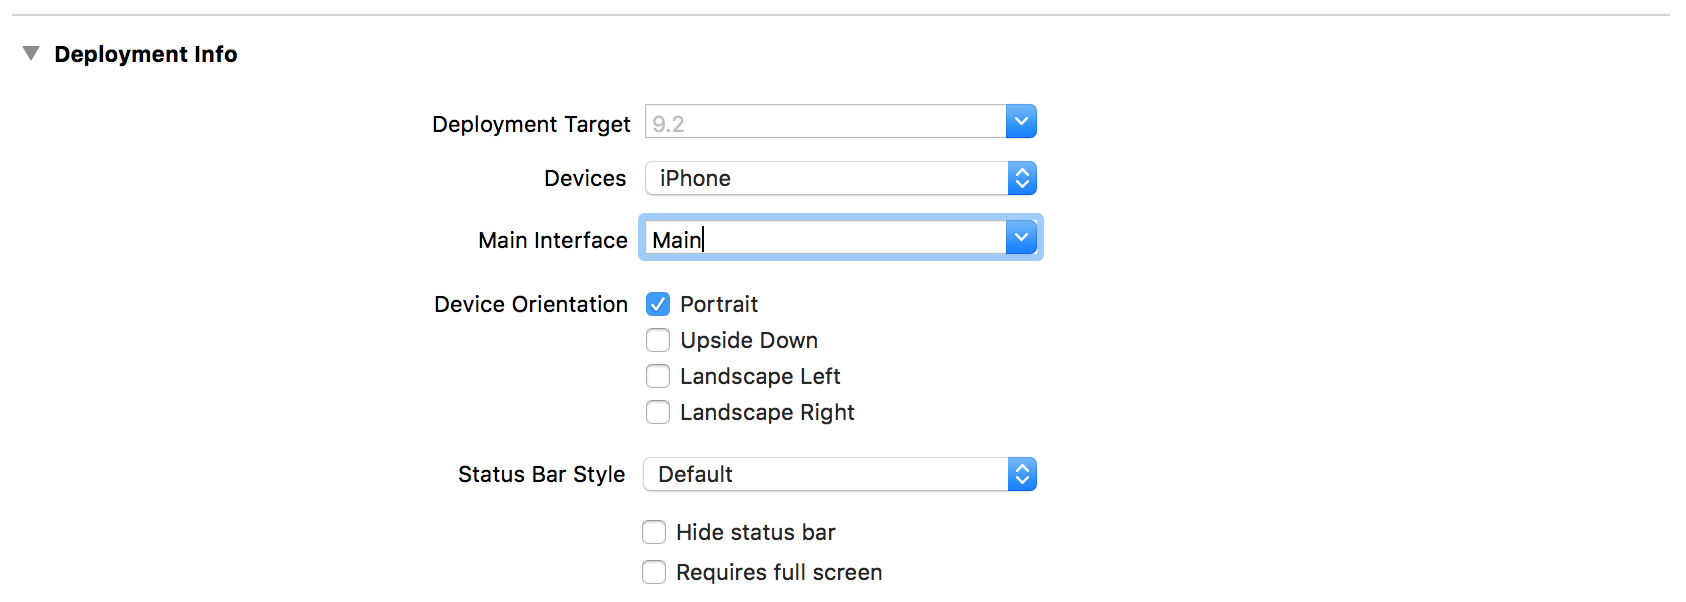
Figure 5 -
Now let's proceed to build the user interface for our calculator. On the Navigator Area select the file
Main.storyboard
In this step we will be adding the buttons and the placeholder text for our calculator app.
You should now have something similar to figure 6.
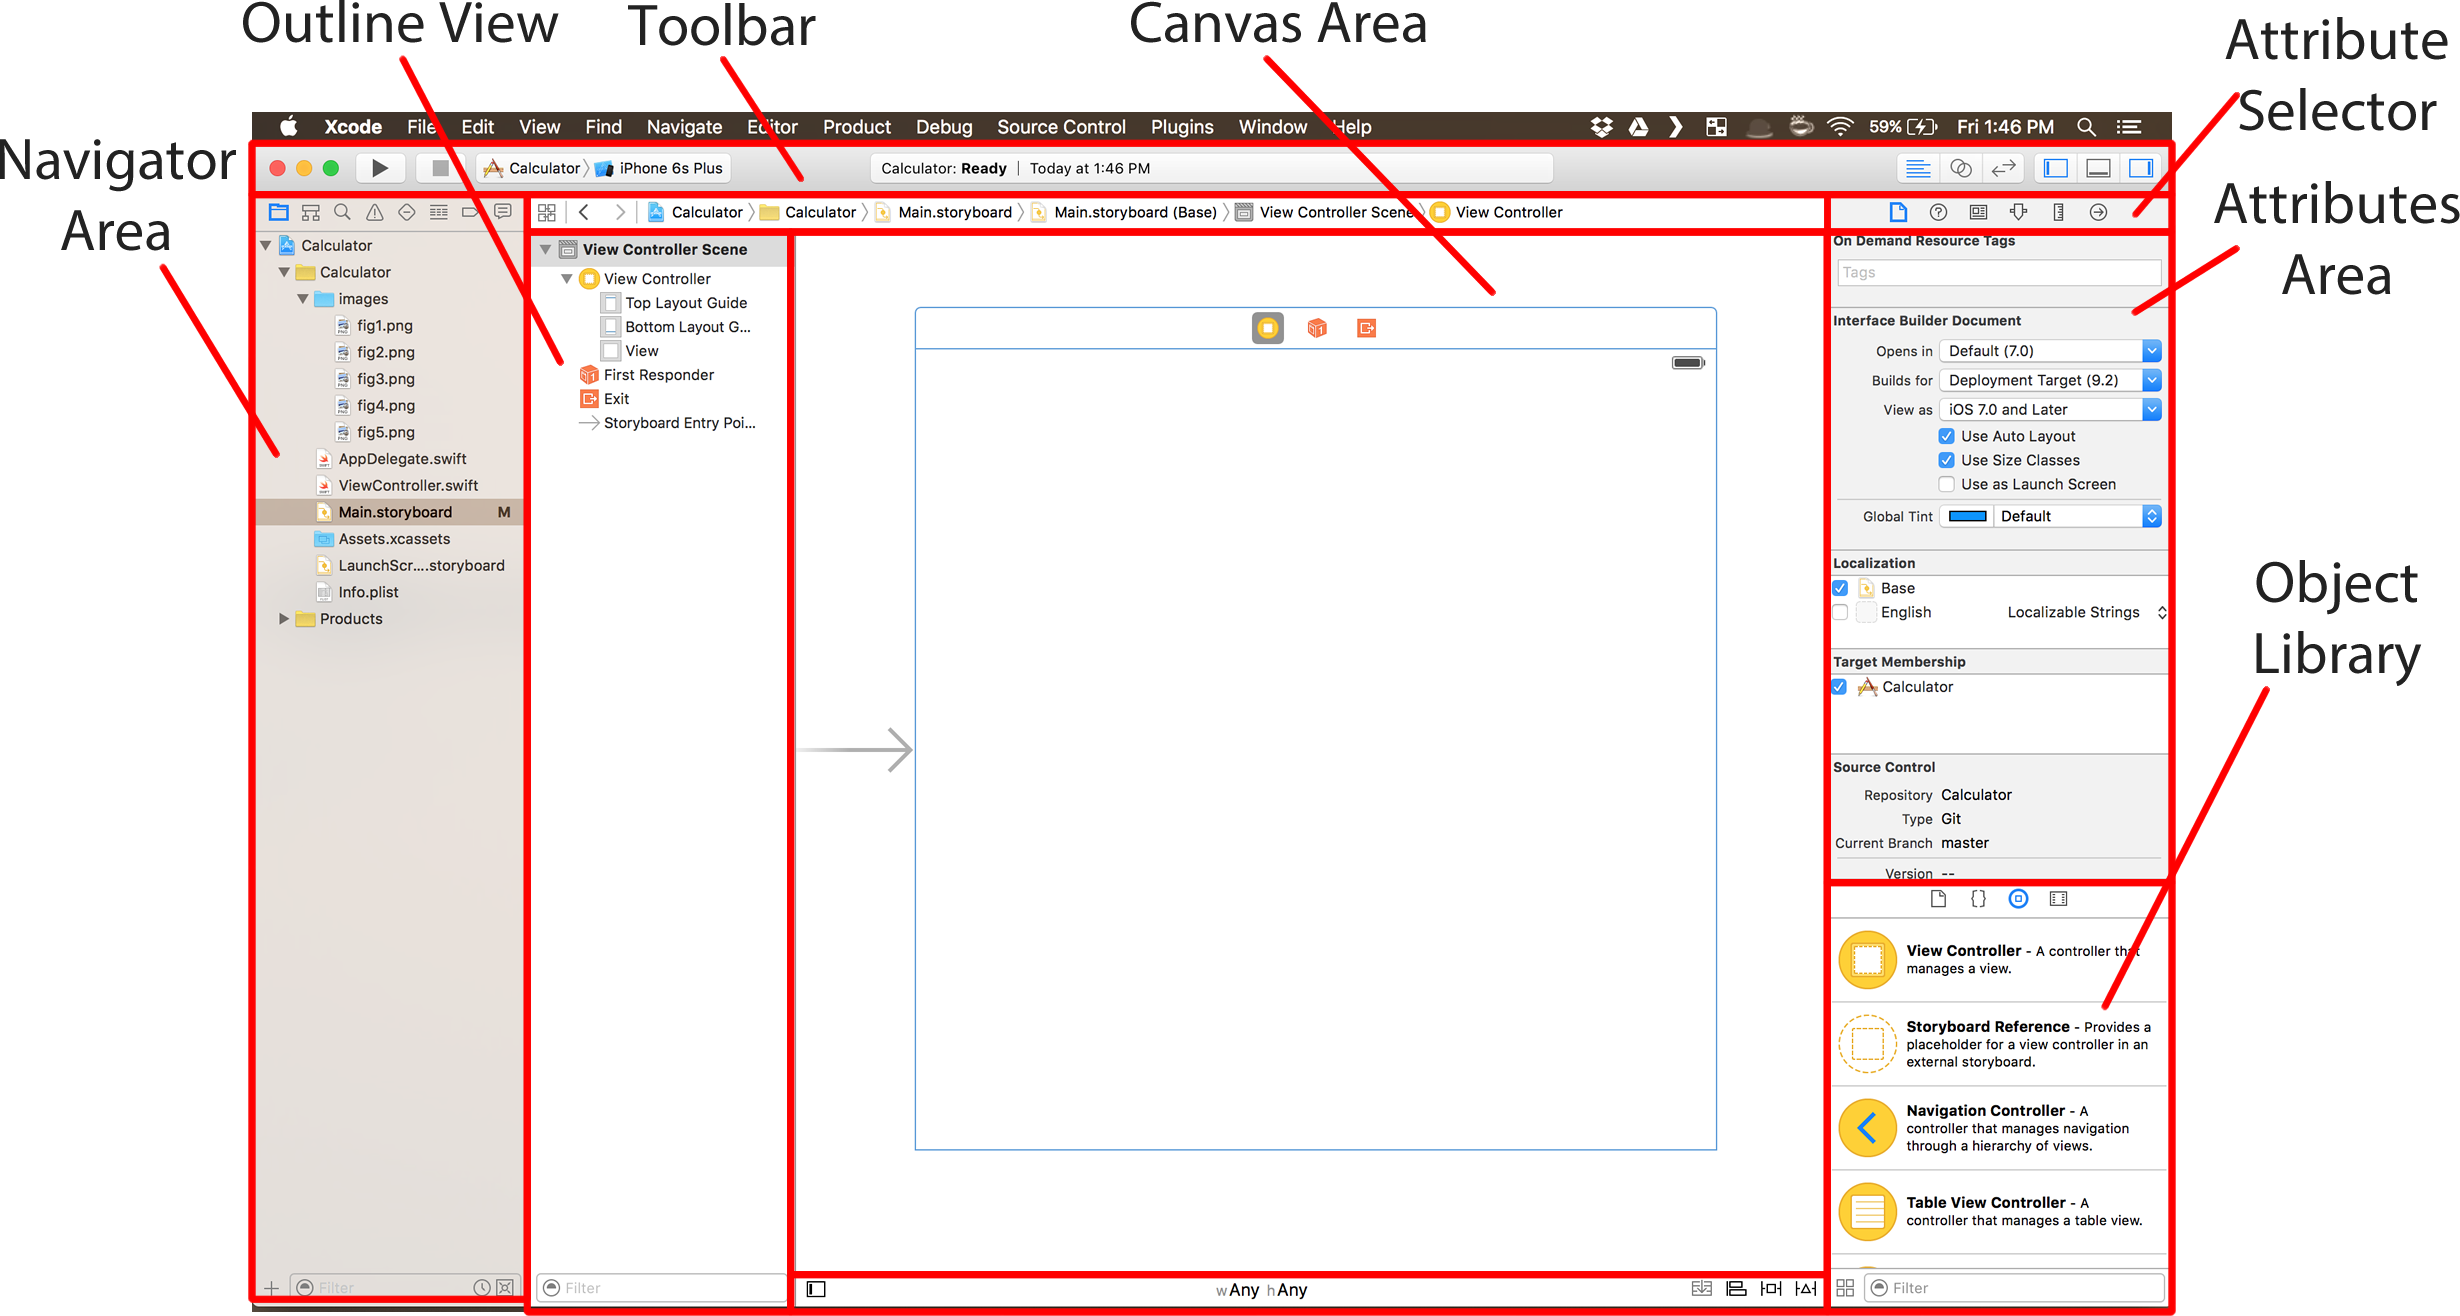
Figure 6
I know that XCode might look intimidating at first glance. So let's take a second to understand what each section of the program does:
- Navigator Area
- A tree view of the files in your project. The .swift files is where our code will live. The .storyboard file is where the user interface for our app will be located.
- Outline View
- The ouline view will show an outline and a hierarchy of the user interface in the storyboard.
- Toolbar
- The buttons on the right are used to hide or show different sections of Xcode.
- The buttons on the left are used to "Run" or stop the application. You can also select which device you want to run the app on. For the purposes of this tutorial we will only be using the iPhone 6.
- The central area of the toolbar will display information about the current status of the project and progress bar for any ongoing operation by Xcode.
- Canvas Area
- The canvas area in the .storyboard files represents the area on which we will build the user interface for our applications
- For the .swift files the canvas will be replaced with a text editor where we will write the code for the app.
- Attribute Selector
- The attributes selector allow us to navigate in between diferent properties of our user interface application
- The attributes selector allow us to navigate in between diferent properties of our user interface application
- Attributes Area
- Displays the attributes for the current selected attribute selector.
- Atrributes can vary depending on the object selected in the canvas.
- Object Library
- The object library is where we will select the different components to build the user interface.
- In the attribute selector click on the leftmost icon. The icon looks like a file
- In the attributes area unchek the box that says "Use size classes".
- When promped with a message to keep the data for iPhone or iPads. Select iPhone and click on "Disable Size Classes". See figure 7.
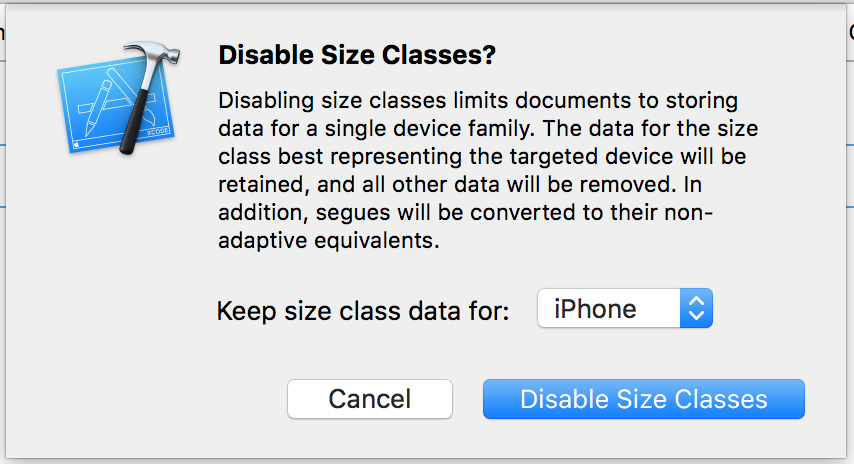
_Figure 7_
4. On the attributes selector click on the 4th icon from left to right 5. On the outline view click on **"ViewController"** 6. In the Attributes area where it says Size, change it to iPhone 4.7 inch 7. In the object selector find the ```Label``` component and drag into the canvas.
8. Resize the label to occupy the full width of the screen, but leaving a small margin on the sides. Xcode should display some guiding margins when you get close to the edge of the screen.
9. On the attributes selector click on 4th icon from left to right.
10. On the attributes area aligh the text of the label to be right. You should now have something similar to Figure 8.
11. Increase the font size of the label to 22. Feel free to explore the Attributes panel and change anything else, such as font, color, etc.
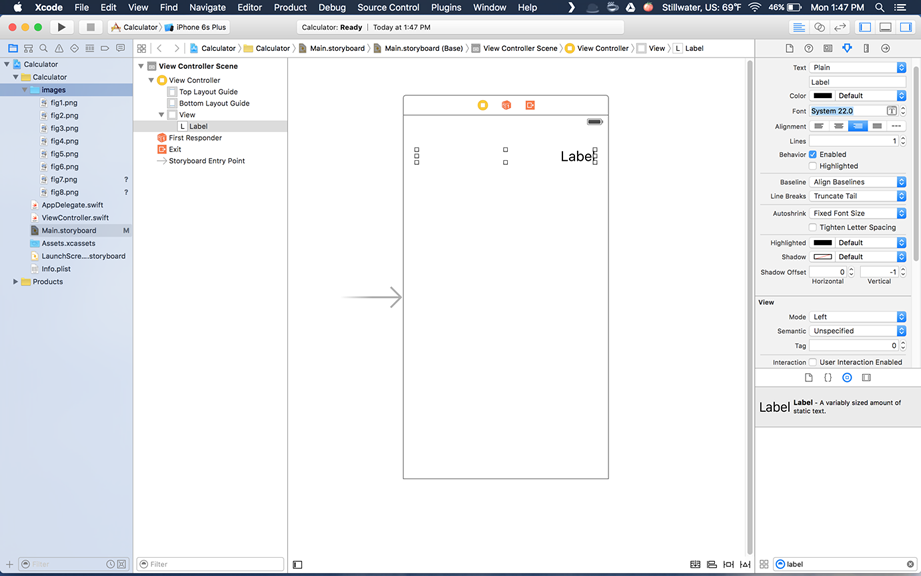
_Figure 8_
12. From the object library drag 16 buttons to the canvas.
13. Arrange the buttons into 4 rows of 4 buttons each.
14. Double click on each button to change it's text and change the text inside a button to mirror a calculator layout. You should now have something similar to Figure 9.
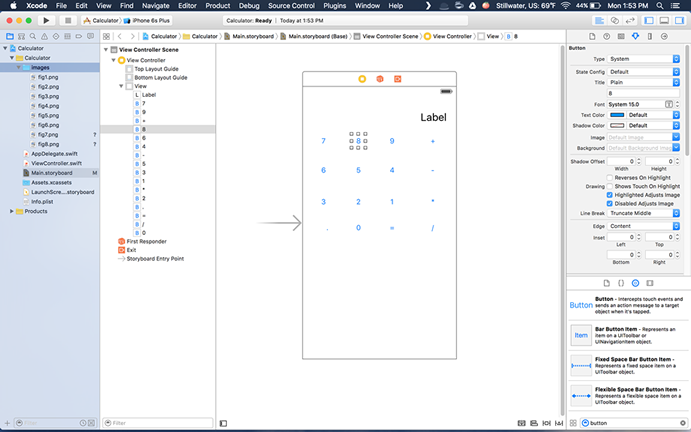
_Figure 9_
15. Double click the label and change the text to 0
16. Using your mouse or trackpad select all numeric buttons of the calculator. You can also hold shift and click each button individually to keep the selection.
17. On the attributes Area change the background color of the buttons to any color you want.
18. Change the text color of the button to anything you want as well.
_**hint**: You can change the text color of a button by changing the **Tint** property, right below the **Background** property. _
19. Select the Group with the different operators and the **"."** symbol.
20. Do the same that you did for the numbers but with a different color.
21. Change the background and text color of the **"="** button.
22. You should now have something similar to Figure 10.
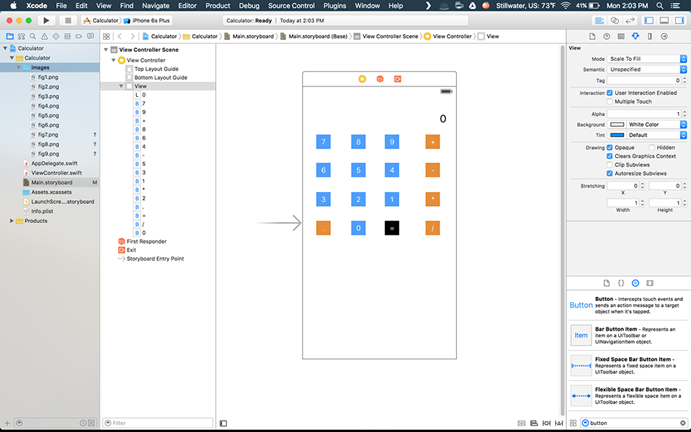
_Figure 10_
You may have noticed that our calculator is not using all the space available in the screen and our buttons are very small.
23. Resize the buttons by dragging from it's edges to fill up more space on the screen. This step is optional and just for asthetics purposes.
24. Change the background color of the Window. To change the background colorof the window in the Outline View click on the Item that says **"View"**.
25. Change the font size of all the buttons and label
26. Click on where says **iPhone 6s plus** and change it to **iPhone 6s**
27. Click the **Play** button in the toolbar to run the app. See figure 11.
_Figure 11_
28. You should now see a simulator window with the calculator app running! See figure 12. Click on the buttons of the calculator.
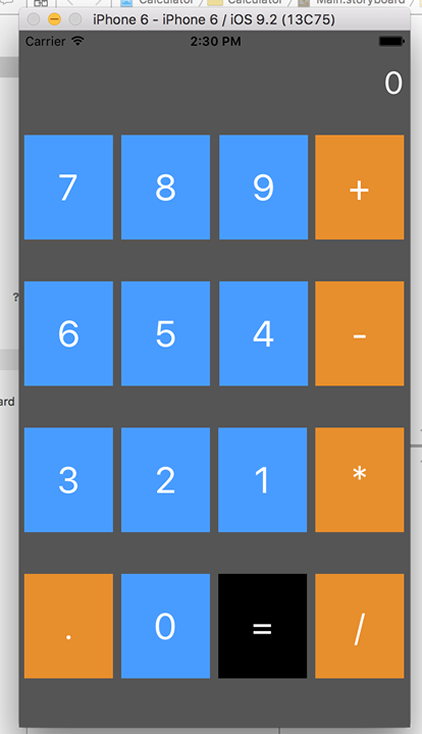
_Figure 12_
As you can see when we click on the buttons of the calculator nothing happens. Don't worry in the next section we will make everything work!
### Step 3: Making it work!
- In the navigator area click on the ViewController.swift. The canvas area is replaced with the Text editor area. You should see something similar to figure 13. (The colors of the editor will probably be different).
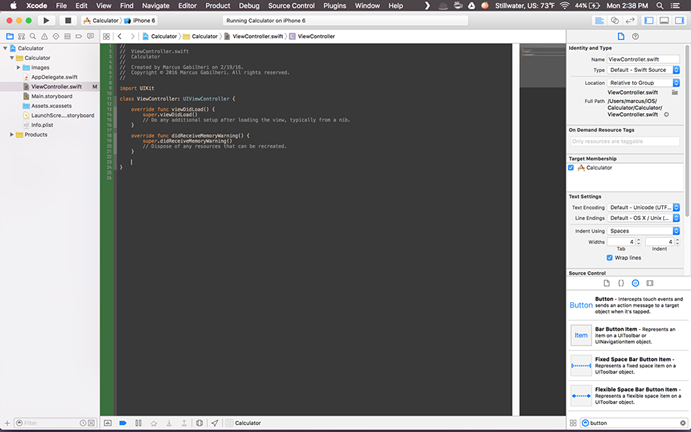
Figure 13 - In the navigator area select the Main.storyboard file again.
- On the right side of the Toolbar click on the icon that are 2 circles. You should now see the Canvas editor on the left and the text editor on the right.
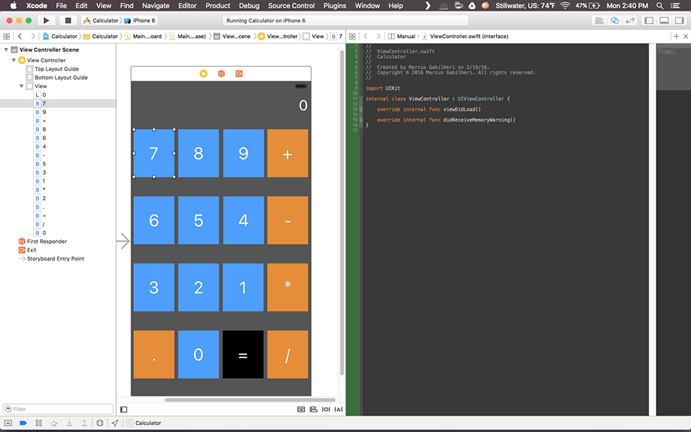
Figure 14
- Select one of the buttons in the canvas area.
- Hold control and drag a line from the canvas area to the text editor area right below the code that says:
override func didReceiveMemoryWarning() {
    super.didReceiveMemoryWarning()
    // Dispose of any resources that can be recreated.
}
// Here is where we will drag
See figure 15.
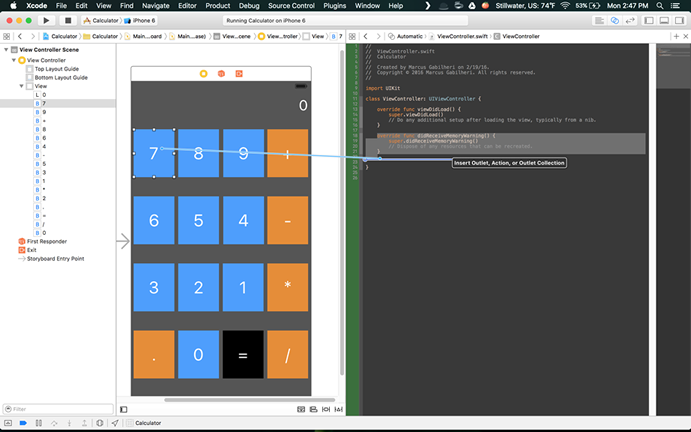
Figure 15
-
After you release the mouse you should get a pop-up window with different options. Make it look like figure 16.
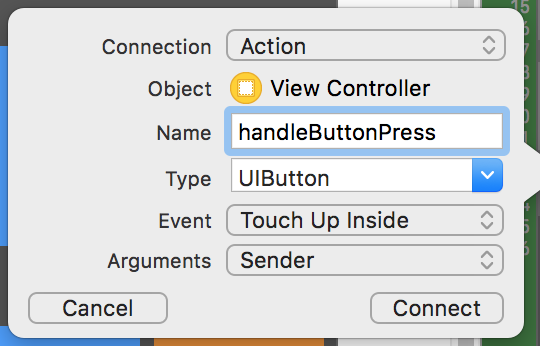
Figure 16 -
You should now see a new function in your code that says:
@IBAction func handleButtonPress(sender: UIButton) {
}
To the right of that function there is tiny filled circle. Drag from the circle each one of the buttons with the exception of the first one. See figure 17.

Figure 17
-
Now drag the Label to the space in between
ViewControllerandViewDidLoad. See figure 18.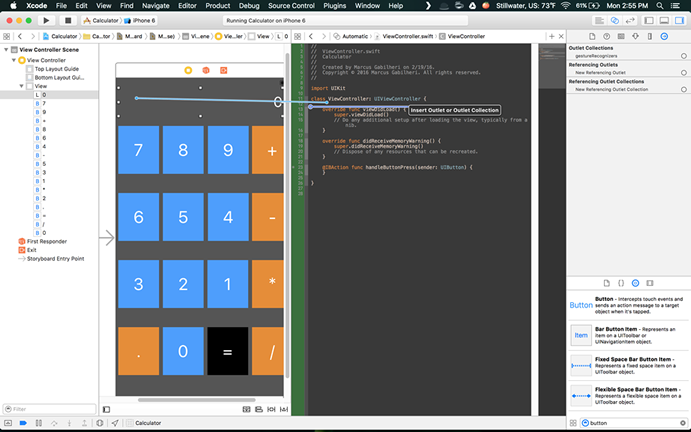
Figure 18 -
Make the items in the pop-up window that appeard look like Figure 19.
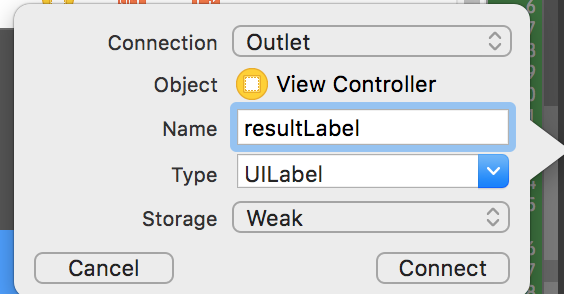
Figure 19 -
Xcode should have generate the following code for you:
@IBOutlet weak var resultLabel: UILabel!Right below that code add the following code to declare the variables we will use.
var firstNumberText = ""
var secondNumberText = ""
var op = ""
var isFirstNumber = true
var hasOp = false
var canClear = true
11. Now below the method says ```handleButtonpress(sender: UIButton) ``` add the following code: ```swift func calculate() -> Double { let firstNumber = Double(firstNumberText)! let secondNumber = Double(secondNumberText)! firstNumberText = "" secondNumberText = "" switch op { case "+": return firstNumber + secondNumber case "-": return firstNumber - secondNumber case "*": return firstNumber * secondNumber case "/": return firstNumber / secondNumber default: return 0 } ```
This function is the one we will use to calculate the result of the operations.
12. Now lets add the code to deal what happens when a button is pressed. Inside the handleButtonpress(sender: UIButton) add the following code:
@IBAction func handleButtonPress(sender: UIButton) {
    if canClear {
        resultLabel.text = ""
        canClear = false
    }
    let currentText = resultLabel.text!
    let textLabel = sender.titleLabel?.text
    if let text = textLabel {
        switch text {
        case "+", "*", "/", "-":
            if hasOp {
                return
            }
            op = text
            isFirstNumber = false
            hasOp = true
            resultLabel.text = "\(currentText) \(op) "
            break
        case "=":
            isFirstNumber = true
            hasOp = false
            canClear = true
            let result = calculate()
            resultLabel.text = "\(result)"
            break
        default:
            if isFirstNumber {
                firstNumberText = "\(firstNumberText)\(text)"
            } else {
                secondNumberText = "\(secondNumberText)\(text)"
            }
            resultLabel.text = "\(currentText)\(text)"
            break;
        }
    }
}
Your code should look something like this: ```swift import UIKit
class ViewController: UIViewController {
@IBOutlet weak var resultLabel: UILabel!

var firstNumberText = ""
var secondNumberText = ""
var op = ""
var isFirstNumber = true
var hasOp = false
var canClear = true

override func viewDidLoad() {
    super.viewDidLoad()
    // Do any additional setup after loading the view, typically from a nib.
}

override func didReceiveMemoryWarning() {
    super.didReceiveMemoryWarning()
    // Dispose of any resources that can be recreated.
}


@IBAction func handleButtonPress(sender: UIButton) {
    if canClear {
        resultLabel.text = ""
        canClear = false
    }
    let currentText = resultLabel.text!
    let textLabel = sender.titleLabel?.text
    if let text = textLabel {
        switch text {
        case "+", "*", "/", "-":
            if hasOp {
                return
            }
            op = text
            isFirstNumber = false
            hasOp = true
            resultLabel.text = "\(currentText) \(op) "
            break
        case "=":
            isFirstNumber = true
            hasOp = false
            canClear = true
            let result = calculate()
            resultLabel.text = "\(result)"
            break
        default:
            if isFirstNumber {
                firstNumberText = "\(firstNumberText)\(text)"
            } else {
                secondNumberText = "\(secondNumberText)\(text)"
            }
            resultLabel.text = "\(currentText)\(text)"
            break;
        }
    }
}


func calculate() -> Double {
    let firstNumber = Double(firstNumberText)!
    let secondNumber = Double(secondNumberText)!
    firstNumberText = ""
    secondNumberText = ""
    switch op {
    case "+":
        return firstNumber + secondNumber
    case "-":
        return firstNumber - secondNumber
    case "*":
        return firstNumber * secondNumber
    case "/":
        return firstNumber / secondNumber
    default:
        return 0
    }
}
}
<br />
13. In the toolbar press the **Play** button to run the app. Play around with the calculator and make sure everything is working!

### Conclusion:

Congratulations! You just built your first app!! Where to go from here? Keep exploring and adding functionality to the calculator! You probably have noticed that the calculator does not handle negative numbers and it's also missing a **clear** and a **delete** button. There is also a really big problem in this calculator! If somebody tries to divide by zero the app will crash. I will live fixing that problem as an exercise for you. So go ahead and keep exploring! You can download the full code for the project from my [Github page](https://github.com/fnk0/iOS-Calculator-Tutorial).


An excelent place to find more iOS tutorials is [Ray Wanderlich](http://www.raywenderlich.com/)


### Troubleshooting:

- The buttons and label have a different size on the screen when I run the emulator?
    + Option 1: Make sure that in the Attributes area you have specified your storyboard to be iPhone 4.7"
    + Option 2: You are using a Simulator for the iPhone 6+ or for the iPhone 5. In the toolbar next to the **Play** button make sure to select iPhone 6 or iPhone 6s.
- When I press a specific button nothing happens.
    + Make sure to connect the function ```func handleButtonPress(sender: UIButton)``` to the button in the .storyboard file by dragging from the circle in the left side of the function.